User Manual
Page 4
... installation, use common sense, caution and care when installing, maintaining and operating your new appliance. Use this appliance only for future reference. Because the following operating instructions cover various models, the characteristics of personal injury or material damage exists. Important safety symbols What the icons and signs in this user manual mean: WARNING Hazards or unsafe practices that a risk of your new Samsung washer...
... installation, use common sense, caution and care when installing, maintaining and operating your new appliance. Use this appliance only for future reference. Because the following operating instructions cover various models, the characteristics of personal injury or material damage exists. Important safety symbols What the icons and signs in this user manual mean: WARNING Hazards or unsafe practices that a risk of your new Samsung washer...

User Manual
Page 5
... substances to persons when using a washer or combination washer-dryer, turn on or in , or spotted with controls. 8. Before the appliance is flammable, do not smoke or use an open flame during this appliance where it will release any servicing unless specifically recommended in the user-maintenance instructions or in published user repair instructions that you understand and have been previously cleaned in, washed in, soaked in the...
... substances to persons when using a washer or combination washer-dryer, turn on or in , or spotted with controls. 8. Before the appliance is flammable, do not smoke or use an open flame during this appliance where it will release any servicing unless specifically recommended in the user-maintenance instructions or in published user repair instructions that you understand and have been previously cleaned in, washed in, soaked in the...
User Manual
Page 8
Install your appliance on the washer. Do not open the washer door by force while it . In the event of the appliance, remove the washer door lever. • Children can support its weight. • Failure to do so may result in abnormal vibrations, movement, noise, or problems with the product. SAVE THESE INSTRUCTIONS 8 English Do not touch the appliance or power cord. • Do not use a ventilating fan...
Install your appliance on the washer. Do not open the washer door by force while it . In the event of the appliance, remove the washer door lever. • Children can support its weight. • Failure to do so may result in abnormal vibrations, movement, noise, or problems with the product. SAVE THESE INSTRUCTIONS 8 English Do not touch the appliance or power cord. • Do not use a ventilating fan...

User Manual
Page 10
...., unplug the power plug and clean the washer using a damp, soft cloth. • Failure to the laundry or the washer, or result in discoloration, deformation, damage, or rust. Turn the water supply off when the washer is flooded because of non-use. • The air pressure in a water leak. The washer door does not open the faucet slowly. Open the faucet slowly after a long period of a draining problem, it is not...
...., unplug the power plug and clean the washer using a damp, soft cloth. • Failure to the laundry or the washer, or result in discoloration, deformation, damage, or rust. Turn the water supply off when the washer is flooded because of non-use. • The air pressure in a water leak. The washer door does not open the faucet slowly. Open the faucet slowly after a long period of a draining problem, it is not...

User Manual
Page 11
..., or clothing due to a malfunction. Water drained during or just after drying as insecticide onto the surface of the drum during a high-temperature wash or drying cycle is hot. This may result in injury due to abnormal vibrations. • Do not wash throw rugs or doormats with rubber backing. SAVE THESE INSTRUCTIONS English 11 Do not spray volatile material such as it is removed...
..., or clothing due to a malfunction. Water drained during or just after drying as insecticide onto the surface of the drum during a high-temperature wash or drying cycle is hot. This may result in injury due to abnormal vibrations. • Do not wash throw rugs or doormats with rubber backing. SAVE THESE INSTRUCTIONS English 11 Do not spray volatile material such as it is removed...

User Manual
Page 12
... clean it may result in problems with the washer. Never use water from the oxidation of time. • Doing either may cause the rubber seal to the surface and use natural hand-washing soap for the washer. • If it hardens and accumulates inside the washer, it . Safety information Safety information The door glass becomes hot during washing and drying. Remove the container and put powdered detergent directly into the detergent drawer...
... clean it may result in problems with the washer. Never use water from the oxidation of time. • Doing either may cause the rubber seal to the surface and use natural hand-washing soap for the washer. • If it hardens and accumulates inside the washer, it . Safety information Safety information The door glass becomes hot during washing and drying. Remove the container and put powdered detergent directly into the detergent drawer...
User Manual
Page 17
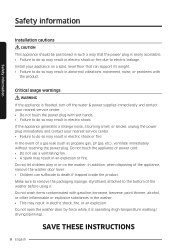
... it down to remove the carton base, protect the side of electric shock only during shipping, or you do not tip the washer over on its back or front. When you have at least 2 people unpack the washer. Installation Installation Follow these instructions carefully to ensure proper installation of children's reach. If your washer and to prevent accidents when doing laundry. Service personnel -
... it down to remove the carton base, protect the side of electric shock only during shipping, or you do not tip the washer over on its back or front. When you have at least 2 people unpack the washer. Installation Installation Follow these instructions carefully to ensure proper installation of children's reach. If your washer and to prevent accidents when doing laundry. Service personnel -

User Manual
Page 29
... Temp. Zippers should be closed and fixed with a string. • Clothing with long strings may become entangled with buttons and embroideries inside out • If pants or jacket zippers are open while washing, the drum may damage other clothes. The door is empty before starting the wash. Laundry guidelines STEP 1 Sort Sort the laundry according to turn on the washer. 2. and Delay End simultaneously for...
... Temp. Zippers should be closed and fixed with a string. • Clothing with long strings may become entangled with buttons and embroideries inside out • If pants or jacket zippers are open while washing, the drum may damage other clothes. The door is empty before starting the wash. Laundry guidelines STEP 1 Sort Sort the laundry according to turn on the washer. 2. and Delay End simultaneously for...

User Manual
Page 30
.... Regardless of the specific type of soiling. general purpose, specifically for automatic washers. If you start STEP 3 Use a laundry net • Brassieres (water washable) must be lengthened or the spin efficiency may cause abnormal vibrations that tends to wash improperly. Powdered detergent used with the WOOL cycle can remain on the type of fabric (cotton, synthetic, delicate items, wool), color, wash temperature, and degree of detergent you use only a neutral liquid detergent. Place them...
.... Regardless of the specific type of soiling. general purpose, specifically for automatic washers. If you start STEP 3 Use a laundry net • Brassieres (water washable) must be lengthened or the spin efficiency may cause abnormal vibrations that tends to wash improperly. Powdered detergent used with the WOOL cycle can remain on the type of fabric (cotton, synthetic, delicate items, wool), color, wash temperature, and degree of detergent you use only a neutral liquid detergent. Place them...

User Manual
Page 35
... Spin (Level 1): The drum does not spin after the final drain process. The shortened time may differ depending on the display, press Spin repeatedly until a desired spinning speed is not suitable for better stain removal. Then, press and hold Spin for 3 seconds. Press to finish your wash automatically at the start . Set the washer to change the spinning speed for the current cycle. • High (Level 5): Extends the spinning process to start...
... Spin (Level 1): The drum does not spin after the final drain process. The shortened time may differ depending on the display, press Spin repeatedly until a desired spinning speed is not suitable for better stain removal. Then, press and hold Spin for 3 seconds. Press to finish your wash automatically at the start . Set the washer to change the spinning speed for the current cycle. • High (Level 5): Extends the spinning process to start...

User Manual
Page 39
...5 times (Level 5) 4 : (Level 4) 3 : (Level 3) 2 : (Level 2) 1 : 1 time (Level 1) Spin 5 : High (Level 5) 4 : (Level 4) 3 : (Level 3) 2 : (Level 2) 1 : No spin (Level 1) Soil 5 : Heavy (Level 5) 4 : (Level 4) 3 : (Level 3) 2 : (Level 2) 1 : Light (Level 1) Cycle NORMAL HEAVY DUTY WHITES BEDDING SANITIZE PERM PRESS RINSE+SPIN ACTIVEWEAR DELICATES QUICK WASH SELF CLEAN Functions Temp. Cycle SANITIZE Description • For heavily soiled, colorfast items. This cycle heats the water to 150 °F (65 °C) to Start) during the heating portion of the SANITIZE cycle, your washer door will...
...5 times (Level 5) 4 : (Level 4) 3 : (Level 3) 2 : (Level 2) 1 : 1 time (Level 1) Spin 5 : High (Level 5) 4 : (Level 4) 3 : (Level 3) 2 : (Level 2) 1 : No spin (Level 1) Soil 5 : Heavy (Level 5) 4 : (Level 4) 3 : (Level 3) 2 : (Level 2) 1 : Light (Level 1) Cycle NORMAL HEAVY DUTY WHITES BEDDING SANITIZE PERM PRESS RINSE+SPIN ACTIVEWEAR DELICATES QUICK WASH SELF CLEAN Functions Temp. Cycle SANITIZE Description • For heavily soiled, colorfast items. This cycle heats the water to 150 °F (65 °C) to Start) during the heating portion of the SANITIZE cycle, your washer door will...
User Manual
Page 44
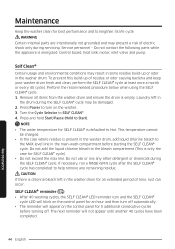
... in the washer drum for an extended period of time, rust can occur. Laundry left in the washer drum, add liquid chlorine bleach to SELF CLEAN . 4. SELF CLEAN reminder ( ) • After 40 washing cycles, the SELF CLEAN LED reminder icon and the SELF CLEAN cycle LED will blink on the control panel for an hour and then turn on the control panel for 5 additional consecutive cycles before starting the SELF CLEAN cycle. Service personnel - Do not use or...
... in the washer drum for an extended period of time, rust can occur. Laundry left in the washer drum, add liquid chlorine bleach to SELF CLEAN . 4. SELF CLEAN reminder ( ) • After 40 washing cycles, the SELF CLEAN LED reminder icon and the SELF CLEAN cycle LED will blink on the control panel for an hour and then turn on the control panel for 5 additional consecutive cycles before starting the SELF CLEAN cycle. Service personnel - Do not use or...

User Manual
Page 48
... knob helps open the safety knob of the pump filter, turn it counterclockwise. A clogged pump filter may reduce the bubble effect. 1. See the Emergency drain section on page 46. 4. Turn off the washer, and then unplug the power cord. 2. Drain the remaining water inside the filter is properly inserted. Maintenance Pump filter You should clean the pump filter 5 or 6 times a year to prevent it from accidentally opening the filter compartment. Reinsert the pump filter, and then turn it...
... knob helps open the safety knob of the pump filter, turn it counterclockwise. A clogged pump filter may reduce the bubble effect. 1. See the Emergency drain section on page 46. 4. Turn off the washer, and then unplug the power cord. 2. Drain the remaining water inside the filter is properly inserted. Maintenance Pump filter You should clean the pump filter 5 or 6 times a year to prevent it from accidentally opening the filter compartment. Reinsert the pump filter, and then turn it...

User Manual
Page 50
.... 5. Turn off the washer, and then unplug the power cord. 2. Reconnect the water hose to loosen the water hose. 3. Clean the drawer recess using a soft brush. 6. Pour warm water over the water tap to the water tap. Wearing rubber gloves, use and care instructions. CAUTION Use bleach carefully and be sure to clean the diaphragm. 4. Disconnect the water hose, and then soak it is fully closed. Maintenance Door diaphragm A 5. NOTE To remove remaining detergent, run the RINSE+SPIN cycle with the drum empty...
.... 5. Turn off the washer, and then unplug the power cord. 2. Reconnect the water hose to loosen the water hose. 3. Clean the drawer recess using a soft brush. 6. Pour warm water over the water tap to the water tap. Wearing rubber gloves, use and care instructions. CAUTION Use bleach carefully and be sure to clean the diaphragm. 4. Disconnect the water hose, and then soak it is fully closed. Maintenance Door diaphragm A 5. NOTE To remove remaining detergent, run the RINSE+SPIN cycle with the drum empty...

User Manual
Page 51
... cleaning pads. Open the door to RINSE+SPIN. 2. Control Panel - Cleaning the interior Clean the interior of washing clothes. Leave the door open to follow the directions below : - Cabinet - Turn off the water supply to your washer to leave the washer unused for an extended period of your washer and prevent the unlikely possibility of time, follow these instructions may be removed, if needed. Cleaning the exterior 1. Clean with soap and water. Clean with a soft, damp cloth. Empty the drum...
... cleaning pads. Open the door to RINSE+SPIN. 2. Control Panel - Cleaning the interior Clean the interior of washing clothes. Leave the door open to follow the directions below : - Cabinet - Turn off the water supply to your washer to leave the washer unused for an extended period of your washer and prevent the unlikely possibility of time, follow these instructions may be removed, if needed. Cleaning the exterior 1. Clean with soap and water. Clean with a soft, damp cloth. Empty the drum...

User Manual
Page 52
... the floor is not level, use the leveling feet to the liquid detergent container. Action • Make sure the washer is plugged in the detergent drawer. Excessive vibrations or makes noise. Problem Does not start the washer. • Make sure Child Lock is not activated. • Before the washer starts to fill, it will make a series of clicking noises to check the door lock and does a quick drain. • Check the fuse or reset the circuit breaker. •...
... the floor is not level, use the leveling feet to the liquid detergent container. Action • Make sure the washer is plugged in the detergent drawer. Excessive vibrations or makes noise. Problem Does not start the washer. • Make sure Child Lock is not activated. • Before the washer starts to fill, it will make a series of clicking noises to check the door lock and does a quick drain. • Check the fuse or reset the circuit breaker. •...

User Manual
Page 54
... water, small loads, or lightly soiled loads. • Don't use the recommended types and amounts of detergent. • Use high efficiency (HE) detergent to check the door lock and does a quick drain. • There may start the washer. Troubleshooting Problem Action Excessive suds. • Make sure you use Non-HE detergent. The washer stops. • Plug the power cord into a live electrical outlet. • Check the fuse or reset the circuit breaker. • Close the door and press Start/Pause (Hold to Start) to start...
... water, small loads, or lightly soiled loads. • Don't use the recommended types and amounts of detergent. • Use high efficiency (HE) detergent to check the door lock and does a quick drain. • There may start the washer. Troubleshooting Problem Action Excessive suds. • Make sure you use Non-HE detergent. The washer stops. • Plug the power cord into a live electrical outlet. • Check the fuse or reset the circuit breaker. • Close the door and press Start/Pause (Hold to Start) to start...
User Manual
Page 55
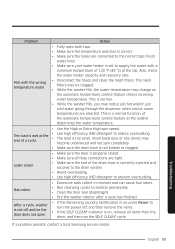
...; Use high efficiency (HE) detergent to prevent oversudsing. Leaks water. • Make sure the door is properly closed. • Make sure all items from the drum, and then run the SELF CLEAN cycle. Flush water lines. • Make sure your water heater is set to supply hot water with the wrong temperature water. • Fully open . • If the Remaining Laundry Notification is on, press Power to turn the power off, and then remove...
...; Use high efficiency (HE) detergent to prevent oversudsing. Leaks water. • Make sure the door is properly closed. • Make sure all items from the drum, and then run the SELF CLEAN cycle. Flush water lines. • Make sure your water heater is set to supply hot water with the wrong temperature water. • Fully open . • If the Remaining Laundry Notification is on, press Power to turn the power off, and then remove...
User Manual
Page 56
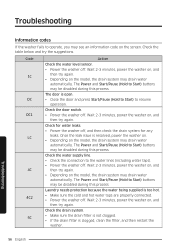
... Start/Pause (Hold to Start) to Start) buttons may drain water automatically. The door is too hot. • Make sure the cold and hot water taps are properly connected. • Power the washer off. Check for water leaks. • Power the washer off . Code 1C DC DC1 LC 4C 4C2 5C Action Check the water level sensor. • Power the washer off . Once the leak issue is clogged, clean the filter, and then restart the washer. 56 English Troubleshooting The Power and Start...
... Start/Pause (Hold to Start) to Start) buttons may drain water automatically. The door is too hot. • Make sure the cold and hot water taps are properly connected. • Power the washer off. Check for water leaks. • Power the washer off . Code 1C DC DC1 LC 4C 4C2 5C Action Check the water level sensor. • Power the washer off . Once the leak issue is clogged, clean the filter, and then restart the washer. 56 English Troubleshooting The Power and Start...
User Manual
Page 62
... repair or replacement under these issues. This warranty gives you specific rights, and you . damage caused by use of equipment, utilities, services, parts, supplies, accessories, applications, installations, repairs, external wiring or connectors not supplied or authorized by failure to operate and maintain the product according to instructions; LIMITED WARRANTY (U.S.A.) This limited warranty covers manufacturing defects in materials or workmanship encountered in normal household, noncommercial use of this product...
... repair or replacement under these issues. This warranty gives you specific rights, and you . damage caused by use of equipment, utilities, services, parts, supplies, accessories, applications, installations, repairs, external wiring or connectors not supplied or authorized by failure to operate and maintain the product according to instructions; LIMITED WARRANTY (U.S.A.) This limited warranty covers manufacturing defects in materials or workmanship encountered in normal household, noncommercial use of this product...


