Samsung WF365BTBGSF/A2 Research

View Results Below
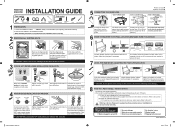
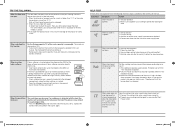
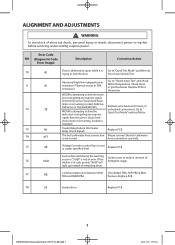
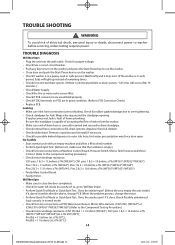
Free Samsung WF365BTBGSF/A2 manuals!
Problems with Samsung WF365BTBGSF/A2?
Ask a Question
Free Samsung WF365BTBGSF/A2 manuals!
Problems with Samsung WF365BTBGSF/A2?
Ask a Question
Related Manual Pages


Related Videos

Samsung WF365BTBGSF Front Load Washer
Duration: :58
Total Views: 368
Duration: :58
Total Views: 368
Similar Questions

How Do I Access And Clean The Drain Pump On This Model?
(Posted by Anonymous-174787 7 months ago)

Water Was Leaking Onto The Floor, Replaced Front Boot Seal And Still Leaks
(Posted by Jkroll58 3 years ago)

Wf365btbgsf/a2 Samsung Front Load Washer
i need the part number for the weight balancer made up of concrete in black plastic casing, half cir...
i need the part number for the weight balancer made up of concrete in black plastic casing, half cir...
(Posted by lmperez0820 5 years ago)
Wf365btbgsf/a2 Washer Samsung Questions
i need part number for the shock absorber of this Samsung washer.how many shock absorbers this washe...
i need part number for the shock absorber of this Samsung washer.how many shock absorbers this washe...
(Posted by lmperez0820 6 years ago)