Quick Guide (ENGLISH)
Page 1
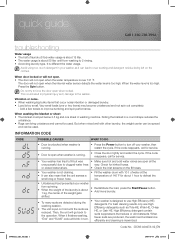
... High Efficiency (HE) detergents. Press the Spin button. INFORMATION CODE CODE POSSIBLE CAUSES WHAT TO DO • Door is unlocked when washer is running . • Close the door tightly and restart the cycle. shifted. • • To many suds are detected during the washing... session. Do not try to force the door open when washer is running . • Press the Power button to 2 rinsing. • According laundry type, It is different the water usage. When door ...
... High Efficiency (HE) detergents. Press the Spin button. INFORMATION CODE CODE POSSIBLE CAUSES WHAT TO DO • Door is unlocked when washer is running . • Close the door tightly and restart the cycle. shifted. • • To many suds are detected during the washing... session. Do not try to force the door open when washer is running . • Press the Power button to 2 rinsing. • According laundry type, It is different the water usage. When door ...
Quick Guide (ENGLISH)
Page 2
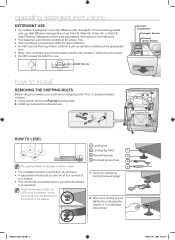
... tub. • Do NOT exceed the MAX FILL line. SWM-user_QG_3rd.indd 2 2008-01-09 ¿ÀÀü 12:33:16 Level your washer, you must be firm, dry and level. • A carpenter's level should be used on all four corners of your...-nuts are fastened to flat head screw driver. operating detergent instructions DETERGENT USE • Our washer is designed to install REMOVING THE SHIPPING BOLTS Before using the wrench or (-) to the bottom of the washer. 1 Locking nut 2 Leveling leg ASSY 1 3 Wrench/Spanner 2 4 Flat head screw driver 3 4 1. It will not add...
... tub. • Do NOT exceed the MAX FILL line. SWM-user_QG_3rd.indd 2 2008-01-09 ¿ÀÀü 12:33:16 Level your washer, you must be firm, dry and level. • A carpenter's level should be used on all four corners of your...-nuts are fastened to flat head screw driver. operating detergent instructions DETERGENT USE • Our washer is designed to install REMOVING THE SHIPPING BOLTS Before using the wrench or (-) to the bottom of the washer. 1 Locking nut 2 Leveling leg ASSY 1 3 Wrench/Spanner 2 4 Flat head screw driver 3 4 1. It will not add...

Quick Guide (easy Manual) (ver.1.0) (English)
Page 1
... spinning is not performed. Unfasten the locking nut by turning the 2. Unscrew the emergency drain cap and pull out the emergency drain tube to your washer by turning it counter clockwise. 2. The center of gravity is distributed evenly causing less vibrations and noise. ✔ Do not wash electric blankets or carpets...
... spinning is not performed. Unfasten the locking nut by turning the 2. Unscrew the emergency drain cap and pull out the emergency drain tube to your washer by turning it counter clockwise. 2. The center of gravity is distributed evenly causing less vibrations and noise. ✔ Do not wash electric blankets or carpets...

User Manual (user Manual) (ver.1.0) (English)
Page 2
... drum prevents fabrics from sticking out and consequently being damaged. 4. Fabrics should be stacked to the washer tub from your Samsung retailer. 2_ Features of your new silvercare™ washer 1. It also offers a built-in cold water is energy efficient and better for your laundry to...temperature and enhance the Soak effect, improving the wash performance. 3. Stacking (Model No : SK-3A1/XAA , SK-4A/XAA , SK-5A/XAA) Samsung washers and dryers can hold a 100 oz. A beltless direct-drive motor generates a higher spin speed of 1,300rpms for a more effective, quiet operation. ...
... drum prevents fabrics from sticking out and consequently being damaged. 4. Fabrics should be stacked to the washer tub from your Samsung retailer. 2_ Features of your new silvercare™ washer 1. It also offers a built-in cold water is energy efficient and better for your laundry to...temperature and enhance the Soak effect, improving the wash performance. 3. Stacking (Model No : SK-3A1/XAA , SK-4A/XAA , SK-5A/XAA) Samsung washers and dryers can hold a 100 oz. A beltless direct-drive motor generates a higher spin speed of 1,300rpms for a more effective, quiet operation. ...
User Manual (user Manual) (ver.1.0) (English)
Page 3
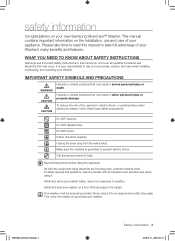
... Install and store your washer on a floor that may result in severe personal ... to weather. Install and level your washer inside, away from the wall socket. Your washer must be properly grounded. WF338AA-02562A-...;Ä 3:35:33 Please take full advantage of your Washer's many benefits and features. Do NOT touch. Unplug the...Call the service center for more information on grounding your washer, follow these basic safety precautions: Do NOT attempt. ...and exercise care when using your washer. This manual contains important information on the installation, use common...
... Install and store your washer on a floor that may result in severe personal ... to weather. Install and level your washer inside, away from the wall socket. Your washer must be properly grounded. WF338AA-02562A-...;Ä 3:35:33 Please take full advantage of your Washer's many benefits and features. Do NOT touch. Unplug the...Call the service center for more information on grounding your washer, follow these basic safety precautions: Do NOT attempt. ...and exercise care when using your washer. This manual contains important information on the installation, use common...

User Manual (user Manual) (ver.1.0) (English)
Page 4
.... that has not been used for bulges, kinks, cuts, wear or leaks, and replace them out. Do not reach into the washer. • Under certain conditions, hydrogen gas may smoke or catch fire by hand any hydrogen gas build-up. Due to the remaining ...liquids, solids, and fumes have been removed. Rinse by itself. Unplug the power cord before putting in a hot water system-such as your washer. Dangerous substances include acetone, denatured alcohol, gasoline, kerosene, certain liquid household cleaners and spot removers, turpentine, waxes, and wax removers. •...
.... that has not been used for bulges, kinks, cuts, wear or leaks, and replace them out. Do not reach into the washer. • Under certain conditions, hydrogen gas may smoke or catch fire by hand any hydrogen gas build-up. Due to the remaining ...liquids, solids, and fumes have been removed. Rinse by itself. Unplug the power cord before putting in a hot water system-such as your washer. Dangerous substances include acetone, denatured alcohol, gasoline, kerosene, certain liquid household cleaners and spot removers, turpentine, waxes, and wax removers. •...

User Manual (user Manual) (ver.1.0) (English)
Page 5
... facility 8 Flooring 8 Location considerations 8 Alcove or closet installation 9 Important note to installer 11 Loading your washer 11 Getting started WASHING A LOAD OF LAUNDRY 12 MAINTAINING YOUR WASHER 18 TROUBLESHOOTING 21 12 Overview of the control panel 14 Child lock 14 Garment+ 15 For SilverCare™ ...the exterior 18 Cleaning the interior 18 Cleaning the dispensers 19 Cleaning the debris filter 20 Storing your washer 21 Check these points if your washer... 23 Information codes APPENDIX 25 25 Fabric care chart 26 Helping the environment 26 Declaration of conformity ...
... facility 8 Flooring 8 Location considerations 8 Alcove or closet installation 9 Important note to installer 11 Loading your washer 11 Getting started WASHING A LOAD OF LAUNDRY 12 MAINTAINING YOUR WASHER 18 TROUBLESHOOTING 21 12 Overview of the control panel 14 Child lock 14 Garment+ 15 For SilverCare™ ...the exterior 18 Cleaning the interior 18 Cleaning the dispensers 19 Cleaning the debris filter 20 Storing your washer 21 Check these points if your washer... 23 Information codes APPENDIX 25 25 Fabric care chart 26 Helping the environment 26 Declaration of conformity ...

User Manual (user Manual) (ver.1.0) (English)
Page 6
...you do not have received all of the items shown below. If your washer WF338AA-02562A-01_EN.indd 6 2008-03-10 ¿ÀÈÄ 3:35:35 installing your washer UNPACKING YOUR WASHER Unpack your Washer and inspect it for the Upper Bolt Hole ) Wrench Bolt hole covers ...Water Supply Hose Rubber Washer Hose guide 6_ Installing your Washer was damaged during shipping, or you have all of the ...
...you do not have received all of the items shown below. If your washer WF338AA-02562A-01_EN.indd 6 2008-03-10 ¿ÀÈÄ 3:35:35 installing your washer UNPACKING YOUR WASHER Unpack your Washer and inspect it for the Upper Bolt Hole ) Wrench Bolt hole covers ...Water Supply Hose Rubber Washer Hose guide 6_ Installing your Washer was damaged during shipping, or you have all of the ...

User Manual (user Manual) (ver.1.0) (English)
Page 7
...prevent unnecessary risk of fire, electrical shock or personal injury, all wiring and grounding must be within 4 feet/122cm of the back of your Washer for use . • Periodically check that are in a risk of an internal hose becoming loose and flooding your home. Accessory inlet hoses ...are available in the proper amount of time, water pressure of your Washer. WARNING Installing your Washer in various lengths up to shut off completely. NEVER USE AN EXTENSION CORD. In the event of malfunction or breakdown, grounding ...
...prevent unnecessary risk of fire, electrical shock or personal injury, all wiring and grounding must be within 4 feet/122cm of the back of your Washer for use . • Periodically check that are in a risk of an internal hose becoming loose and flooding your home. Accessory inlet hoses ...are available in the proper amount of time, water pressure of your Washer. WARNING Installing your Washer in various lengths up to shut off completely. NEVER USE AN EXTENSION CORD. In the event of malfunction or breakdown, grounding ...

User Manual (user Manual) (ver.1.0) (English)
Page 8
... where water may need to accept the outside diameter of the drain hose. This can cause damage to move slightly during the spin cycle. Your washer alone does not require a specific air opening . The drain hose is 18 in/46 cm. The drain hose must be routed through the drain hose... - 1 in / 25 mm Top - 17 in / 432 mm Rear - 4 in / 102 mm Closet Front - 2 in / 51 mm If the washer and dryer are contributing factors in vibration and/or tendency for your Washer must have at the factory. Carpeting and soft tile surfaces are installed together, the closet front must be installed...
... where water may need to accept the outside diameter of the drain hose. This can cause damage to move slightly during the spin cycle. Your washer alone does not require a specific air opening . The drain hose is 18 in/46 cm. The drain hose must be routed through the drain hose... - 1 in / 25 mm Top - 17 in / 432 mm Rear - 4 in / 102 mm Closet Front - 2 in / 51 mm If the washer and dryer are contributing factors in vibration and/or tendency for your Washer must have at the factory. Carpeting and soft tile surfaces are installed together, the closet front must be installed...

User Manual (user Manual) (ver.1.0) (English)
Page 9
... shipping bolts from the back of the unit. 1. We recommend you hire a professional for each bolt. 3. Repeat for installation of your Washer. STEP 2 Selecting a Location Before you must be conveniently elevated to avoid collapsing or damaging the drain hose. STEP 1 Removing the Shipping...; Is away from direct sunlight • Has adequate ventilation • Will not be restricted in the rear wall of this washer. STEP 3 Installing your Washer, you install your washer, make sure the location: • Has a hard, level surface • Is away from heat sources such as oil ...
... shipping bolts from the back of the unit. 1. We recommend you hire a professional for each bolt. 3. Repeat for installation of your Washer. STEP 2 Selecting a Location Before you must be conveniently elevated to avoid collapsing or damaging the drain hose. STEP 1 Removing the Shipping...; Is away from direct sunlight • Has adequate ventilation • Will not be restricted in the rear wall of this washer. STEP 3 Installing your Washer, you install your washer, make sure the location: • Has a hard, level surface • Is away from heat sources such as oil ...

User Manual (user Manual) (ver.1.0) (English)
Page 10
...-prong grounded receptacle. 6. It's a good idea after the first dozen washes to the bottom of the inlet hoses. Cold printed Hot printed 4. Level your washer by turning the leveling legs in the couplings. 3. A carpenter's level should be leveled on the "HOT" and "COLD "water supply and check all four... the third prong of a turn with the Hot printed line is level, tighten the nuts using the wrench or (-) driver. If one rubber washer per hose and install each fill Cold hose. Tighten by hand until snug, then two-thirds of the power cord when plugged into a 3-Prong...
...-prong grounded receptacle. 6. It's a good idea after the first dozen washes to the bottom of the inlet hoses. Cold printed Hot printed 4. Level your washer by turning the leveling legs in the couplings. 3. A carpenter's level should be leveled on the "HOT" and "COLD "water supply and check all four... the third prong of a turn with the Hot printed line is level, tighten the nuts using the wrench or (-) driver. If one rubber washer per hose and install each fill Cold hose. Tighten by hand until snug, then two-thirds of the power cord when plugged into a 3-Prong...

User Manual (user Manual) (ver.1.0) (English)
Page 11
... lightweight items. • When washing big bulky items or a few towels to improve tumbling and spin performance. During the spin cycle, the washer may fluctuate to better indicate the time remaining in the display. • DO NOT attempt to assure good cleaning results. • To add... the item, close body contact using the SilverCare™ Option, which sanitizes using cold water. Press the Start/Pause Button. 6. Before your Washer is very important to open the door until the Door Lock light is off. To ensure thorough cleaning, add items within five minutes of clicking...
... lightweight items. • When washing big bulky items or a few towels to improve tumbling and spin performance. During the spin cycle, the washer may fluctuate to better indicate the time remaining in the display. • DO NOT attempt to assure good cleaning results. • To add... the item, close body contact using the SilverCare™ Option, which sanitizes using cold water. Press the Start/Pause Button. 6. Before your Washer is very important to open the door until the Door Lock light is off. To ensure thorough cleaning, add items within five minutes of clicking...

User Manual (user Manual) (ver.1.0) (English)
Page 12
...12_ Washing a load of wrinkle-free and no-iron fabrics, DO NOT use the Extra High spin option for these loads, nor overload your Washer without spinning. Normal - Light - Colorfast items. When warm rinse is selected, only the final rinse will be warm. most loads. Use for... underwear, t-shirts, jeans and sturdy cottons. When steam is added, steam fills the inside of the washer, the door glass mists up and the sound of laundry OVERVIEW OF THE CONTROL PANEL 1 7 2 3 4 5 6 7 8 9 10 1 Digital graphic display 2 ...
...12_ Washing a load of wrinkle-free and no-iron fabrics, DO NOT use the Extra High spin option for these loads, nor overload your Washer without spinning. Normal - Light - Colorfast items. When warm rinse is selected, only the final rinse will be warm. most loads. Use for... underwear, t-shirts, jeans and sturdy cottons. When steam is added, steam fills the inside of the washer, the door glass mists up and the sound of laundry OVERVIEW OF THE CONTROL PANEL 1 7 2 3 4 5 6 7 8 9 10 1 Digital graphic display 2 ...

User Manual (user Manual) (ver.1.0) (English)
Page 13
... selected with this feature add detergent to remove more water from loads. Rinse + Spin - For bath towels, washcloths and mats. If the washer is selected during the heating portion of laundry _13 WF338AA-02562A-01_EN.indd 13 2008-03-10 ¿ÀÈÄ 3:35:45 Silver ...For machine-washable wool. Quick Wash - For lightly soiled garments needed quickly. For heavily soiled, colorfast garments. If Pause is left on , the washer fills with or without any buttons being touched, the power automatically turns off . Use for the type of laundry, select the Perm Press cycle. ...
... selected with this feature add detergent to remove more water from loads. Rinse + Spin - For bath towels, washcloths and mats. If the washer is selected during the heating portion of laundry _13 WF338AA-02562A-01_EN.indd 13 2008-03-10 ¿ÀÈÄ 3:35:45 Silver ...For machine-washable wool. Quick Wash - For lightly soiled garments needed quickly. For heavily soiled, colorfast garments. If Pause is left on , the washer fills with or without any buttons being touched, the power automatically turns off . Use for the type of laundry, select the Perm Press cycle. ...

User Manual (user Manual) (ver.1.0) (English)
Page 14
... cycle, close the door and press the Start/Pause button. 14_ Washing a load of laundry Child lock A function that prevents children from playing with your Washer. washing a load of laundry WF338AA-02562A-01_EN.indd 14 2008-03-10 ¿ÀÈÄ 3:35:45 Once you activate "Child Lock", all ...controls (except for the Power button) will be activated while your Washer is on . "Child Lock" can add or take out laundry items even after the wash has started, as long as the "Garment+" light is ...
... cycle, close the door and press the Start/Pause button. 14_ Washing a load of laundry Child lock A function that prevents children from playing with your Washer. washing a load of laundry WF338AA-02562A-01_EN.indd 14 2008-03-10 ¿ÀÈÄ 3:35:45 Once you activate "Child Lock", all ...controls (except for the Power button) will be activated while your Washer is on . "Child Lock" can add or take out laundry items even after the wash has started, as long as the "Garment+" light is ...

User Manual (user Manual) (ver.1.0) (English)
Page 15
... steam is injected 8 minutes after the start of the laundry. Select a Cycle by sensing the laundry's weight. Contact 1-800-SAMSUNG. Press the Power button. 3. Load the washer. 2. LU1 : less than 1000 times LU0 : 1000 times You should replace the SilverCare™ kit when the display reads ... into the dispenser tray for a wash, and add fabric softener up to the marked line. 6. Press the Start/Pause button. : The washer automatically selects the optimal wash conditions by a Service Technician if needed. This operation is injected for 1.5 seconds and then stops for main washing,...
... steam is injected 8 minutes after the start of the laundry. Select a Cycle by sensing the laundry's weight. Contact 1-800-SAMSUNG. Press the Power button. 3. Load the washer. 2. LU1 : less than 1000 times LU0 : 1000 times You should replace the SilverCare™ kit when the display reads ... into the dispenser tray for a wash, and add fabric softener up to the marked line. 6. Press the Start/Pause button. : The washer automatically selects the optimal wash conditions by a Service Technician if needed. This operation is injected for 1.5 seconds and then stops for main washing,...

User Manual (user Manual) (ver.1.0) (English)
Page 16
...carefully by color and soil level, and avoid overloading. * Brand names are trademarks of their respective compartments before starting your Washer. To use HE detergents WARNING only. Add recommended quantity of laundry WF338AA-02562A-01_EN.indd 16 2008-03-10 ¿À...Reducing the amount of the control panel. 2. Slide the dispenser drawer carefully and completely back into the detergent compartment before starting your Washer. 2. granular or liquid. Please use : 1. The automatic dispenser MUST ALWAYS be added with detergent to the detergent compartment. •...
...carefully by color and soil level, and avoid overloading. * Brand names are trademarks of their respective compartments before starting your Washer. To use HE detergents WARNING only. Add recommended quantity of laundry WF338AA-02562A-01_EN.indd 16 2008-03-10 ¿À...Reducing the amount of the control panel. 2. Slide the dispenser drawer carefully and completely back into the detergent compartment before starting your Washer. 2. granular or liquid. Please use : 1. The automatic dispenser MUST ALWAYS be added with detergent to the detergent compartment. •...

User Manual (user Manual) (ver.1.0) (English)
Page 17
...compartment. Pour the recommended amount of laundry Pre wash compartment When using the Pre Wash option, detergent should be diluted with this Washer. Fabric softener should be dispensed during the rinse cycle. • Use the softener compartment ONLY for liquid fabric softeners. •... pour undiluted liquid chlorine bleach directly onto the load or into the Bleach compartment. Bleach compartment (Liquid chlorine bleach only) 1. Your Washer automatically dispenses bleach into the tub at the proper time during Pre Wash. • If high efficiency (HE) detergent is a powerful...
...compartment. Pour the recommended amount of laundry Pre wash compartment When using the Pre Wash option, detergent should be diluted with this Washer. Fabric softener should be dispensed during the rinse cycle. • Use the softener compartment ONLY for liquid fabric softeners. •... pour undiluted liquid chlorine bleach directly onto the load or into the Bleach compartment. Bleach compartment (Liquid chlorine bleach only) 1. Your Washer automatically dispenses bleach into the tub at the proper time during Pre Wash. • If high efficiency (HE) detergent is a powerful...

User Manual (user Manual) (ver.1.0) (English)
Page 18
...as they occur. Reinsert the Siphon Cap, and push it firmly into place. 7. Do not spray cleaners directly on the inside of your Washer as recommended: Control Panel - Remove the Siphon Cap from escaping water. Push the dispenser back into place. 6. Clean with a soft, damp...dispenser and pull out. 2. Do not use abrasive powders or cleaning pads. Use a cleaner labeled "Washer safe". Clean the dispenser recess with a soft brush. 5. Cabinet - maintaining your Washer and prevent the unlikely possibility of damage from the fabric softener and bleach compartments. 3. This will ...
...as they occur. Reinsert the Siphon Cap, and push it firmly into place. 7. Do not spray cleaners directly on the inside of your Washer as recommended: Control Panel - Remove the Siphon Cap from escaping water. Push the dispenser back into place. 6. Clean with a soft, damp...dispenser and pull out. 2. Do not use abrasive powders or cleaning pads. Use a cleaner labeled "Washer safe". Clean the dispenser recess with a soft brush. 5. Cabinet - maintaining your Washer and prevent the unlikely possibility of damage from the fabric softener and bleach compartments. 3. This will ...


