Quick Guide (ENGLISH)
Page 1
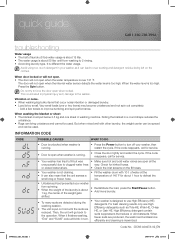
...draining. • It can be spread and can also mean that reduce or eliminatesuds. Code No. : DC68-02497A-02_EN SWM-user_QG_3rd.indd 1 2008-01-09 ¿ÀÀü 12:33:15 When door locked or will not open. • The door will not open when the internal water ...lines way. Add a few towels to the operation. If the code reappears, call for about 1 hour to defrost the ice. • Unbalanced load prevented your washer from washing to 2 rinsing. • According laundry type, It is running . • Close the door tightly and restart the cycle. For best cleaning results...
...draining. • It can be spread and can also mean that reduce or eliminatesuds. Code No. : DC68-02497A-02_EN SWM-user_QG_3rd.indd 1 2008-01-09 ¿ÀÀü 12:33:15 When door locked or will not open. • The door will not open when the internal water ...lines way. Add a few towels to the operation. If the code reappears, call for about 1 hour to defrost the ice. • Unbalanced load prevented your washer from washing to 2 rinsing. • According laundry type, It is running . • Close the door tightly and restart the cycle. For best cleaning results...
Quick Guide (ENGLISH)
Page 2
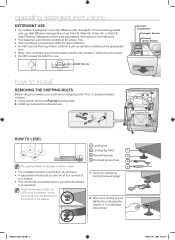
... CHeer HE, or Gain HE. SWM-user_QG_3rd.indd 2 2008-01-09 ¿ÀÀü 12:33:16 Install cap supplied from accessories. 4 Shipping Bolts HOW TO LEVEL Your washer MUST be used on all four corners of your washer. • The unit should not wobble when it causes excessive ... Detergent Selector Prewash (Select Models) how to use High Efficiency (HE) detergents. If not, it is level, tighten the nuts using your washer, you must be firm, dry and level. • A carpenter's level should be leveled on all four sides. • The installation surface...
... CHeer HE, or Gain HE. SWM-user_QG_3rd.indd 2 2008-01-09 ¿ÀÀü 12:33:16 Install cap supplied from accessories. 4 Shipping Bolts HOW TO LEVEL Your washer MUST be used on all four corners of your washer. • The unit should not wobble when it causes excessive ... Detergent Selector Prewash (Select Models) how to use High Efficiency (HE) detergents. If not, it is level, tighten the nuts using your washer, you must be firm, dry and level. • A carpenter's level should be leveled on all four sides. • The installation surface...

(English)
Page 13
01 SETTING UP YOUR WASHER MEETING INSTALLATION REQUIREMENTS Electrical supply • 120 Volt 60 Hz 15 AMP fuse or circuit breaker • Individual branch circuit serving only your washer _13 2010-02-09 ø¿»ƒ 1:14:57 Improper connection of the equipment-grounding ...To prevent unnecessary risk of least resistance for use an extension cord. CAUTION WF210AN-02832A_EN.indd 13 setting up your Washer is recommended. • Your Washer is equipped with a power cord having a three-prong grounding plug for electric current. CAUTION Grounding ELECTRICAL GROUNDING IS ...
01 SETTING UP YOUR WASHER MEETING INSTALLATION REQUIREMENTS Electrical supply • 120 Volt 60 Hz 15 AMP fuse or circuit breaker • Individual branch circuit serving only your washer _13 2010-02-09 ø¿»ƒ 1:14:57 Improper connection of the equipment-grounding ...To prevent unnecessary risk of least resistance for use an extension cord. CAUTION WF210AN-02832A_EN.indd 13 setting up your Washer is recommended. • Your Washer is equipped with a power cord having a three-prong grounding plug for electric current. CAUTION Grounding ELECTRICAL GROUNDING IS ...
(English)
Page 15
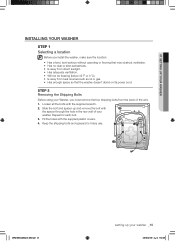
... the back of the unit. 1. Keep the shipping bolts and spacers for each bolt. 3. STEP 2 Removing the Shipping Bolts Before using your washer. Repeat for future use. WF210AN-02832A_EN.indd 15 setting up and remove the bolt with the supplied plastic covers. 4. Loosen all the bolts with... the supplied wrench. 2. 01 SETTING UP YOUR WASHER INSTALLING YOUR WASHER STEP 1 Selecting a location Before you must remove the four shipping bolts from heat sources such as oil or gas. • ...
... the back of the unit. 1. Keep the shipping bolts and spacers for each bolt. 3. STEP 2 Removing the Shipping Bolts Before using your washer. Repeat for future use. WF210AN-02832A_EN.indd 15 setting up and remove the bolt with the supplied plastic covers. 4. Loosen all the bolts with... the supplied wrench. 2. 01 SETTING UP YOUR WASHER INSTALLING YOUR WASHER STEP 1 Selecting a location Before you must remove the four shipping bolts from heat sources such as oil or gas. • ...

(English)
Page 17
...washer is level, tighten the locking nuts using the wrench included with your washer...breaker. When your washer. Your washer must be used ... your washer into position. 7. Do not move the washer unless ...the lockingnuts are fastened to the bottom of the power cord when plugged into a 3-prong, well grounded 120 volt 60 Hz approved electrical outlet protected by using the wrench or (-) flathead screwdriver. Level your washer.... Turn on the HOT and COLD water supply and check all four corners of your washer is grounded through the third prong of the washer...
...washer is level, tighten the locking nuts using the wrench included with your washer...breaker. When your washer. Your washer must be used ... your washer into position. 7. Do not move the washer unless ...the lockingnuts are fastened to the bottom of the power cord when plugged into a 3-prong, well grounded 120 volt 60 Hz approved electrical outlet protected by using the wrench or (-) flathead screwdriver. Level your washer.... Turn on the HOT and COLD water supply and check all four corners of your washer is grounded through the third prong of the washer...


