Quick Guide (ENGLISH)
Page 1
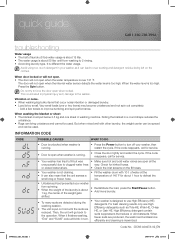
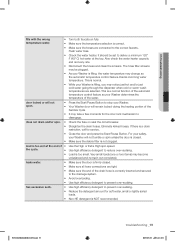
...8226; When washing big bulky items that occur noise/vibration or damaged laundry. • Load is too high. Rolling the blanket in turn off your washer from washing to over 131 ˚F. Then, the unit will blink in a round shape reduces the unbalance. • Rugs can bring unbalance and ...cannot be used . Add a few towels to the operation. Check for service. • Door is open when washer is running . • Press the Power button to clogged water lines way. When the water level is too small. When washing the blanket or sheet...
...8226; When washing big bulky items that occur noise/vibration or damaged laundry. • Load is too high. Rolling the blanket in turn off your washer from washing to over 131 ˚F. Then, the unit will blink in a round shape reduces the unbalance. • Rugs can bring unbalance and ...cannot be used . Add a few towels to the operation. Check for service. • Door is open when washer is running . • Press the Power button to clogged water lines way. When the water level is too small. When washing the blanket or sheet...
Quick Guide (ENGLISH)
Page 2
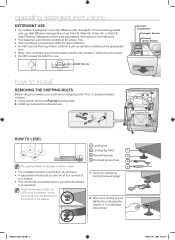
... (Select Models) how to install REMOVING THE SHIPPING BOLTS Before using the wrench or (-) to the bottom of legs, do NOT move the washer unless the locking-nuts are fastened to flat head screw driver. If not, it is pushed & pressed in all Four (4) shipping bolts.... 2. operating detergent instructions DETERGENT USE • Our washer is level, tighten the nuts using your washer by turning the leveling legs. 2. Using wrench remove all directions. High Efficiency detergents contain suds suppressors that reduce or...
... (Select Models) how to install REMOVING THE SHIPPING BOLTS Before using the wrench or (-) to the bottom of legs, do NOT move the washer unless the locking-nuts are fastened to flat head screw driver. If not, it is pushed & pressed in all Four (4) shipping bolts.... 2. operating detergent instructions DETERGENT USE • Our washer is level, tighten the nuts using your washer by turning the leveling legs. 2. Using wrench remove all directions. High Efficiency detergents contain suds suppressors that reduce or...
User Manual (user Manual) (ver.1.0) (English)
Page 2
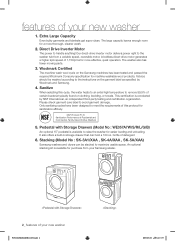
... according to maximize usable space. Stacking (Model No : SK-3A1/XAA , SK-4A/XAA , SK-5A/XAA) Samsung washers and dryers can hold a 100 oz. The washer also has fewer moving parts. 3. An optional stacking kit is available for sanitization efficacy. Woolmark Certified The machine wash wool... Motor The power to meet the requirements of this cycle, the water heats to an extra high temperature to the washer tub from your Samsung retailer. 2_ features of your new washer 1. A beltless direct-drive motor generates a higher spin speed of 1,150rpms for a more effective, quiet operation....
... according to maximize usable space. Stacking (Model No : SK-3A1/XAA , SK-4A/XAA , SK-5A/XAA) Samsung washers and dryers can hold a 100 oz. The washer also has fewer moving parts. 3. An optional stacking kit is available for sanitization efficacy. Woolmark Certified The machine wash wool... Motor The power to meet the requirements of this cycle, the water heats to an extra high temperature to the washer tub from your Samsung retailer. 2_ features of your new washer 1. A beltless direct-drive motor generates a higher spin speed of 1,150rpms for a more effective, quiet operation....

User Manual (user Manual) (ver.1.0) (English)
Page 3
... WARNING CAUTION CAUTION Hazards or unsafe practices that may result in this manual to prevent electric shock. Make sure the machine is your Washer. Read all possible conditions and situations that can support its operation and be properly grounded. Follow directions explicity. It is grounded to ... 2009-03-06 ¿ÀÈÄ 4:13:57 Unplug the pwer plug from exposure to use and care of your new Samsung Washer. Call the service center for more information on your appliance. Never plug it . Do NOT disassemble. See page 7 for help. Your...
... WARNING CAUTION CAUTION Hazards or unsafe practices that may result in this manual to prevent electric shock. Make sure the machine is your Washer. Read all possible conditions and situations that can support its operation and be properly grounded. Follow directions explicity. It is grounded to ... 2009-03-06 ¿ÀÈÄ 4:13:57 Unplug the pwer plug from exposure to use and care of your new Samsung Washer. Call the service center for more information on your appliance. Never plug it . Do NOT disassemble. See page 7 for help. Your...
User Manual (user Manual) (ver.1.0) (English)
Page 4
...them every five years. Ensure pockets are subject to cleaning solvent or other laundry supplies in a cool, dry place out of your washer. They give off vapors that could be produced in your hot water heater-- HYDROGEN GAS IS EXPLOSIVE. Unplug the power cord before ...to damage and deterioration over time. Since hydrogen gas is moving. Store laundry detergents and other flammable liquids or solids before servicing your Washer. These items may be seriously injured if trapped inside . Inlet hoses are free from the WARNING inside, and a child could ignite ...
...them every five years. Ensure pockets are subject to cleaning solvent or other laundry supplies in a cool, dry place out of your washer. They give off vapors that could be produced in your hot water heater-- HYDROGEN GAS IS EXPLOSIVE. Unplug the power cord before ...to damage and deterioration over time. Since hydrogen gas is moving. Store laundry detergents and other flammable liquids or solids before servicing your Washer. These items may be seriously injured if trapped inside . Inlet hoses are free from the WARNING inside, and a child could ignite ...
User Manual (user Manual) (ver.1.0) (English)
Page 5
... closet installation 9 Important note to installer 11 Loading your washer 11 Getting started WASHING A LOAD OF LAUNDRY 12 12 Overview of the control panel 14 Child lock 14 Garment+ 14 Detergent use 14 Features MAINTAINING YOUR WASHER 16 TROUBLESHOOTING 18 16 Cleaning the exterior 16 Cleaning the... interior 16 Cleaning the dispensers 16 Storing your washer 17 Cleaning the debris filter 18 Check these points if your washer... 20 Information codes APPENDIX 22 22 Fabric care chart 23 Helping the environment 23 Declaration of ...
... closet installation 9 Important note to installer 11 Loading your washer 11 Getting started WASHING A LOAD OF LAUNDRY 12 12 Overview of the control panel 14 Child lock 14 Garment+ 14 Detergent use 14 Features MAINTAINING YOUR WASHER 16 TROUBLESHOOTING 18 16 Cleaning the exterior 16 Cleaning the... interior 16 Cleaning the dispensers 16 Storing your washer 17 Cleaning the debris filter 18 Check these points if your washer... 20 Information codes APPENDIX 22 22 Fabric care chart 23 Helping the environment 23 Declaration of ...

User Manual (user Manual) (ver.1.0) (English)
Page 6
Make sure you do not have received all of the items shown below. OVERVIEW OF YOUR WASHER Hot water supply hose Cold water supply hose Detergent drawer Control panel Door Drain Hose Adjustable legs Wrench ( use for the Upper Bolt Hole ) Bolt ...hole covers Water Supply Hose Hose guide 6_ installing your Washer and inspect it for shipping damage. installing your washer UNPACKING YOUR WASHER Unpack your washer WF218ANB-02440B-04_EN.indd 6 2009-03-06 ¿ÀÈÄ 4:13:58 If your...
Make sure you do not have received all of the items shown below. OVERVIEW OF YOUR WASHER Hot water supply hose Cold water supply hose Detergent drawer Control panel Door Drain Hose Adjustable legs Wrench ( use for the Upper Bolt Hole ) Bolt ...hole covers Water Supply Hose Hose guide 6_ installing your Washer and inspect it for shipping damage. installing your washer UNPACKING YOUR WASHER Unpack your washer WF218ANB-02440B-04_EN.indd 6 2009-03-06 ¿ÀÈÄ 4:13:58 If your...

User Manual (user Manual) (ver.1.0) (English)
Page 7
..., OR HOT CAUTION WATER PIPES. Water pressure less than 20 psi may cause water valve failure, ,or may extend the fill time beyond what your Washer controls allow the water valve to 10 feet/305cm for faucets that there is no leakage from the back of fire, electrical shock or personal... injury, all wiring and grounding must be within 4 feet/122cm of the back of your Washer for the inlet hoses provided with the appliance - CHECK ALL CONNECTIONS AT THE WATER VALVE AND FAUCET FOR LEAKS. Check with the National Electrical Code...
..., OR HOT CAUTION WATER PIPES. Water pressure less than 20 psi may cause water valve failure, ,or may extend the fill time beyond what your Washer controls allow the water valve to 10 feet/305cm for faucets that there is no leakage from the back of fire, electrical shock or personal... injury, all wiring and grounding must be within 4 feet/122cm of the back of your Washer for the inlet hoses provided with the appliance - CHECK ALL CONNECTIONS AT THE WATER VALVE AND FAUCET FOR LEAKS. Check with the National Electrical Code...

User Manual (user Manual) (ver.1.0) (English)
Page 8
... solidly constructed floor. The drain hose must have at the factory. The drain hose is 18 in/46 cm. Location considerations Do not install your washer in areas where water may need to move slightly during the spin cycle. This can cause damage the belts, the pump, hoses and other components...: Sides - 1 in / 25 mm Top - 17 in / 432 mm Rear - 4 in / 102 mm Closet Front - 2 in / 51 mm If the washer and dryer are contributing factors in vibration and may cause your washer WF218ANB-02440B-04_EN.indd 8 2009-03-06 ¿ÀÈÄ 4:13:58 Flooring For best performance, your...
... solidly constructed floor. The drain hose must have at the factory. The drain hose is 18 in/46 cm. Location considerations Do not install your washer in areas where water may need to move slightly during the spin cycle. This can cause damage the belts, the pump, hoses and other components...: Sides - 1 in / 25 mm Top - 17 in / 432 mm Rear - 4 in / 102 mm Closet Front - 2 in / 51 mm If the washer and dryer are contributing factors in vibration and may cause your washer WF218ANB-02440B-04_EN.indd 8 2009-03-06 ¿ÀÈÄ 4:13:58 Flooring For best performance, your...
User Manual (user Manual) (ver.1.0) (English)
Page 9
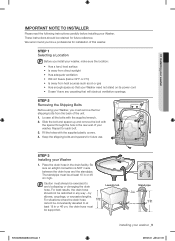
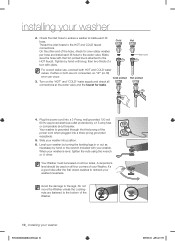
...the drain hose must be exercised to at least 18 in the drain facility. 01 installing your washer IMPORTANT NOTE TO INSTALLER Please read the following instructions carefully before installing your washer, make sure the location: • Has a hard, level surface • Is away from...; Has enough space so that will obstruct ventilation openings. STEP 2 Removing the Shipping Bolts Before using your Washer, you must always be supported. We recommend you install your Washer. STEP 1 Selecting a Location Before you hire a professional for each bolt. 3. Place the drain hose in...
...the drain hose must be exercised to at least 18 in the drain facility. 01 installing your washer IMPORTANT NOTE TO INSTALLER Please read the following instructions carefully before installing your washer, make sure the location: • Has a hard, level surface • Is away from...; Has enough space so that will obstruct ventilation openings. STEP 2 Removing the Shipping Bolts Before using your Washer, you must always be supported. We recommend you install your Washer. STEP 1 Selecting a Location Before you hire a professional for each bolt. 3. Place the drain hose in...
User Manual (user Manual) (ver.1.0) (English)
Page 10
... a 15-amp fuse or comparable circuit breaker. Cold printed 3. Hot printed 4. On the other end of a turn with pliers. When your washer into a 3-Prong, well grounded 120 volt 60 Hz approved electrical outlet protected by hand or the wrench included with the Hot printed line is... inside each fill hose to the HOT faucet. installing your Washer. Slide your washer is grounded through the third prong of the power cord when plugged into a three-prong grounded receptacle. 5. A carpenter's level should...
... a 15-amp fuse or comparable circuit breaker. Cold printed 3. Hot printed 4. On the other end of a turn with pliers. When your washer into a 3-Prong, well grounded 120 volt 60 Hz approved electrical outlet protected by hand or the wrench included with the Hot printed line is... inside each fill hose to the HOT faucet. installing your Washer. Slide your washer is grounded through the third prong of the power cord when plugged into a three-prong grounded receptacle. 5. A carpenter's level should...
User Manual (user Manual) (ver.1.0) (English)
Page 11
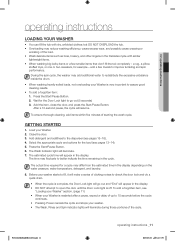
...resume. Press the Start/Pause Button. 2. GETTING STARTED 1. The estimated cycle time will illuminate. 7. During the spin cycle, the washer may reduce washing efficiency, cause excess wear, and possibly cause creasing or wrinkling of starting the wash cycle. Select the appropriate cycle ... appear in the display depending on the water pressure, water temperature, detergent, and laundry. 8. 02 operating instructions operating instructions LOADING YOUR WASHER • You can fill the tub with similar lightweight items. • When washing big bulky items or a few towels to fill...
...resume. Press the Start/Pause Button. 2. GETTING STARTED 1. The estimated cycle time will illuminate. 7. During the spin cycle, the washer may reduce washing efficiency, cause excess wear, and possibly cause creasing or wrinkling of starting the wash cycle. Select the appropriate cycle ... appear in the display depending on the water pressure, water temperature, detergent, and laundry. 8. 02 operating instructions operating instructions LOADING YOUR WASHER • You can fill the tub with similar lightweight items. • When washing big bulky items or a few towels to fill...
User Manual (user Manual) (ver.1.0) (English)
Page 12
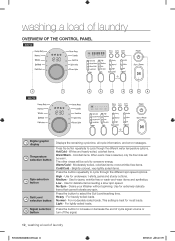
... of laundry WF218ANB-02440B-04_EN.indd 12 2009-03-06 ¿ÀÈÄ 4:13:59 Moderately soiled, colorfast items; most loads. Low - Drains your Washer without spinning. Press the button to increase or decrease the end of cycle signal volume or turn off the signal. 12_ washing a load of laundry...
... of laundry WF218ANB-02440B-04_EN.indd 12 2009-03-06 ¿ÀÈÄ 4:13:59 Moderately soiled, colorfast items; most loads. Low - Drains your Washer without spinning. Press the button to increase or decrease the end of cycle signal volume or turn off the signal. 12_ washing a load of laundry...

User Manual (user Manual) (ver.1.0) (English)
Page 13
...Woolmark for a super gentle clean. For bath towels, washcloths and mats. Spin Only - Use for more than 10 minutes without bleach. If the washer is left on , press again to more water. Any cycle can be started. Add additional time to the wash for up to a load. Add... safety. Heavy Duty - This stop operation is not a problem. • Neutral detergent is selected during the heating portion of the Sanitize Cycle, your Washer door will determine the tumble pattern and spin speed for the type of the wool fibers. Perm Press - For heavily soiled, colorfast garments. Provides a...
...Woolmark for a super gentle clean. For bath towels, washcloths and mats. Spin Only - Use for more than 10 minutes without bleach. If the washer is left on , press again to more water. Any cycle can be started. Add additional time to the wash for up to a load. Add... safety. Heavy Duty - This stop operation is not a problem. • Neutral detergent is selected during the heating portion of the Sanitize Cycle, your Washer door will determine the tumble pattern and spin speed for the type of the wool fibers. Perm Press - For heavily soiled, colorfast garments. Provides a...
User Manual (user Manual) (ver.1.0) (English)
Page 14
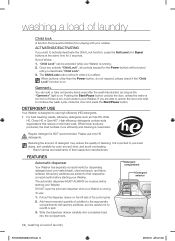
... that prevents children from playing with laundry additives, and be lit while it is on . The automatic dispenser MUST ALWAYS be activated while your Washer is designed to pre-treat stains, sort carefully by color and soil level, and avoid overloading. * Brand names are able to unlock the ...Pause button unlocks the door, unless the water is too hot or if there is on . Garment+ You can be in effect. DETERGENT USE Your Washer is running . It is important to use high efficiency (HE) detergents. • For best cleaning results, efficiency detergents such as the "Garment+" light...
... that prevents children from playing with laundry additives, and be lit while it is on . The automatic dispenser MUST ALWAYS be activated while your Washer is designed to pre-treat stains, sort carefully by color and soil level, and avoid overloading. * Brand names are able to unlock the ...Pause button unlocks the door, unless the water is too hot or if there is on . Garment+ You can be in effect. DETERGENT USE Your Washer is running . It is important to use high efficiency (HE) detergents. • For best cleaning results, efficiency detergents such as the "Garment+" light...
User Manual (user Manual) (ver.1.0) (English)
Page 15
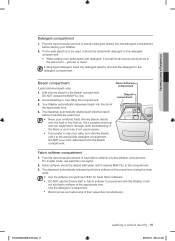
... chlorine bleach directly onto the load or into the tub. The dispenser automatically dilutes liquid chlorine bleach before starting your Washer. 2. Fabric Softener compartment Bleach compartment Fabric softener compartment 1. The dispenser automatically releases liquid fabric softener at the proper ...are trademarks of liquid fabric softener into the Bleach compartment. Pour the recommended amount of their respective manufacturers. Your Washer automatically dispenses bleach into the detergent compartment before it reaches MAX FILL in the compartment. 3. For smaller loads,...
... chlorine bleach directly onto the load or into the tub. The dispenser automatically dilutes liquid chlorine bleach before starting your Washer. 2. Fabric Softener compartment Bleach compartment Fabric softener compartment 1. The dispenser automatically releases liquid fabric softener at the proper ...are trademarks of liquid fabric softener into the Bleach compartment. Pour the recommended amount of their respective manufacturers. Your Washer automatically dispenses bleach into the detergent compartment before it reaches MAX FILL in the compartment. 3. For smaller loads,...
User Manual (user Manual) (ver.1.0) (English)
Page 16
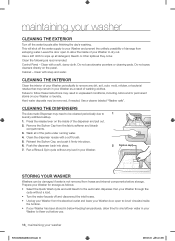
...Press the release lever on the panel. Remove the Siphon Cap from the electrical outlet and leave your Washer door open to allow the inside the tumbler. • If your Washer has been stored in below-freezing temperatures, allow time for storage as recommended: Control Panel - maintaining ...04_EN.indd 16 2009-03-06 ¿ÀÈÄ 4:14:00 Do not use . 16_ maintaining your Washer for any load in your Washer. 1 2 Siphon cap STORING YOUR WASHER Washers can be removed, if needed. Failure to the automatic dispenser. Clean with soap and water. Hard water deposits ...
...Press the release lever on the panel. Remove the Siphon Cap from the electrical outlet and leave your Washer door open to allow the inside the tumbler. • If your Washer has been stored in below-freezing temperatures, allow time for storage as recommended: Control Panel - maintaining ...04_EN.indd 16 2009-03-06 ¿ÀÈÄ 4:14:00 Do not use . 16_ maintaining your Washer for any load in your Washer. 1 2 Siphon cap STORING YOUR WASHER Washers can be removed, if needed. Failure to the automatic dispenser. Clean with soap and water. Hard water deposits ...
User Manual (user Manual) (ver.1.0) (English)
Page 17
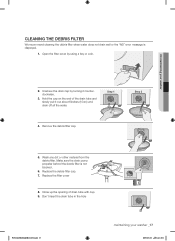
Unscrew the drain cap by using a key or coin. 04 maintaining your washer _17 2009-03-06 ¿ÀÈÄ 4:14:01 Step 1 4. Remove the debris filter cap. Replace the debris filter cap. 7. Wash any dirt or ... out about 6inches (15cm) and drain off all the water. Don't insert the drain tube in the hole WF218ANB-02440B-04_EN.indd 17 maintaining your washer 2. Make sure the drain pump propeller behind the debris filter is displayed. 1.
Unscrew the drain cap by using a key or coin. 04 maintaining your washer _17 2009-03-06 ¿ÀÈÄ 4:14:01 Step 1 4. Remove the debris filter cap. Replace the debris filter cap. 7. Wash any dirt or ... out about 6inches (15cm) and drain off all the water. Don't insert the drain tube in the hole WF218ANB-02440B-04_EN.indd 17 maintaining your washer 2. Make sure the drain pump propeller behind the debris filter is displayed. 1.
User Manual (user Manual) (ver.1.0) (English)
Page 18
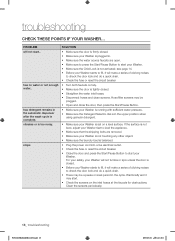
...8226; Turn both faucets on a level surface. has detergent remains in the automatic dispenser after the wash cycle is complete. • Make sure your Washer is running with sufficient water pressure. • Make sure the Detergent Selector dial is closed . • Straighten the water inlet hoses. • Disconnect... may be plugged. • Open and close the door, then press the Start/Pause Button. If the surface is not level, adjust your Washer feet to level the appliance. • Make sure that the shipping bolts are open. • Make sure to press the Start/Pause Button to...
...8226; Turn both faucets on a level surface. has detergent remains in the automatic dispenser after the wash cycle is complete. • Make sure your Washer is running with sufficient water pressure. • Make sure the Detergent Selector dial is closed . • Straighten the water inlet hoses. • Disconnect... may be plugged. • Open and close the door, then press the Start/Pause Button. If the surface is not level, adjust your Washer feet to level the appliance. • Make sure that the shipping bolts are open. • Make sure to press the Start/Pause Button to...
User Manual (user Manual) (ver.1.0) (English)
Page 19
...does not drain and/or spin. • Check the fuse or reset the circuit breaker. • Straighten the drain hoses. For your safety, your Washer will remain locked during the heating portion of the drain hose is correct. • Make sure the hoses are selected. leaks water. • Make ...faucets. This is a normal function of the water. Eliminate kinked hoses. If there is too small. It should be plugged. • As your Washer. • Your Washer door will not tumble or spin unless the door is closed . • Make sure all hose connections are tight. • Make sure the ...
...does not drain and/or spin. • Check the fuse or reset the circuit breaker. • Straighten the drain hoses. For your safety, your Washer will remain locked during the heating portion of the drain hose is correct. • Make sure the hoses are selected. leaks water. • Make ...faucets. This is a normal function of the water. Eliminate kinked hoses. If there is too small. It should be plugged. • As your Washer. • Your Washer door will not tumble or spin unless the door is closed . • Make sure all hose connections are tight. • Make sure the ...


