

User Manual
Page 7
... result in abnormal vibrations, noise, or problems with the product. Do not pull the power cord when unplugging the power plug. • Unplug the power plug by holding the plug. • Failing to do so may result in a location exposed to electric leakage. Install your nearest service center. Apjes This appliance must be properly grounded. Do not install this appliance in a location where gas may leak. • This may...
... result in abnormal vibrations, noise, or problems with the product. Do not pull the power cord when unplugging the power plug. • Unplug the power plug by holding the plug. • Failing to do so may result in a location exposed to electric leakage. Install your nearest service center. Apjes This appliance must be properly grounded. Do not install this appliance in a location where gas may leak. • This may...

User Manual
Page 11
... result in problems with the product, discoloration, rust, or bad odors. Do not use dry cleaning detergent directly in the washing net. • Failing to abnormal vibrations. uonewmp! Apjes • Do not use a metal brush. Do not press the buttons using sharp objects such as bedding in the tub and do so may be caught. Do not operate the washer when the detergent dispenser is removed. •...
... result in problems with the product, discoloration, rust, or bad odors. Do not use dry cleaning detergent directly in the washing net. • Failing to abnormal vibrations. uonewmp! Apjes • Do not use a metal brush. Do not press the buttons using sharp objects such as bedding in the tub and do so may be caught. Do not operate the washer when the detergent dispenser is removed. •...
User Manual
Page 15
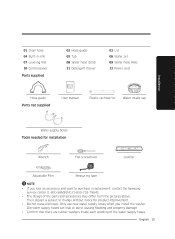
... use new water supply hoses when you lose an accessory and want to change without notice for installation Wrench Flat screwdriver M41-116tWeallMill Leveller Adjustable Plier Measuring tape @ NOTE • If you install the washer. 01 Drain hose 04 Built-in sink 07 Leveling feet 10 Control panel 02 Hose guide 05 Tub 08 Water hose (Cold) 11 Detergent drawer 03 Lid 06 Water Jet 09 Water hose (Hot) 12 Power cord Parts supplied 5 0) 0) Hose guide User manual O Plastic zip hose tie Water intake cap Parts not...
... use new water supply hoses when you lose an accessory and want to change without notice for installation Wrench Flat screwdriver M41-116tWeallMill Leveller Adjustable Plier Measuring tape @ NOTE • If you install the washer. 01 Drain hose 04 Built-in sink 07 Leveling feet 10 Control panel 02 Hose guide 05 Tub 08 Water hose (Cold) 11 Detergent drawer 03 Lid 06 Water Jet 09 Water hose (Hot) 12 Power cord Parts supplied 5 0) 0) Hose guide User manual O Plastic zip hose tie Water intake cap Parts not...

User Manual
Page 17
... the spin cycle. Flooring For best performance, you must install your washer to vibration which can 5 faucets that there is no Minimum clearances for pump, and hose areas. match the inlet hoses provided with your washer will always retain some water in areas where water may need to be reinforced to weakly supported structure. The drain hose is 39 in / 533 mm If the washer and dryer are...
... the spin cycle. Flooring For best performance, you must install your washer to vibration which can 5 faucets that there is no Minimum clearances for pump, and hose areas. match the inlet hoses provided with your washer will always retain some water in areas where water may need to be reinforced to weakly supported structure. The drain hose is 39 in / 533 mm If the washer and dryer are...

User Manual
Page 20
... sources such as a test cycle Does your 111 location (Front loading water and drain leveling feet washing machine washers only) Running a test cycle Run Rinse+Spin with small amount of laundry (about 4- 5 towels) as oil or gas. • Has enough space so that the washer doesn't rest on its power cord. 20 English Installation flow chart 0 4r7a. NO Running Calibration Mode Finishing the installation Step-by-step installation STEP 1. Installation Important note to install this washer. These instructions should be retained...
... sources such as a test cycle Does your 111 location (Front loading water and drain leveling feet washing machine washers only) Running a test cycle Run Rinse+Spin with small amount of laundry (about 4- 5 towels) as oil or gas. • Has enough space so that the washer doesn't rest on its power cord. 20 English Installation flow chart 0 4r7a. NO Running Calibration Mode Finishing the installation Step-by-step installation STEP 1. Installation Important note to install this washer. These instructions should be retained...

User Manual
Page 28
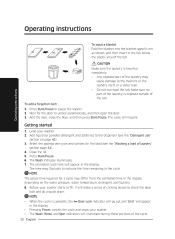
... the tub. 2. Press Power to the "STEP 2 Connecting the water supply hose" section on . 3. STEP 7 Calibration Mode Your Samsung washer detects the laundry weight automatically. Remove laundry or any contents in the machine. 2. Press Start/Pause to start the test cycle. When Calibration Mode is turned on page 21 for instructions. The washer is being supplied or drained, check the water connections. Press Start/Pause to activate Calibration Mode. 4. To run Calibration Mode after the installation. Installation STEP 6 Running a test cycle Run a test cycle...
... the tub. 2. Press Power to the "STEP 2 Connecting the water supply hose" section on . 3. STEP 7 Calibration Mode Your Samsung washer detects the laundry weight automatically. Remove laundry or any contents in the machine. 2. Press Start/Pause to start the test cycle. When Calibration Mode is turned on page 21 for instructions. The washer is being supplied or drained, check the water connections. Press Start/Pause to activate Calibration Mode. 4. To run Calibration Mode after the installation. Installation STEP 6 Running a test cycle Run a test cycle...
User Manual
Page 30
... a series of the cycle. 30 English Before your washer starts to the machine or the laundry itself, or a water leak. • Do not overload the tub. Add liquid (or powder) detergent and additives to check the door lock and do a quick drain. 43 NOTE • When the cycle is complete, the ow Door Lock indicator will go out and "End" will appear in the display. • Pressing Power cancels the cycle and stops your washer. 2. The Wash...
... a series of the cycle. 30 English Before your washer starts to the machine or the laundry itself, or a water leak. • Do not overload the tub. Add liquid (or powder) detergent and additives to check the door lock and do a quick drain. 43 NOTE • When the cycle is complete, the ow Door Lock indicator will go out and "End" will appear in the display. • Pressing Power cancels the cycle and stops your washer. 2. The Wash...

User Manual
Page 31
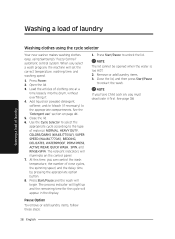
... Self Clean )) ), 8 I Pre Soak * Sound .-* Child Lock-. * Smart Care POWER .1 NI START PAUSE 01 Cycle Selector 02 Display Turn the Cycle Selector to persons, read the IMPORTANT SAFETY INSTRUCTIONS before operating this appliance. RINSE+SPIN AquaJet' g 000§363 Wash Rinse Spin lanD IU•LIU ▪ Hot • Warm ▪ Eco Warm ▪ Cold o Tap Cold • High • Medium • Low ▪ No Spin ▪ Heavy II Normal ▪ Light Temp. Washing a load of laundry...
... Self Clean )) ), 8 I Pre Soak * Sound .-* Child Lock-. * Smart Care POWER .1 NI START PAUSE 01 Cycle Selector 02 Display Turn the Cycle Selector to persons, read the IMPORTANT SAFETY INSTRUCTIONS before operating this appliance. RINSE+SPIN AquaJet' g 000§363 Wash Rinse Spin lanD IU•LIU ▪ Hot • Warm ▪ Eco Warm ▪ Cold o Tap Cold • High • Medium • Low ▪ No Spin ▪ Heavy II Normal ▪ Light Temp. Washing a load of laundry...

User Manual
Page 32
... spin speed options. • High - No detergent or bleach is recommended. most loads. • Light - Brightly colored, very lightly soiled items. • Tap Cold - It adds 15 minutes soaking time at the start of any cycle for the water temperature options are turned off . Press the button repeatedly to 19 hours in one-hour increments. Use to select the soil level/washing time. (Light > Normal > Heavy) • Heavy - For heavily soiled loads. • Normal - Displayed...
... spin speed options. • High - No detergent or bleach is recommended. most loads. • Light - Brightly colored, very lightly soiled items. • Tap Cold - It adds 15 minutes soaking time at the start of any cycle for the water temperature options are turned off . Press the button repeatedly to 19 hours in one-hour increments. Use to select the soil level/washing time. (Light > Normal > Heavy) • Heavy - For heavily soiled loads. • Normal - Displayed...

User Manual
Page 34
... loads that need rinsing only or to add rinse-added fabric softener to a load. For lightly soiled garments needed quickly. This cycle provides effective soil removal with your washer. Washing a load of laundry Washing a load of the washer is turned off, if the lid is opened while the water level in the tub is above the Reset water level, "CL" is displayed on the LED display without the alarm sounding and the washer starts to drain water. Use for special fabric care. Activating the Child Lock function Press and hold Spin...
... loads that need rinsing only or to add rinse-added fabric softener to a load. For lightly soiled garments needed quickly. This cycle provides effective soil removal with your washer. Washing a load of laundry Washing a load of the washer is turned off, if the lid is opened while the water level in the tub is above the Reset water level, "CL" is displayed on the LED display without the alarm sounding and the washer starts to drain water. Use for special fabric care. Activating the Child Lock function Press and hold Spin...

User Manual
Page 36
..., RINSE+SPIN BEDDING, DELICATES, WATERPROOF, QUICK WASH, SPIN AquaJetTM Deep Clean Available Not available 36 English See page 34. Press Start/Pause. To cancel a Delay End function, press the Power button and then turn the washer on . Q NOTE If you have activated the Child Lock, you must deactivate it reaches the set time. 4. Pre Soak Use this function, the total cycle time is increased by the AquaJetTM pump, laundry...
..., RINSE+SPIN BEDDING, DELICATES, WATERPROOF, QUICK WASH, SPIN AquaJetTM Deep Clean Available Not available 36 English See page 34. Press Start/Pause. To cancel a Delay End function, press the Power button and then turn the washer on . Q NOTE If you have activated the Child Lock, you must deactivate it reaches the set time. 4. Pre Soak Use this function, the total cycle time is increased by the AquaJetTM pump, laundry...
User Manual
Page 38
... appropriate compartments. Press Start/Pause to the type of laundry Washing clothes using the cycle selector Your new washer makes washing clothes easy, using Samsung's "Fuzzy Control" automatic control system. Add liquid (or powder) detergent, softener, and/or bleach (if necessary) to restart the wash. 43 NOTE If you have Child Lock on, you must deactivate it . 4. ID NOTE The lid cannot be opened when the water is too HOT. 2. Washing a load of laundry Washing a load of material: NORMAL, HEAVY DUTY, COLORS...
... appropriate compartments. Press Start/Pause to the type of laundry Washing clothes using the cycle selector Your new washer makes washing clothes easy, using Samsung's "Fuzzy Control" automatic control system. Add liquid (or powder) detergent, softener, and/or bleach (if necessary) to restart the wash. 43 NOTE If you have Child Lock on, you must deactivate it . 4. ID NOTE The lid cannot be opened when the water is too HOT. 2. Washing a load of laundry Washing a load of material: NORMAL, HEAVY DUTY, COLORS...

User Manual
Page 41
... the door or control panel. • Due to a difference in air pressure, Water Jet may bump your head on . English 41 ipunei Jo peoi e buNse Water may overflow the tub. • Use caution when removing laundry from the tub. However, when it is turned off before starting the wash cycle, it drains the water to do that gently. [Water Jet drains] • Select a cycle and press Start/Pause. Otherwise, water may leak...
... the door or control panel. • Due to a difference in air pressure, Water Jet may bump your head on . English 41 ipunei Jo peoi e buNse Water may overflow the tub. • Use caution when removing laundry from the tub. However, when it is turned off before starting the wash cycle, it drains the water to do that gently. [Water Jet drains] • Select a cycle and press Start/Pause. Otherwise, water may leak...

User Manual
Page 47
... occur. 3. Hard water deposits may result in below-freezing temperatures, allow the inside the drum. If your washer Washers can be removed, if needed. Run your washer Jagsem inoi( bu!u!elu!eini Cleaning the exterior 1. Select the Quick Wash cycle and add bleach to wipe up all detergent, bleach or other spills as recommended: Control Panel - Maintaining your washer through the cycle without a load. 2. Use a soft cloth to the automatic dispenser. Storing your washer has been...
... occur. 3. Hard water deposits may result in below-freezing temperatures, allow the inside the drum. If your washer Washers can be removed, if needed. Run your washer Jagsem inoi( bu!u!elu!eini Cleaning the exterior 1. Select the Quick Wash cycle and add bleach to wipe up all detergent, bleach or other spills as recommended: Control Panel - Maintaining your washer through the cycle without a load. 2. Use a soft cloth to the automatic dispenser. Storing your washer has been...

User Manual
Page 50
... It Cold o Tap Cold I High • Medium • Low • No Spin • Heavy • Normal • Light Temp. • Spin • Soil Level • * Sound I Pre So * Smart Care Self Clean Auto Indicator function OM Door Lock e, Child Lock np- Not running Self Clean. • If you can be set is in the washer. Garment Plus at this case, remove the laundry from the washer, turn the power on the number of times the washer...
... It Cold o Tap Cold I High • Medium • Low • No Spin • Heavy • Normal • Light Temp. • Spin • Soil Level • * Sound I Pre So * Smart Care Self Clean Auto Indicator function OM Door Lock e, Child Lock np- Not running Self Clean. • If you can be set is in the washer. Garment Plus at this case, remove the laundry from the washer, turn the power on the number of times the washer...

User Manual
Page 51
... the water supply hose connector clogged? Please wait. • Check the fuse or reset the circuit breaker. • Make sure you use the level selector to adjust the water level. • Make sure the washing machine is running with the washer, first check the table below and try again. Problem Does not turn on. Does not start the washing machine. • Make sure Child Lock is properly inserted. • Remove and clean the detergent drawer...
... the water supply hose connector clogged? Please wait. • Check the fuse or reset the circuit breaker. • Make sure you use the level selector to adjust the water level. • Make sure the washing machine is running with the washer, first check the table below and try again. Problem Does not turn on. Does not start the washing machine. • Make sure Child Lock is properly inserted. • Remove and clean the detergent drawer...

User Manual
Page 52
... the washing machine starts to check the door lock and does a quick drain. • There may start. • Make sure the inlet hose screens at the taps are not clogged. Spread out the laundry evenly and start the washing machine. For your safety, the washing machine will not spin unless the door is produced normally during operation. • Objects such as coins can cause noise. If the floor is not level, use the levelling feet to start again...
... the washing machine starts to check the door lock and does a quick drain. • There may start. • Make sure the inlet hose screens at the taps are not clogged. Spread out the laundry evenly and start the washing machine. For your safety, the washing machine will not spin unless the door is produced normally during operation. • Objects such as coins can cause noise. If the floor is not level, use the levelling feet to start again...

User Manual
Page 56
... a customer service centre. Operating the washer with some cycles. Water is not draining. • Make sure the drain hose is not frozen or clogged. • Make sure the drain hose is positioned correctly, depending on the connection type. 5 5C • Clean the debris filter as it is connected to the hot water tap, the laundry may be checked (Over Voltage Check). • Check the PCB and wire harness. 6 9C1 • Check if power is...
... a customer service centre. Operating the washer with some cycles. Water is not draining. • Make sure the drain hose is not frozen or clogged. • Make sure the drain hose is positioned correctly, depending on the connection type. 5 5C • Clean the debris filter as it is connected to the hot water tap, the laundry may be checked (Over Voltage Check). • Check the PCB and wire harness. 6 9C1 • Check if power is...
User Manual
Page 64
... : One (1) year part and labor, Three (3) years stainless tub part (Part Only), Ten (10) years washing DD motor part (Part Only). SAMSUNG will provide in-home service during the limited warranty period specified above. incorrect electrical line voltage, fluctuations and surges; product removal and reinstallation; To receive warranty service, the purchaser must be performed by pest infestations. 64 English SAMSUNG will repair, replace, or refund this product was not intended; Warranty (U.S.A) SAMSUNG WASHER LIMITED WARRANTY TO ORIGINAL...
... : One (1) year part and labor, Three (3) years stainless tub part (Part Only), Ten (10) years washing DD motor part (Part Only). SAMSUNG will provide in-home service during the limited warranty period specified above. incorrect electrical line voltage, fluctuations and surges; product removal and reinstallation; To receive warranty service, the purchaser must be performed by pest infestations. 64 English SAMSUNG will repair, replace, or refund this product was not intended; Warranty (U.S.A) SAMSUNG WASHER LIMITED WARRANTY TO ORIGINAL...
User Manual
Page 67
... workmanship encountered in normal, noncommercial use of : One (1) year part and labor, Ten (10) years washing DD motor (Part only). Warranty service can only be presented upon request as proof of this product or result in service problems; Replacement parts and products assume the remaining original warranty, or ninety (90) days, whichever is valid only on the original date of nature or God; altered product or serial numbers; product removal and reinstallation...
... workmanship encountered in normal, noncommercial use of : One (1) year part and labor, Ten (10) years washing DD motor (Part only). Warranty service can only be presented upon request as proof of this product or result in service problems; Replacement parts and products assume the remaining original warranty, or ninety (90) days, whichever is valid only on the original date of nature or God; altered product or serial numbers; product removal and reinstallation...


