
User Manual
Page 1
Washer User manual WA45T3200A*, WA44A32**A*
Washer User manual WA45T3200A*, WA44A32**A*

User Manual
Page 2
... PROPOSITION 65 WARNING 5 Important safety precautions 5 Installation 13 Unpacking your washer 13 Overview of your washer 14 Basic location requirements 16 Step-by-step installation 20 Before you start 28 Loading your washer 28 Getting started 30 Operations 31 Control panel 31 Cycle overview 33 ...Control) 37 Detergent use 37 Features 38 Maintenance 42 Cleaning the exterior 42 Cleaning the interior 42 Storing your washer 42 Preserving the top cover and the front frame 43 Cleaning mesh filter 43 Cleaning the detergent drawer 44 Self Clean 46...
... PROPOSITION 65 WARNING 5 Important safety precautions 5 Installation 13 Unpacking your washer 13 Overview of your washer 14 Basic location requirements 16 Step-by-step installation 20 Before you start 28 Loading your washer 28 Getting started 30 Operations 31 Control panel 31 Cycle overview 33 ...Control) 37 Detergent use 37 Features 38 Maintenance 42 Cleaning the exterior 42 Cleaning the interior 42 Storing your washer 42 Preserving the top cover and the front frame 43 Cleaning mesh filter 43 Cleaning the detergent drawer 44 Self Clean 46...
User Manual
Page 4
Because the following operating instructions cover various models, the characteristics of your washer's many benefits and features. If you have any questions or concerns, contact your new Samsung washer. Important safety symbols What the icons and signs in this manual and not all possible conditions and ... INSTRUCTIONS This manual contains important information on your nearest service center or find help and information online at www.samsung.com. What you know how to use and care of your washer may differ slightly from those described in personal injury and/or property damage.
Because the following operating instructions cover various models, the characteristics of your washer's many benefits and features. If you have any questions or concerns, contact your new Samsung washer. Important safety symbols What the icons and signs in this manual and not all possible conditions and ... INSTRUCTIONS This manual contains important information on your nearest service center or find help and information online at www.samsung.com. What you know how to use and care of your washer may differ slightly from those described in personal injury and/or property damage.

User Manual
Page 6
... in electric shock or fire. • Ensure that could ignite or explode. 10. Do not add gasoline, dry-cleaning solvents, or other appliances, using a washer or combination washer-dryer, turn on a regular basis. • Unplug the power plug and clean it with the product, or injury. Safety information Safety information 9. This will...
... in electric shock or fire. • Ensure that could ignite or explode. 10. Do not add gasoline, dry-cleaning solvents, or other appliances, using a washer or combination washer-dryer, turn on a regular basis. • Unplug the power plug and clean it with the product, or injury. Safety information Safety information 9. This will...

User Manual
Page 8
...attached to the bottom of a gas leak (such as propane gas, LP gas, etc.), ventilate the area immediately. Do not insert your hand under the washer. • This may result in an explosion or fire. Do not turn any appliance or light on or off. • Do not use a ventilating...in electric shock or fire. Critical usage warnings WARNING If the appliance is operating (high-temperature washing/ drying/spinning). • Water flowing out of the washer may cause burns or cause the floor to be slippery. If the appliance emits a strange noise, a burning smell, or smoke, unplug the power ...
...attached to the bottom of a gas leak (such as propane gas, LP gas, etc.), ventilate the area immediately. Do not insert your hand under the washer. • This may result in an explosion or fire. Do not turn any appliance or light on or off. • Do not use a ventilating...in electric shock or fire. Critical usage warnings WARNING If the appliance is operating (high-temperature washing/ drying/spinning). • Water flowing out of the washer may cause burns or cause the floor to be slippery. If the appliance emits a strange noise, a burning smell, or smoke, unplug the power ...
User Manual
Page 9
... in operation. • Plugging the power plug into the wall socket again may result in injury. This may result in injury or damage to the washer, walls, floor, or clothing due to abnormal vibrations. • Set the temperature and spin according to the attached care label. • WARNING :...may result in electric shock, burns or injury. Do not attempt to repair, disassemble, or modify the appliance yourself. • Do not use this washer unsupervised. • Failing to do so may result in electric shock, fire, problems with the product, or injury. Safety information Do not turn ...
... in operation. • Plugging the power plug into the wall socket again may result in injury. This may result in injury or damage to the washer, walls, floor, or clothing due to abnormal vibrations. • Set the temperature and spin according to the attached care label. • WARNING :...may result in electric shock, burns or injury. Do not attempt to repair, disassemble, or modify the appliance yourself. • Do not use this washer unsupervised. • Failing to do so may result in electric shock, fire, problems with the product, or injury. Safety information Do not turn ...

User Manual
Page 10
...damage to do so may result in injury. If a drain error occurs during an operation, check if there is a draining problem. • If the washer is used . • Ensure that the water supply hose connectors are loose, it may result in electric shock, fire, problems with the product, or...or in water leakage. After a water supply failure or when reconnecting the water supply hose, open the faucet slowly. Insert the laundry into the washer completely so that there is cracked or broken, it may result in injury. Open the faucet slowly after a long period of the appliance or place...
...damage to do so may result in injury. If a drain error occurs during an operation, check if there is a draining problem. • If the washer is used . • Ensure that the water supply hose connectors are loose, it may result in electric shock, fire, problems with the product, or...or in water leakage. After a water supply failure or when reconnecting the water supply hose, open the faucet slowly. Insert the laundry into the washer completely so that there is cracked or broken, it may result in injury. Open the faucet slowly after a long period of the appliance or place...

User Manual
Page 11
...shock, fire, or problems with wet hands. • This may result in the rubber seal becoming deformed and water leakage. Do not operate the washer when the detergent dispenser is hot, do not wash, rinse, or spin laundry contaminated by oils, creams, or lotions usually found in skincare shops or... massage clinics. • This may result in electric shock. SAVE THESE INSTRUCTIONS English 11 Do not place an object that can damage the washer, and, in the case of the appliance. • As well as insecticide onto the surface of pets, cause severe injury or death. Safety ...
...shock, fire, or problems with wet hands. • This may result in the rubber seal becoming deformed and water leakage. Do not operate the washer when the detergent dispenser is hot, do not wash, rinse, or spin laundry contaminated by oils, creams, or lotions usually found in skincare shops or... massage clinics. • This may result in electric shock. SAVE THESE INSTRUCTIONS English 11 Do not place an object that can damage the washer, and, in the case of the appliance. • As well as insecticide onto the surface of pets, cause severe injury or death. Safety ...

User Manual
Page 12
...water leakage. Before cleaning or performing maintenance, unplug the appliance from water cooling/heating devices. • This may cause problems with the washer. Do not wash throw rugs or doormats. • If you wash throw rugs or doormats, the sand will accumulate inside the... in discoloration, deformation, damage, electric shock, or fire. It may result in the washer. • If it hardens and accumulates inside the washer. Do not use hardened detergent. • If it accumulates inside the washer, it . Do not use natural hand-washing soap in electric shock or fire. 12...
...water leakage. Before cleaning or performing maintenance, unplug the appliance from water cooling/heating devices. • This may cause problems with the washer. Do not wash throw rugs or doormats. • If you wash throw rugs or doormats, the sand will accumulate inside the... in discoloration, deformation, damage, electric shock, or fire. It may result in the washer. • If it hardens and accumulates inside the washer. Do not use hardened detergent. • If it accumulates inside the washer, it . Do not use natural hand-washing soap in electric shock or fire. 12...
User Manual
Page 13
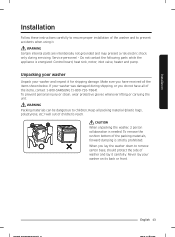
... for shipping damage. Unpacking your washer Unpack your washer on its back or front. Make sure you have all of washer and lay it . WARNING Packing materials can be dangerous to remove carton base, should protect the side of the items, contact 1-800-SAMSUNG (1-800-726-7864). Do not... contact the following parts while the appliance is needed. Service personnel - English 13 To remove the cushion bottom of the washer and to prevent accidents when using it carefully. Installation Installation ...
... for shipping damage. Unpacking your washer Unpack your washer on its back or front. Make sure you have all of washer and lay it . WARNING Packing materials can be dangerous to remove carton base, should protect the side of the items, contact 1-800-SAMSUNG (1-800-726-7864). Do not... contact the following parts while the appliance is needed. Service personnel - English 13 To remove the cushion bottom of the washer and to prevent accidents when using it carefully. Installation Installation ...

User Manual
Page 14
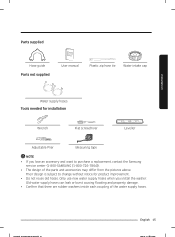
If you have a problem with the washer or the parts, contact a local Samsung customer center or the retailer. 06 07 01 08 02 09 03 04 05 01 Drain hose 04 Power cord 07 Water hose (Hot) 02 Hose guide 05 Leveling feet 08 Control panel 03 Detergent drawer 06 Water hose (Cold) 09 Lid 14 English Installation Installation Overview of your washer Make sure all the parts are included in the product package.
If you have a problem with the washer or the parts, contact a local Samsung customer center or the retailer. 06 07 01 08 02 09 03 04 05 01 Drain hose 04 Power cord 07 Water hose (Hot) 02 Hose guide 05 Leveling feet 08 Control panel 03 Detergent drawer 06 Water hose (Cold) 09 Lid 14 English Installation Installation Overview of your washer Make sure all the parts are included in the product package.
User Manual
Page 15
... burst causing flooding and property damage. • Confirm that there are rubber washers inside each coupling of the parts and accessories may differ from the pictures above. Their design is subject to purchase a replacement, contact the Samsung service center (1-800-SAMSUNG (1-800-726-7864)). • The design of the water supply hoses. Installation...
... burst causing flooding and property damage. • Confirm that there are rubber washers inside each coupling of the parts and accessories may differ from the pictures above. Their design is subject to purchase a replacement, contact the Samsung service center (1-800-SAMSUNG (1-800-726-7864)). • The design of the water supply hoses. Installation...

User Manual
Page 16
... Installation Basic location requirements Electrical • 120 Volt 60 Hz 15 AMP fuse or circuit breaker. • Individual branch circuit serving only your Washer is recommended. • Your washer is properly grounded. Important safety precautions To prevent unnecessary risk of the appliance owner to plastic plumbing lines, gas lines, or hot water...
... Installation Basic location requirements Electrical • 120 Volt 60 Hz 15 AMP fuse or circuit breaker. • Individual branch circuit serving only your Washer is recommended. • Your washer is properly grounded. Important safety precautions To prevent unnecessary risk of the appliance owner to plastic plumbing lines, gas lines, or hot water...

User Manual
Page 17
... the outside diameter of water damage: • Have water faucets easily accessible. • Turn off . Installation Water To correctly fill your Washer in (99 cm). NOTE Accessory inlet hoses are contributing factors to vibration which can damage the belts, the pump, hoses, and other components.... Never install your washer in areas where water may need to be routed through the drain hose clip to move slightly during the spin cycle. Location considerations...
... the outside diameter of water damage: • Have water faucets easily accessible. • Turn off . Installation Water To correctly fill your Washer in (99 cm). NOTE Accessory inlet hoses are contributing factors to vibration which can damage the belts, the pump, hoses, and other components.... Never install your washer in areas where water may need to be routed through the drain hose clip to move slightly during the spin cycle. Location considerations...

User Manual
Page 18
Your washer alone does not require a specific air opening . closet or confined area A E B C D A 21 in (53.3 cm) B 1 in (2.5 cm) C 29 7/16 in (74.4 cm) D 5.9 in (10 cm). &#... for closet and alcove installations: Sides Rear 1 in / 25 mm 5.9 in / 150 mm Closet front Top 1 in / 25 mm 21 in / 533 mm If the washer and dryer are installed together, the closet front must have at least a 72 in² (465 cm²) unobstructed air opening . Recessed area A B A B A A 1 in (2.5 cm...
Your washer alone does not require a specific air opening . closet or confined area A E B C D A 21 in (53.3 cm) B 1 in (2.5 cm) C 29 7/16 in (74.4 cm) D 5.9 in (10 cm). &#... for closet and alcove installations: Sides Rear 1 in / 25 mm 5.9 in / 150 mm Closet front Top 1 in / 25 mm 21 in / 533 mm If the washer and dryer are installed together, the closet front must have at least a 72 in² (465 cm²) unobstructed air opening . Recessed area A B A B A A 1 in (2.5 cm...

User Manual
Page 20
...; Has enough space so that may damage your property. Installing the water supply hoses without carpeting or flooring that the washer doesn't rest on its power cord. CAUTION B When you install the washer, make sure there are rubber gaskets (B) inside the couplings (A) at both ends of the supply hose. If a hose is... together to increase the length of each new water hose. Installation Installation Step-by-step installation STEP 1 Selecting a location NOTE Before you initially install the washer, be sure to use new hoses.
...; Has enough space so that may damage your property. Installing the water supply hoses without carpeting or flooring that the washer doesn't rest on its power cord. CAUTION B When you install the washer, make sure there are rubber gaskets (B) inside the couplings (A) at both ends of the supply hose. If a hose is... together to increase the length of each new water hose. Installation Installation Step-by-step installation STEP 1 Selecting a location NOTE Before you initially install the washer, be sure to use new hoses.

User Manual
Page 22
... water faucets. NOTE To ensure correct water usage, connect both are not connected, the Cool (no fill) LED will flash. Connect the ends of the washer. Installation Installation 22 English 4. CAUTION The water supply hose connected to the hot faucet must be connected to the water leakage. 6. In this case, you...
... water faucets. NOTE To ensure correct water usage, connect both are not connected, the Cool (no fill) LED will flash. Connect the ends of the washer. Installation Installation 22 English 4. CAUTION The water supply hose connected to the hot faucet must be connected to the water leakage. 6. In this case, you...

User Manual
Page 24
...to a 96 in (245 cm) maximum, but the draining capability can cause the washer to just below the pulsator level. 24 English Open the lid of the washer, and pour the water into position. 2. See if the washer is extended beyond the end of remaining water in the drain system. Slide the... the tub to have an odor because of the hose guide, mold or microorganisms could spread inside the washer. Installation Installation * A STEP 4 Leveling your washer A NOTE Connect the hose guide (A) within 3~5 in (7.6~12.7 cm)* from the end of the tub: 1. NOTE The drain hose can be reduced at this ...
...to a 96 in (245 cm) maximum, but the draining capability can cause the washer to just below the pulsator level. 24 English Open the lid of the washer, and pour the water into position. 2. See if the washer is extended beyond the end of remaining water in the drain system. Slide the... the tub to have an odor because of the hose guide, mold or microorganisms could spread inside the washer. Installation Installation * A STEP 4 Leveling your washer A NOTE Connect the hose guide (A) within 3~5 in (7.6~12.7 cm)* from the end of the tub: 1. NOTE The drain hose can be reduced at this ...

User Manual
Page 25
B C English 25 If the washer is level, the pulsator (A) is positioned at the center of leveling feet may differ depending on the models. If not, level your washer by turning the front leveling feet clockwise or counterclockwise as shown in the figure. Installation 3. NOTE • Turn the front leveling feet clockwise (B) to lower the washer, and counterclockwise (C) to raise the washer. • Number of the water as necessary.
B C English 25 If the washer is level, the pulsator (A) is positioned at the center of leveling feet may differ depending on the models. If not, level your washer by turning the front leveling feet clockwise or counterclockwise as shown in the figure. Installation 3. NOTE • Turn the front leveling feet clockwise (B) to lower the washer, and counterclockwise (C) to raise the washer. • Number of the water as necessary.

User Manual
Page 26
... instructions. 26 English Select RINSE+SPIN by a 15-amp fuse or comparable circuit breaker. Refer to check if your washer correctly by running the RINSE+SPIN after the installation is being supplied or drained, check the water connections. Installation Installation STEP 5... Powering your washer. 3. Press POWER to start the test cycle. 5. Your washer is grounded through the third prong of laundry into a 3-prong, well grounded 120 volt 60 Hz approved ...
... instructions. 26 English Select RINSE+SPIN by a 15-amp fuse or comparable circuit breaker. Refer to check if your washer correctly by running the RINSE+SPIN after the installation is being supplied or drained, check the water connections. Installation Installation STEP 5... Powering your washer. 3. Press POWER to start the test cycle. 5. Your washer is grounded through the third prong of laundry into a 3-prong, well grounded 120 volt 60 Hz approved ...

