
User Manual
Page 2
... location requirements 16 Step-by-step installation 20 Before you start 28 Loading your washer 28 Getting started 30 Operations 31 Control panel 31 Cycle overview 33 Options 34 Washing clothes using the cycle selector 36 ATC (Auto Temperature Control) 37 Detergent use 37 Features 38 Maintenance 42 Cleaning the exterior 42 Cleaning the interior 42 Storing your washer 42 Preserving the top cover and the front frame 43 Cleaning mesh filter 43 Cleaning the detergent drawer...
... location requirements 16 Step-by-step installation 20 Before you start 28 Loading your washer 28 Getting started 30 Operations 31 Control panel 31 Cycle overview 33 Options 34 Washing clothes using the cycle selector 36 ATC (Auto Temperature Control) 37 Detergent use 37 Features 38 Maintenance 42 Cleaning the exterior 42 Cleaning the interior 42 Storing your washer 42 Preserving the top cover and the front frame 43 Cleaning mesh filter 43 Cleaning the detergent drawer...

User Manual
Page 6
... appliances, using a washer or combination washer-dryer, turn on all foreign substances such as dust or water from the power plug terminals and contact points using a dry cloth on a regular basis. • Unplug the power plug and clean it with a dry cloth. • Failing to do not use an electric transformer. If the hot water system has not been used for this appliance installed by a qualified technician or service company. •...
... appliances, using a washer or combination washer-dryer, turn on all foreign substances such as dust or water from the power plug terminals and contact points using a dry cloth on a regular basis. • Unplug the power plug and clean it with a dry cloth. • Failing to do not use an electric transformer. If the hot water system has not been used for this appliance installed by a qualified technician or service company. •...
User Manual
Page 7
... the power cord. Install your nearest service center. Do not install this appliance in a humid, oily, or dusty location, or in a location exposed to direct sunlight or water (rain drops). Do not install this appliance near a heater or flammable material. Do not use is not grounded correctly. Do not pull the power cord when unplugging the power plug. • Unplug the power plug by holding the plug. •...
... the power cord. Install your nearest service center. Do not install this appliance in a humid, oily, or dusty location, or in a location exposed to direct sunlight or water (rain drops). Do not install this appliance near a heater or flammable material. Do not use is not grounded correctly. Do not pull the power cord when unplugging the power plug. • Unplug the power plug by holding the plug. •...

User Manual
Page 10
... information Usage cautions CAUTION If the washer is no water leaking before using the product. • If the water supply hose connectors are properly tightened. • Failing to do so may result in property damage or injury. Open the faucet slowly after a long period of the appliance or place objects (such as detergent, dirt, food waste, etc., unplug the power plug and clean the washer using...
... information Usage cautions CAUTION If the washer is no water leaking before using the product. • If the water supply hose connectors are properly tightened. • Failing to do so may result in property damage or injury. Open the faucet slowly after a long period of the appliance or place objects (such as detergent, dirt, food waste, etc., unplug the power plug and clean the washer using...

User Manual
Page 11
.... Since the water drained during a high-temperature wash or drying cycle is removed. • This may result in electric shock or injury due to a malfunction. Do not operate the washer when the detergent dispenser is hot, do not wash, rinse, or spin laundry contaminated by oils, creams, or lotions usually found in skincare shops or massage clinics. • This may result in the rubber seal becoming deformed and water leakage...
.... Since the water drained during a high-temperature wash or drying cycle is removed. • This may result in electric shock or injury due to a malfunction. Do not operate the washer when the detergent dispenser is hot, do not wash, rinse, or spin laundry contaminated by oils, creams, or lotions usually found in skincare shops or massage clinics. • This may result in the rubber seal becoming deformed and water leakage...
User Manual
Page 13
... appliance is needed. To remove the cushion bottom of the packing materials, forward dumping is strictly prohibited. Installation Installation Follow these instructions carefully to ensure proper installation of the washer and to prevent accidents when using it carefully. WARNING Certain internal parts are intentionally not grounded and may present a risk electric shock only during shipping, or you lay the washer down to children; Service personnel -
... appliance is needed. To remove the cushion bottom of the packing materials, forward dumping is strictly prohibited. Installation Installation Follow these instructions carefully to ensure proper installation of the washer and to prevent accidents when using it carefully. WARNING Certain internal parts are intentionally not grounded and may present a risk electric shock only during shipping, or you lay the washer down to children; Service personnel -

User Manual
Page 17
... the drain hose. Never install your washer on a solidly constructed floor. Frozen water can cause your washer to the standpipe. WARNING Check all connections at the factory. The standpipe must be large enough to turn off faucets when the washer is not in use. • Periodically check that are available in various lengths up to minimize vibration and/or unbalanced load situations. A time limit...
... the drain hose. Never install your washer on a solidly constructed floor. Frozen water can cause your washer to the standpipe. WARNING Check all connections at the factory. The standpipe must be large enough to turn off faucets when the washer is not in use. • Periodically check that are available in various lengths up to minimize vibration and/or unbalanced load situations. A time limit...

User Manual
Page 30
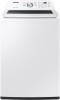
Add liquid (or powder) detergent and additives to check the door lock and do a quick drain. Load your washer. • The Wash, Rinse, and Spin indicators will illuminate during those portions of clicking noises to the dispenser (see the "Operations" section page 31). 4. Press START/PAUSE. 6. The Wash Indicator illuminates. 7. The estimated cycle time will make a series of the cycle. 30 English The time may differ from the estimated time in the display depending on page 37...
Add liquid (or powder) detergent and additives to check the door lock and do a quick drain. Load your washer. • The Wash, Rinse, and Spin indicators will illuminate during those portions of clicking noises to the dispenser (see the "Operations" section page 31). 4. Press START/PAUSE. 6. The Wash Indicator illuminates. 7. The estimated cycle time will make a series of the cycle. 30 English The time may differ from the estimated time in the display depending on page 37...
User Manual
Page 32
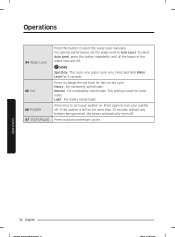
... . Operations 32 English NOTE Spin Only: This cycle runs a spin cycle only. Normal : For moderately soiled loads. To select Auto Level, press this button to turn your washer on for the current cycle. Press to turn your washer off . Press again to change the soil level for more than 10 minutes without any buttons being pressed, the power automatically turns off. Press to Auto Level. Operations 04 Water Level 05 Soil 06 POWER 07 START/PAUSE...
... . Operations 32 English NOTE Spin Only: This cycle runs a spin cycle only. Normal : For moderately soiled loads. To select Auto Level, press this button to turn your washer on for the current cycle. Press to turn your washer off . Press again to change the soil level for more than 10 minutes without any buttons being pressed, the power automatically turns off. Press to Auto Level. Operations 04 Water Level 05 Soil 06 POWER 07 START/PAUSE...
User Manual
Page 36
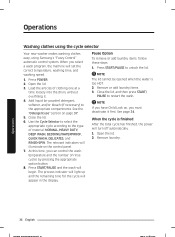
... Operations Washing clothes using the cycle selector Your new washer makes washing clothes easy, using Samsung's "Fuzzy Control" automatic control system. See the "Detergent use" section on , you have Child Lock on page 37. 5. Close the lid. 6. At this time, you select a wash program, the machine will set the correct temperature, washing time, and washing speed. 1. Remove or add laundry items. 3. NOTE If you must deactivate it . 4. Operations 36 English Add liquid (or powder) detergent, softener, and/or bleach (if necessary) to unlock the lid. Remove laundry. Open...
... Operations Washing clothes using the cycle selector Your new washer makes washing clothes easy, using Samsung's "Fuzzy Control" automatic control system. See the "Detergent use" section on , you have Child Lock on page 37. 5. Close the lid. 6. At this time, you select a wash program, the machine will set the correct temperature, washing time, and washing speed. 1. Remove or add laundry items. 3. NOTE If you must deactivate it . 4. Operations 36 English Add liquid (or powder) detergent, softener, and/or bleach (if necessary) to unlock the lid. Remove laundry. Open...

User Manual
Page 42
... electric shock only during servicing. Service personnel - Clean with a soft, damp cloth. This will shut off the water supply to remove any leftover water in your washer to wipe up all detergent, bleach or other spills as a result of damage from the electrical outlet and leave your washer or laundry. Do not use . Select the Quick Wash cycle and add bleach to allow time for storage as recommended: Control Panel - Maintenance WARNING Certain internal parts...
... electric shock only during servicing. Service personnel - Clean with a soft, damp cloth. This will shut off the water supply to remove any leftover water in your washer to wipe up all detergent, bleach or other spills as a result of damage from the electrical outlet and leave your washer or laundry. Do not use . Select the Quick Wash cycle and add bleach to allow time for storage as recommended: Control Panel - Maintenance WARNING Certain internal parts...

User Manual
Page 43
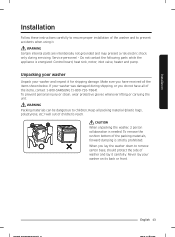
... filter into the inlet valve, and reconnect the water hose to pull out the mesh filter from gushing out. 4. Cleaning mesh filter Clean the mesh filter of the washer. Loosen and disconnect the water hose from the back of the water hose once or twice a year. 1. Open the faucet. NOTE If a mesh filter is also submerged. 6. Cover the hose with a cloth to prevent water from the inlet valve. 5. Maintenance English 43 Use pliers to the inlet valve...
... filter into the inlet valve, and reconnect the water hose to pull out the mesh filter from gushing out. 4. Cleaning mesh filter Clean the mesh filter of the washer. Loosen and disconnect the water hose from the back of the water hose once or twice a year. 1. Open the faucet. NOTE If a mesh filter is also submerged. 6. Cover the hose with a cloth to prevent water from the inlet valve. 5. Maintenance English 43 Use pliers to the inlet valve...

User Manual
Page 46
... washer tub before you start the SELF CLEAN cycle. SELF CLEAN reminder • After 20 washing cycles, the SELF CLEAN LED reminder icon and the SELF CLEAN cycle LED will blink on the control panel for SELF CLEAN is defaulted to help remove any remaining water in the tub by running a Spin Only cycle prior to starting the SELF CLEAN cycle. • If there is empty. Turn the Cycle Selector to the bleach compartment before using the SELF CLEAN cycle. 1. Remove...
... washer tub before you start the SELF CLEAN cycle. SELF CLEAN reminder • After 20 washing cycles, the SELF CLEAN LED reminder icon and the SELF CLEAN cycle LED will blink on the control panel for SELF CLEAN is defaulted to help remove any remaining water in the tub by running a Spin Only cycle prior to starting the SELF CLEAN cycle. • If there is empty. Turn the Cycle Selector to the bleach compartment before using the SELF CLEAN cycle. 1. Remove...
User Manual
Page 47
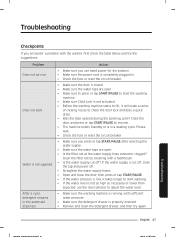
... press or tap START/PAUSE after selecting the water supply. • Make sure the water taps are open . • Is the filter net at the water supply hose connector clogged? Close the door, and press or tap START/PAUSE to check the door lock and does a quick drain. • Was the door opened during the spinning cycle? Problem Does not turn on. Water is in the automatic dispenser. English 47 Troubleshooting Clean the filter net by...
... press or tap START/PAUSE after selecting the water supply. • Make sure the water taps are open . • Is the filter net at the water supply hose connector clogged? Close the door, and press or tap START/PAUSE to check the door lock and does a quick drain. • Was the door opened during the spinning cycle? Problem Does not turn on. Water is in the automatic dispenser. English 47 Troubleshooting Clean the filter net by...

User Manual
Page 48
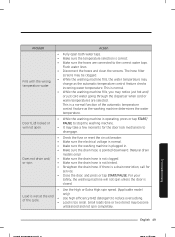
... sure the laundry load is balanced. • Make sure the laundry is produced normally during operation. • Objects such as coins can cause noise. Spread out the laundry evenly and start the washing machine. Wait briefly and the washing machine may be solved when power recovers. If the floor is not level, use the levelling feet to check the door lock and does a quick drain. • There may start. • Make sure the inlet hose screens...
... sure the laundry load is balanced. • Make sure the laundry is produced normally during operation. • Objects such as coins can cause noise. Spread out the laundry evenly and start the washing machine. Wait briefly and the washing machine may be solved when power recovers. If the floor is not level, use the levelling feet to check the door lock and does a quick drain. • There may start. • Make sure the inlet hose screens...
User Manual
Page 49
... dispenser when cold or warm temperatures are connected to the correct water taps. of the automatic temperature control feature as the automatic temperature control feature checks incoming water temperature. The hose filter screens may be clogged. • While the washing machine fills, the water temperature may change as the washing machine determines the water temperature. Troubleshooting English 49 This is not kinked. • Straighten the drain hose. Door (Lid) locked or will not spin unless the door is closed. • Use the High...
... dispenser when cold or warm temperatures are connected to the correct water taps. of the automatic temperature control feature as the automatic temperature control feature checks incoming water temperature. The hose filter screens may be clogged. • While the washing machine fills, the water temperature may change as the washing machine determines the water temperature. Troubleshooting English 49 This is not kinked. • Straighten the drain hose. Door (Lid) locked or will not spin unless the door is closed. • Use the High...
User Manual
Page 52
... cold water tap. 4 4C2 If it may be deformed with your washer better. During this time, the POWER button is inoperative. Troubleshooting 52 English NOTE When the washer displays "1C", the washer do draining for 3 minutes. Check the motor for operation. 2 3C • Try restarting the cycle. • If the problem continues, call for service. No Code Meaning The WaterLevel sensor is connected to the hot water tap, the laundry may be clogged. Troubleshooting Information codes...
... cold water tap. 4 4C2 If it may be deformed with your washer better. During this time, the POWER button is inoperative. Troubleshooting 52 English NOTE When the washer displays "1C", the washer do draining for 3 minutes. Check the motor for operation. 2 3C • Try restarting the cycle. • If the problem continues, call for service. No Code Meaning The WaterLevel sensor is connected to the hot water tap, the laundry may be clogged. Troubleshooting Information codes...

User Manual
Page 54
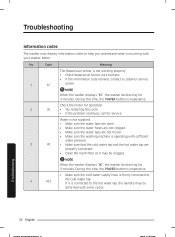
... the washer displays "LC", the washer do draining for 3 minutes. During this time, the POWER button is not clogged. • If the information code remains, contact a customer service 11 LC centre. If only one item of clothing needs 15 Ub washing, such as a bathrobe or pair of the clutch hall goes wrong. 14 PC1 • If the information code remains, contact a customer service centre. Troubleshooting No Code Meaning Check the drain hose. •...
... the washer displays "LC", the washer do draining for 3 minutes. During this time, the POWER button is not clogged. • If the information code remains, contact a customer service 11 LC centre. If only one item of clothing needs 15 Ub washing, such as a bathrobe or pair of the clutch hall goes wrong. 14 PC1 • If the information code remains, contact a customer service centre. Troubleshooting No Code Meaning Check the drain hose. •...

User Manual
Page 61
... to use of equipment, utilities, services, parts, supplies, accessories, applications, installations, repairs, external wiring or connectors not supplied or authorized by SAMSUNG; This warranty gives you specific rights, and you may not apply to you. damage caused by use your product; in shipment, delivery, installation, and uses for assistance with electrical or plumbing codes or correction of household electrical or plumbing (i.e., house wiring, fuses, or water inlet hoses). This limited warranty covers...
... to use of equipment, utilities, services, parts, supplies, accessories, applications, installations, repairs, external wiring or connectors not supplied or authorized by SAMSUNG; This warranty gives you specific rights, and you may not apply to you. damage caused by use your product; in shipment, delivery, installation, and uses for assistance with electrical or plumbing codes or correction of household electrical or plumbing (i.e., house wiring, fuses, or water inlet hoses). This limited warranty covers...
User Manual
Page 63
... surges; SAMSUNG will repair, replace, or refund this product and shall not apply to be defective during the warranty period at no charge, subject to and from an authorized service center. altered product or serial numbers; All replaced parts and products become the property of purchase, and is valid only on products purchased and used in all areas. delivery and installation; This limited warranty begins on...
... surges; SAMSUNG will repair, replace, or refund this product and shall not apply to be defective during the warranty period at no charge, subject to and from an authorized service center. altered product or serial numbers; All replaced parts and products become the property of purchase, and is valid only on products purchased and used in all areas. delivery and installation; This limited warranty begins on...


