User Manual
Page 2
... Product Tilt 16 Anti-theft Lock 16 Precautions for moving the monitor 17 Installing a Wall-mount Kit or Desktop Stand 18 Installation 19 Attaching the Stand 19 Removing the Stand 20 Connecting and Using a Source Device Read below before installing the monitor. 21 Connecting and Using a PC 21...Headphones 22 Connecting the Power 23 Correct posture to use the product 24 Driver Installation 24 Setting Optimum Resolution 24 Screen Setup SAMSUNG MAGIC Bright 25 Brightness 26 Contrast 26 Sharpness 26 Color 26 HDMI Black Level 27 Eye Saver Mode 27 Game Mode 27...
... Product Tilt 16 Anti-theft Lock 16 Precautions for moving the monitor 17 Installing a Wall-mount Kit or Desktop Stand 18 Installation 19 Attaching the Stand 19 Removing the Stand 20 Connecting and Using a Source Device Read below before installing the monitor. 21 Connecting and Using a PC 21...Headphones 22 Connecting the Power 23 Correct posture to use the product 24 Driver Installation 24 Setting Optimum Resolution 24 Screen Setup SAMSUNG MAGIC Bright 25 Brightness 26 Contrast 26 Sharpness 26 Color 26 HDMI Black Level 27 Eye Saver Mode 27 Game Mode 27...
User Manual
Page 18
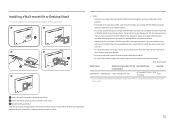
... Kit while your own. ‒‒ To mount the product on . A Attach the wall-mount kit or desktop stand here. Installing a Wall-mount Kit or Desktop Stand ――Power the product off and remove the power cable from the power socket. 1 2 3 4 C 5 •• Notes ‒‒ Using a screw ... be held liable for any damage or injury caused by using improper screws or attaching the wall-mount kit or desktop stand using excessive force. ‒‒ Samsung shall not be installed 10 cm or farther away from the monitor. Do not attach the wall-mount kit or desktop...
... Kit while your own. ‒‒ To mount the product on . A Attach the wall-mount kit or desktop stand here. Installing a Wall-mount Kit or Desktop Stand ――Power the product off and remove the power cable from the power socket. 1 2 3 4 C 5 •• Notes ‒‒ Using a screw ... be held liable for any damage or injury caused by using improper screws or attaching the wall-mount kit or desktop stand using excessive force. ‒‒ Samsung shall not be installed 10 cm or farther away from the monitor. Do not attach the wall-mount kit or desktop...

User Manual
Page 20
Press the lower part of the arrow as shown in the figure. Remove the stand neck from side to make some gap between them. There is unavailable, use a thick sitting mat. To disassemble the stand from the monitor, be sure to press the lower part of the monitor with one hand, .... 20 Caution Do not press down on the monitor. If Styrofoam is a risk of the arrow as shown in the figure. - Removing the Stand ――Before removing the stand from the monitor, place the monitor on a flat and stable surface with the screen facing down. ――The exterior may differ...
Press the lower part of the arrow as shown in the figure. Remove the stand neck from side to make some gap between them. There is unavailable, use a thick sitting mat. To disassemble the stand from the monitor, be sure to press the lower part of the monitor with one hand, .... 20 Caution Do not press down on the monitor. If Styrofoam is a risk of the arrow as shown in the figure. - Removing the Stand ――Before removing the stand from the monitor, place the monitor on a flat and stable surface with the screen facing down. ――The exterior may differ...


