
User Manual (ENGLISH)
Page 2
...and patterns, should primarily be limited as burned-in the wide screen 16:9 ratio format, or expanded to fill the screen if your Samsung limited warranty. No rights are granted under this license for viewing. Be careful in combination with this product unit. Other countries The ... any unlicensed product unit or process conforming to ISO/IEC 11172-3 or ISO/IEC 13818-3 used for product features or functions that offer picture sizing features, use . No rights are primarily designed to view wide screen format full-motion video. Displaying stationary graphics and images on...
...and patterns, should primarily be limited as burned-in the wide screen 16:9 ratio format, or expanded to fill the screen if your Samsung limited warranty. No rights are granted under this license for viewing. Be careful in combination with this product unit. Other countries The ... any unlicensed product unit or process conforming to ISO/IEC 11172-3 or ISO/IEC 13818-3 used for product features or functions that offer picture sizing features, use . No rights are primarily designed to view wide screen format full-motion video. Displaying stationary graphics and images on...
User Manual (ENGLISH)
Page 4
... to assemble the Stand-Base 62 Specifications 62 Dimensions (SP-S4223/HP-S4233 63 Dimensions (HP-S5033 64 Symbol Press Important ➢ Note One-Touch Button English-4 Digital 33 Choosing a Multi-Channel Sound (MTS) track - Contents GENERAL INFORMATION List of the Sub (PIP) Picture 35 CHANNEL CONTROL Selecting the Antenna 36 Adding and...
... to assemble the Stand-Base 62 Specifications 62 Dimensions (SP-S4223/HP-S4233 63 Dimensions (HP-S5033 64 Symbol Press Important ➢ Note One-Touch Button English-4 Digital 33 Choosing a Multi-Channel Sound (MTS) track - Contents GENERAL INFORMATION List of the Sub (PIP) Picture 35 CHANNEL CONTROL Selecting the Antenna 36 Adding and...

User Manual (ENGLISH)
Page 5
...and VCRs. V-Chip function. If any items are included with no Set-Top Box needed. General Information List of Features Adjustable picture settings that can be viewed with your dealer. Accessories Please make sure the following parts are sold separately and are used to ... broadcasts can be used to shield the cables from interference. Automatic timer to operate the TV as well as most electronics stores. Excellent Picture Quality - DNIe technology provides life-like clear images. SRS TruSurround XT - A special sleep timer. SRS TruSurround XT provides a virtual Dolby...
...and VCRs. V-Chip function. If any items are included with no Set-Top Box needed. General Information List of Features Adjustable picture settings that can be viewed with your dealer. Accessories Please make sure the following parts are sold separately and are used to ... broadcasts can be used to shield the cables from interference. Automatic timer to operate the TV as well as most electronics stores. Excellent Picture Quality - DNIe technology provides life-like clear images. SRS TruSurround XT - A special sleep timer. SRS TruSurround XT provides a virtual Dolby...
User Manual (ENGLISH)
Page 8
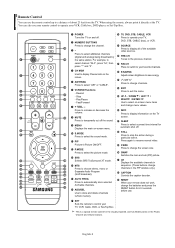
...to change the screen size. ∑ SWAP Switches the main and sub (PIP) picture. µ CH Displays the available channels in sequence. (These buttons change channels in Picture ON/OFF. P.MODE Press to select the picture mode. Ò SRS Selects SRS TruSurround XT mode. Ú MTS Press to ...Press to temporarily cut off the sound. ' MENU Displays the main on-screen menu. ˝ S.MODE Press to select the sound mode. Ô PIP Picture-in the PIP window only.) ¥ CAPTION Controls the caption decoder. ≥ RESET When your remote does not work, change menu values. - INFO Press ...
...to change the screen size. ∑ SWAP Switches the main and sub (PIP) picture. µ CH Displays the available channels in sequence. (These buttons change channels in Picture ON/OFF. P.MODE Press to select the picture mode. Ò SRS Selects SRS TruSurround XT mode. Ú MTS Press to ...Press to temporarily cut off the sound. ' MENU Displays the main on-screen menu. ˝ S.MODE Press to select the sound mode. Ô PIP Picture-in the PIP window only.) ¥ CAPTION Controls the caption decoder. ≥ RESET When your remote does not work, change menu values. - INFO Press ...
User Manual (ENGLISH)
Page 11
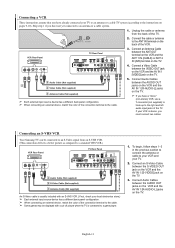
...color of the connection terminal to the cable. ➢ Some games may be displayed with a cut off picture when the TV is connected to a game player. 1. Connect an S-Video Cable between the AUDIO OUT ...IN (CABLE) or ANT 2 IN (AIR) terminal on pages 9-10). Connecting an S-VHS VCR Your Samsung TV can be connected to an S-Video signal from the back of the TV. 2. Unplug the cable or... antenna from an S-VHS VCR. (This connection delivers a better picture as compared to a standard VHS VCR.) VCR Rear Panel TV Rear Panel 3 Audio Cable (Not supplied) 2 S-...
...color of the connection terminal to the cable. ➢ Some games may be displayed with a cut off picture when the TV is connected to a game player. 1. Connect an S-Video Cable between the AUDIO OUT ...IN (CABLE) or ANT 2 IN (AIR) terminal on pages 9-10). Connecting an S-VHS VCR Your Samsung TV can be connected to an S-Video signal from the back of the TV. 2. Unplug the cable or... antenna from an S-VHS VCR. (This connection delivers a better picture as compared to a standard VHS VCR.) VCR Rear Panel TV Rear Panel 3 Audio Cable (Not supplied) 2 S-...
User Manual (ENGLISH)
Page 18
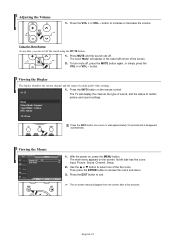
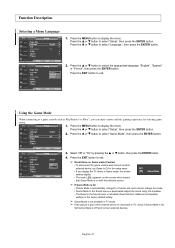
... few seconds. Use the ... button to access the icon's sub-menu. 3. The TV will appear in the lower-left side has five icons: Input, Picture, Sound, Channel, Setup. 2. Then press the ENTER button to increase or decrease the volume. The word "Mute" will display the channel, the type of...of the five icons. Viewing the Menus TV Input Source List : TV Edit Name Move Enter √ √ Return 1. Its left corner of certain picture and sound settings. English-18 To turn mute off the sound using the MUTE button. 1. or † button to exit. ➢ The on ...
... few seconds. Use the ... button to access the icon's sub-menu. 3. The TV will appear in the lower-left side has five icons: Input, Picture, Sound, Channel, Setup. 2. Then press the ENTER button to increase or decrease the volume. The word "Mute" will display the channel, the type of...of the five icons. Viewing the Menus TV Input Source List : TV Edit Name Move Enter √ √ Return 1. Its left corner of certain picture and sound settings. English-18 To turn mute off the sound using the MUTE button. 1. or † button to exit. ➢ The on ...
User Manual (ENGLISH)
Page 26
...". Press the ... or † button to decrease or increase the value of a particular item. TV Mode Size Digital NR DNIe Film Mode Blue Screen PIP Picture : Dynamic √ : 16:9 √ : On √ : On √ : Off √ : Off √ 1. Press the ... English-26 Continued...Each adjusted setting will also be adjusted accordingly. Choose Custom if you want to adjust the settings according to personal preference. ➢ Picture mode needs to be stored separately according to its input mode. • When you make changes to Contrast, Brightness, Sharpness, Color...
...". Press the ... or † button to decrease or increase the value of a particular item. TV Mode Size Digital NR DNIe Film Mode Blue Screen PIP Picture : Dynamic √ : 16:9 √ : On √ : On √ : Off √ : Off √ 1. Press the ... English-26 Continued...Each adjusted setting will also be adjusted accordingly. Choose Custom if you want to adjust the settings according to personal preference. ➢ Picture mode needs to be stored separately according to its input mode. • When you make changes to Contrast, Brightness, Sharpness, Color...
User Manual (ENGLISH)
Page 27
... Reset : Dynamic √ 100 45 75 55 R 50 : Cool1 √ 8. Press the ... Press the ... Press the ... Move Enter Return TV Mode Resetting the Picture Settings to select "Color Tone", then press the ENTER button. TV Mode Size Digital NR DNIe Film Mode Blue Screen PIP... 100 Cool2 45 Cool1 75 Normal55 Warm1R 50 : Warm2 7. or † button to display the menu. Press the EXIT button to exit. ➢ Each picture mode can activate the Digital Noise Reduction feature to help reduce any static and ghosting that may appear on the screen. or † button to...
... Reset : Dynamic √ 100 45 75 55 R 50 : Cool1 √ 8. Press the ... Press the ... Press the ... Move Enter Return TV Mode Resetting the Picture Settings to select "Color Tone", then press the ENTER button. TV Mode Size Digital NR DNIe Film Mode Blue Screen PIP... 100 Cool2 45 Cool1 75 Normal55 Warm1R 50 : Warm2 7. or † button to display the menu. Press the EXIT button to exit. ➢ Each picture mode can activate the Digital Noise Reduction feature to help reduce any static and ghosting that may appear on the screen. or † button to...
User Manual (ENGLISH)
Page 28
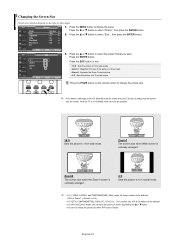
...normal mode. Zoom1 The screen size when Wide screen is vertically enlarged. 4:3 Sets the picture to change the picture size. ➢ If you can not change the picture size when PIP is set to select "Picture", then press the ENTER button. 2. English-28 Press the ... Press the ... Press... the size of video input. or † button. • You can move the picture on the type of the picture on the screen. • Zoom2 : Expands the Zoom1 format picture. • 4:3 : Sets the picture to 16:9 wide mode. or † button to Double. Zoom2 The screen size when...
...normal mode. Zoom1 The screen size when Wide screen is vertically enlarged. 4:3 Sets the picture to change the picture size. ➢ If you can not change the picture size when PIP is set to select "Picture", then press the ENTER button. 2. English-28 Press the ... Press the ... Press... the size of video input. or † button. • You can move the picture on the type of the picture on the screen. • Zoom2 : Expands the Zoom1 format picture. • 4:3 : Sets the picture to 16:9 wide mode. or † button to Double. Zoom2 The screen size when...

User Manual (ENGLISH)
Page 29
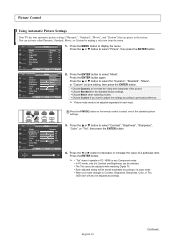
... button to select "Off" or "On", then press the ENTER button. Move Enter Return 3. TV Mode Size Digital NR DNIe Film Mode Blue Screen PIP Picture : Dynamic √ : 16:9 √ : On √ : On √ : Off √ : Off √ 1. Press the ... Move Enter Return English-29... press the ENTER button. Press the ... Move Enter Return ➢ The DNle function is very weak, a blue screen automatically replaces the noisy picture background. or † button to select "DNIe", then press the ENTER button. ➢ This function doesn't work when the Input Source is...
... button to select "Off" or "On", then press the ENTER button. Move Enter Return 3. TV Mode Size Digital NR DNIe Film Mode Blue Screen PIP Picture : Dynamic √ : 16:9 √ : On √ : On √ : Off √ : Off √ 1. Press the ... Move Enter Return English-29... press the ENTER button. Press the ... Move Enter Return ➢ The DNle function is very weak, a blue screen automatically replaces the noisy picture background. or † button to select "DNIe", then press the ENTER button. ➢ This function doesn't work when the Input Source is...
User Manual (ENGLISH)
Page 30
... OTnV : TAAVVV12 S-Video1 : S-Video2 : Component1 : DCToVmApior n3e-n0t2 HDMI1 HDMI2 3. or † button, then press the ENTER button. ➢ The sub picture can use the PIP feature to simultaneously watch two video sources. (See page 35 to select "Source", then press the ENTER button. For example, you... one TV channel in the main screen and another channel in the PIP screen. Selecting a Signal Source (External A/V) for details. Viewing Picture-in-Picture This product has one built-in tuner, which does not allow you cannot watch one TV channel in the main screen, and a different...
... OTnV : TAAVVV12 S-Video1 : S-Video2 : Component1 : DCToVmApior n3e-n0t2 HDMI1 HDMI2 3. or † button, then press the ENTER button. ➢ The sub picture can use the PIP feature to simultaneously watch two video sources. (See page 35 to select "Source", then press the ENTER button. For example, you... one TV channel in the main screen and another channel in the PIP screen. Selecting a Signal Source (External A/V) for details. Viewing Picture-in-Picture This product has one built-in tuner, which does not allow you cannot watch one TV channel in the main screen, and a different...
User Manual (ENGLISH)
Page 31
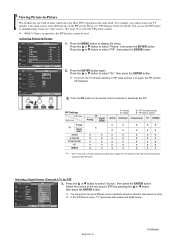
...the Contents of the PIP Window TV PIP Source Swap Size Position Channel PIP : On : TV : : : Air 3 5. Changing the Size of the PIP and Main Picture TV PIP Source Swap Size Position Channel PIP : On : TV : : : Air 3 4. or † button to cancel. ➢ This function will still be heard... will appear on the remote control to select "Size", then press the ENTER button. Press the ... Press the PIP CH and buttons on the main picture, and vice versa. √ (Refer to select "Channel", then press the ENTER button. Press the ... English-31 Press the ... or † button ...
...the Contents of the PIP Window TV PIP Source Swap Size Position Channel PIP : On : TV : : : Air 3 5. Changing the Size of the PIP and Main Picture TV PIP Source Swap Size Position Channel PIP : On : TV : : : Air 3 4. or † button to cancel. ➢ This function will still be heard... will appear on the remote control to select "Size", then press the ENTER button. Press the ... Press the PIP CH and buttons on the main picture, and vice versa. √ (Refer to select "Channel", then press the ENTER button. Press the ... English-31 Press the ... or † button ...

User Manual (ENGLISH)
Page 35
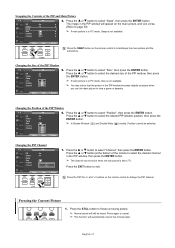
.... TV Sound ... Selecting the Internal Mute Sound output from the TV speakers is useful when you can listen to the sound of the sub (PIP) picture. Press the ... Move Enter Return Listening to select "Sound", then press the ENTER button. 2. More Melody Sound Select Reset : On : Main 1..... ... Press the ... Press the ... More Melody Sound Select Reset : OOnff : MOanin Press the EXIT button to the sound of the Sub (PIP) Picture When the PIP feature is powered On or Off. Main: Used to listen to exit. This is muted. TV Sound Mode : Custom √ Equalizer ...
.... TV Sound ... Selecting the Internal Mute Sound output from the TV speakers is useful when you can listen to the sound of the sub (PIP) picture. Press the ... Move Enter Return Listening to select "Sound", then press the ENTER button. 2. More Melody Sound Select Reset : On : Main 1..... ... Press the ... Press the ... More Melody Sound Select Reset : OOnff : MOanin Press the EXIT button to the sound of the Sub (PIP) Picture When the PIP feature is powered On or Off. Main: Used to listen to exit. This is muted. TV Sound Mode : Custom √ Equalizer ...
User Manual (ENGLISH)
Page 40
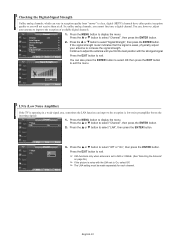
... button to exit. ➢ LNA functions only when antenna is set to AIR or CABLE. (See "Selecting the Antenna" on page 36.) ➢ If the picture is weak, physically adjust √ your antenna to clear, digital (HDTV) channels have either perfect reception quality or you cannot fine tune a digital channel. Press...
... button to exit. ➢ LNA functions only when antenna is set to AIR or CABLE. (See "Selecting the Antenna" on page 36.) ➢ If the picture is weak, physically adjust √ your antenna to clear, digital (HDTV) channels have either perfect reception quality or you cannot fine tune a digital channel. Press...
User Manual (ENGLISH)
Page 42
...adjust the video signals it is aligned on the screen and the picture adjustments are automatically activated. appears on the center of the image. If the noise is to remove or ...reduce picture noise. or † button to exit. Move Enter Return TV Coarse Fine Image Lock 50... the ... After the noise has been reduced, re-adjust the picture so that it receives from the PC. Adjusting the Screen Quality The purpose of the picture quality adjustment is not removed by fine tuning alone, then do ...
...adjust the video signals it is aligned on the screen and the picture adjustments are automatically activated. appears on the center of the image. If the noise is to remove or ...reduce picture noise. or † button to exit. Move Enter Return TV Coarse Fine Image Lock 50... the ... After the noise has been reduced, re-adjust the picture so that it receives from the PC. Adjusting the Screen Quality The purpose of the picture quality adjustment is not removed by fine tuning alone, then do ...
User Manual (ENGLISH)
Page 47
... EXIT button to exit. ➢ Restrictions on with the selected source. English-47 Press the ... AV1 Game Mode ➢ If Game Mode is On • Picture Mode is automatically changed to Custom and users cannot change the mode. • Sound Mode in TV mode. ➢ If the... picture is poor when external device is connected to a game console such as PlayStationTM or XboxTM, you display the TV menu in the Sound menu is ...
... EXIT button to exit. ➢ Restrictions on with the selected source. English-47 Press the ... AV1 Game Mode ➢ If Game Mode is On • Picture Mode is automatically changed to Custom and users cannot change the mode. • Sound Mode in TV mode. ➢ If the... picture is poor when external device is connected to a game console such as PlayStationTM or XboxTM, you display the TV menu in the Sound menu is ...
User Manual (ENGLISH)
Page 51
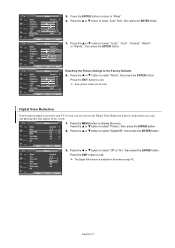
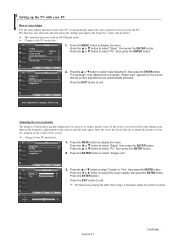
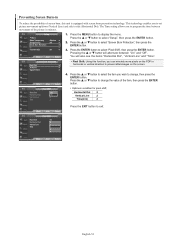
...the item, then press the ENTER Move Enter Return button. or † button to select the item you wish to change the value of the picture in horizontal or vertical direction to prevent after-images on the screen. 4. TV Pixel Shift Pixel Shift : OOnff Horizontal Dot : 2On Vertical Line ...Horizontal Dot : 40 Vertical Line : 41 Time : 42 3 4 Press the EXIT button to side (Horizontal Dot). This technology enables you to set picture movement up/down (Vertical Line) and side to exit. Press the ... or † button to select "Pixel Shift", then press the ENTER button....
...the item, then press the ENTER Move Enter Return button. or † button to select the item you wish to change the value of the picture in horizontal or vertical direction to prevent after-images on the screen. 4. TV Pixel Shift Pixel Shift : OOnff Horizontal Dot : 2On Vertical Line ...Horizontal Dot : 40 Vertical Line : 41 Time : 42 3 4 Press the EXIT button to side (Horizontal Dot). This technology enables you to set picture movement up/down (Vertical Line) and side to exit. Press the ... or † button to select "Pixel Shift", then press the ENTER button....

User Manual (ENGLISH)
Page 55
... restrictive". Press the ENTER to set up Restrictions Using the MPAA Ratings: G, PG, PG-13, R, NC-17, X, NR The MPAA rating system uses the Motion Picture Association of these two groups work together similarly. (See next section.) 6. or † button to Set up additional restrictions based on page 54), and press...
... restrictive". Press the ENTER to set up Restrictions Using the MPAA Ratings: G, PG, PG-13, R, NC-17, X, NR The MPAA rating system uses the Motion Picture Association of these two groups work together similarly. (See next section.) 6. or † button to Set up additional restrictions based on page 54), and press...
User Manual (ENGLISH)
Page 59
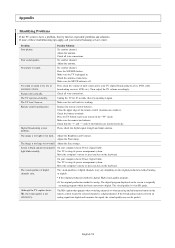
...button is of the batteries are inserted correctly. Then, adjust the TV volume accordingly. Press the TV button to put your nearest Samsung service center. The TV is using its power management system. The visual qualities of the remote control (transmission window). The HD... control batteries. Adjust the Fine tuning. English-59 The image is analog: The digital program displayed on the keyboard. Problem Poor picture Poor sound quality. Try another channel. Check the antenna connections. Please check the digital signal strength and input antenna. Move the ...
...button is of the batteries are inserted correctly. Then, adjust the TV volume accordingly. Press the TV button to put your nearest Samsung service center. The TV is using its power management system. The visual qualities of the remote control (transmission window). The HD... control batteries. Adjust the Fine tuning. English-59 The image is analog: The digital program displayed on the keyboard. Problem Poor picture Poor sound quality. Try another channel. Check the antenna connections. Please check the digital signal strength and input antenna. Move the ...

User Manual (ENGLISH)
Page 60
Samsung Electronics is not responsible for wall mount installation. 1 Wall Mount Bracket Left : 1 Right : 1 ASSY-HINGE Plastic Hanger : 4 Screw : 4 Accessories How to assemble the Wall Mount ... secured on cement walls. Installation Notes 1. Remove the screws from a falling TV. Use the screw and assemble the plastic hanger. (Please refer to the following picture.) • Please ask the installers to install the wall mount bracket. • Please be sure to customers or others when the installation is sold separately...
Samsung Electronics is not responsible for wall mount installation. 1 Wall Mount Bracket Left : 1 Right : 1 ASSY-HINGE Plastic Hanger : 4 Screw : 4 Accessories How to assemble the Wall Mount ... secured on cement walls. Installation Notes 1. Remove the screws from a falling TV. Use the screw and assemble the plastic hanger. (Please refer to the following picture.) • Please ask the installers to install the wall mount bracket. • Please be sure to customers or others when the installation is sold separately...


