
User Manual (ENGLISH)
Page 2
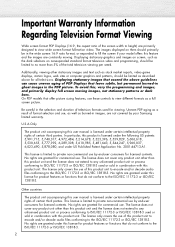
... than this product unit and the license does not extend to any unlicensed product unit or process conforming to fill the screen if your Samsung limited warranty. Uneven PDP aging as a result of this product unit. No rights are granted for commercial use of format selection and ...above guidelines can cause uneven aging of the total television viewing per week. Displaying stationary graphics and images on them should be in the PDP picture. Additionally, viewing other than 5% of PDP Displays that exceed the above for viewing. To avoid this user manual is limited to view ...
... than this product unit and the license does not extend to any unlicensed product unit or process conforming to fill the screen if your Samsung limited warranty. Uneven PDP aging as a result of this product unit. No rights are granted for commercial use of format selection and ...above guidelines can cause uneven aging of the total television viewing per week. Displaying stationary graphics and images on them should be in the PDP picture. Additionally, viewing other than 5% of PDP Displays that exceed the above for viewing. To avoid this user manual is limited to view ...
User Manual (ENGLISH)
Page 6
... Channels 44 Setting Up Your Remote Control 47 Viewing an External Signal Source 49 Picture Control Changing the Picture Standard 52 Customizing the Picture Settings 53 Viewing the DNIe Demonstration 55 Changing the Screen Size 56 Viewing the Picture-in-Picture 58 Selecting the Sound Source 64 Setting the My Color Control Mode 65 Sound...
... Channels 44 Setting Up Your Remote Control 47 Viewing an External Signal Source 49 Picture Control Changing the Picture Standard 52 Customizing the Picture Settings 53 Viewing the DNIe Demonstration 55 Changing the Screen Size 56 Viewing the Picture-in-Picture 58 Selecting the Sound Source 64 Setting the My Color Control Mode 65 Sound...
User Manual (ENGLISH)
Page 7
... contained in this User's Manual is subject to change without prior notice for improvement, and may vary depending on the version of the Image 94 Picture Quality Adjustment 95 Image Reset 98 Appendix Troubleshooting 136 Care and Maintenance 137 Specifications 138 Dimensions 139 Time Setting Setting the Clock 100 Setting the...
... contained in this User's Manual is subject to change without prior notice for improvement, and may vary depending on the version of the Image 94 Picture Quality Adjustment 95 Image Reset 98 Appendix Troubleshooting 136 Care and Maintenance 137 Specifications 138 Dimensions 139 Time Setting Setting the Clock 100 Setting the...
User Manual (ENGLISH)
Page 14
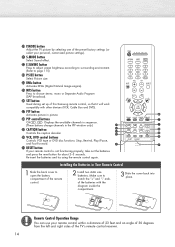
...Sound effect. ˛ E.SAVING button Press to adjust screen brightness according to surrounding environment. (Refer to page 115) ◊ P.SIZE button Select Picture size. ± DNIe button Activates DNIe (Digital Natural Image engine). ≠ MTS button Press to choose stereo, mono or Separate Audio Program (...SAP broadcast). - ¿ P.MODE button Adjust the TV picture by selecting one of this Samsung remote control, so that it will work compatibly with the diagram inside the compartment. 3 Slide the cover back into place....
...Sound effect. ˛ E.SAVING button Press to adjust screen brightness according to surrounding environment. (Refer to page 115) ◊ P.SIZE button Select Picture size. ± DNIe button Activates DNIe (Digital Natural Image engine). ≠ MTS button Press to choose stereo, mono or Separate Audio Program (...SAP broadcast). - ¿ P.MODE button Adjust the TV picture by selecting one of this Samsung remote control, so that it will work compatibly with the diagram inside the compartment. 3 Slide the cover back into place....
User Manual (ENGLISH)
Page 19
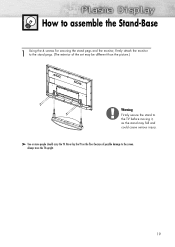
Never lay the TV on the floor because of the set may fall and could cause serious injury. ➤ Two or more people should carry the TV. Always store the TV upright. 19 How to assemble the Stand-Base 1 Using the 4 screws for securing the stand pegs and the monitor, firmly attach the monitor to the stand pegs. (The exterior of possible damage to the TV before moving it, as the stand may be different than the picture.) Warning Firmly secure the stand to the screen.
Never lay the TV on the floor because of the set may fall and could cause serious injury. ➤ Two or more people should carry the TV. Always store the TV upright. 19 How to assemble the Stand-Base 1 Using the 4 screws for securing the stand pegs and the monitor, firmly attach the monitor to the stand pegs. (The exterior of possible damage to the TV before moving it, as the stand may be different than the picture.) Warning Firmly secure the stand to the screen.
User Manual (ENGLISH)
Page 29
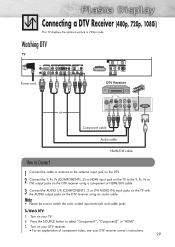
Connecting a DTV Receiver (480p, 720p, 1080i) This TV displays the optimum picture in 720p mode. Watching DTV TV Power cord DTV Receiver Component cable Audio cable HDMI/DVI cable How to Connect 1 Connect the cable or antenna ...
Connecting a DTV Receiver (480p, 720p, 1080i) This TV displays the optimum picture in 720p mode. Watching DTV TV Power cord DTV Receiver Component cable Audio cable HDMI/DVI cable How to Connect 1 Connect the cable or antenna ...
User Manual (ENGLISH)
Page 31
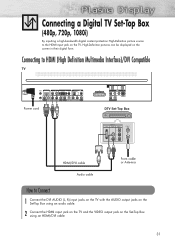
... cord DTV Set-Top Box HDMI/DVI cable Audio cable From cable or Antenna How to the HDMI input jack on the TV, High-Definition pictures can be displayed on the Set-Top Box using an HDMI/DVI cable. 31 Connecting a Digital TV Set-Top Box (480p, 720p, 1080i) By inputting... a high-bandwidth digital content protection High-Definition picture source to Connect 1 Connect the DVI AUDIO (L, R) input jacks on the TV with the AUDIO output jacks on the Set-Top Box using an audio...
... cord DTV Set-Top Box HDMI/DVI cable Audio cable From cable or Antenna How to the HDMI input jack on the TV, High-Definition pictures can be displayed on the Set-Top Box using an HDMI/DVI cable. 31 Connecting a Digital TV Set-Top Box (480p, 720p, 1080i) By inputting... a high-bandwidth digital content protection High-Definition picture source to Connect 1 Connect the DVI AUDIO (L, R) input jacks on the TV with the AUDIO output jacks on the Set-Top Box using an audio...
User Manual (ENGLISH)
Page 51
PLASMA DISPLAY PANEL Picture Control Changing the Picture Standard 52 Customizing the Picture Settings 53 Viewing the DNIe Demonstration 55 Changing the Screen Size 56 Viewing the Picture-in-Picture 58 Selecting the Sound Source 64 Setting the My Color Control Mode 65
PLASMA DISPLAY PANEL Picture Control Changing the Picture Standard 52 Customizing the Picture Settings 53 Viewing the DNIe Demonstration 55 Changing the Screen Size 56 Viewing the Picture-in-Picture 58 Selecting the Sound Source 64 Setting the My Color Control Mode 65

User Manual (ENGLISH)
Page 52
...Choose Movie when viewing the movie. • Choose Custom if you want to adjust the settings according to select the desired picture mode (Dynamic, Standard, Movie, Custom), then press the ENTER button. Press the ▲ or ▼ button to personal preference (see ..."Customizing the Picture Settings", page 53). 52 TV Mode Size Picture : Dynamic √ : 16:9 √ Digital NR : On √ DNIe Demo : Off √ My Color Control √ Film ...
...Choose Movie when viewing the movie. • Choose Custom if you want to adjust the settings according to select the desired picture mode (Dynamic, Standard, Movie, Custom), then press the ENTER button. Press the ▲ or ▼ button to personal preference (see ..."Customizing the Picture Settings", page 53). 52 TV Mode Size Picture : Dynamic √ : 16:9 √ Digital NR : On √ DNIe Demo : Off √ My Color Control √ Film ...
User Manual (ENGLISH)
Page 53
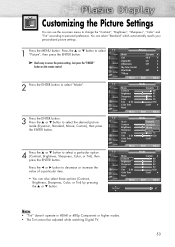
... √ button to decrease or increase the value of a particular item. • You can select "Standard" which automatically recalls your personalized picture settings. 1 Press the MENU button. You can also select these options (Contrast, Brightness, Sharpness, Color, or Tint) by pressing the &#...9650; or ▼ button. TV Picture Mode Size Digital NR DNIe Demo My Color Control Film Mode † More : Dynamic √ : 16:9 √ : On √ : Off ...
... √ button to decrease or increase the value of a particular item. • You can select "Standard" which automatically recalls your personalized picture settings. 1 Press the MENU button. You can also select these options (Contrast, Brightness, Sharpness, Color, or Tint) by pressing the &#...9650; or ▼ button. TV Picture Mode Size Digital NR DNIe Demo My Color Control Film Mode † More : Dynamic √ : 16:9 √ : On √ : Off ...

User Manual (ENGLISH)
Page 54
Press the MENU button to the factory defaults. • The "Reset" will be set each picture mode. TV Mode Mode Contrast Brightness Sharpness Color Tint G 50 Color Tone Reset : Custom √ 90 50 50 50 R 50 : Cool1 √ Move Enter Return ... Mode Contrast Brightness Sharpness Color Tint G 50 Color Tone Reset : Custom 90 Cool2 50 Cool1 50 Normal50 Warm1R 50 : CWoaorl1m2 Move Enter Return Resetting the Picture Settings to "Mode". 5 Press the ENTER button to return to the Factory Defaults 7 To return the factory defaults, select "Reset" by pressing the ▲ or...
Press the MENU button to the factory defaults. • The "Reset" will be set each picture mode. TV Mode Mode Contrast Brightness Sharpness Color Tint G 50 Color Tone Reset : Custom √ 90 50 50 50 R 50 : Cool1 √ Move Enter Return ... Mode Contrast Brightness Sharpness Color Tint G 50 Color Tone Reset : Custom 90 Cool2 50 Cool1 50 Normal50 Warm1R 50 : CWoaorl1m2 Move Enter Return Resetting the Picture Settings to "Mode". 5 Press the ENTER button to return to the Factory Defaults 7 To return the factory defaults, select "Reset" by pressing the ▲ or...

User Manual (ENGLISH)
Page 55
..." or "On", then press the ENTER button. • Off : Switches off the DNIe Demo mode. • On : Switches on the screen, for demonstration purposes. TV Picture Mode Size Digital NR DNIe Demo My Color Control Film Mode † More : Dynamic √ : 16:9 √ : On √ : Off √ √ : ...in the visual quality. 1 Press the MENU button. If you set DNIe Demo to On, you can view an applied DNIe and a normal picture on the DNIe Demo mode. 4 Press the MENU button to provide a high visual quality. Viewing the DNIe Demonstration This TV includes the DNIe function...
..." or "On", then press the ENTER button. • Off : Switches off the DNIe Demo mode. • On : Switches on the screen, for demonstration purposes. TV Picture Mode Size Digital NR DNIe Demo My Color Control Film Mode † More : Dynamic √ : 16:9 √ : On √ : Off √ √ : ...in the visual quality. 1 Press the MENU button. If you set DNIe Demo to On, you can view an applied DNIe and a normal picture on the DNIe Demo mode. 4 Press the MENU button to provide a high visual quality. Viewing the DNIe Demonstration This TV includes the DNIe function...

User Manual (ENGLISH)
Page 56
... 2 Press the ▲ or ▼ button to select "Size", then press the ENTER button. 3 Press the œ or √ button to exit. TV Picture Mode Size Digital NR DNIe Demo My Color Control Film Mode † More : Dynamic √ : 16:9 √ : On √ : Off √ ...√ : Off √ Move Enter Return TV Picture Mode Size Digital NR DNIe Demo My Color Control Film Mode † More : Dynamic √ : 16:9 √ : On √ : Off √ √ ...
... 2 Press the ▲ or ▼ button to select "Size", then press the ENTER button. 3 Press the œ or √ button to exit. TV Picture Mode Size Digital NR DNIe Demo My Color Control Film Mode † More : Dynamic √ : 16:9 √ : On √ : Off √ ...√ : Off √ Move Enter Return TV Picture Mode Size Digital NR DNIe Demo My Color Control Film Mode † More : Dynamic √ : 16:9 √ : On √ : Off √ √ ...
User Manual (ENGLISH)
Page 57
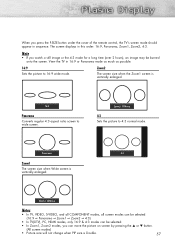
... screen size when the Zoom1 screen is vertically enlarged. View the TV in this order: 16:9, Panorama, Zoom1, Zoom2, 4:3. Zoom2 Move 4:3 Sets the picture to wide screen. Zoom1 Move Notes • In TV, VIDEO, S-VIDEO, and all COMPONENT modes, all screen modes can be selected. (16:9 ➞... ➞ 4:3). • In TV(DTV), PC, HDMI modes, only 16:9 & 4:3 modes can move the picture on screen by pressing the ▲ or ▼ button. (All screen modes) • Picture size will not change when PIP size is Double. 57 Panorama 4:3 Zoom1 The screen size when Wide screen is...
... screen size when the Zoom1 screen is vertically enlarged. View the TV in this order: 16:9, Panorama, Zoom1, Zoom2, 4:3. Zoom2 Move 4:3 Sets the picture to wide screen. Zoom1 Move Notes • In TV, VIDEO, S-VIDEO, and all COMPONENT modes, all screen modes can be selected. (16:9 ➞... ➞ 4:3). • In TV(DTV), PC, HDMI modes, only 16:9 & 4:3 modes can move the picture on screen by pressing the ▲ or ▼ button. (All screen modes) • Picture size will not change when PIP size is Double. 57 Panorama 4:3 Zoom1 The screen size when Wide screen is...
User Manual (ENGLISH)
Page 58
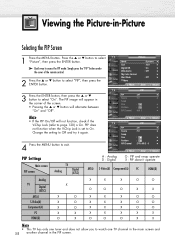
... not allow you to watch one TV channel in the main screen and 58 another channel in the corner of the remote control. Viewing the Picture-in-Picture Selecting the PIP Screen 1 Press the MENU button. PIP : Off √ Source : TV √ Swap Size : √ Position : √ PIP Channel :...; Note • If the PIP On/Off will alternate between "On" and "Off". Press the ▲ or ▼ button to On. TV Mode Size Picture : Dynamic √ : 16:9 √ ➤ Quick way to access the PIP mode: Simply press the "PIP" button under the cover of the screen....
... not allow you to watch one TV channel in the main screen and 58 another channel in the corner of the remote control. Viewing the Picture-in-Picture Selecting the PIP Screen 1 Press the MENU button. PIP : Off √ Source : TV √ Swap Size : √ Position : √ PIP Channel :...; Note • If the PIP On/Off will alternate between "On" and "Off". Press the ▲ or ▼ button to On. TV Mode Size Picture : Dynamic √ : 16:9 √ ➤ Quick way to access the PIP mode: Simply press the "PIP" button under the cover of the screen....
User Manual (ENGLISH)
Page 59
... MENU button. Selecting an External Signal You can not be selected on both the main screen and subscreen. • PC is not available in PIP picture. 59 TV PIP PIP : On √ Source : TV √ Swap Size : √ Position : √ PIP Channel : DTV AIR 3 - 0 √ 3 Press the &#... press the ENTER button. Press the ▲ or ▼ button to select "Source", then press the ENTER button. TV Mode Size Picture : Dynamic √ : 16:9 √ Digital NR : On √ DNIe Demo : Off √ My Color Control √ Film Mode : Off √ † ...
... MENU button. Selecting an External Signal You can not be selected on both the main screen and subscreen. • PC is not available in PIP picture. 59 TV PIP PIP : On √ Source : TV √ Swap Size : √ Position : √ PIP Channel : DTV AIR 3 - 0 √ 3 Press the &#... press the ENTER button. Press the ▲ or ▼ button to select "Source", then press the ENTER button. TV Mode Size Picture : Dynamic √ : 16:9 √ Digital NR : On √ DNIe Demo : Off √ My Color Control √ Film Mode : Off √ † ...
User Manual (ENGLISH)
Page 60
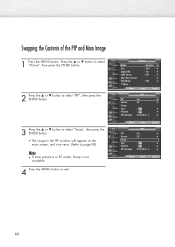
... : TV √ Swap Size : √ Position : √ PIP Channel : DTV AIR 3 - 0 √ Move Enter Return 60 Press the ▲ or ▼ button to select "Picture", then press the ENTER button. 2 Press the ▲ or ▼ button to select "PIP", then press the ENTER button. 3 Press the ▲ or ▼ button... • The image in the PIP window will appear on the main screen, and vice versa. (Refer to page 58) Note • If main picture is in PC mode, Swap is not available. 4 Press the MENU button to exit. Swapping the Contents of the PIP and Main Image 1 Press the...
... : TV √ Swap Size : √ Position : √ PIP Channel : DTV AIR 3 - 0 √ Move Enter Return 60 Press the ▲ or ▼ button to select "Picture", then press the ENTER button. 2 Press the ▲ or ▼ button to select "PIP", then press the ENTER button. 3 Press the ▲ or ▼ button... • The image in the PIP window will appear on the main screen, and vice versa. (Refer to page 58) Note • If main picture is in PC mode, Swap is not available. 4 Press the MENU button to exit. Swapping the Contents of the PIP and Main Image 1 Press the...

User Manual (ENGLISH)
Page 61
TV Picture Mode Size Digital NR DNIe Demo My Color Control Film Mode † More : Dynamic √ : 16:9 √ : On √ : Off √ √ : Off √ Move ... TV PIP PIP Source Swap Size Position PIP Channel : On : TV : : : DTV AIR 3 - 0 Move Enter Return 61 Press the ▲ or ▼ button to select "Picture", then press the ENTER button. 2 Press the ▲ or ▼ button to select "PIP", then press the ENTER button. 3 Press the ▲ or ▼ button...
TV Picture Mode Size Digital NR DNIe Demo My Color Control Film Mode † More : Dynamic √ : 16:9 √ : On √ : Off √ √ : Off √ Move ... TV PIP PIP Source Swap Size Position PIP Channel : On : TV : : : DTV AIR 3 - 0 Move Enter Return 61 Press the ▲ or ▼ button to select "Picture", then press the ENTER button. 2 Press the ▲ or ▼ button to select "PIP", then press the ENTER button. 3 Press the ▲ or ▼ button...

User Manual (ENGLISH)
Page 62
TV Picture Mode Size Digital NR DNIe Demo My Color Control Film Mode † More : Dynamic √ : 16:9 √ : On √ : Off √ √ : Off √ Move ... AIR 3 - 0 Move Enter Return Note • The Double1 ( ) and Double2 ( ) mode cannot be selected in Position. 62 Press the ▲ or ▼ button to select "Picture", then press the ENTER button. 2 Press the ▲ or ▼ button to select "PIP", then press the ENTER button. 3 Press the ▲ or ▼ button...
TV Picture Mode Size Digital NR DNIe Demo My Color Control Film Mode † More : Dynamic √ : 16:9 √ : On √ : Off √ √ : Off √ Move ... AIR 3 - 0 Move Enter Return Note • The Double1 ( ) and Double2 ( ) mode cannot be selected in Position. 62 Press the ▲ or ▼ button to select "Picture", then press the ENTER button. 2 Press the ▲ or ▼ button to select "PIP", then press the ENTER button. 3 Press the ▲ or ▼ button...
User Manual (ENGLISH)
Page 63
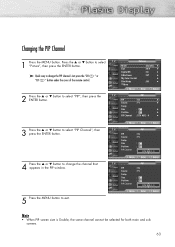
...; My Color Control √ Film Mode : Off √ † More Move Enter Return 2 Press the ▲ or ▼ button to select "Picture", then press the ENTER button. TV Mode Size Picture : Dynamic √ : 16:9 √ Digital NR : On √ ➤ Quick way to change the channel that appears in the PIP window...
...; My Color Control √ Film Mode : Off √ † More Move Enter Return 2 Press the ▲ or ▼ button to select "Picture", then press the ENTER button. TV Mode Size Picture : Dynamic √ : 16:9 √ Digital NR : On √ ➤ Quick way to change the channel that appears in the PIP window...


