

Quick Guide (easy Manual) (ver.1.0) (English)
Page 3
...with heavy dust, high or low temperatures, high humidity, and chemical substances, or where it can cause screen image retention. Watching the PDP TV in the upper part of the product. This image retention is not covered by the Warranty. To prevent this manual to the screen. ...as on a video game) on the plasma display panel for more than a certain period of time may produce partial afterimages. Avoid operating the TV at altitudes above effect are not covered by the warranty. These pixels will not operate normally at temperatures below 5°C(41°F) A still...
...with heavy dust, high or low temperatures, high humidity, and chemical substances, or where it can cause screen image retention. Watching the PDP TV in the upper part of the product. This image retention is not covered by the Warranty. To prevent this manual to the screen. ...as on a video game) on the plasma display panel for more than a certain period of time may produce partial afterimages. Avoid operating the TV at altitudes above effect are not covered by the warranty. These pixels will not operate normally at temperatures below 5°C(41°F) A still...

Quick Guide (easy Manual) (ver.1.0) (English)
Page 4
...Panel 8 Remote Control Buttons 11 Wall Installation Instructions 13 How to assemble the Stand-Base 17 Connections Connecting VHF and UHF Antennas 20 Connecting Cable TV 21 Connecting a VCR 23 Connecting a Camcorder 24 Connecting a DVD Player (480i, 480p) ........25 Connecting a DTV Receiver (480p, 720p,... 1080i 26 Connecting to HDMI (High Definition Multimedia Interface) (480p, 720p, 1080i) ..27 Connecting a Digital TV Set-Top Box (480p, 720p, 1080i 28 Connecting a Digital Audio System 29 Connecting to an Analog Amplifier 30 Operation Turning the...
...Panel 8 Remote Control Buttons 11 Wall Installation Instructions 13 How to assemble the Stand-Base 17 Connections Connecting VHF and UHF Antennas 20 Connecting Cable TV 21 Connecting a VCR 23 Connecting a Camcorder 24 Connecting a DVD Player (480i, 480p) ........25 Connecting a DTV Receiver (480p, 720p,... 1080i 26 Connecting to HDMI (High Definition Multimedia Interface) (480p, 720p, 1080i) ..27 Connecting a Digital TV Set-Top Box (480p, 720p, 1080i 28 Connecting a Digital Audio System 29 Connecting to an Analog Amplifier 30 Operation Turning the...

Quick Guide (easy Manual) (ver.1.0) (English)
Page 5
Connecting a PC and Operation Connecting a PC 86 Changing the Position of the TV's software and the regional conditions. 5 Digital 108 Menu Transparency Level 110 Using the Energy Saving feature 111 Preventing Screen Burn-in 112 Reducing the Effects ...
Connecting a PC and Operation Connecting a PC 86 Changing the Position of the TV's software and the regional conditions. 5 Digital 108 Menu Transparency Level 110 Using the Energy Saving feature 111 Preventing Screen Burn-in 112 Reducing the Effects ...

Quick Guide (easy Manual) (ver.1.0) (English)
Page 8
...Ø Œ SOURCE button Press to increase or decrease the volume. buttons Press to display all of the available video sources (TV, AV, S-Video, Component1, Component2, PC, and HDMI). ´ MENU button Displays the main on and off. Also used ... menu. ¨ CH( , ) buttons Press CH or CH to turn the TV on -screen menu. ˇ VOL +, - Power Off : Red - Also used to move up or down in ...the on the TV. Power On : Off ∏ Remote Control Sensor Aim the remote control towards this spot on -screen menu....
...Ø Œ SOURCE button Press to increase or decrease the volume. buttons Press to display all of the available video sources (TV, AV, S-Video, Component1, Component2, PC, and HDMI). ´ MENU button Displays the main on and off. Also used ... menu. ¨ CH( , ) buttons Press CH or CH to turn the TV on -screen menu. ˇ VOL +, - Power Off : Red - Also used to move up or down in ...the on the TV. Power On : Off ∏ Remote Control Sensor Aim the remote control towards this spot on -screen menu....
Quick Guide (easy Manual) (ver.1.0) (English)
Page 9
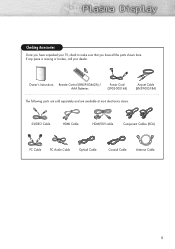
If any piece is missing or broken, call your TV, check to make sure that you have unpacked your dealer. Owner's Instructions Remote Control (BN59-00462A) / AAA Batteries Power Cord (3903-000144) Anynet Cable (BN39-00518A) The following parts are sold separately and are available at most electronics stores. S-VIDEO Cable HDMI Cable HDMI/DVI cable Component Cables (RCA) PC Cable PC Audio Cable Optical Cable Coaxial Cable Antenna Cable 9 Checking Accessories Once you have all the parts shown here.
If any piece is missing or broken, call your TV, check to make sure that you have unpacked your dealer. Owner's Instructions Remote Control (BN59-00462A) / AAA Batteries Power Cord (3903-000144) Anynet Cable (BN39-00518A) The following parts are sold separately and are available at most electronics stores. S-VIDEO Cable HDMI Cable HDMI/DVI cable Component Cables (RCA) PC Cable PC Audio Cable Optical Cable Coaxial Cable Antenna Cable 9 Checking Accessories Once you have all the parts shown here.

Quick Guide (easy Manual) (ver.1.0) (English)
Page 10
... refer to receive left and right audio from your DVI device. (Not compatible with separate analog audio inputs. This jack is for connecting to other Samsung Anynet-enabled devices. ˝ COMPONENT IN 1, 2 Video (Y/PB/PR) and audio (L-AUDIO-R) component inputs. Ô ANT (75Ω) 75Ω Coaxial .... These inputs can also be sure to make this connection. When using the optional HDMI/DVI adapter, the DVI analog audio inputs on your TV allow you to the Anynet Owner's Instruction. Rear Panel Œ POWER IN Connect the supplied power cord. ´ SERVICE ONLY Connector for external...
... refer to receive left and right audio from your DVI device. (Not compatible with separate analog audio inputs. This jack is for connecting to other Samsung Anynet-enabled devices. ˝ COMPONENT IN 1, 2 Video (Y/PB/PR) and audio (L-AUDIO-R) component inputs. Ô ANT (75Ω) 75Ω Coaxial .... These inputs can also be sure to make this connection. When using the optional HDMI/DVI adapter, the DVI analog audio inputs on your TV allow you to the Anynet Owner's Instruction. Rear Panel Œ POWER IN Connect the supplied power cord. ´ SERVICE ONLY Connector for external...

Quick Guide (easy Manual) (ver.1.0) (English)
Page 11
...a target device to be controlled by the same station. button Press to select additional channels (digital and analog) being broadcast by the Samsung remote control (i.e., TV, STB, VCR, CABLE, or DVD). Ú PRE-CH button Tunes to the previous channel. Æ SOURCE button Press to ...¨ Number buttons ˆ - For example, to select channel "54-3", press "54", then press "-" and "3". Ø MUTE button Press to mute the TV sound. ∏ VOL (Volume) buttons Use it to switch channels. ˜ INFO button Press to display information on -screen Electronic Program Guide (EPG). ˇ...
...a target device to be controlled by the same station. button Press to select additional channels (digital and analog) being broadcast by the Samsung remote control (i.e., TV, STB, VCR, CABLE, or DVD). Ú PRE-CH button Tunes to the previous channel. Æ SOURCE button Press to ...¨ Number buttons ˆ - For example, to select channel "54-3", press "54", then press "-" and "3". Ø MUTE button Press to mute the TV sound. ∏ VOL (Volume) buttons Use it to switch channels. ˜ INFO button Press to display information on -screen Electronic Program Guide (EPG). ˇ...

Quick Guide (easy Manual) (ver.1.0) (English)
Page 12
SET button Used during set up of this Samsung remote control, so that it will work compatibly with the diagram inside the compartment. 3 Slide the cover back...or Separate Audio Program (SAP broadcast). - Re-insert the batteries and try using the remote control again. ¿ P.MODE button Adjust the TV picture by selecting one of the preset factory settings (or select your personal, customized picture settings). ¸ S.MODE button Select Sound effect. &#... the remote control. 2 Install two AAA size batteries. Make sure to match the "+" and "-" ends of the TV's remote control receiver. 12
SET button Used during set up of this Samsung remote control, so that it will work compatibly with the diagram inside the compartment. 3 Slide the cover back...or Separate Audio Program (SAP broadcast). - Re-insert the batteries and try using the remote control again. ¿ P.MODE button Adjust the TV picture by selecting one of the preset factory settings (or select your personal, customized picture settings). ¸ S.MODE button Select Sound effect. &#... the remote control. 2 Install two AAA size batteries. Make sure to match the "+" and "-" ends of the TV's remote control receiver. 12

Quick Guide (easy Manual) (ver.1.0) (English)
Page 15
... bracket. PDP Wall Bracket Wall 15 Make sure to reinsert and tighten the safety pin (#) to securely hold the product to the bracket. Fixing the TV panel to the wall attachment panel bracket The shape of the product may vary depending on the model. (The assemblies of the plastic hanger and...
... bracket. PDP Wall Bracket Wall 15 Make sure to reinsert and tighten the safety pin (#) to securely hold the product to the bracket. Fixing the TV panel to the wall attachment panel bracket The shape of the product may vary depending on the model. (The assemblies of the plastic hanger and...
Quick Guide (easy Manual) (ver.1.0) (English)
Page 17
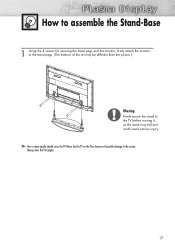
Always store the TV upright. 17 How to assemble the Stand-Base 1 Using the 4 screws for securing the stand pegs and the monitor, firmly attach the monitor to the stand pegs. (The exterior of possible damage to the TV before moving it, as the stand may be different than the picture.) Warning Firmly secure the stand to the screen. Never lay the TV on the floor because of the set may fall and could cause serious injury. ➤ Two or more people should carry the TV.
Always store the TV upright. 17 How to assemble the Stand-Base 1 Using the 4 screws for securing the stand pegs and the monitor, firmly attach the monitor to the stand pegs. (The exterior of possible damage to the TV before moving it, as the stand may be different than the picture.) Warning Firmly secure the stand to the screen. Never lay the TV on the floor because of the set may fall and could cause serious injury. ➤ Two or more people should carry the TV.
Quick Guide (easy Manual) (ver.1.0) (English)
Page 20
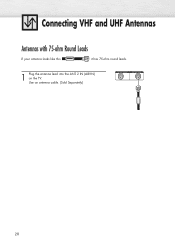
Use an antenna cable. (Sold Separately) 20 Connecting VHF and UHF Antennas Antennas with 75-ohm Round Leads If your antenna looks like this: it has 75-ohm round leads. 1 Plug the antenna lead into the ANT 2 IN (AIR IN) on the TV.
Use an antenna cable. (Sold Separately) 20 Connecting VHF and UHF Antennas Antennas with 75-ohm Round Leads If your antenna looks like this: it has 75-ohm round leads. 1 Plug the antenna lead into the ANT 2 IN (AIR IN) on the TV.
Quick Guide (easy Manual) (ver.1.0) (English)
Page 21
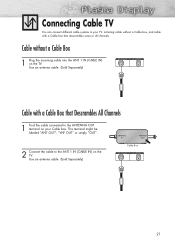
This terminal might be labeled "ANT OUT", "VHF OUT" or simply "OUT". 2 Connect the cable to the ANT 1 IN (CABLE IN) on the TV. Cable without a Cable box, and cable with a Cable Box that descrambles some or all channels. Use an antenna cable. (Sold Separately) Cable Box 21 Use ...an antenna cable. (Sold Separately) Cable with a Cable box that Descrambles All Channels 1 Find the cable connected to the ANTENNA OUT terminal on your TV, including cable without a Cable Box 1 Plug the incoming cable into the ANT 1 IN (CABLE IN) on the...
This terminal might be labeled "ANT OUT", "VHF OUT" or simply "OUT". 2 Connect the cable to the ANT 1 IN (CABLE IN) on the TV. Cable without a Cable box, and cable with a Cable Box that descrambles some or all channels. Use an antenna cable. (Sold Separately) Cable Box 21 Use ...an antenna cable. (Sold Separately) Cable with a Cable box that Descrambles All Channels 1 Find the cable connected to the ANTENNA OUT terminal on your TV, including cable without a Cable Box 1 Plug the incoming cable into the ANT 1 IN (CABLE IN) on the...

Quick Guide (easy Manual) (ver.1.0) (English)
Page 22
... the Cable box's output channel, which is connected to the ANTENNA IN terminal of the RF (A/B) switch and the ANT 1 IN (CABLE IN) on the TV. Cable with a Cable Box that is usually channel 3 or 4.) 22 Set the A/B switch to the "B" position to view scrambled channels. (When you set ...coaxial cable between the OUT terminal of your Splitter. After you've made this connection, set the A/B switch to "B", you can buy from your Samsung dealer or any electronics store). 1 Find and disconnect the cable that Descrambles Some (But Not All) Channels To complete this cable to the "A" position...
... the Cable box's output channel, which is connected to the ANTENNA IN terminal of the RF (A/B) switch and the ANT 1 IN (CABLE IN) on the TV. Cable with a Cable Box that is usually channel 3 or 4.) 22 Set the A/B switch to the "B" position to view scrambled channels. (When you set ...coaxial cable between the OUT terminal of your Splitter. After you've made this connection, set the A/B switch to "B", you can buy from your Samsung dealer or any electronics store). 1 Find and disconnect the cable that Descrambles Some (But Not All) Channels To complete this cable to the "A" position...
Quick Guide (easy Manual) (ver.1.0) (English)
Page 23
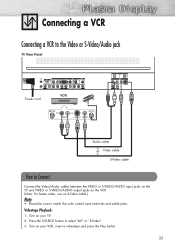
... VCR Audio cable Video cable S-Video cable How to Connect Connect the Video/Audio cables between the VIDEO or S-VIDEO/AUDIO input jacks on the TV and VIDEO or S-VIDEO/AUDIO output jacks on your VCR, insert a videotape and press the Play button. 23 Turn on the VCR. (Note: For better... video, use an S-Video cable.) Note • Please be sure to select "AV" or "S-Video". 3. Videotape Playback: 1. Turn on your TV. 2. Press the SOURCE button to match the color coded input terminals and cable jacks.
... VCR Audio cable Video cable S-Video cable How to Connect Connect the Video/Audio cables between the VIDEO or S-VIDEO/AUDIO input jacks on the TV and VIDEO or S-VIDEO/AUDIO output jacks on your VCR, insert a videotape and press the Play button. 23 Turn on the VCR. (Note: For better... video, use an S-Video cable.) Note • Please be sure to select "AV" or "S-Video". 3. Videotape Playback: 1. Turn on your TV. 2. Press the SOURCE button to match the color coded input terminals and cable jacks.

Quick Guide (easy Manual) (ver.1.0) (English)
Page 24
... cord Camcorder Audio cable Video cable S-Video cable How to Connect Connect a Video/Audio cable between the VIDEO or S-VIDEO/AUDIO input jacks on the TV and the VIDEO or S-VIDEO/AUDIO output jacks on your camcorder and set it to video mode. (For details, refer to your camcorder owner's instructions... on your camcorder to select "AV" or "S-Video". 3. Insert the tape into the camcorder and press the Play button. 24 Viewing Tapes 1. Turn on your TV. 2. Press the SOURCE button to OUT. 5.
... cord Camcorder Audio cable Video cable S-Video cable How to Connect Connect a Video/Audio cable between the VIDEO or S-VIDEO/AUDIO input jacks on the TV and the VIDEO or S-VIDEO/AUDIO output jacks on your camcorder and set it to video mode. (For details, refer to your camcorder owner's instructions... on your camcorder to select "AV" or "S-Video". 3. Insert the tape into the camcorder and press the Play button. 24 Viewing Tapes 1. Turn on your TV. 2. Press the SOURCE button to OUT. 5.

Quick Guide (easy Manual) (ver.1.0) (English)
Page 25
... using a audio cable. Note • Please be sure to select "Component 1" or "Component 2". 3. To Play DVD: 1. Connecting a DVD Player (480i, 480p) Playing DVD TV Rear Panel Power cord DVD Player Component cable Audio cable How to Connect 1 Connect the Y, PB, PR (COMPONENT1, 2) input jacks on the... TV to the Y, PB, PR output jacks on the DVD player using a component cable. 2 Connect the AUDIO L/R (COMPONENT1, 2) input jacks on the TV to the AUDIO output jacks on your DVD player, insert a DVD disc and press the...
... using a audio cable. Note • Please be sure to select "Component 1" or "Component 2". 3. To Play DVD: 1. Connecting a DVD Player (480i, 480p) Playing DVD TV Rear Panel Power cord DVD Player Component cable Audio cable How to Connect 1 Connect the Y, PB, PR (COMPONENT1, 2) input jacks on the... TV to the Y, PB, PR output jacks on the DVD player using a component cable. 2 Connect the AUDIO L/R (COMPONENT1, 2) input jacks on the TV to the AUDIO output jacks on your DVD player, insert a DVD disc and press the...
Quick Guide (easy Manual) (ver.1.0) (English)
Page 26
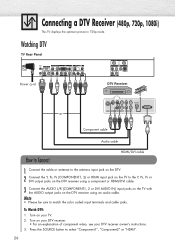
... on your DTV receiver owner's instructions. 3. Press the SOURCE button to match the color coded input terminals and cable jacks. Watching DTV TV Rear Panel Power cord DTV Receiver Component cable Audio cable How to Connect HDMI/DVI cable 1 Connect the cable or antenna to the antenna input ...jack on the DTV. 2 Connect the Y, PB, PR (COMPONENT1, 2) or HDMI input jack on the TV to the Y, PB, PR or DVI output jacks on the DTV receiver using a component or HDMI/DVI cable. 3 Connect the AUDIO L/R (COMPONENT1, 2 or DVI AUDIO...
... on your DTV receiver owner's instructions. 3. Press the SOURCE button to match the color coded input terminals and cable jacks. Watching DTV TV Rear Panel Power cord DTV Receiver Component cable Audio cable How to Connect HDMI/DVI cable 1 Connect the cable or antenna to the antenna input ...jack on the DTV. 2 Connect the Y, PB, PR (COMPONENT1, 2) or HDMI input jack on the TV to the Y, PB, PR or DVI output jacks on the DTV receiver using a component or HDMI/DVI cable. 3 Connect the AUDIO L/R (COMPONENT1, 2 or DVI AUDIO...

Quick Guide (easy Manual) (ver.1.0) (English)
Page 27
... receiver. • For an explanation of HDMI video, see your TV. 2. To Watch DTV: 1. Press the SOURCE button to the antenna input jack on the DTV. 2 Connect the HDMI input jack on the TV with the HDMI output jack on the TV. Connecting to HDMI (High Definition Multimedia Interface) (480p, 720p, ...1080i) Watching DTV TV Rear Panel Power cord HDMI cable DTV Set-Top Box How to Connect 1 Connect the ...
... receiver. • For an explanation of HDMI video, see your TV. 2. To Watch DTV: 1. Press the SOURCE button to the antenna input jack on the DTV. 2 Connect the HDMI input jack on the TV with the HDMI output jack on the TV. Connecting to HDMI (High Definition Multimedia Interface) (480p, 720p, ...1080i) Watching DTV TV Rear Panel Power cord HDMI cable DTV Set-Top Box How to Connect 1 Connect the ...

Quick Guide (easy Manual) (ver.1.0) (English)
Page 28
... Panel Power cord DTV Set-Top Box HDMI/DVI cable From cable or Antenna Audio cable How to the HDMI input jack on the TV, High-Definition pictures can be displayed on the screen in their digital form. Note • Use analog stereo audio inputs when using the HDMI... input with PC. 28 Connecting a Digital TV Set-Top Box (480p, 720p, 1080i) By inputting a high-bandwidth digital content protection High-Definition picture source to Connect 1 Connect the DVI AUDIO (L, R) ...
... Panel Power cord DTV Set-Top Box HDMI/DVI cable From cable or Antenna Audio cable How to the HDMI input jack on the TV, High-Definition pictures can be displayed on the screen in their digital form. Note • Use analog stereo audio inputs when using the HDMI... input with PC. 28 Connecting a Digital TV Set-Top Box (480p, 720p, 1080i) By inputting a high-bandwidth digital content protection High-Definition picture source to Connect 1 Connect the DVI AUDIO (L, R) ...
Quick Guide (easy Manual) (ver.1.0) (English)
Page 29
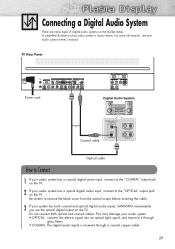
...output before inserting the cable. 3 If your audio system has a optical digital audio input, connect to the "COAXIAL" output jack on the TV. 2 If your system has both optical and coaxial cables. For more information, see your audio system. • OPTICAL: converts the electric signal...; COAXIAL: The digital audio signal is shown below. Do not connect both coaxial and optical digital audio inputs, SAMSUNG recommends you use the optical digital output on the TV. Connecting a Digital Audio System There are many types of an audio system is received through a coaxial copper cable...
...output before inserting the cable. 3 If your audio system has a optical digital audio input, connect to the "COAXIAL" output jack on the TV. 2 If your system has both optical and coaxial cables. For more information, see your audio system. • OPTICAL: converts the electric signal...; COAXIAL: The digital audio signal is shown below. Do not connect both coaxial and optical digital audio inputs, SAMSUNG recommends you use the optical digital output on the TV. Connecting a Digital Audio System There are many types of an audio system is received through a coaxial copper cable...


