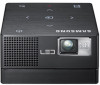
User Manual (user Manual) (ver.1.0) (English)
Page 1
SP-H03 PICO Projector User Manual The color and the appearance of the product may differ from the illustrations in this manual. The specifications are subject to change without prior notice to improve performance.
User Manual (user Manual) (ver.1.0) (English)
Page 2
... Details 3-2 LED Indications 3-3 Using the Screen Adjustment Menu (OSD: On Screen Display) . . . . 3-4 Supported File Formats 3-5 Firmware Update 3-6 TROUBLESHOOTING Before Requesting Service 4-1 MORE INFORMATION Specifications 5-1 Contact SAMSUNG WORLDWIDE 5-2 Correct Disposal -
User Manual (user Manual) (ver.1.0) (English)
Page 3
...visit is no defect in the product. (i.e. Using this Manual The contents of this manual are subject to change without the written permission of Samsung Electronics, Co., Ltd. An administration fee may be charged if either. (a) An engineer is called out at your request and there is ...work or the setting may be canceled. Note Indicates a hint or tip to a repair centre and there is reserved by Samsung Electronics, Co., Ltd. Copyright Notice Copyright © 2010 Samsung Electronics Co., Ltd. where you have failed to read this user manual). (b) You bring the unit to operate a function...
User Manual (user Manual) (ver.1.0) (English)
Page 4
... benzene or thinner. • Avoid scratching the lens with the product. • A white stain may appear on the surface of the projector, contact an authorized Samsung Service Center. • Contact a Service Center if dust or other substances are inside the projector. 1-2 Major Safety Precautions The appearance and the color may result...
User Manual (user Manual) (ver.1.0) (English)
Page 5
Warning Avoid plugging in or unplugging the power supply with wet hands. 30 LUMEN • Otherwise, it may result in electric shock or fire. Keep the power cord and the product away from heaters. • Otherwise, it thoroughly. • There is exposed to overheating of the wall outlet. Avoid connecting multiple electric appliances to a single wall outlet. • Otherwise, it may result in fire due to dust, water or alien substances, clean it may result in electric shock. If the power plug pin or jack is a danger of Signs Do not perform. Plug the power ...
User Manual (user Manual) (ver.1.0) (English)
Page 6
shock or fire. In addition, do not use only the power cord supplied by connecting or removing the power plug. (Do not use an unapproved battery. The power button alone will not cut off the power supply completely. Keep the plastic bags used to pack the product away from children. • If children place the plastic bags over their heads, they may result in electric ! battery or attempt to make sure that the front of the product does not protrude out of the console or shelf. 30 LUMEN • Otherwise, this may result in electric shock or fire. Caution When unplugging the power ...
User Manual (user Manual) (ver.1.0) (English)
Page 7
..., handle it gently. 30 LUMEN • Otherwise, it may result in a malfunction or injury. • Make sure to use a cabinet or shelf suitable to the SAMSUNG surrounding environment. When installing the product on a console or shelf, make sure that the front of the product does not protrude out of the product...
User Manual (user Manual) (ver.1.0) (English)
Page 8
...only the power cord or signal cable. • Otherwise, it may trip over the projector and hurt yourself, or damage the projector. ! 30 LUMEN SAMSUNG 30 LUMEN Do not use the product when it may cause dust accumulation and result in fire caused by overheating or short circuit or result... bottle, etc., or a metal object on the product. • Otherwise, it may result in a problem with the product or injury. 30 LUMEN 30 LUMEN SAMSUNG If water or any outer part of the product with the product or injury. electric shock. If the product generates a strange noise, a burning smell, or...
User Manual (user Manual) (ver.1.0) (English)
Page 9
... turned off . Caution When cleaning the product, disconnect the power cord and clean the product with a small LUMEN amount of the product such as wax, ! SAMSUNG Major Safety Precautions 1-3 Do not let 30 the adaptor to use adaptor by the waterside or outside particularly when it rains or snows. LUMEN •...
User Manual (user Manual) (ver.1.0) (English)
Page 10
... product at a later date. • If any items are missing, contact your dealer. • You can purchase items listed as Sold Separately from your local Samsung dealer. 2 Installation and Connection 2-1 Package Contents • Unpack the product and confirm that all locations) User Manual Power Cord / Adapter B Battery USB gender adaptor 3RCA...
User Manual (user Manual) (ver.1.0) (English)
Page 11
Push the top and back of the projector with the counterparts on the battery. 2-2 Connecting and Disconnecting the Battery Connecting the Battery Align and fasten the grooves on the bottom of the projector forward simultaneously until you hear a click. With the lock held down, lift the back of the battery. Installation and Connection 2-2 Disconnecting the Battery Press the lock, marked [PUSH], on the back of the projector.
User Manual (user Manual) (ver.1.0) (English)
Page 12
If you will not be able to adjust the focus correctly. 2-3 Installation and Connection 2-3 Zoom and Focus Adjustment FOCUS Move the [FOCUS] slide bar left or right until the picture is clear. The size of your screen determines the distance you set your projector at the projection distance specified in the Screen Size and Projection Distance table in Section 2-4, you do not place your projector from the screen.
User Manual (user Manual) (ver.1.0) (English)
Page 13
2-4 Screen Size and Projection Distance Screen: Side view Screen: Front view Projector Y 90° M Y X Z Z: Throw Distance If the picture is not clear, adjust [FOCUS], or move the projector forward or backward. M (DIAGONAL) INCHES CM 8.6 21.8 10 25.4 17.2 43.7 34.3 87.1 57.2 145.3 85.5 217.2 SCREEN SIZE X (HORIZONTAL) INCHES CM 7.5 19.0 8.7 22.1 15.0 38.1 29.9 75.9 49.9 126.6 74.5 189.3 Y (VERTICAL) INCHES CM 4.2 10.7 4.9 12.5 8.4 21.4 16.8 42.7 28.0 71.2 41.9 106.5 Z (THROW DISTANCE) INCHES 12.0 14.0 23.8 47.4 78.8 117.7 CM 30.5 35.5 60...
User Manual (user Manual) (ver.1.0) (English)
Page 14
Blocking the ventilation openings can cause your projector to overheat and may cause it to fail. , , , NAME Exhaust vents Intake vents Air outtake vent Air intake vent DESCRIPTION 2-5 Installation and Connection 2-5 Ventilation openings Ventilation openings For the location of the ventilation openings, see the picture below: • Do not block the ventilation openings.
User Manual (user Manual) (ver.1.0) (English)
Page 15
AV Timing (VIDEO) NTSC, NTSC 4.43, PAL, PAL60, PAL-N, PAL-M, SECAM Installation and Connection 2-6 PC Timing (D-Sub) FORMAT IBM VESA VESA VESA EIA-861B VESA VESA VESA RESOLUTION 640 x 480 800 x 600 1024 x 768 720 x 576 720 x 480 1280 x 800 1280 x 768 1280 x 720 60Hz 60Hz 60Hz 60Hz 60Hz 60Hz 60Hz 60Hz HORIZONTAL FREQUENCY (KHZ) 31.469 37.879 48.363 35.91 31.5 49.702 47.776 47.772 VERTICAL FREQUENCY (HZ) 59.94 60.317 60.004 59.95 60 59.81 59.87 59.855 PIXEL FREQUENCY (MHZ) 25.175 40 65 32.75 27.027 83.5 79.5 74.5 All resolutions higher or lower than 854 x 480 are converted to the ...
User Manual (user Manual) (ver.1.0) (English)
Page 16
Rear View Open the cover on the back of the memory device.) 2-7 Installation and Connection PC IN AV IN ICON PC IN port AV IN port NAME Power port USB port Audio output port The maximum memory capacity supported for a USB memory device is 16 GB. (The maximum capacity supported for external memory is based on the manufacturer of the projector. Your experience may differ depending on our factory test. 2-7 Ports 2-7-1.
User Manual (user Manual) (ver.1.0) (English)
Page 17
Side View FOCUS ICON MicroSD(HC) card slot NAME The maximum memory capacity supported for a MicroSD(HC) card is 32 GB. (The maximum capacity supported for external memory is based on the manufacturer of the memory device.) Installation and Connection 2-7 2-7-2. Your experience may differ depending on our factory test.
User Manual (user Manual) (ver.1.0) (English)
Page 18
For other resolutions supported by the projector, see the refresh rate (60 Hz, 70 Hz, etc.) next to your projector. 1. Another property window appears. 2 3 4. Setting the refresh rate sets both the vertical and horizontal frequencies. 4 5. Click the [OK] button to close that matches the resolution you've chosen, see the PC Timing Display Mode table in section 2-6. Shut down the PC and connect it to change the setup. 3. Click the right mouse button on the window to close the window, and then click the [OK] button on the Windows desktop, and then click [Properties]. The optimal ...
User Manual (user Manual) (ver.1.0) (English)
Page 19
Connecting with the display settings supported by this projector. Installation and Connection 2-8 Connect the D-Sub Gender Cable to [PC IN] on the back of the projector and RGB on the monitor manufacturer or Windows version. • When connecting the projector to "PC Timing (D-Sub)" in the power cords of the projector and the PC. Plug in the "Supported Display Modes" section for information on supported input signals. 2. Adjust the screen. • The setup process might vary depending on your type of computer or version of Windows. (For example, [Properties] appears instead ...
User Manual (user Manual) (ver.1.0) (English)
Page 20
2-9 Connecting to an AV Device PC IN AV IN VIDEO OUT AUDIO OUT Make sure that the AV device and your projector are sold separately. 2-9 Installation and Connection Video and audio cables are turned off. 1. Connect the audio cable to the VIDEO OUT port on the AV device. Connect the video cable to the AUDIO OUT port on the AV device. Refer to the 3RCA gender adaptor. Insert the 3RCA gender adaptor into the [AV IN] port on supported input signals. 3. Connect a video cable and audio cable to "AV Timing (VIDEO)" in the "Supported Display Modes" section for information on...