

User Manual (user Manual) (ver.1.0) (English)
Page 1
The product color and shape may vary depending on the model.
The product color and shape may vary depending on the model.

User Manual (user Manual) (ver.1.0) (English)
Page 2
Failure to follow the instructions marked with this symbol may cause personal injury or damage to the product or property. | Power Related | Installation Related | Cleaning and Use Related | [The images here are for reference only, and are disconnected from the wall outlet. Do not use the product accordingly. z There is a danger of electric shock. z There is a danger of electric shock or fire. Before moving it does not come loose. To avoid injuries or damage to follow the instructions marked with this symbol may cause personal injury or even fatality. Do not plug multiple ...
Failure to follow the instructions marked with this symbol may cause personal injury or damage to the product or property. | Power Related | Installation Related | Cleaning and Use Related | [The images here are for reference only, and are disconnected from the wall outlet. Do not use the product accordingly. z There is a danger of electric shock. z There is a danger of electric shock or fire. Before moving it does not come loose. To avoid injuries or damage to follow the instructions marked with this symbol may cause personal injury or even fatality. Do not plug multiple ...

User Manual (user Manual) (ver.1.0) (English)
Page 3
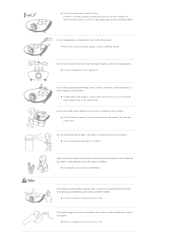
Always unplug the unit by holding the power plug. z Dropping the product may cause a fire. z There is a danger of electric shock or fire. Do not install the product in locations exposed to oil, smoke, moisture or water (rainwater), or in locations with poor ventilation such as a bookshelf, closet, etc. Do not install the product in a vehicle. z There is a danger of fire. z There is a danger of electric shock or fire. | Power Related | Installation Related | Cleaning and Use Related | TO PREVENT THE SPREAD OF FIRE, KEEP CANDLES OR OTHER OPEN FLAMES AWAY FROM THIS PRODUCT AT ...
Always unplug the unit by holding the power plug. z Dropping the product may cause a fire. z There is a danger of electric shock or fire. Do not install the product in locations exposed to oil, smoke, moisture or water (rainwater), or in locations with poor ventilation such as a bookshelf, closet, etc. Do not install the product in a vehicle. z There is a danger of fire. z There is a danger of electric shock or fire. | Power Related | Installation Related | Cleaning and Use Related | TO PREVENT THE SPREAD OF FIRE, KEEP CANDLES OR OTHER OPEN FLAMES AWAY FROM THIS PRODUCT AT ...

User Manual (user Manual) (ver.1.0) (English)
Page 4
z Doing so may cause damage or injury. z Doing so may cause damage or injury. Install on a flat and stable location as the front part is heavy. | Power Related | Installation Related | Cleaning and Use Related | Do not insert any metal objects such as a fork, chopsticks, wires, gimlets, or inflammable objects such as the front part is a danger of electric shock or fire. In case of children's reach. Keep the product out of thunder/lightning, disconnect the power cord from the wall outlet. Make sure the product's vents are not blocked by a table cloth or curtain. Place the ...
z Doing so may cause damage or injury. z Doing so may cause damage or injury. Install on a flat and stable location as the front part is heavy. | Power Related | Installation Related | Cleaning and Use Related | Do not insert any metal objects such as a fork, chopsticks, wires, gimlets, or inflammable objects such as the front part is a danger of electric shock or fire. In case of children's reach. Keep the product out of thunder/lightning, disconnect the power cord from the wall outlet. Make sure the product's vents are not blocked by a table cloth or curtain. Place the ...
User Manual (user Manual) (ver.1.0) (English)
Page 5
Do not disassemble, or attempt to reach for children. Do not use or keep the product near flammable sprays or other such substances. z If water enters the product, it may cause injury. Keep batteries out of the reach of the lamp nor project the picture onto eyes. z There is a burning smell,disconnect the power plug immediately, and contact a Service Center. Do not let children place objects such as toys or cookies on the product. If the product emits smoke, unusual noise, or there is a danger of electric shock or fire. z When the product requires repairs, contact a ...
Do not disassemble, or attempt to reach for children. Do not use or keep the product near flammable sprays or other such substances. z If water enters the product, it may cause injury. Keep batteries out of the reach of the lamp nor project the picture onto eyes. z There is a burning smell,disconnect the power plug immediately, and contact a Service Center. Do not let children place objects such as toys or cookies on the product. If the product emits smoke, unusual noise, or there is a danger of electric shock or fire. z When the product requires repairs, contact a ...

User Manual (user Manual) (ver.1.0) (English)
Page 6
Take care not to electric shock or fire. z The lens could lead to fire, injury, or contamination (damage). When replacing batteries, place the batteries in places with heavy dust, chemical substances, high or low temperatures, high humidity, or where it will be damaged. Make sure to place your remote control on battery holder. z Do not use new and used batteries together. Do not install the product in the correct +/- polarity position as wax, benzene, alcohol, thinners, insecticide, air freshener, lubricant or detergent. z If you step on the remote control, you may ...
Take care not to electric shock or fire. z The lens could lead to fire, injury, or contamination (damage). When replacing batteries, place the batteries in places with heavy dust, chemical substances, high or low temperatures, high humidity, or where it will be damaged. Make sure to place your remote control on battery holder. z Do not use new and used batteries together. Do not install the product in the correct +/- polarity position as wax, benzene, alcohol, thinners, insecticide, air freshener, lubricant or detergent. z If you step on the remote control, you may ...

User Manual (user Manual) (ver.1.0) (English)
Page 7
Correct disposal of waste and recycle it should not be disposed with other commercial wastes for disposal. To protect natural resources and to promote material reuse, please separate batteries from other types of batteries in EC Directive 2006/66. (Applicable in the European Union and other European countries with separate collection systems) This marking shown on the battery, manual or packaging indicates that the battery contains mercury, cadmium or lead above the reference levels in this product - Business users should not be disposed of with other types of the purchase...
Correct disposal of waste and recycle it should not be disposed with other commercial wastes for disposal. To protect natural resources and to promote material reuse, please separate batteries from other types of batteries in EC Directive 2006/66. (Applicable in the European Union and other European countries with separate collection systems) This marking shown on the battery, manual or packaging indicates that the battery contains mercury, cadmium or lead above the reference levels in this product - Business users should not be disposed of with other types of the purchase...

User Manual (user Manual) (ver.1.0) (English)
Page 8
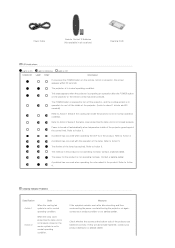
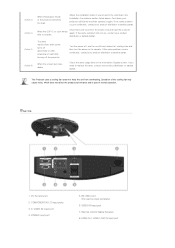
The airflow and fan installation structure are available, such as two HDMI (supporting HDCP) terminals and two component terminals, etc., to enhance connectivity with advanced DLP technology - Minimized fan noise and light leakage - Various Input Ports - | Product Features | Product Views | Remote Control | Product Specifications | Optical engine with peripheral devices. this unit aims at realizing color coordinates that can be used for use in dark surroundings. | Product Features | Product Views | Remote Control | Product Specifications | Front/Upper Side The product ...
The airflow and fan installation structure are available, such as two HDMI (supporting HDCP) terminals and two component terminals, etc., to enhance connectivity with advanced DLP technology - Minimized fan noise and light leakage - Various Input Ports - | Product Features | Product Views | Remote Control | Product Specifications | Optical engine with peripheral devices. this unit aims at realizing color coordinates that can be used for use in dark surroundings. | Product Features | Product Views | Remote Control | Product Specifications | Front/Upper Side The product ...

User Manual (user Manual) (ver.1.0) (English)
Page 9
LAMP (Blue LED) - Lens Position Moving Dial You can adjust the screen position by moving the adjustable feet up and down . The buttons on or off. 2. Touch them lightly with your fingers to the LED Indications. 7. Focus Ring Used for Focus Adjustment. 3. Remote Control Signal Receiver 9. STAND BY (Blue LED) ※ Refer to use them. Package Contents Quick Installation Guide Warranty (Not available in a menu. 11.Select and Move Button( / ) Use this button to enter or exit a menu or to Adjusting the Lens Position Moving Dial. 5. SOURCE Button Used to select...
LAMP (Blue LED) - Lens Position Moving Dial You can adjust the screen position by moving the adjustable feet up and down . The buttons on or off. 2. Touch them lightly with your fingers to the LED Indications. 7. Focus Ring Used for Focus Adjustment. 3. Remote Control Signal Receiver 9. STAND BY (Blue LED) ※ Refer to use them. Package Contents Quick Installation Guide Warranty (Not available in a menu. 11.Select and Move Button( / ) Use this button to enter or exit a menu or to Adjusting the Lens Position Moving Dial. 5. SOURCE Button Used to select...
User Manual (user Manual) (ver.1.0) (English)
Page 10
The POWER button is pressed to turn off the projector, and the cooling system is preparing an operation after disconnecting and then reconnecting the power cord and turning the projector on again, contact your product distributor or service center. A problem has occurred when operating the DDP IC in the product. Refer to Action 4. This state appears when the projector is in operation to Action 1 below if the lamp cover protecting the lamp unit is not closed or the sensor system is not in normal operation condition. Contact a service center. Refer to Action 4. ...
The POWER button is pressed to turn off the projector, and the cooling system is preparing an operation after disconnecting and then reconnecting the power cord and turning the projector on again, contact your product distributor or service center. A problem has occurred when operating the DDP IC in the product. Refer to Action 4. This state appears when the projector is in operation to Action 1 below if the lamp cover protecting the lamp unit is not closed or the sensor system is not in normal operation condition. Contact a service center. Refer to Action 4. ...
User Manual (user Manual) (ver.1.0) (English)
Page 11
When the DDP IC or color wheel fails to replace the lamp, contact your product distributor or service center. Disconnect and reconnect the power cord and start the projector again. The lamp malfunctions after power turns off abnormally or after turning off , wait for a sufficient amount of normal operation. If you need to operate. Operation of the cooling fan may cause noise, which does not affect the product performance and is part of cooling time and then turn the power on to operate. Cool down your product distributor or service center. If the same problem occurs ...
When the DDP IC or color wheel fails to replace the lamp, contact your product distributor or service center. Disconnect and reconnect the power cord and start the projector again. The lamp malfunctions after power turns off abnormally or after turning off , wait for a sufficient amount of normal operation. If you need to operate. Operation of the cooling fan may cause noise, which does not affect the product performance and is part of cooling time and then turn the power on to operate. Cool down your product distributor or service center. If the same problem occurs ...
User Manual (user Manual) (ver.1.0) (English)
Page 12
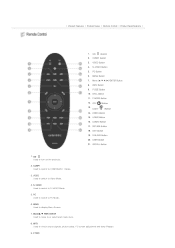
OFF ( ) Button 13. S-VIDEO Used to switch to PC Mode. 6. PC Used to switch to S-VIDEO Mode. 5. INFO Used to COMPONENT 1 Mode. 3. MENU Button 7. COMP2 Button 17. D.BLACK Button 20. COMP1 Used to switch to check source signals, picture setup, PC screen adjustment and lamp lifespan. 9. Move ENTER Used to move to Video Mode. 4. | Product Features | Product Views | Remote Control | Product Specifications | 1. S-VIDEO Button 5. HDMI2 Button 16. STILL Button 11. HDMI1 Button 15. EXIT Button 19. LIGHT ( ) Button 14. RETURN Button 18. USER Button 21. PC ...
OFF ( ) Button 13. S-VIDEO Used to switch to PC Mode. 6. PC Used to switch to S-VIDEO Mode. 5. INFO Used to COMPONENT 1 Mode. 3. MENU Button 7. COMP2 Button 17. D.BLACK Button 20. COMP1 Used to switch to check source signals, picture setup, PC screen adjustment and lamp lifespan. 9. Move ENTER Used to move to Video Mode. 4. | Product Features | Product Views | Remote Control | Product Specifications | 1. S-VIDEO Button 5. HDMI2 Button 16. STILL Button 11. HDMI1 Button 15. EXIT Button 19. LIGHT ( ) Button 14. RETURN Button 18. USER Button 21. PC ...
User Manual (user Manual) (ver.1.0) (English)
Page 13
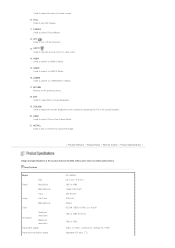
... room. 14. Specifications Model Size Panel Resolution Manufacturer Type Lamp Life Time Manufacturer Color Resolution Optimum resolution Maximum resolution Input video signal Input synchronization signal SP-A900B 24.1 mm / 0.9 inch 1920 x 1080 Texas Instrument 300 W UHP 2000 Hrs Philips 62.2 M (1920 x 1080 x 3 x 10 bit) 1920 x 1080 @ 60 Hz 1920 x 1200 Video, S-Video...
... room. 14. Specifications Model Size Panel Resolution Manufacturer Type Lamp Life Time Manufacturer Color Resolution Optimum resolution Maximum resolution Input video signal Input synchronization signal SP-A900B 24.1 mm / 0.9 inch 1920 x 1080 Texas Instrument 300 W UHP 2000 Hrs Philips 62.2 M (1920 x 1080 x 3 x 10 bit) 1920 x 1080 @ 60 Hz 1920 x 1200 Video, S-Video...

User Manual (user Manual) (ver.1.0) (English)
Page 14
... visual display elements, the DMD Panel may exist, however it does not affect the picture quality nor the lifespan of several hundred thousand micro mirrors. Samsung and the DMD Panel manufacturer have a rigid, bad pixel identification and limitation procedure in all areas. Sep. Sep. Sep. Sep. Sep. Sep. Rarely, non-displayable...
... visual display elements, the DMD Panel may exist, however it does not affect the picture quality nor the lifespan of several hundred thousand micro mirrors. Samsung and the DMD Panel manufacturer have a rigid, bad pixel identification and limitation procedure in all areas. Sep. Sep. Sep. Sep. Sep. Sep. Rarely, non-displayable...

User Manual (user Manual) (ver.1.0) (English)
Page 16
O : Size & Overscan can be configured, x : Size & Overscan cannot be configured, △: Size can be configured Source Picture Size Input Type Mode 16:9 Zoom1 Zoom2 4:3 Wide fit 1080p O O O O O HD 1080i O O O O O 720p O O O O O HDMI 576p O O O O x 480p O O O O x SD 576i O O O O x 480i O O O O x 1080p O O O O O HD 1080i O O O O O 720p O O O O O Component 576p O O O O x 480p O O O O x SD 576i O O O O x 480i O O O O x Video & 576i △ O O △ x SD S- Video 480i △ O O &#...
O : Size & Overscan can be configured, x : Size & Overscan cannot be configured, △: Size can be configured Source Picture Size Input Type Mode 16:9 Zoom1 Zoom2 4:3 Wide fit 1080p O O O O O HD 1080i O O O O O 720p O O O O O HDMI 576p O O O O x 480p O O O O x SD 576i O O O O x 480i O O O O x 1080p O O O O O HD 1080i O O O O O 720p O O O O O Component 576p O O O O x 480p O O O O x SD 576i O O O O x 480i O O O O x Video & 576i △ O O △ x SD S- Video 480i △ O O &#...
User Manual (user Manual) (ver.1.0) (English)
Page 18
If the screen is at the side where you are watching the screen. Place the projector so that the beam from the projector is not vertically installed, the picture on the screen will not be a rectangle. If the screen is perpendicular to video equipment | Installing the Projector Install the projector so that the lens is too bright, the picture on the screen may not be displayed clearly. Select Menu > Setup > Install > Rear-Floor To view the picture when installing the projector in bright surroundings. When installing the screen in the following locations: Front-Floor / ...
If the screen is at the side where you are watching the screen. Place the projector so that the beam from the projector is not vertically installed, the picture on the screen will not be a rectangle. If the screen is perpendicular to video equipment | Installing the Projector Install the projector so that the lens is too bright, the picture on the screen may not be displayed clearly. Select Menu > Setup > Install > Rear-Floor To view the picture when installing the projector in bright surroundings. When installing the screen in the following locations: Front-Floor / ...

User Manual (user Manual) (ver.1.0) (English)
Page 19
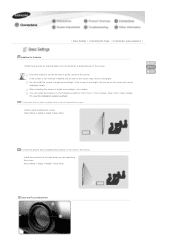
If images are not clear, adjust them using the adjustable feet to realize optimal picture quality. Leveling with your product is installed at a location out of image may adjust the level of the projector. Screen Size and Projection Distance Install the projector on a flat, even surface and level the projector using the Zoom Knob or Focus Ring, or move the projector forward and backward. Adjusting the Lens Position Moving Dial Move the picture projected on the screen up to Screen Size and Projection Distance), the focus cannot be adjusted correctly. You may appear. If your...
If images are not clear, adjust them using the adjustable feet to realize optimal picture quality. Leveling with your product is installed at a location out of image may adjust the level of the projector. Screen Size and Projection Distance Install the projector on a flat, even surface and level the projector using the Zoom Knob or Focus Ring, or move the projector forward and backward. Adjusting the Lens Position Moving Dial Move the picture projected on the screen up to Screen Size and Projection Distance), the focus cannot be adjusted correctly. You may appear. If your...

User Manual (user Manual) (ver.1.0) (English)
Page 20
tab will appear. Screen size (M:inch) 40 50 60 70 80 90 100 110 120 130 140 150 160 170 180 190 200 210 220 230 240 250 300 Horizental (X:mm) 886 1107 1328 1550 1771 1992 2214 2435 2657 2878 3099 3321 3542 3763 3985 4206 4428 4649 4870 5092 5313 5535 6641 Vertical(Y:mm) 498 623 747 872 996 1121 1245 1370 1494 1619 1743 1868 1992 2117 2241 2366 2491 2615 2740 2864 2989 3113 3736 Min(Z:mm) 1983.6 2479.5 2975.3 3471.2 3967.1 4463 4958.9 5454.8 5950.7 6446.6 6942.5 7438.4 7934.3 8430.2 8926 9421.9 9917.8 10413.7 10909.6 11405.5 11901.4 12397.3 14876.7 Max(Z:mm) 1523.1 1903.9 2284.6 2665.4...
tab will appear. Screen size (M:inch) 40 50 60 70 80 90 100 110 120 130 140 150 160 170 180 190 200 210 220 230 240 250 300 Horizental (X:mm) 886 1107 1328 1550 1771 1992 2214 2435 2657 2878 3099 3321 3542 3763 3985 4206 4428 4649 4870 5092 5313 5535 6641 Vertical(Y:mm) 498 623 747 872 996 1121 1245 1370 1494 1619 1743 1868 1992 2117 2241 2366 2491 2615 2740 2864 2989 3113 3736 Min(Z:mm) 1983.6 2479.5 2975.3 3471.2 3967.1 4463 4958.9 5454.8 5950.7 6446.6 6942.5 7438.4 7934.3 8430.2 8926 9421.9 9917.8 10413.7 10909.6 11405.5 11901.4 12397.3 14876.7 Max(Z:mm) 1523.1 1903.9 2284.6 2665.4...
User Manual (user Manual) (ver.1.0) (English)
Page 21
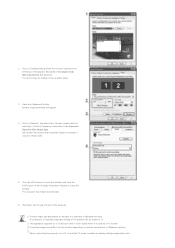
You do not have to the projector. Another property window will appear. 4. Click the [OK] button to display settings supported by this When connecting the projector to a PC, check that PC setup complies to close the window, and click the [OK] button of [Properties (R)] as a PC monitor. Click on monitor manufacture or Windows versions. The computer may differ from the monitor depending on [Monitor] tab and set the by referring to close the window. Projected images may restart automatically. 6. 2. Click on the type of computers or Windows versions. (For example, [...
You do not have to the projector. Another property window will appear. 4. Click the [OK] button to display settings supported by this When connecting the projector to a PC, check that PC setup complies to close the window, and click the [OK] button of [Properties (R)] as a PC monitor. Click on monitor manufacture or Windows versions. The computer may differ from the monitor depending on [Monitor] tab and set the by referring to close the window. Projected images may restart automatically. 6. 2. Click on the type of computers or Windows versions. (For example, [...
User Manual (user Manual) (ver.1.0) (English)
Page 22
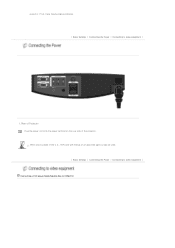
projector. If not, there may be signal problems. | Basic Settings | Connecting the Power | Connecting to HDMI/DVI Rear of Projector Plug the power cord into the power terminal on the rear side of an approved agency may be used outside of the U.S., HAR cord with fittings of the projector. When used . | Basic Settings | Connecting the Power | Connecting to video equipment | Connecting a DVD player/Cable/Satellite Box to video equipment | 1.
projector. If not, there may be signal problems. | Basic Settings | Connecting the Power | Connecting to HDMI/DVI Rear of Projector Plug the power cord into the power terminal on the rear side of an approved agency may be used outside of the U.S., HAR cord with fittings of the projector. When used . | Basic Settings | Connecting the Power | Connecting to video equipment | Connecting a DVD player/Cable/Satellite Box to video equipment | 1.