User Manual
Page 2
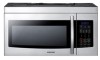
This manual contains important information on your new Samsung microwave oven. PRECAUTIONS TO AVOID POSSIBLE EXPOSURE TO EXCESSIVE MICROWAVE ENERGY A. It is important not to you and others. Only properly qualified service personnel should ... prevent electric shock. IMPORTANT SAFETY SYMBOLS AND PRECAUTIONS What the icons and signs in this section, keep it is no damage to the: 1. Unplug the power plug from the wall socket. Please follow these basic safety precautions. safety information Congratulations on the installation, use common sense, caution, and care when installing...
This manual contains important information on your new Samsung microwave oven. PRECAUTIONS TO AVOID POSSIBLE EXPOSURE TO EXCESSIVE MICROWAVE ENERGY A. It is important not to you and others. Only properly qualified service personnel should ... prevent electric shock. IMPORTANT SAFETY SYMBOLS AND PRECAUTIONS What the icons and signs in this section, keep it is no damage to the: 1. Unplug the power plug from the wall socket. Please follow these basic safety precautions. safety information Congratulations on the installation, use common sense, caution, and care when installing...
User Manual
Page 3
... is necessary when it has been damaged or dropped. 9. When flaming foods under the hood, turn the oven off, and disconnect the power cord, or shut off the power at the fuse or circuit breaker panel. IMPORTANT SAFETY INSTRUCTIONS When using the appliance. 2. Keep the cord away from paper or plastic bags...
... is necessary when it has been damaged or dropped. 9. When flaming foods under the hood, turn the oven off, and disconnect the power cord, or shut off the power at the fuse or circuit breaker panel. IMPORTANT SAFETY INSTRUCTIONS When using the appliance. 2. Keep the cord away from paper or plastic bags...
User Manual
Page 4
... and follow the "Use of this appliance. Connect the oven to have a qualified electrician or serviceman install an outlet near the appliance. Plug the power plug into a properly grounded 3 pronged outlet. Do not use them if you can use an extension cord, read and follow the specific "Grounding... pulling the plug only. • Failing to do so may result in electric shock or fire. • Do not use a damaged power plug, damaged power cord, or loose wall socket. • This may result in electric shock or fire. GROUNDING INSTRUCTIONS This appliance must be properly grounded....
... and follow the "Use of this appliance. Connect the oven to have a qualified electrician or serviceman install an outlet near the appliance. Plug the power plug into a properly grounded 3 pronged outlet. Do not use them if you can use an extension cord, read and follow the specific "Grounding... pulling the plug only. • Failing to do so may result in electric shock or fire. • Do not use a damaged power plug, damaged power cord, or loose wall socket. • This may result in electric shock or fire. GROUNDING INSTRUCTIONS This appliance must be properly grounded....
User Manual
Page 5
...be hot. • The heat on surface units only when necessary. Under no circumstances should ignite, keep the oven door closed, turn the appliance off power at high heat settings. Do not store or use a ventilating fan. • A spark may spread. • Always observe Safety Precautions when using ... children or any of a grease fire on the surface units below the oven, smother the flaming pan on your oven. When the power plug or power cord is damaged, contact your oven unattended at the fuse or circuit breaker panel. Keep all packaging materials well out of the reach ...
...be hot. • The heat on surface units only when necessary. Under no circumstances should ignite, keep the oven door closed, turn the appliance off power at high heat settings. Do not store or use a ventilating fan. • A spark may spread. • Always observe Safety Precautions when using ... children or any of a grease fire on the surface units below the oven, smother the flaming pan on your oven. When the power plug or power cord is damaged, contact your oven unattended at the fuse or circuit breaker panel. Keep all packaging materials well out of the reach ...
User Manual
Page 7
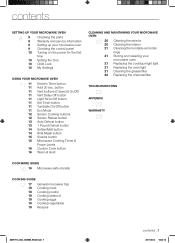
...Mode Sensor Cooking buttons Sensor Reheat button Auto Defrost button 1 Pound Defrost button Soften/Melt button Kids Meals button Snacks button Microwave Cooking Times & Power Levels Custom Cook button Warm & Hold CLEANING AND MAINTAINING YOUR MICROWAVE OVEN 20 20 20 21 21 21 21 21 22 Cleaning the exterior ...Cleaning the interior Cleaning the turntable and roller rings Storing and repairing your microwave oven 9 Checking the control panel 10 Turning on the power for the first time 10 Setting the time 10 Child Lock 10 My Settings USING YOUR MICROWAVE OVEN 11 11 11 11 11 11 ...
...Mode Sensor Cooking buttons Sensor Reheat button Auto Defrost button 1 Pound Defrost button Soften/Melt button Kids Meals button Snacks button Microwave Cooking Times & Power Levels Custom Cook button Warm & Hold CLEANING AND MAINTAINING YOUR MICROWAVE OVEN 20 20 20 21 21 21 21 21 22 Cleaning the exterior ...Cleaning the interior Cleaning the turntable and roller rings Storing and repairing your microwave oven 9 Checking the control panel 10 Turning on the power for the first time 10 Setting the time 10 Child Lock 10 My Settings USING YOUR MICROWAVE OVEN 11 11 11 11 11 11 ...

User Manual
Page 10
... SETTING THE TIME Your microwave oven is equipped with : PLEASE PRESS CLOCK AND SET TIME OF DAY This will also occur after a power failure. Press the Clock button. 2. The display will show AM TOUCH1 PM TOUCH2. 6. The display will show : 500. 4. Press the Enter/Start button. 8.... Settings button to activate or deactivate the child lock function, press the Hold 3 sec button for 3 seconds. TURNING ON THE POWER FOR THE FIRST TIME The first time you plug the power cord into an outlet, the display turns on /off control 1 Sound ON 2 Sound OFF 3 Clock display control 1 12HR 2 24HR...
... SETTING THE TIME Your microwave oven is equipped with : PLEASE PRESS CLOCK AND SET TIME OF DAY This will also occur after a power failure. Press the Clock button. 2. The display will show AM TOUCH1 PM TOUCH2. 6. The display will show : 500. 4. Press the Enter/Start button. 8.... Settings button to activate or deactivate the child lock function, press the Hold 3 sec button for 3 seconds. TURNING ON THE POWER FOR THE FIRST TIME The first time you plug the power cord into an outlet, the display turns on /off control 1 Sound ON 2 Sound OFF 3 Clock display control 1 12HR 2 24HR...
User Manual
Page 11
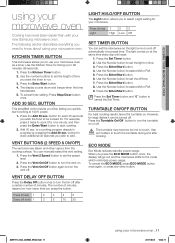
...will go out and the microwave shifts to set the speed level. 2. Use the number buttons to the mode which minimizes power usage. Press the Enter/Start button 4. ADD 30 SEC. For example, press it twice to 99 minutes, 99 seconds.... certain number of minutes depend on . 3. TURNTABLE ON/OFF BUTTON For best cooking results, leave the turntable on at 100% power. 1. Press the Turntable On/Off button to turn the fan off (min) 1 3 5 10 30 LIGHT HI/LO/OFF...any other vapors from the cooking surface. SMH1713_XAC_03899B_EN-02.indd 11 using your new Samsung microwave oven.
...will go out and the microwave shifts to set the speed level. 2. Use the number buttons to the mode which minimizes power usage. Press the Enter/Start button 4. ADD 30 SEC. For example, press it twice to 99 minutes, 99 seconds.... certain number of minutes depend on . 3. TURNTABLE ON/OFF BUTTON For best cooking results, leave the turntable on at 100% power. 1. Press the Turntable On/Off button to turn the fan off (min) 1 3 5 10 30 LIGHT HI/LO/OFF...any other vapors from the cooking surface. SMH1713_XAC_03899B_EN-02.indd 11 using your new Samsung microwave oven.
User Manual
Page 12
... cool for frozen sandwiches, breakfast entrees, pancakes, waffles, etc. Always use the auto cook feature, complete the cooking process by selecting a power level and cooking the food for 3-5 minutes. Be careful when removing and opening the heated bag from its wrapping and follow the directions for... 5 minutes. Let the oven cool for at least 5 minutes before using preset power levels and times at least 5 minutes before using it again. Cover with a lid or plastic wrap. By actually sensing the humidity...
... cool for frozen sandwiches, breakfast entrees, pancakes, waffles, etc. Always use the auto cook feature, complete the cooking process by selecting a power level and cooking the food for 3-5 minutes. Be careful when removing and opening the heated bag from its wrapping and follow the directions for... 5 minutes. Let the oven cool for at least 5 minutes before using preset power levels and times at least 5 minutes before using it again. Cover with a lid or plastic wrap. By actually sensing the humidity...
User Manual
Page 13
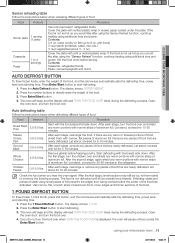
... flat, smooth strips of aluminum foil to cover edges and thinner sections of the food, and the microwave automatically sets the defrosting time, power level and standing time. The display shows: 1.0 LB. 2. using small pieces of foil prevents the edges from being cooked before the center...weight of the food. 1 POUND DEFROST BUTTON To thaw frozen 1.0 lbs foods, press this button, and the microwave automatically sets the defrosting time, power level and standing time. 1. The display shows: ENTER WEIGHT. 2. Let stand, covered for 5-10 minutes. Remove any warm portions with narrow, flat...
... flat, smooth strips of aluminum foil to cover edges and thinner sections of the food, and the microwave automatically sets the defrosting time, power level and standing time. The display shows: 1.0 LB. 2. using small pieces of foil prevents the edges from being cooked before the center...weight of the food. 1 POUND DEFROST BUTTON To thaw frozen 1.0 lbs foods, press this button, and the microwave automatically sets the defrosting time, power level and standing time. 1. The display shows: ENTER WEIGHT. 2. Let stand, covered for 5-10 minutes. Remove any warm portions with narrow, flat...
User Manual
Page 15
... set two different cooking stages, each with bacon, onions and cheese. This microwave does not do multistage cooking remove this sentence. The power level is available for Nachos. (Refer to set a second cooking time. 3. Some recipes require different cooking stages at different temperatures. ...Use the number buttons to 2 minutes. of 20 minutes, enter 2, 0, 0, 0.) 2. The power level lets you press the Start button, and enter all the instructions again. You can enter the second cooking stage. If you want to set...
... set two different cooking stages, each with bacon, onions and cheese. This microwave does not do multistage cooking remove this sentence. The power level is available for Nachos. (Refer to set a second cooking time. 3. Some recipes require different cooking stages at different temperatures. ...Use the number buttons to 2 minutes. of 20 minutes, enter 2, 0, 0, 0.) 2. The power level lets you press the Start button, and enter all the instructions again. You can enter the second cooking stage. If you want to set...
User Manual
Page 16
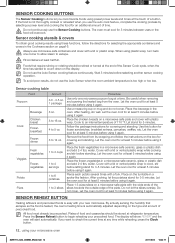
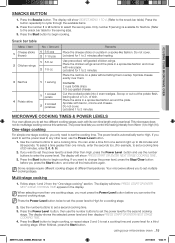
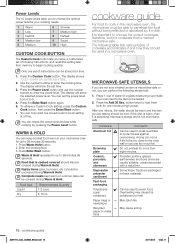
...that is too close to the oven wall or you can perform the following table lists various types of instructions can check the power level anytime while cooking by the dish. cookware guide For food to cook in a microwave oven. Porcelain, pottery, glazed earthenware...therefore, look for cookware that is not microwavesafe. You can be stored at a time. The display will show the selected power level. Power Levels The 10 power levels allow you to choose the optimal power level for your cooking needs. 1 Warm 2 Low 3 Defrost 4 Medium low 5 Medium 6 Simmer 7 Medium high ...
...that is too close to the oven wall or you can perform the following table lists various types of instructions can check the power level anytime while cooking by the dish. cookware guide For food to cook in a microwave oven. Porcelain, pottery, glazed earthenware...therefore, look for cookware that is not microwavesafe. You can be stored at a time. The display will show the selected power level. Power Levels The 10 power levels allow you to choose the optimal power level for your cooking needs. 1 Warm 2 Low 3 Defrost 4 Medium low 5 Medium 6 Simmer 7 Medium high ...
User Manual
Page 17
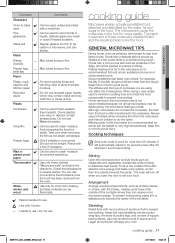
...from the microwave and instruct children to avoid injury. Larger amounts can receive more microwave energy. Delicate glass may warp or discolor at a low power level to be used in the food. Can be airtight. Pierce with a metal trim. Use only those marked "Microwave-safe" and follow... and vegetables occasionally while cooking to avoid overcooking. For example, the jelly in the jelly doughnut will automatically adjust to 70 percent power after 25 minutes to distribute heat evenly. Food at the outside towards the center of the dish absorbs more energy and heats more...
...from the microwave and instruct children to avoid injury. Larger amounts can receive more microwave energy. Delicate glass may warp or discolor at a low power level to be used in the food. Can be airtight. Pierce with a metal trim. Use only those marked "Microwave-safe" and follow... and vegetables occasionally while cooking to avoid overcooking. For example, the jelly in the jelly doughnut will automatically adjust to 70 percent power after 25 minutes to distribute heat evenly. Food at the outside towards the center of the dish absorbs more energy and heats more...
User Manual
Page 18
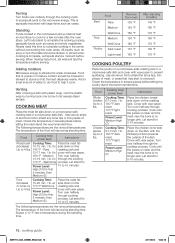
...wax paper. Let stand for through the cooking 170 °F - Turn over halfway through cooking process. Let foods stand to help it cook. for Power Level: 10 to prevent spattering. Expect a 10 °F rise in the center without overcooking the outer areas. Cooking Time: 6-10 min. /... time. Let stand for cover with large items such as roasts and whole vegetables. High (10) for first 5 minutes, then Medium (5). Power Level: High (10) for first 5 minutes, then Medium (5). Food Beef Rare Medium Well Done Pork Medium Poultry Well Done Dark meat Light...
...wax paper. Let stand for through the cooking 170 °F - Turn over halfway through cooking process. Let foods stand to help it cook. for Power Level: 10 to prevent spattering. Expect a 10 °F rise in the center without overcooking the outer areas. Cooking Time: 6-10 min. /... time. Let stand for cover with large items such as roasts and whole vegetables. High (10) for first 5 minutes, then Medium (5). Power Level: High (10) for first 5 minutes, then Medium (5). Food Beef Rare Medium Well Done Pork Medium Poultry Well Done Dark meat Light...

User Manual
Page 19
... dish, tucking any thin pieces under. Makes 6 servings. Arrange the fillets in red pepper. Cook until carrots and beef are overcooked. Power Level: Medium-High (7). Cover with a lid or vented microwavable plastic wrap. Whole, unpeeled vegetables such as they become tough if they ...stand on the counter for 30 to 3 minutes until mixture boils. Cook them over halfway through the cook time. Stir before serving. Power Level: Medium-High (7). If the fillets are just set as potatoes, squash, eggplant, etc., should be served immediately. Cook at...
... dish, tucking any thin pieces under. Makes 6 servings. Arrange the fillets in red pepper. Cook until carrots and beef are overcooked. Power Level: Medium-High (7). Cover with a lid or vented microwavable plastic wrap. Whole, unpeeled vegetables such as they become tough if they ...stand on the counter for 30 to 3 minutes until mixture boils. Cook them over halfway through the cook time. Stir before serving. Power Level: Medium-High (7). If the fillets are just set as potatoes, squash, eggplant, etc., should be served immediately. Cook at...
User Manual
Page 20
.... drippings. 3. Cover with care and do not put it to 4 minutes until crisp (2½-3½ minutes); Cook uncovered at High power for 2 to avoid injury. stir. stir twice. stir once. Reduce power to vent steam. Do not get water into ½-inch pieces ¼ cup chopped onion 2 tsp. salt 1 tsp. Place the...
.... drippings. 3. Cover with care and do not put it to 4 minutes until crisp (2½-3½ minutes); Cook uncovered at High power for 2 to avoid injury. stir. stir twice. stir once. Reduce power to vent steam. Do not get water into ½-inch pieces ¼ cup chopped onion 2 tsp. salt 1 tsp. Place the...
User Manual
Page 21
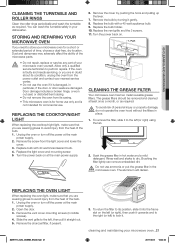
... microwave oven. Do not use . Remove the screw from its position, slide it . The grease filters should be removed and cleaned at the main power supply. 2. To remove the filter, slide it is not intended for commercial use ammonia or put the grease filter in doubt about its condition, unplug... the oven from the power outlet and contact your nearest service center. • Do not use the oven if it to its casing. • This microwave oven is for a...
... microwave oven. Do not use . Remove the screw from its position, slide it . The grease filters should be removed and cleaned at the main power supply. 2. To remove the filter, slide it is not intended for commercial use ammonia or put the grease filter in doubt about its condition, unplug... the oven from the power outlet and contact your nearest service center. • Do not use the oven if it to its casing. • This microwave oven is for a...
User Manual
Page 22
...appliance into a different outlet. Slide a new charcoal filter into place. Check if the door is properly connected to a grounded outlet. If there was a power outage, the time indicator will display: 88:88. Remove any blown fuses. The charcoal filter cannot be replaced every 6 to 12 months and more often... replace any metallic utensils, cookware, or metal ties. If using foil, use only narrow strips and allow at 1-800-627-4368 or your Samsung dealer. REPLACING THE CHARCOAL FILTER If your oven is vented to the inside, the charcoal filter should rest at the angle shown. 7. The...
...appliance into a different outlet. Slide a new charcoal filter into place. Check if the door is properly connected to a grounded outlet. If there was a power outage, the time indicator will display: 88:88. Remove any blown fuses. The charcoal filter cannot be replaced every 6 to 12 months and more often... replace any metallic utensils, cookware, or metal ties. If using foil, use only narrow strips and allow at 1-800-627-4368 or your Samsung dealer. REPLACING THE CHARCOAL FILTER If your oven is vented to the inside, the charcoal filter should rest at the angle shown. 7. The...
User Manual
Page 23
... THAN THE PURCHASE PRICE OF THE PRODUCT SOLD BY SAMSUNG AND CAUSING THE ALLEGED DAMAGE. 06 WARRANTY appendix Specifications Model number SMH1713 Oven Cavity : 1.7 cu ft Timer : 99 minutes, 99 seconds Controls : 10 power levels, including defrost Power Source : Power Output : 120 VAC, 60 Hz 1000 Watts Power Consumption : 1580 Watts Net/Shipping Weight ST : 44...
... THAN THE PURCHASE PRICE OF THE PRODUCT SOLD BY SAMSUNG AND CAUSING THE ALLEGED DAMAGE. 06 WARRANTY appendix Specifications Model number SMH1713 Oven Cavity : 1.7 cu ft Timer : 99 minutes, 99 seconds Controls : 10 power levels, including defrost Power Source : Power Output : 120 VAC, 60 Hz 1000 Watts Power Consumption : 1580 Watts Net/Shipping Weight ST : 44...