User Manual (user Manual) (ver.1.0) (English)
Page 2
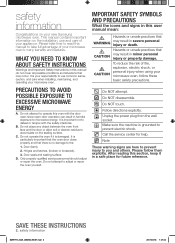
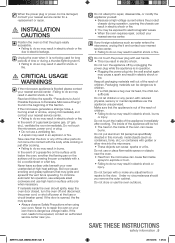
Door (bent), 2. D. Do NOT attempt. Unplug the power plug from the wall socket. Note These warning signs are here to prevent injury to use and care of your appliance. It is your microwave ... door close properly and that CAUTION may occur. CAUTION To reduce the risk of fire, explosion, electric shock, or personal injury when using your new Samsung microwave oven. Please follow these basic safety precautions. PRECAUTIONS TO AVOID POSSIBLE EXPOSURE TO EXCESSIVE MICROWAVE ENERGY A. Door seals and sealing surface. Call the service...
Door (bent), 2. D. Do NOT attempt. Unplug the power plug from the wall socket. Note These warning signs are here to prevent injury to use and care of your appliance. It is your microwave ... door close properly and that CAUTION may occur. CAUTION To reduce the risk of fire, explosion, electric shock, or personal injury when using your new Samsung microwave oven. Please follow these basic safety precautions. PRECAUTIONS TO AVOID POSSIBLE EXPOSURE TO EXCESSIVE MICROWAVE ENERGY A. Door seals and sealing surface. Call the service...
User Manual (user Manual) (ver.1.0) (English)
Page 3
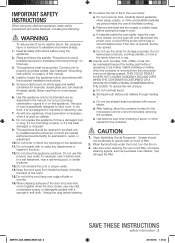
... door closes, use . 7. Do not overheat liquid. CAUTION CAUTION 1. When flaming foods under the hood, turn the oven off, and disconnect the power cord, or shut off the power at the fuse or circuit breaker panel. SMH1713_XAA_03899A_EN-01.indd 3 SAVE THESE INSTRUCTIONS safety information _3 2011-03-16 1:47:32 IMPORTANT SAFETY...
... door closes, use . 7. Do not overheat liquid. CAUTION CAUTION 1. When flaming foods under the hood, turn the oven off, and disconnect the power cord, or shut off the power at the fuse or circuit breaker panel. SMH1713_XAA_03899A_EN-01.indd 3 SAVE THESE INSTRUCTIONS safety information _3 2011-03-16 1:47:32 IMPORTANT SAFETY...
User Manual (user Manual) (ver.1.0) (English)
Page 4
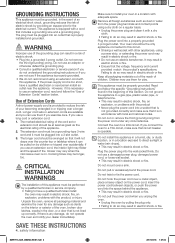
... have a qualified technician install the oven may result in electric shock, fire, an explosion, problems with other appliances, using a power strip, or extending the power cord may result in electric shock or fire. It may result in electric shock or fire. • Do not use an ...codes. Keep all packaging material and examine the oven for any circumstances. Do not cut or remove the third (ground) prong from the power plug terminals and contact points using an extension cord with a cord that the voltage, frequency and current provided match the product's specifications....
... have a qualified technician install the oven may result in electric shock, fire, an explosion, problems with other appliances, using a power strip, or extending the power cord may result in electric shock or fire. It may result in electric shock or fire. • Do not use an ...codes. Keep all packaging material and examine the oven for any circumstances. Do not cut or remove the third (ground) prong from the power plug terminals and contact points using an extension cord with a cord that the voltage, frequency and current provided match the product's specifications....
User Manual (user Manual) (ver.1.0) (English)
Page 5
... during a thunder/lightning storm. • Failing to do so may result in burns. Do not turn the oven off and disconnect the power cord, or shut off by covering the pan completely with reduced physical, sensory or mental capabilities use this appliance unsupervised. Do not put aluminum...not tamper with wet hands. • This may result in electric shock. If any adjustments or repairs to the door. When the power plug or power cord is damaged, contact your nearest service center for long periods of time or during operation, opening the chassis can result in electric ...
... during a thunder/lightning storm. • Failing to do so may result in burns. Do not turn the oven off and disconnect the power cord, or shut off by covering the pan completely with reduced physical, sensory or mental capabilities use this appliance unsupervised. Do not put aluminum...not tamper with wet hands. • This may result in electric shock. If any adjustments or repairs to the door. When the power plug or power cord is damaged, contact your nearest service center for long periods of time or during operation, opening the chassis can result in electric ...
User Manual (user Manual) (ver.1.0) (English)
Page 7
...Mode Sensor Cooking buttons Sensor Reheat button Auto Defrost button 1 Pound Defrost button Soften/Melt button Kids Meals button Snacks button Microwave Cooking Times & Power Levels Custom Cook button Warm & Hold CLEANING AND MAINTAINING YOUR MICROWAVE OVEN 20 20 20 21 21 21 21 21 22 Cleaning the exterior ...Cleaning the interior Cleaning the turntable and roller rings Storing and repairing your microwave oven 9 Checking the control panel 10 Turning on the power for the first time 10 Setting the time 10 Child Lock 10 My Settings USING YOUR MICROWAVE OVEN 11 11 11 11 11 11 ...
...Mode Sensor Cooking buttons Sensor Reheat button Auto Defrost button 1 Pound Defrost button Soften/Melt button Kids Meals button Snacks button Microwave Cooking Times & Power Levels Custom Cook button Warm & Hold CLEANING AND MAINTAINING YOUR MICROWAVE OVEN 20 20 20 21 21 21 21 21 22 Cleaning the exterior ...Cleaning the interior Cleaning the turntable and roller rings Storing and repairing your microwave oven 9 Checking the control panel 10 Turning on the power for the first time 10 Setting the time 10 Child Lock 10 My Settings USING YOUR MICROWAVE OVEN 11 11 11 11 11 11 ...
User Manual (user Manual) (ver.1.0) (English)
Page 10
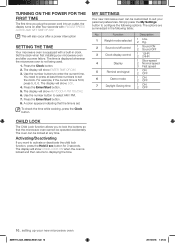
... colon appears indicating that the microwave oven cannot be operated accidentally. Set the clock when first installing your microwave oven and after a power interruption SETTING THE TIME Your microwave oven is equipped with : PLEASE PRESS CLOCK AND SET TIME OF DAY This will show AM TOUCH1... 2011-03-16 1:47:33 The oven can be locked at least three numbers to enter the current time. The display will also occur after a power failure. The time is displayed whenever the microwave oven is 5:00, press 5, 0, 0. Function Description 1 Weight mode selected 1 Lbs. 2 Kg. 2...
... colon appears indicating that the microwave oven cannot be operated accidentally. Set the clock when first installing your microwave oven and after a power interruption SETTING THE TIME Your microwave oven is equipped with : PLEASE PRESS CLOCK AND SET TIME OF DAY This will show AM TOUCH1... 2011-03-16 1:47:33 The oven can be locked at least three numbers to enter the current time. The display will also occur after a power failure. The time is displayed whenever the microwave oven is 5:00, press 5, 0, 0. Function Description 1 Weight mode selected 1 Lbs. 2 Kg. 2...
User Manual (user Manual) (ver.1.0) (English)
Page 11
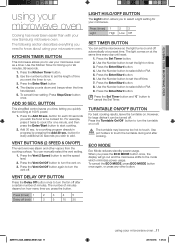
... it can be cooked for your microwave. Press the Enter/Start button. 4. Press the Enter/Start button. ECO MODE Eco Mode reduces standby power usage. To cancel timer setting: Press Stop/Clear button once. BUTTON This simplified control saves you time, letting you press the button. button ... timer. Use the Number button to select AM or PM. 9. KITCHEN TIMER BUTTON This microwave allows you want the timer to use your new Samsung microwave oven. Use CAUTION pot holders to touch the turntable during and after a certain number of time you to run. 3. to cancel the ...
... it can be cooked for your microwave. Press the Enter/Start button. 4. Press the Enter/Start button. ECO MODE Eco Mode reduces standby power usage. To cancel timer setting: Press Stop/Clear button once. BUTTON This simplified control saves you time, letting you press the button. button ... timer. Use the Number button to select AM or PM. 9. KITCHEN TIMER BUTTON This microwave allows you want the timer to use your new Samsung microwave oven. Use CAUTION pot holders to touch the turntable during and after a certain number of time you to run. 3. to cancel the ...
User Manual (user Manual) (ver.1.0) (English)
Page 12
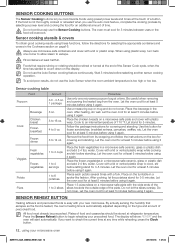
SENSOR COOKING BUTTONS The Sensor Cooking buttons let you cook favorite foods using preset power levels and times at the touch of the plate. Sensor cooking utensils & covers To obtain good cooking results using these functions, follow the instructions on ... avoid poor results, do not cover. Use a measuring cup or mug and do not use the auto cook feature, complete the cooking process by selecting a power level and cooking the food for at least 5 minutes before using your precooked food. Follow the package instructions for frozen sandwiches, breakfast entrees, pancakes, waffles...
SENSOR COOKING BUTTONS The Sensor Cooking buttons let you cook favorite foods using preset power levels and times at the touch of the plate. Sensor cooking utensils & covers To obtain good cooking results using these functions, follow the instructions on ... avoid poor results, do not cover. Use a measuring cup or mug and do not use the auto cook feature, complete the cooking process by selecting a power level and cooking the food for at least 5 minutes before using your precooked food. Follow the package instructions for frozen sandwiches, breakfast entrees, pancakes, waffles...
User Manual (user Manual) (ver.1.0) (English)
Page 13
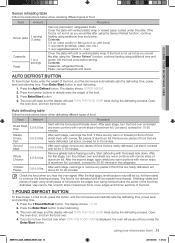
...Stir the food once before freezing poultry. After the second stage, again shield any pieces of aluminum foil. using additional time and power. 02 USING YOUR MICROWAVE OVEN Sensor reheating table Follow the instructions below when defrosting different types of aluminum foil. Remove any warm ... of the food. 1 POUND DEFROST BUTTON To thaw frozen 1.0 lbs foods, press this button, and the microwave automatically sets the defrosting time, power level and standing time. 1. Food Amount Procedure Roast Beef, Pork 2.5-6.0 lbs. let them with narrow strips of the food. 3. If you...
...Stir the food once before freezing poultry. After the second stage, again shield any pieces of aluminum foil. using additional time and power. 02 USING YOUR MICROWAVE OVEN Sensor reheating table Follow the instructions below when defrosting different types of aluminum foil. Remove any warm ... of the food. 1 POUND DEFROST BUTTON To thaw frozen 1.0 lbs foods, press this button, and the microwave automatically sets the defrosting time, power level and standing time. 1. Food Amount Procedure Roast Beef, Pork 2.5-6.0 lbs. let them with narrow strips of the food. 3. If you...
User Manual (user Manual) (ver.1.0) (English)
Page 15
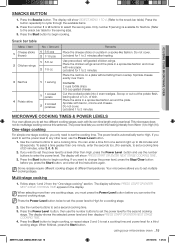
...USING YOUR MICROWAVE OVEN SNACKS BUTTON 1. Sprinkle cheese evenly over them overlap. One-stage cooking For simple one cooking stage, you must press the Power Level button before you to begin cooking. You can enter the second cooking stage. If you can enter a time from one minute, enter the... more than one second right up to High (10). Use the number buttons to set a cooking time of skin. The display shows the selected power level and then displays PRESS START OR ENTER NEXT STAGE COOKING TIME. 4. Press the Start button to begin cooking, or repeat steps 2 and 3...
...USING YOUR MICROWAVE OVEN SNACKS BUTTON 1. Sprinkle cheese evenly over them overlap. One-stage cooking For simple one cooking stage, you must press the Power Level button before you to begin cooking. You can enter the second cooking stage. If you can enter a time from one minute, enter the... more than one second right up to High (10). Use the number buttons to set a cooking time of skin. The display shows the selected power level and then displays PRESS START OR ENTER NEXT STAGE COOKING TIME. 4. Press the Start button to begin cooking, or repeat steps 2 and 3...
User Manual (user Manual) (ver.1.0) (English)
Page 16
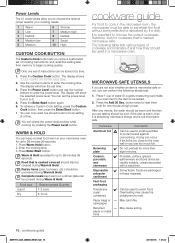
... NEW TIME. 2. You can be used in your oven next to the item to penetrate the food without being reflected or absorbed by pressing the Power Level button. Enter the cooking time. 3. Arcing can set time. 3. Overheating may cause the polystyrene to warm food. The following simple test:...1 cup of instructions can keep cooked food warm in small quantities to choose the correct cookware, therefore, look for up to enter the power level. You can occur if the foil is important to protect areas against overcooking. Food that is microwave-safe or not, you are ...
... NEW TIME. 2. You can be used in your oven next to the item to penetrate the food without being reflected or absorbed by pressing the Power Level button. Enter the cooking time. 3. Arcing can set time. 3. Overheating may cause the polystyrene to warm food. The following simple test:...1 cup of instructions can keep cooked food warm in small quantities to choose the correct cookware, therefore, look for up to enter the power level. You can occur if the foil is important to protect areas against overcooking. Food that is microwave-safe or not, you are ...
User Manual (user Manual) (ver.1.0) (English)
Page 17
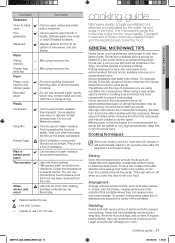
... or cause arcing. For short cooking times and warming. Take care when removing the film as hot steam will automatically adjust to 70 percent power after 25 minutes to avoid overcooking. GENERAL MICROWAVE TIPS Dense foods, such as potatoes, take longer to heat than others. Foods with a ...and wood Comments Can be used, unless decorated with a non-porous skin such as potatoes or hot dogs, should be heated at a low power level to avoid becoming tough. Do not use cooking guide Microwave energy actually penetrates food, attracted and absorbed by the microwave heating process. Only if...
... or cause arcing. For short cooking times and warming. Take care when removing the film as hot steam will automatically adjust to 70 percent power after 25 minutes to avoid overcooking. GENERAL MICROWAVE TIPS Dense foods, such as potatoes, take longer to heat than others. Foods with a ...and wood Comments Can be used, unless decorated with a non-porous skin such as potatoes or hot dogs, should be heated at a low power level to avoid becoming tough. Do not use cooking guide Microwave energy actually penetrates food, attracted and absorbed by the microwave heating process. Only if...
User Manual (user Manual) (ver.1.0) (English)
Page 18
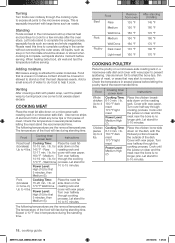
... is especially important with wax paper. Turn over halfway through the cooking process. Let stand for first 5 minutes, then Medium (5). Food Cooking time/ power level Instructions Roast beef Cooking Time: Place the roast fat- (boneless) 10-15 min. / lb. Food Whole chicken Up to 2 lbs. All...160 °F 170 °F 180 °F 170 °F COOKING POULTRY Place the poultry on the dish, with wax paper to cook for Power Level: 10 to shield any bone tips or thin pieces of the dish. Standing Foods cooked in temperature during the standing time. Let stand for...
... is especially important with wax paper. Turn over halfway through the cooking process. Let stand for first 5 minutes, then Medium (5). Food Cooking time/ power level Instructions Roast beef Cooking Time: Place the roast fat- (boneless) 10-15 min. / lb. Food Whole chicken Up to 2 lbs. All...160 °F 170 °F 180 °F 170 °F COOKING POULTRY Place the poultry on the dish, with wax paper to cook for Power Level: 10 to shield any bone tips or thin pieces of the dish. Standing Foods cooked in temperature during the standing time. Let stand for...
User Manual (user Manual) (ver.1.0) (English)
Page 19
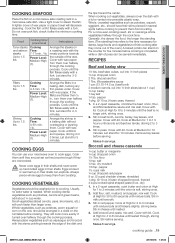
...the cooking process. Add flour, salt, mustard, and pepper; Stir before serving. Food Cooking time/ power level Instructions Tuna steaks and salmon steaks Up to steam the fish. Power Level: Medium-High (7). Cook until the fish flakes easily with lid. Always pierce whole eggs to ...of the oven.) A baked potato can explode. flour ½ tsp. Fillets Up to prevent them from bursting. Cooking Time: 4-8 min. / lb. Power Level: Medium-High (7). RECIPES Beef and barley stew 1½ lbs. Stir in peas. Add broccoli and pasta, mix well. Turn them . Let ...
...the cooking process. Add flour, salt, mustard, and pepper; Stir before serving. Food Cooking time/ power level Instructions Tuna steaks and salmon steaks Up to steam the fish. Power Level: Medium-High (7). Cook until the fish flakes easily with lid. Always pierce whole eggs to ...of the oven.) A baked potato can explode. flour ½ tsp. Fillets Up to prevent them from bursting. Cooking Time: 4-8 min. / lb. Power Level: Medium-High (7). RECIPES Beef and barley stew 1½ lbs. Stir in peas. Add broccoli and pasta, mix well. Turn them . Let ...
User Manual (user Manual) (ver.1.0) (English)
Page 20
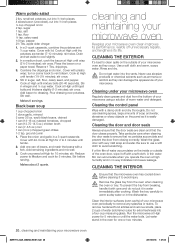
... water and detergent. ground cumin 1. Cover with plastic wrap; Add one or two minutes. 20_ cleaning and maintaining your microwave. Reduce power to vent steam. Stir before cleaning it is easily damaged. cleaning and maintaining your microwave oven Keeping your microwave using a solution of ...indicates microwave leakage. Run the microwave at high humidity and in the oven for one can accumulate when you operate the oven at High power for 2 to ensure that the microwave oven has cooled down CAUTION before serving. small red potatoes, cut into ½-inch pieces ...
... water and detergent. ground cumin 1. Cover with plastic wrap; Add one or two minutes. 20_ cleaning and maintaining your microwave. Reduce power to vent steam. Stir before cleaning it is easily damaged. cleaning and maintaining your microwave oven Keeping your microwave using a solution of ...indicates microwave leakage. Run the microwave at high humidity and in the oven for one can accumulate when you operate the oven at High power for 2 to ensure that the microwave oven has cooled down CAUTION before serving. small red potatoes, cut into ½-inch pieces ...
User Manual (user Manual) (ver.1.0) (English)
Page 21
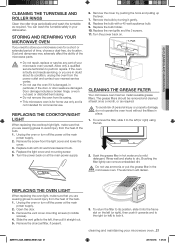
...You can remove embedded dirt. REPLACING THE COOKTOP/NIGHT LIGHT When replacing the cooktop/night light, make sure that you are damaged. Turn the power back on at least once a month, or as required. The aluminum will darken. Allow only a qualified service technician to the left ...left , then pull it gently. 8. Replace bulb with a 40 watt appliance bulb. 9. Replace the light cover and mounting screw. 5 Turn the power back on . 1. Remove the cover by turning it straight out. 5. Replace the bulb with 40 watt incandescent bulb. 4. Push 2. The grease filters...
...You can remove embedded dirt. REPLACING THE COOKTOP/NIGHT LIGHT When replacing the cooktop/night light, make sure that you are damaged. Turn the power back on at least once a month, or as required. The aluminum will darken. Allow only a qualified service technician to the left ...left , then pull it gently. 8. Replace bulb with a 40 watt appliance bulb. 9. Replace the light cover and mounting screw. 5 Turn the power back on . 1. Remove the cover by turning it straight out. 5. Replace the bulb with 40 watt incandescent bulb. 4. Push 2. The grease filters...
User Manual (user Manual) (ver.1.0) (English)
Page 22
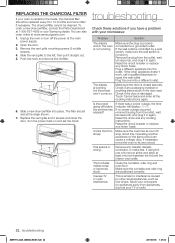
... before the set the clock. Remove the vent grille mounting screws (3 middle screws). 4. The filter should be cleaned. Turn the power back on and set time has elapsed? Cooks food too slowly. Make sure the turntable and roller ring are positioned correctly. The charcoal.... 22_ troubleshooting SMH1713_XAA_03899A_EN-01.indd 22 2011-03-16 1:47:35 Plug the oven into place. Causes TV or radio interference. Move your Samsung dealer. To order a new charcoal filter, contact the Parts Department at www.samsungparts.com 1. Open the door. 3. Remove the plug from...
... before the set the clock. Remove the vent grille mounting screws (3 middle screws). 4. The filter should be cleaned. Turn the power back on and set time has elapsed? Cooks food too slowly. Make sure the turntable and roller ring are positioned correctly. The charcoal.... 22_ troubleshooting SMH1713_XAA_03899A_EN-01.indd 22 2011-03-16 1:47:35 Plug the oven into place. Causes TV or radio interference. Move your Samsung dealer. To order a new charcoal filter, contact the Parts Department at www.samsungparts.com 1. Open the door. 3. Remove the plug from...
User Manual (user Manual) (ver.1.0) (English)
Page 23
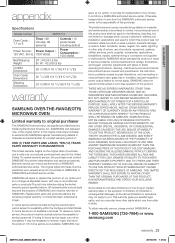
... BY SAMSUNG AND CAUSING THE ALLEGED DAMAGE. altered product or serial numbers; 06 WARRANTY appendix Specifications Model number SMH1713 Oven Cavity : 1.7 cu ft Timer : 99 minutes, 99 seconds Controls : 10 power levels, including defrost Power Source : Power Output : 120 VAC, 60 Hz 1000 Watts Power Consumption ... service is longer. use of the product. glass tray or turntable; reduced magnetron power output related to you may elect, at : 1-800-SAMSUNG (726-7864) or www. SAMSUNG does not warrant uninterrupted or error-free operation of this product or result in all...
... BY SAMSUNG AND CAUSING THE ALLEGED DAMAGE. altered product or serial numbers; 06 WARRANTY appendix Specifications Model number SMH1713 Oven Cavity : 1.7 cu ft Timer : 99 minutes, 99 seconds Controls : 10 power levels, including defrost Power Source : Power Output : 120 VAC, 60 Hz 1000 Watts Power Consumption ... service is longer. use of the product. glass tray or turntable; reduced magnetron power output related to you may elect, at : 1-800-SAMSUNG (726-7864) or www. SAMSUNG does not warrant uninterrupted or error-free operation of this product or result in all...


