
User Manual
Page 2
Table of contents Features Camera Multi window Night mode Expandable storage Getting started Device layout Assemble your device Charge the battery Install the Kids Edition bumper Start using your device Use the Setup Wizard Lock or unlock your device Accounts Transfer data from an old device Navigation Navigation bar Customize your home screen i 1 1 1 1 1 2 3 4 5 6 6 6 7 8 9 10 15 16 WIF_T290_EN_UM_TN_SF5_072919_FINAL
Table of contents Features Camera Multi window Night mode Expandable storage Getting started Device layout Assemble your device Charge the battery Install the Kids Edition bumper Start using your device Use the Setup Wizard Lock or unlock your device Accounts Transfer data from an old device Navigation Navigation bar Customize your home screen i 1 1 1 1 1 2 3 4 5 6 6 6 7 8 9 10 15 16 WIF_T290_EN_UM_TN_SF5_072919_FINAL

User Manual
Page 6
Table of contents System sounds 76 Dolby Atmos 76 Notifications 77 Manage notifications 77 Customize app notifications 77 Smart pop-up view 77 Display 78 Screen brightness 78 Night mode 78 Font size and style 78 Screen zoom 79 Screen timeout 79 Screen saver 79 Reduce animations 79 Double tap to wake 79 Device maintenance 80 Quick optimization 80 Battery 80 Storage 81 v
Table of contents System sounds 76 Dolby Atmos 76 Notifications 77 Manage notifications 77 Customize app notifications 77 Smart pop-up view 77 Display 78 Screen brightness 78 Night mode 78 Font size and style 78 Screen zoom 79 Screen timeout 79 Screen saver 79 Reduce animations 79 Double tap to wake 79 Device maintenance 80 Quick optimization 80 Battery 80 Storage 81 v

User Manual
Page 7
Table of contents Memory 82 Security 82 Language and input 83 Date and time 85 Troubleshooting 86 Lock screen and security 89 Screen lock types 89 Clock and information 89 Google Play Protect 90 Find My Mobile 90 Security update 91 Install unknown apps 91 Encrypt SD card 91 View passwords 92 Device administration 92 Credential storage 92 Strong Protection 92 Advanced security settings 93 Location 93 vi
Table of contents Memory 82 Security 82 Language and input 83 Date and time 85 Troubleshooting 86 Lock screen and security 89 Screen lock types 89 Clock and information 89 Google Play Protect 90 Find My Mobile 90 Security update 91 Install unknown apps 91 Encrypt SD card 91 View passwords 92 Device administration 92 Credential storage 92 Strong Protection 92 Advanced security settings 93 Location 93 vi
User Manual
Page 8
Table of contents App permissions 94 Send diagnostic data 94 Accounts 95 Add an account 95 Account settings 95 Remove an account 95 Users 96 Backup and restore 96 Samsung Cloud 97 Google settings 97 Accessibility 98 Screen Reader 98 Visibility enhancements 98 Hearing enhancements 99 Interaction and dexterity 100 Advanced settings 101 Installed services 101 Other settings 102 About tablet 102 vii
Table of contents App permissions 94 Send diagnostic data 94 Accounts 95 Add an account 95 Account settings 95 Remove an account 95 Users 96 Backup and restore 96 Samsung Cloud 97 Google settings 97 Accessibility 98 Screen Reader 98 Visibility enhancements 98 Hearing enhancements 99 Interaction and dexterity 100 Advanced settings 101 Installed services 101 Other settings 102 About tablet 102 vii

User Manual
Page 16
Press to turn on page 89. Devices and software are for reference only. 7 Getting started Lock or unlock your device Use your device's screen lock features to unlock it. the illustrations you see Lock screen and security on the screen, and then swipe the screen to secure your device. By default, the device locks automatically when the screen times out. Power key Press to lock. For more information about screen locks, see here are constantly evolving -
Press to turn on page 89. Devices and software are for reference only. 7 Getting started Lock or unlock your device Use your device's screen lock features to unlock it. the illustrations you see Lock screen and security on the screen, and then swipe the screen to secure your device. By default, the device locks automatically when the screen times out. Power key Press to lock. For more information about screen locks, see here are constantly evolving -

User Manual
Page 19
Getting started Navigation A touch screen responds best to a light touch from the pad of your finger or a capacitive stylus. Using excessive force or a metallic object on the touch screen may damage the tempered glass surface and void the warranty. Tap Clear history 2+2 =4 43,71 0x4 174,840 c:::J
Getting started Navigation A touch screen responds best to a light touch from the pad of your finger or a capacitive stylus. Using excessive force or a metallic object on the touch screen may damage the tempered glass surface and void the warranty. Tap Clear history 2+2 =4 43,71 0x4 174,840 c:::J

User Manual
Page 20
the illustrations you see here are constantly evolving - Getting started Swipe 12:00 PM 1w System 12:45 PM .., Screenshot captured Lightly drag your finger across the screen. Devices and software are for reference only. 11 l Swipe the screen to scroll through the Home screens or menu options. l Swipe the screen to unlock the device.
the illustrations you see here are constantly evolving - Getting started Swipe 12:00 PM 1w System 12:45 PM .., Screenshot captured Lightly drag your finger across the screen. Devices and software are for reference only. 11 l Swipe the screen to scroll through the Home screens or menu options. l Swipe the screen to unlock the device.

User Manual
Page 21
Devices and software are for reference only. 12 l Drag a widget to place it to a Home screen. the illustrations you see here are constantly evolving - Getting started Drag and drop Touch and hold an item, and then move it in a new location. l Drag an app shortcut to add it to a new location.
Devices and software are for reference only. 12 l Drag a widget to place it to a Home screen. the illustrations you see here are constantly evolving - Getting started Drag and drop Touch and hold an item, and then move it in a new location. l Drag an app shortcut to add it to a new location.

User Manual
Page 22
the illustrations you see here are constantly evolving - l Move your thumb and forefinger apart on the screen to zoom in and out. l Bring your thumb and forefinger together or apart to zoom in . Devices and software are for reference only. 13 Getting started Zoom in and out Bring your thumb and forefinger together on the screen to zoom out.
the illustrations you see here are constantly evolving - l Move your thumb and forefinger apart on the screen to zoom in and out. l Bring your thumb and forefinger together or apart to zoom in . Devices and software are for reference only. 13 Getting started Zoom in and out Bring your thumb and forefinger together on the screen to zoom out.

User Manual
Page 23
Getting started Touch and hold JUL 201• M Year Month w 10 11 m 13 !Lunch 14 15 16 19 20 21 22 23 24 25 26 27 28 29 30 31 • Touch and hold a field to display a pop-up menu of options. the illustrations you see here are constantly evolving - l Touch and hold items to customize the Home screen. l Touch and hold a Home screen to activate them. Devices and software are for reference only. 14
Getting started Touch and hold JUL 201• M Year Month w 10 11 m 13 !Lunch 14 15 16 19 20 21 22 23 24 25 26 27 28 29 30 31 • Touch and hold a field to display a pop-up menu of options. the illustrations you see here are constantly evolving - l Touch and hold items to customize the Home screen. l Touch and hold a Home screen to activate them. Devices and software are for reference only. 14

User Manual
Page 24
Getting started Navigation bar The Navigation bar, at the bottom of the screen, displays the navigation keys. the illustrations you see here are constantly evolving - Recent apps Home Back Devices and software are for reference only. 15
Getting started Navigation bar The Navigation bar, at the bottom of the screen, displays the navigation keys. the illustrations you see here are constantly evolving - Recent apps Home Back Devices and software are for reference only. 15

User Manual
Page 25
... To remove an icon: ◌ Touch and hold an app icon, and tap Add to navigate the device. Customize your home screen The Home screen is the starting point for navigating your device by changing where the Recent apps and Back buttons display on the...You can also quickly switch between navigation gestures and navigation buttons using the Quick settings menu. Simply swipe up additional Home screens, remove screens, change the order of the screen where gestures must be done for each navigation button. -'A'- Getting started Navigation gestures To make more space on the Navigation ...
... To remove an icon: ◌ Touch and hold an app icon, and tap Add to navigate the device. Customize your home screen The Home screen is the starting point for navigating your device by changing where the Recent apps and Back buttons display on the...You can also quickly switch between navigation gestures and navigation buttons using the Quick settings menu. Simply swipe up additional Home screens, remove screens, change the order of the screen where gestures must be done for each navigation button. -'A'- Getting started Navigation gestures To make more space on the Navigation ...

User Manual
Page 26
...and then touch and hold a widget, and tap an option: -at • Remove from Home: Delete a widget from your home screens for quick access to a Home screen, and release it to info or apps. -•• 1. Tap Wallpapers. 3. Tap Set as wallpaper, and confirm when prompted. ...0 • App info: Review the widget usage, permissions, and more information, see Create and use folders on an Apps screen or Home screen. From a Home screen, touch and hold the screen. 2. For more . 17 Customize Widgets Once you have added a widget, you want to apply the wallpaper. 4. Getting ...
...and then touch and hold a widget, and tap an option: -at • Remove from Home: Delete a widget from your home screens for quick access to a Home screen, and release it to info or apps. -•• 1. Tap Wallpapers. 3. Tap Set as wallpaper, and confirm when prompted. ...0 • App info: Review the widget usage, permissions, and more information, see Create and use folders on an Apps screen or Home screen. From a Home screen, touch and hold the screen. 2. For more . 17 Customize Widgets Once you have added a widget, you want to apply the wallpaper. 4. Getting ...

User Manual
Page 27
... appear as results in Finder searches. • About Home screen: View version information. 18 Hidden apps are arranged on the Apps screen. • Apps button: Add a button to the Home screen for easy access to the Apps screen. • App icon badges: Enable to show badges on... active notifications. Getting started Home screen settings Customize your device to have separate Home and Apps screens, or only a Home screen where all apps are located. • Home screen grid: Choose a layout to determine how icons are arranged on the Home screen. • Apps screen grid: Choose a layout to...
... appear as results in Finder searches. • About Home screen: View version information. 18 Hidden apps are arranged on the Apps screen. • Apps button: Add a button to the Home screen for easy access to the Apps screen. • App icon badges: Enable to show badges on... active notifications. Getting started Home screen settings Customize your device to have separate Home and Apps screens, or only a Home screen where all apps are located. • Home screen grid: Choose a layout to determine how icons are arranged on the Home screen. • Apps screen grid: Choose a layout to...

User Manual
Page 30
... View all upward to close the Notification panel. Getting started View the Notification panel You can access the Notification panel from the bottom of the screen or tap Back to close Quick settings. 21 Drag the Status bar down to display the Notification panel. 2. Drag View all downward. • Tap a quick... setting icon to see notification details. • To open the setting. Drag the Status bar down to display the Notification panel. 2. Drag upward from any screen. 1.
... View all upward to close the Notification panel. Getting started View the Notification panel You can access the Notification panel from the bottom of the screen or tap Back to close Quick settings. 21 Drag the Status bar down to display the Notification panel. 2. Drag View all downward. • Tap a quick... setting icon to see notification details. • To open the setting. Drag the Status bar down to display the Notification panel. 2. Drag upward from any screen. 1.

User Manual
Page 31
... throughout the day. • Wind down before going to see how many notifications you receive, and how often you wind down : Enable to turn the screen to grayscale and limit notifications before going to bed. 0 ◌ From Settings, tap Digital wellbeing for the following features: •...; Screen time: Tap the time value in the dashboard circle for details on how long each app has been opened and used today. • Times opened: ...
... throughout the day. • Wind down before going to see how many notifications you receive, and how often you wind down : Enable to turn the screen to grayscale and limit notifications before going to bed. 0 ◌ From Settings, tap Digital wellbeing for the following features: •...; Screen time: Tap the time value in the dashboard circle for details on how long each app has been opened and used today. • Times opened: ...

User Manual
Page 32
...apps at the same time. You can be displayed together on a split screen. From any screen, tap 111 Recent apps. 2. Tap an app in split screen view. 3. Tap the app icon, and then tap Open in the ...other window to add it to the split screen view. • Drag the middle of their windows. = JUL 20,. Month w 10 ,, m 13 ...lUl'IC~ 1◄ 15 -p:-1 " 16 19 20 21 22 23 24 25 26 27 28 29 30 31 Split screen control 1. Apps that support Multi window™ can switch between the apps and adjust the size of the window border to ...
...apps at the same time. You can be displayed together on a split screen. From any screen, tap 111 Recent apps. 2. Tap an app in split screen view. 3. Tap the app icon, and then tap Open in the ...other window to add it to the split screen view. • Drag the middle of their windows. = JUL 20,. Month w 10 ,, m 13 ...lUl'IC~ 1◄ 15 -p:-1 " 16 19 20 21 22 23 24 25 26 27 28 29 30 31 Split screen control 1. Apps that support Multi window™ can switch between the apps and adjust the size of the window border to ...
User Manual
Page 35
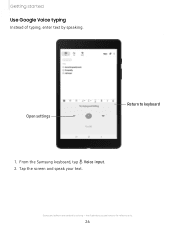
From the Samsung keyboard, tap Voice input. 2. Getting started Use Google Voice typing Instead of typing, enter text by speaking. ~ '" Brush 0 Go to the grocery store 0 Do laundry 0 Callmom Save ~ a B .!l Try saying something Return to keyboard Open settings • Google 1. Devices and software are for reference only. 26 Tap the screen and speak your text. the illustrations you see here are constantly evolving -
From the Samsung keyboard, tap Voice input. 2. Getting started Use Google Voice typing Instead of typing, enter text by speaking. ~ '" Brush 0 Go to the grocery store 0 Do laundry 0 Callmom Save ~ a B .!l Try saying something Return to keyboard Open settings • Google 1. Devices and software are for reference only. 26 Tap the screen and speak your text. the illustrations you see here are constantly evolving -

User Manual
Page 38
... As you can be listed alphabetically or in your device. Some apps that app. _'(')'_ ,'I :(, TIP When apps are preloaded (available on the screen. 2. Apps can use the Search feature. 1. Sort apps App shortcuts can be downloaded from Galaxy Store and the Google Play™ store. ...◌ From a Home screen, swipe the screen upward to that are arranged manually (Custom order), empty icon spaces can only be disabled. From Apps, tap Finder search, and ...
... As you can be listed alphabetically or in your device. Some apps that app. _'(')'_ ,'I :(, TIP When apps are preloaded (available on the screen. 2. Apps can use the Search feature. 1. Sort apps App shortcuts can be downloaded from Galaxy Store and the Google Play™ store. ...◌ From a Home screen, swipe the screen upward to that are arranged manually (Custom order), empty icon spaces can only be disabled. From Apps, tap Finder search, and ...

User Manual
Page 39
... more apps in the folder. Tap Menu to set which apps to delete. 2. App settings Manage your downloaded and preloaded apps. 1. Copy a folder to a Home screen You can make folders to organize App shortcuts on top of another app shortcut until it on the Apps list. 1. Tap ••• More... Apps, touch and hold a folder to view, and then choose All, Enabled, or Disabled. 3. Apps Create and use folders You can copy a folder to a Home screen. ◌ From Apps, touch and hold a folder, and tap Add to Home.
... more apps in the folder. Tap Menu to set which apps to delete. 2. App settings Manage your downloaded and preloaded apps. 1. Copy a folder to a Home screen You can make folders to organize App shortcuts on top of another app shortcut until it on the Apps list. 1. Tap ••• More... Apps, touch and hold a folder to view, and then choose All, Enabled, or Disabled. 3. Apps Create and use folders You can copy a folder to a Home screen. ◌ From Apps, touch and hold a folder, and tap Add to Home.


