User Manual
Page 2
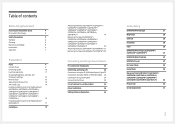
...*) 15 Installing a Wall-mount Kit or Desktop Stand (S32F351FU*) 17 Installation 19 Attaching the Stand (S22F350FH*/S22F352FH*/ S22F354FH*/S24F350FH*/S24F352FH*/ S24F354FH*/S24F359FH*/S27F350FH*/ S27F352FH*/S27F354FH*/S27F359FH*/ S32F351FU*) 19 Removing the Stand (S22F350FH*/ S22F352FH*/S22F354FH*/S24F350FH*/ S24F352FH*/S24F354FH*/S24F359FH*/... 26 Setting Optimum Resolution 26 Screen Setup SAMSUNG MAGIC Bright 27 Brightness 28 Contrast 28 Sharpness 28 Color 28 SAMSUNG MAGIC Angle (S22F350FH*/ S22F352FH*/S22F354FH*) 29 SAMSUNG MAGIC Upscale 29 HDMI Black Level 29 ...
...*) 15 Installing a Wall-mount Kit or Desktop Stand (S32F351FU*) 17 Installation 19 Attaching the Stand (S22F350FH*/S22F352FH*/ S22F354FH*/S24F350FH*/S24F352FH*/ S24F354FH*/S24F359FH*/S27F350FH*/ S27F352FH*/S27F354FH*/S27F359FH*/ S32F351FU*) 19 Removing the Stand (S22F350FH*/ S22F352FH*/S22F354FH*/S24F350FH*/ S24F352FH*/S24F354FH*/S24F359FH*/... 26 Setting Optimum Resolution 26 Screen Setup SAMSUNG MAGIC Bright 27 Brightness 28 Contrast 28 Sharpness 28 Color 28 SAMSUNG MAGIC Angle (S22F350FH*/ S22F352FH*/S22F354FH*) 29 SAMSUNG MAGIC Upscale 29 HDMI Black Level 29 ...
User Manual
Page 8
... will become hot. •• Store small accessories out of the reach of children. •• Exercise caution when adjusting the product angle or stand height. ‒‒ Your hand or finger may get stuck and injured. ‒‒ Tilting the product at an excessive angle may cause the ... product at the recommended resolution and frequency. ‒‒ Your eyesight may deteriorate. •• Do not put AC/DC adapters together. •• Remove the plastic bag from the AC/DC adapter before you use it. •• Do not let water enter the power device or get the...
... will become hot. •• Store small accessories out of the reach of children. •• Exercise caution when adjusting the product angle or stand height. ‒‒ Your hand or finger may get stuck and injured. ‒‒ Tilting the product at an excessive angle may cause the ... product at the recommended resolution and frequency. ‒‒ Your eyesight may deteriorate. •• Do not put AC/DC adapters together. •• Remove the plastic bag from the AC/DC adapter before you use it. •• Do not let water enter the power device or get the...
User Manual
Page 15
...*/S24F356FH*/S24F359FH*/ S27F350FH*/S27F352FH*/S27F354FH*/S27F358FW*/ S27F359FH*) ――Power the product off and remove the power cable from the power socket. 1 2 A A 3 4 B Attach the wall-mount kit or desktop stand here B Bracket (sold separately) Align the grooves and tightly fasten the screws on the bracket... required for any damage or injury caused by using improper screws or attaching the wall-mount kit or desktop stand using excessive force. ‒‒ Samsung shall not be held liable for any product damage or personal injury caused by using a wall-mount kit other...
...*/S24F356FH*/S24F359FH*/ S27F350FH*/S27F352FH*/S27F354FH*/S27F358FW*/ S27F359FH*) ――Power the product off and remove the power cable from the power socket. 1 2 A A 3 4 B Attach the wall-mount kit or desktop stand here B Bracket (sold separately) Align the grooves and tightly fasten the screws on the bracket... required for any damage or injury caused by using improper screws or attaching the wall-mount kit or desktop stand using excessive force. ‒‒ Samsung shall not be held liable for any product damage or personal injury caused by using a wall-mount kit other...
User Manual
Page 17
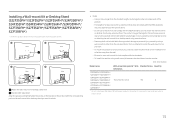
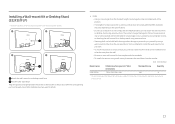
Installing a Wall-mount Kit or Desktop Stand (S32F351FU*) ――Power the product off and remove the power cable from the power socket. 1 2 A A 3 4 B Attach the wall-mount kit or desktop stand here B Bracket (sold separately) Align the grooves and tightly fasten the screws on the bracket on the product with ...other than the one specified or from an attempt to electric shock. 17 Do not attach the wall-mount kit or desktop stand using excessive force. ‒‒ Samsung shall not be installed 10 cm or farther away from the wall. ‒‒ Be sure to use screws that ...
Installing a Wall-mount Kit or Desktop Stand (S32F351FU*) ――Power the product off and remove the power cable from the power socket. 1 2 A A 3 4 B Attach the wall-mount kit or desktop stand here B Bracket (sold separately) Align the grooves and tightly fasten the screws on the bracket on the product with ...other than the one specified or from an attempt to electric shock. 17 Do not attach the wall-mount kit or desktop stand using excessive force. ‒‒ Samsung shall not be installed 10 cm or farther away from the wall. ‒‒ Be sure to use screws that ...
User Manual
Page 20
...so that the screen is facing downwards. ――The exterior may differ depending on the monitor. Remove the stand neck from the stand base by the stand. While holding the stand neck with one hand, pound the other fisted hand down onto the top of the... 3 it . 3 Do not press down on the product. There is a risk of the stand - Turn the connecting screw at the bottom of damaging the monitor. Removing the Stand (S22F350FH*/S22F352FH*/S22F354FH*/S24F350FH*/S24F352FH*/S24F354FH*/S24F359FH*/ S27F350FH*/S27F352FH*/S27F354FH*/S27F359FH*/S32F351FU*) ――Before assembling...
...so that the screen is facing downwards. ――The exterior may differ depending on the monitor. Remove the stand neck from the stand base by the stand. While holding the stand neck with one hand, pound the other fisted hand down onto the top of the... 3 it . 3 Do not press down on the product. There is a risk of the stand - Turn the connecting screw at the bottom of damaging the monitor. Removing the Stand (S22F350FH*/S22F352FH*/S22F354FH*/S24F350FH*/S24F352FH*/S24F354FH*/S24F359FH*/ S27F350FH*/S27F352FH*/S27F354FH*/S27F359FH*/S32F351FU*) ――Before assembling...

User Manual
Page 22
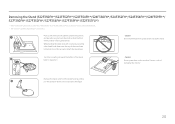
Remove the stand neck from the stand base by the stand. - There is facing downwards. ――The exterior may differ depending on the product. Turn the connecting screw at the bottom of the stand 2 base to separate it in the direction of the arrow as shown in the figure. - While ...hand to protect the product 1 and place the product onto the cloth so that the screen is a risk of damaging the monitor. 22 Removing the Stand (S24F356FH*/S27F358FW*) ――Before assembling the product, place the product down on a flat and stable surface so that the front of ...
Remove the stand neck from the stand base by the stand. - There is facing downwards. ――The exterior may differ depending on the product. Turn the connecting screw at the bottom of the stand 2 base to separate it in the direction of the arrow as shown in the figure. - While ...hand to protect the product 1 and place the product onto the cloth so that the screen is a risk of damaging the monitor. 22 Removing the Stand (S24F356FH*/S27F358FW*) ――Before assembling the product, place the product down on a flat and stable surface so that the front of ...
User Manual
Page 33
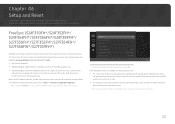
... to your gaming experience. FreeSync can I change the frequency? ――When using the function, contact the Samsung Service Center. 33 FreeSync is provided. System FreeSync Eco Saving Plus Off Timer PC/AV Mode Source Detection Key ...Repeat Time Power LED On Off Off Auto Acceleration Stand-by the monitor manufacturer. A higher resolution generally decreases the response rate. ――If you play . Screen... drivers from the AMD website may occur during game play. Refer to remove the flicker.
... to your gaming experience. FreeSync can I change the frequency? ――When using the function, contact the Samsung Service Center. 33 FreeSync is provided. System FreeSync Eco Saving Plus Off Timer PC/AV Mode Source Detection Key ...Repeat Time Power LED On Off Off Auto Acceleration Stand-by the monitor manufacturer. A higher resolution generally decreases the response rate. ――If you play . Screen... drivers from the AMD website may occur during game play. Refer to remove the flicker.


