
User Manual (ENGLISH)
Page 4
...User Manual 4 Activating Your Phone 4 Charging the Battery 6 Setting Up Your Voicemail 7 Memory Card (Optional 7 Section 2: Understanding Your Phone 9 Features of Your Phone 9 Closed View of Your Phone 9 Front Open View of Your Phone 10 Command Keys 12 Understanding the Display Screen 14 Your Phone's Modes 15 Section 3: ...37 Editing an Existing Contact Entry 40 Speed Dial Numbers 43 Renaming a Contacts Group 44 Deleting a Contacts Entry 44 Memory Info 45 Section 7: Messaging 46 Accessing Your Messages 46 Creating and Sending New Messages 46 Message Send Options 50 Receiving...
...User Manual 4 Activating Your Phone 4 Charging the Battery 6 Setting Up Your Voicemail 7 Memory Card (Optional 7 Section 2: Understanding Your Phone 9 Features of Your Phone 9 Closed View of Your Phone 9 Front Open View of Your Phone 10 Command Keys 12 Understanding the Display Screen 14 Your Phone's Modes 15 Section 3: ...37 Editing an Existing Contact Entry 40 Speed Dial Numbers 43 Renaming a Contacts Group 44 Deleting a Contacts Entry 44 Memory Info 45 Section 7: Messaging 46 Accessing Your Messages 46 Creating and Sending New Messages 46 Message Send Options 50 Receiving...

User Manual (ENGLISH)
Page 5
... 103 Voice Settings 104 Section 14: Changing Your Settings 108 Accessing Your Settings 108 Location 108 Display Settings 108 Sounds Settings 111 Call Settings 113 Phone Settings 115 Memory Info 122 2
... 103 Voice Settings 104 Section 14: Changing Your Settings 108 Accessing Your Settings 108 Location 108 Display Settings 108 Sounds Settings 111 Call Settings 113 Phone Settings 115 Memory Info 122 2

User Manual (ENGLISH)
Page 10
..., press and hold the key or dial your own mobile number to provide additional memory for storing files (such as, sound files and photos) in approximately 4 hours. Memory Card (Optional) Your phone has a memory card slot on the right side of the display indicates power level. Setting Up ...your voice mail. Install a Memory Card 1. Low Battery Indicator The battery indicator ( ) in the new user tutorial to dial voice mail. Enter your password and follow the prompts to listen to use the Voicemail folder (under the Message menu) to operate the phone. In standby mode, press...
..., press and hold the key or dial your own mobile number to provide additional memory for storing files (such as, sound files and photos) in approximately 4 hours. Memory Card (Optional) Your phone has a memory card slot on the right side of the display indicates power level. Setting Up ...your voice mail. Install a Memory Card 1. Low Battery Indicator The battery indicator ( ) in the new user tutorial to dial voice mail. Enter your password and follow the prompts to listen to use the Voicemail folder (under the Message menu) to operate the phone. In standby mode, press...
User Manual (ENGLISH)
Page 11
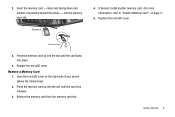
... down and smaller end pointing toward the phone - If desired, install another memory card. (For more information, refer to "Install a Memory Card" on the right side of your phone (above the Camera key). 2. Replace the microSD cover. Press the memory card up into the slot until the... card locks into the memory card slot. 4. into place. 4. Insert the memory card - Replace the microSD cover...
... down and smaller end pointing toward the phone - If desired, install another memory card. (For more information, refer to "Install a Memory Card" on the right side of your phone (above the Camera key). 2. Replace the microSD cover. Press the memory card up into the slot until the... card locks into the memory card slot. 4. into place. 4. Insert the memory card - Replace the microSD cover...
User Manual (ENGLISH)
Page 12
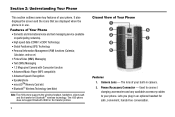
... also displays the screen and the icons that are displayed when the phone is in an optional headset for Bluetooth® wireless technology. The r500 phone does not support Bluetooth OBEX or file transfer profiles. 9 Closed View of your built-in ...function • Advanced Music Player (MP3 compatible) • Advanced Speech Recognition • Speakerphone • microSDTM Memory Card slot • Bluetooth® Wireless Technology (see Note) Note: The r500 phone supports the wireless headset, handsfree, object push and file transfer for safe, convenient, hands-free conversation.
... also displays the screen and the icons that are displayed when the phone is in an optional headset for Bluetooth® wireless technology. The r500 phone does not support Bluetooth OBEX or file transfer profiles. 9 Closed View of your built-in ...function • Advanced Music Player (MP3 compatible) • Advanced Speech Recognition • Speakerphone • microSDTM Memory Card slot • Bluetooth® Wireless Technology (see Note) Note: The r500 phone supports the wireless headset, handsfree, object push and file transfer for safe, convenient, hands-free conversation.

User Manual (ENGLISH)
Page 13
...backlight when pressed. Front Display - Shows time and date. 6. Memory Card Socket - Front Open View of your phone, including status icons, message indicators, signal strength, and so on. Understanding Your Phone 10 With the phone closed and idle, turns on the front display backlight when pressed..../Media Player Key - Used to center the image when taking selfportraits. 4. Volume Keys - With the flip closed , the phone idle, and with a memory card containing music files inserted, launches the Media Player when pressed and held. 7. Lets you hear the other caller. Indicates the...
...backlight when pressed. Front Display - Shows time and date. 6. Memory Card Socket - Front Open View of your phone, including status icons, message indicators, signal strength, and so on. Understanding Your Phone 10 With the phone closed and idle, turns on the front display backlight when pressed..../Media Player Key - Used to center the image when taking selfportraits. 4. Volume Keys - With the flip closed , the phone idle, and with a memory card containing music files inserted, launches the Media Player when pressed and held. 7. Lets you hear the other caller. Indicates the...

User Manual (ENGLISH)
Page 17
...of your 1 phone's main display ..., signal strength, connection type, and more. 2. Display Screen Icons Your The r500 phone can appear on the top lines of the icons that can show the Contacts ...: ᮣ In standby mode, press the MENU/OK key ( ), then select Settings ➔ Phone Info ➔ Icon Glossary. Example: "Erase all messages?" • Performing - The center portion...Message saved" • Information - Example: "Card not available, Insert card" Understanding Your Phone 14 Dialogue boxes and their definitions are outlined below. • Choice - "Connecting..." ...
...of your 1 phone's main display ..., signal strength, connection type, and more. 2. Display Screen Icons Your The r500 phone can appear on the top lines of the icons that can show the Contacts ...: ᮣ In standby mode, press the MENU/OK key ( ), then select Settings ➔ Phone Info ➔ Icon Glossary. Example: "Erase all messages?" • Performing - The center portion...Message saved" • Information - Example: "Card not available, Insert card" Understanding Your Phone 14 Dialogue boxes and their definitions are outlined below. • Choice - "Connecting..." ...
User Manual (ENGLISH)
Page 18
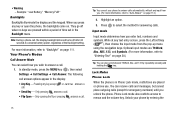
.... Pressing any text entry screen, press the Left soft key ( ), then choose the input mode from you unlock the phone. While at any key except or call , the display backlight dims and turns off when no keys are T9 Word, ... emergency numbers) until you . (For more information, refer to answer a call answer options appear in the Backlight menu. Your Phone's Modes Call Answer Mode You can select how you wish to "Backlight" on page 30.) Tip: You can also cycle between.... You can set in the display: • Any Key - • Warning - Example: "Low Battery," "Memory Full!"
.... Pressing any text entry screen, press the Left soft key ( ), then choose the input mode from you unlock the phone. While at any key except or call , the display backlight dims and turns off when no keys are T9 Word, ... emergency numbers) until you . (For more information, refer to answer a call answer options appear in the Backlight menu. Your Phone's Modes Call Answer Mode You can select how you wish to "Backlight" on page 30.) Tip: You can also cycle between.... You can set in the display: • Any Key - • Warning - Example: "Low Battery," "Memory Full!"
User Manual (ENGLISH)
Page 37
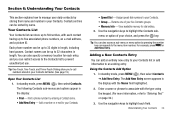
... can be up to five associated phone numbers, an e-mail address, and a picture ID. You can also specify a memory location for each entry, and you to call numbers stored in... Use the navigation keys to highlight the Contacts submenu or option of your five Contacts groups. • Memory Info - Use the navigation keys to highlight each contact having up to 32 digits in your Contacts list ...access a sub-menu or menu option by storing their name and number in length. View available memory for Add New Entry. For example, press abc for dial entries. 2. Section 6: Understanding ...
... can be up to five associated phone numbers, an e-mail address, and a picture ID. You can also specify a memory location for each entry, and you to call numbers stored in... Use the navigation keys to highlight the Contacts submenu or option of your five Contacts groups. • Memory Info - Use the navigation keys to highlight each contact having up to 32 digits in your Contacts list ...access a sub-menu or menu option by storing their name and number in length. View available memory for Add New Entry. For example, press abc for dial entries. 2. Section 6: Understanding ...
User Manual (ENGLISH)
Page 48
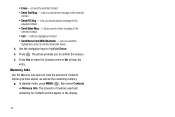
The phone prompts you have stored, as well as the remaining memory. ᮣ In standby mode, press MENU ( ), then select Contacts ➔ Memory Info. Memory Info Use the Memory sub-menu to view the amount of memory used and remaining for Contacts entries appear in the display. 45 Lets you send a picture message to the selected contact...
The phone prompts you have stored, as well as the remaining memory. ᮣ In standby mode, press MENU ( ), then select Contacts ➔ Memory Info. Memory Info Use the Memory sub-menu to view the amount of memory used and remaining for Contacts entries appear in the display. 45 Lets you send a picture message to the selected contact...

User Manual (ENGLISH)
Page 59
..., enable, and update the callback number that can be inserted in outgoing Text messages. - Lets you choose whether to On, the phone automatically scrolls message text, letting you define numerous message settings such as notification types and save options. 1. Lets you choose whether to ...using the Navigation key. • Picture/Video Message - Select the desired option and value. Automatically erase the oldest read message after memory is full. - Lets you disable, enable, and update the text signature that can be inserted in outgoing messages. - The following...
..., enable, and update the callback number that can be inserted in outgoing Text messages. - Lets you choose whether to On, the phone automatically scrolls message text, letting you define numerous message settings such as notification types and save options. 1. Lets you choose whether to ...using the Navigation key. • Picture/Video Message - Select the desired option and value. Automatically erase the oldest read message after memory is full. - Lets you disable, enable, and update the text signature that can be inserted in outgoing messages. - The following...

User Manual (ENGLISH)
Page 63
... mode, press and hold the Camera key ( ) on the right side of the following: • Press the Save soft key to save the picture to memory. • Press Send ( ) to save the picture and include it in a Picture message. • Press the Erase soft key to erase the photo. Section ...10: Camera Use your The r500 phone to take full color digital pictures and videos, display them with your phone, at your pictures. This section explains how you can do the following : 1. When the image that help you wish...
... mode, press and hold the Camera key ( ) on the right side of the following: • Press the Save soft key to save the picture to memory. • Press Send ( ) to save the picture and include it in a Picture message. • Press the Erase soft key to erase the photo. Section ...10: Camera Use your The r500 phone to take full color digital pictures and videos, display them with your phone, at your pictures. This section explains how you can do the following : 1. When the image that help you wish...
User Manual (ENGLISH)
Page 65
... in the display. • Series Shot: - Press and hold the Camera key ( ) on page 64 for more information.) Note: You can also activate the camcorder by the camera view finder screen. 2. From...of the following : 1. From the camera screen, by pressing the Camera key ( ). 3. To save the video to memory. • Press Send ( ) to erase the photo. Pressing MENU ( ), then select Multimedia ➔ Camcorder. 2. ...photo screen appears in the display followed by doing one of the phone. In standby mode, press and hold the Camera key ( ) a second time. To ...
... in the display. • Series Shot: - Press and hold the Camera key ( ) on page 64 for more information.) Note: You can also activate the camcorder by the camera view finder screen. 2. From...of the following : 1. From the camera screen, by pressing the Camera key ( ). 3. To save the video to memory. • Press Send ( ) to erase the photo. Pressing MENU ( ), then select Multimedia ➔ Camcorder. 2. ...photo screen appears in the display followed by doing one of the phone. In standby mode, press and hold the Camera key ( ) a second time. To ...
User Manual (ENGLISH)
Page 66
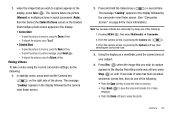
...camera resolution setting.) White Balance - Quality - Indicates camera's current resolution setting. (You can change to "The Photo Gallery" on page 74.) Phone Memory - Zoom - Multi Shot in low light. The center of the display shows a viewfinder image of the display change the picture quality setting. ... folder so you press the key. For more information, refer to +4. Card Memory - The number of camera options and settings. Night Shot - Indicates photos will be stored in the phone's memory. Indicates photos will be stored on the bottom line of the subject at which...
...camera resolution setting.) White Balance - Quality - Indicates camera's current resolution setting. (You can change to "The Photo Gallery" on page 74.) Phone Memory - Zoom - Multi Shot in low light. The center of the display shows a viewfinder image of the display change the picture quality setting. ... folder so you press the key. For more information, refer to +4. Card Memory - The number of camera options and settings. Night Shot - Indicates photos will be stored in the phone's memory. Indicates photos will be stored on the bottom line of the subject at which...

User Manual (ENGLISH)
Page 67
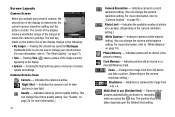
... setting. Indicates the camcorder's white balance setting. (You can view or manage your phone's camcorder, the first line of memory available for you press the key. See "White Balance" on page 77.) • Rec - for more information.) Memory Available - Zoom - Camera 64 Self Timer in use (Series Shot) - Delays the camera shutter from -4 to...
... setting. Indicates the camcorder's white balance setting. (You can view or manage your phone's camcorder, the first line of memory available for you press the key. See "White Balance" on page 77.) • Rec - for more information.) Memory Available - Zoom - Camera 64 Self Timer in use (Series Shot) - Delays the camera shutter from -4 to...

User Manual (ENGLISH)
Page 68
... keys to highlight a Setting. Saving Pictures and Videos After you've taken a picture or video, you press the key. These folders are part of the phone's memory and/or part of the photo. For a detailed procedure, see "Creating and Sending a Picture Message" on page 47 or see "Creating and Sending a... The Camera Options let you adjust the default camera settings to suite available lighting, the subject of the photo, or the purpose of an optional Memory Card devoted to storing, browsing, and viewing saved pictures and videos. (See "The Photo Gallery" on page 48. • Discard the picture ...
... keys to highlight a Setting. Saving Pictures and Videos After you've taken a picture or video, you press the key. These folders are part of the phone's memory and/or part of the photo. For a detailed procedure, see "Creating and Sending a Picture Message" on page 47 or see "Creating and Sending a... The Camera Options let you adjust the default camera settings to suite available lighting, the subject of the photo, or the purpose of an optional Memory Card devoted to storing, browsing, and viewing saved pictures and videos. (See "The Photo Gallery" on page 48. • Discard the picture ...
User Manual (ENGLISH)
Page 72
...-up menu of the preloaded picture frames in the display. 69 4. Subjects and pictures appear in phone memory. • Card - Stores pictures in a bright blue hue. • Warm - • Green - Subjects and pictures appear in the display: • Phone - You're returned to the camera viewfinder screen. Fun Frames Fun Frames lets you take...
...-up menu of the preloaded picture frames in the display. 69 4. Subjects and pictures appear in phone memory. • Card - Stores pictures in a bright blue hue. • Warm - • Green - Subjects and pictures appear in the display: • Phone - You're returned to the camera viewfinder screen. Fun Frames Fun Frames lets you take...

User Manual (ENGLISH)
Page 76
... can be included in the display. 2. The options menu bar appears in video messages. Record videos that are any length up, depending on available memory. 3. The phone reads the countdown timer value beginning with two or three and continuing to save the selected setting. In camcorder mode, press the Options soft key...
... can be included in the display. 2. The options menu bar appears in video messages. Record videos that are any length up, depending on available memory. 3. The phone reads the countdown timer value beginning with two or three and continuing to save the selected setting. In camcorder mode, press the Options soft key...

User Manual (ENGLISH)
Page 78
... hue. • Negative - When you record your next video, the phone's display previews your subject image with a normal hue. • Black&White - Settings Memory 1. Select Memory. The following Memory options appear in phone memory. • Card - Stores videos in the display: • Phone - Select the desired memory ...and pictures appear in black and white. • Sepia - Stores videos on an optional microSD Memory Card. 4. Subjects and pictures appear in a greenish hue. • Aqua - You're returned to the camcorder viewfinder screen. The options menu bar appears...
... hue. • Negative - When you record your next video, the phone's display previews your subject image with a normal hue. • Black&White - Settings Memory 1. Select Memory. The following Memory options appear in phone memory. • Card - Stores videos in the display: • Phone - Select the desired memory ...and pictures appear in black and white. • Sepia - Stores videos on an optional microSD Memory Card. 4. Subjects and pictures appear in a greenish hue. • Aqua - You're returned to the camcorder viewfinder screen. The options menu bar appears...
User Manual (ENGLISH)
Page 81
... appear in thumbnail format. 1. The following options appear in the display. Relocate the currently displayed or highlighted picture from phone memory to a Memory Card or from a Memory Card to Thumbnail Mode 1. Switch From Expanded to phone memory. • Lock / Unlock - To return to another Bluetooth device. 4. You can be standby screen Wallpaper or as a Picture ID...
... appear in thumbnail format. 1. The following options appear in the display. Relocate the currently displayed or highlighted picture from phone memory to a Memory Card or from a Memory Card to Thumbnail Mode 1. Switch From Expanded to phone memory. • Lock / Unlock - To return to another Bluetooth device. 4. You can be standby screen Wallpaper or as a Picture ID...


