

User Manual Ver.1.0 (English)
Page 1
BN46-00314A-00 User Manual S24C230BL S24C230JL S24C230JY S27C230B S27C230J The color and the appearance may differ depending on the product, and the specifications are subject to change without prior notice to improve the performance.
BN46-00314A-00 User Manual S24C230BL S24C230JL S24C230JY S27C230B S27C230J The color and the appearance may differ depending on the product, and the specifications are subject to change without prior notice to improve the performance.

User Manual Ver.1.0 (English)
Page 4
... APPENDIX 66 Contact SAMSUNG WORLD WIDE 4 Table Of Contents Table Of Contents USING THE OSD MENU 47 ON S24C230JL, 47 S24C230JY AND 48 S27C230J 48 49 49 50 50 51 51 52 52 54 54 55 55 55 TROUBLESHOOTING 56 GUIDE 56 56 56 58 SPECIFICATIONS 60 63 64 SAMSUNG MAGIC Bright Configuring... SAMSUNG MAGIC Bright Brightness Configuring Brightness Contrast Configuring Contrast Gamma Configuring Gamma PC/AV Mode Configuring PC/AV Mode Image Size Changing the...
... APPENDIX 66 Contact SAMSUNG WORLD WIDE 4 Table Of Contents Table Of Contents USING THE OSD MENU 47 ON S24C230JL, 47 S24C230JY AND 48 S27C230J 48 49 49 50 50 51 51 52 52 54 54 55 55 55 TROUBLESHOOTING 56 GUIDE 56 56 56 58 SPECIFICATIONS 60 63 64 SAMSUNG MAGIC Bright Configuring... SAMSUNG MAGIC Bright Brightness Configuring Brightness Contrast Configuring Contrast Gamma Configuring Gamma PC/AV Mode Configuring PC/AV Mode Image Size Changing the...

User Manual Ver.1.0 (English)
Page 21
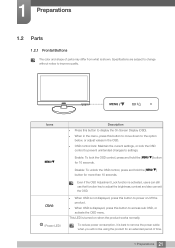
... parts may differ from what is turned on /off the product. When OSD is best to access sub OSD, or activate the OSD menu. Specifications are subject to change without notice to settings. This LED is shown. Icons MENU (Power LED) Description Press this button to display the On...
... parts may differ from what is turned on /off the product. When OSD is best to access sub OSD, or activate the OSD menu. Specifications are subject to change without notice to settings. This LED is shown. Icons MENU (Power LED) Description Press this button to display the On...
User Manual Ver.1.0 (English)
Page 22
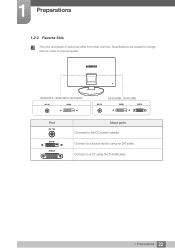
1 Preparations 1.2.2 Reverse Side The color and shape of parts may differ from what is shown. Connect to a PC using an DVI cable. Connect to a source device using the D-SUB cable. 22 1 Preparations Specifications are subject to change without notice to the DC power adapter. S24C230JL, S24C230JY, S27C230J S24C230BL, S27C230B Port DC 14V DVI IN RGB IN About ports Connects to improve quality.
1 Preparations 1.2.2 Reverse Side The color and shape of parts may differ from what is shown. Connect to a PC using an DVI cable. Connect to a source device using the D-SUB cable. 22 1 Preparations Specifications are subject to change without notice to the DC power adapter. S24C230JL, S24C230JY, S27C230J S24C230BL, S27C230B Port DC 14V DVI IN RGB IN About ports Connects to improve quality.

User Manual Ver.1.0 (English)
Page 24
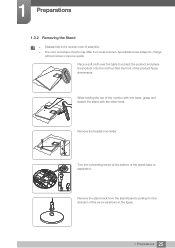
The color and shape of the arrow as shown by the stand. 1 Preparations Hold the main body of the product with your hand as shown in the direction of parts may differ from what is shown. Specifications are subject to change without notice to improve quality. 24 1 Preparations Caution Do not hold the product upside down only by the figure. Push the assembled stand into the main body in the figure. -
The color and shape of the arrow as shown by the stand. 1 Preparations Hold the main body of the product with your hand as shown in the direction of parts may differ from what is shown. Specifications are subject to change without notice to improve quality. 24 1 Preparations Caution Do not hold the product upside down only by the figure. Push the assembled stand into the main body in the figure. -
User Manual Ver.1.0 (English)
Page 25
... the direction of the monitor with one hand, grasp and detach the stand with the other hand. Remove the stand neck from what is shown. Specifications are subject to change without notice to separate it in the figure. 25 1 Preparations Remove the headphone holder. Turn the connecting screw at the bottom...
... the direction of the monitor with one hand, grasp and detach the stand with the other hand. Remove the stand neck from what is shown. Specifications are subject to change without notice to separate it in the figure. 25 1 Preparations Remove the headphone holder. Turn the connecting screw at the bottom...
User Manual Ver.1.0 (English)
Page 26
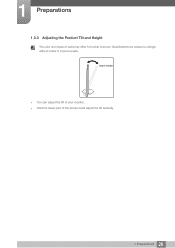
1 Preparations 1.3.3 Adjusting the Product Tilt and Height The color and shape of the product and adjust the tilt carefully. 26 1 Preparations Specifications are subject to change without notice to improve quality. -1.0°(±2.0°) ~20.0°(±2.0°) You can adjust the tilt of your monitor. Hold the lower part of parts may differ from what is shown.
1 Preparations 1.3.3 Adjusting the Product Tilt and Height The color and shape of the product and adjust the tilt carefully. 26 1 Preparations Specifications are subject to change without notice to improve quality. -1.0°(±2.0°) ~20.0°(±2.0°) You can adjust the tilt of your monitor. Hold the lower part of parts may differ from what is shown.
User Manual Ver.1.0 (English)
Page 27
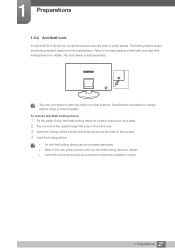
Refer to a heavy object such as a desk. 2 Put one end of parts may differ from what is sold separately. The lock device is shown. Specifications are subject to change without notice to use the product securely even in public places. To lock an anti-theft locking device: 1 Fix the cable ...
Refer to a heavy object such as a desk. 2 Put one end of parts may differ from what is sold separately. The lock device is shown. Specifications are subject to change without notice to use the product securely even in public places. To lock an anti-theft locking device: 1 Fix the cable ...

User Manual Ver.1.0 (English)
Page 60
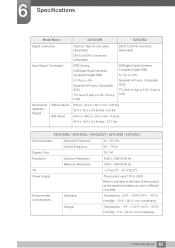
6 Specifications 6.1 General Model Name S24C230BL S24C230JL S24C230JY Panel Size 23.6 Inches (59 cm) Display area (H x V) 521.28 mm x 293.22 mm 20.52 x 11.54 Inches Pixel Pitch (H x V) 0.2715 x 0.2715 ....6 mm (H) x 336.15 mm (V) 23.53 Inches (H) x 13.23 Inches (V) 0.31125 mm (H) x 0.31125 mm (V) 0.012254 Inches (H) x 0.012254 Inches (V) 148MHz (Analog, Digital) 148 MHz (Digital) 60 6 Specifications
6 Specifications 6.1 General Model Name S24C230BL S24C230JL S24C230JY Panel Size 23.6 Inches (59 cm) Display area (H x V) 521.28 mm x 293.22 mm 20.52 x 11.54 Inches Pixel Pitch (H x V) 0.2715 x 0.2715 ....6 mm (H) x 336.15 mm (V) 23.53 Inches (H) x 13.23 Inches (V) 0.31125 mm (H) x 0.31125 mm (V) 0.012254 Inches (H) x 0.012254 Inches (V) 148MHz (Analog, Digital) 148 MHz (Digital) 60 6 Specifications
User Manual Ver.1.0 (English)
Page 61
... Stand 644.8 × 414.2 × 50.7 mm / 4.05 Kg 25.4 x 16.3 x 2.0 Inches / 8.9 lbs 644.8 × 485.2 × 242.0 mm / 4.6 kg 25.4 x 18.0 x 9.5 Inches / 10.1 lbs S24C230BL / S24C230JL / S24C230JY / S27C230B / S27C230J Synchronization Horizontal Frequency 30 ~ 81 kHz Vertical Frequency 56 ~ 75 Hz Display Color 16.7 M Resolution Optimum Resolution 1920 x 1080 @ 60 Hz...;F ~ 104°F (10°C ~ 40°C) Humidity : 10 % - 80 %, non-condensing Storage Temperature : -4°F ~ 113°F (-20°C ~ 45°C) Humidity : 5 % - 95 %, non-condensing 61 6 Specifications
... Stand 644.8 × 414.2 × 50.7 mm / 4.05 Kg 25.4 x 16.3 x 2.0 Inches / 8.9 lbs 644.8 × 485.2 × 242.0 mm / 4.6 kg 25.4 x 18.0 x 9.5 Inches / 10.1 lbs S24C230BL / S24C230JL / S24C230JY / S27C230B / S27C230J Synchronization Horizontal Frequency 30 ~ 81 kHz Vertical Frequency 56 ~ 75 Hz Display Color 16.7 M Resolution Optimum Resolution 1920 x 1080 @ 60 Hz...;F ~ 104°F (10°C ~ 40°C) Humidity : 10 % - 80 %, non-condensing Storage Temperature : -4°F ~ 113°F (-20°C ~ 45°C) Humidity : 5 % - 95 %, non-condensing 61 6 Specifications
User Manual Ver.1.0 (English)
Page 62
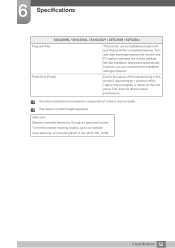
... subject to change without notice to our website: www.samsung.com/recyclingdirect or call, (877) 278 - 0799 62 6 Specifications This does not affect product performance. This device is a Class B digital apparatus. (USA only) Dispose unwanted electronics through an approved recycler. 6 Specifications S24C230BL / S24C230JL / S24C230JY / S27C230B / S27C230J Plug-and-Play This monitor can customize the...
... subject to change without notice to our website: www.samsung.com/recyclingdirect or call, (877) 278 - 0799 62 6 Specifications This does not affect product performance. This device is a Class B digital apparatus. (USA only) Dispose unwanted electronics through an approved recycler. 6 Specifications S24C230BL / S24C230JL / S24C230JY / S27C230B / S27C230J Plug-and-Play This monitor can customize the...

User Manual Ver.1.0 (English)
Page 63
... can vary in power-saving mode. Power-saving mode functions only when the product is not available, disconnect the power cable. 63 6 Specifications To reduce the power consumption to 0 watts when the power switch is connected to a PC that has a power-saving function. Be ...switch the screen back on, press any key on the back of the product or disconnect the power cable. PowerSaver Power Indicator Power Consumption S24C230BL S24C230JL S24C230JY S27C230B S27C230J Energy Star Power Consumption On 18 watts 22 watts Power saving mode Blinking Typical 0.3 W Typical 0.3 W Power off...
... can vary in power-saving mode. Power-saving mode functions only when the product is not available, disconnect the power cable. 63 6 Specifications To reduce the power consumption to 0 watts when the power switch is connected to a PC that has a power-saving function. Be ...switch the screen back on, press any key on the back of the product or disconnect the power cable. PowerSaver Power Indicator Power Consumption S24C230BL S24C230JL S24C230JY S27C230B S27C230J Energy Star Power Consumption On 18 watts 22 watts Power saving mode Blinking Typical 0.3 W Typical 0.3 W Power off...
User Manual Ver.1.0 (English)
Page 64
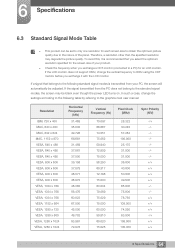
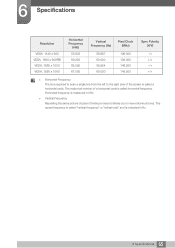
... 40.000 50.000 49.500 65.000 75.000 78.750 108.000 74.250 83.500 108.000 135.000 Sync Polarity (H/V) 64 6 Specifications If the LCD monitor does not support 85Hz, change the settings according to the following table by referring to the following standard signal modes is... frequency to 60Hz using the CDT monitor before you exchange a CDT monitor (connected to the nature of your PC, the screen will automatically be adjusted. 6 Specifications 6.3 Standard Signal Mode Table This product can be blank even though the power LED turns on.
... 40.000 50.000 49.500 65.000 75.000 78.750 108.000 74.250 83.500 108.000 135.000 Sync Polarity (H/V) 64 6 Specifications If the LCD monitor does not support 85Hz, change the settings according to the following table by referring to the following standard signal modes is... frequency to 60Hz using the CDT monitor before you exchange a CDT monitor (connected to the nature of your PC, the screen will automatically be adjusted. 6 Specifications 6.3 Standard Signal Mode Table This product can be blank even though the power LED turns on.
User Manual Ver.1.0 (English)
Page 65
6 Specifications Resolution VESA, 1440 x 900 VESA, 1600 x 900RB VESA, 1680 x 1050 VESA, 1920 x 1080 Horizontal Frequency (kHz) 55.935 60.000 65.290 67.500 Vertical ... to the right side of a horizontal cycle is called horizontal frequency. Horizontal frequency is called a horizontal cycle. The repeat frequency is measured in Hz. 65 6 Specifications
6 Specifications Resolution VESA, 1440 x 900 VESA, 1600 x 900RB VESA, 1680 x 1050 VESA, 1920 x 1080 Horizontal Frequency (kHz) 55.935 60.000 65.290 67.500 Vertical ... to the right side of a horizontal cycle is called horizontal frequency. Horizontal frequency is called a horizontal cycle. The repeat frequency is measured in Hz. 65 6 Specifications
User Manual Ver.1.0 (English)
Page 1
BN46-00314A-00 User Manual S24C230BL S24C230JL S24C230JY S27C230B S27C230J The color and the appearance may differ depending on the product, and the specifications are subject to change without prior notice to improve the performance.
BN46-00314A-00 User Manual S24C230BL S24C230JL S24C230JY S27C230B S27C230J The color and the appearance may differ depending on the product, and the specifications are subject to change without prior notice to improve the performance.

User Manual Ver.1.0 (English)
Page 4
... APPENDIX 66 Contact SAMSUNG WORLD WIDE 4 Table Of Contents Table Of Contents USING THE OSD MENU 47 ON S24C230JL, 47 S24C230JY AND 48 S27C230J 48 49 49 50 50 51 51 52 52 54 54 55 55 55 TROUBLESHOOTING 56 GUIDE 56 56 56 58 SPECIFICATIONS 60 63 64 SAMSUNG MAGIC Bright Configuring... SAMSUNG MAGIC Bright Brightness Configuring Brightness Contrast Configuring Contrast Gamma Configuring Gamma PC/AV Mode Configuring PC/AV Mode Image Size Changing the...
... APPENDIX 66 Contact SAMSUNG WORLD WIDE 4 Table Of Contents Table Of Contents USING THE OSD MENU 47 ON S24C230JL, 47 S24C230JY AND 48 S27C230J 48 49 49 50 50 51 51 52 52 54 54 55 55 55 TROUBLESHOOTING 56 GUIDE 56 56 56 58 SPECIFICATIONS 60 63 64 SAMSUNG MAGIC Bright Configuring... SAMSUNG MAGIC Bright Brightness Configuring Brightness Contrast Configuring Contrast Gamma Configuring Gamma PC/AV Mode Configuring PC/AV Mode Image Size Changing the...
User Manual Ver.1.0 (English)
Page 21
Specifications are subject to change without notice to settings. To reduce power consumption, it is best to remove the power cable when you will not be ...
Specifications are subject to change without notice to settings. To reduce power consumption, it is best to remove the power cable when you will not be ...

User Manual Ver.1.0 (English)
Page 22
Connect to a source device using the D-SUB cable. 22 1 Preparations Connect to a PC using an DVI cable. S24C230JL, S24C230JY, S27C230J S24C230BL, S27C230B Port DC 14V DVI IN RGB IN About ports Connects to improve quality. Specifications are subject to change without notice to the DC power adapter. 1 Preparations 1.2.2 Reverse Side The color and shape of parts may differ from what is shown.
Connect to a source device using the D-SUB cable. 22 1 Preparations Connect to a PC using an DVI cable. S24C230JL, S24C230JY, S27C230J S24C230BL, S27C230B Port DC 14V DVI IN RGB IN About ports Connects to improve quality. Specifications are subject to change without notice to the DC power adapter. 1 Preparations 1.2.2 Reverse Side The color and shape of parts may differ from what is shown.

User Manual Ver.1.0 (English)
Page 24
1 Preparations Hold the main body of the arrow as shown in the direction of the product with your hand as shown by the stand. Push the assembled stand into the main body in the figure. - The color and shape of parts may differ from what is shown. Caution Do not hold the product upside down only by the figure. Specifications are subject to change without notice to improve quality. 24 1 Preparations
1 Preparations Hold the main body of the arrow as shown in the direction of the product with your hand as shown by the stand. Push the assembled stand into the main body in the figure. - The color and shape of parts may differ from what is shown. Caution Do not hold the product upside down only by the figure. Specifications are subject to change without notice to improve quality. 24 1 Preparations

User Manual Ver.1.0 (English)
Page 25
... front of the monitor with one hand, grasp and detach the stand with the other hand. While holding the top of the product faces downwards. Specifications are subject to change without notice to separate it in the figure. 25 1 Preparations Remove the headphone holder. 1 Preparations 1.3.2 Removing the Stand Disassembly is...
... front of the monitor with one hand, grasp and detach the stand with the other hand. While holding the top of the product faces downwards. Specifications are subject to change without notice to separate it in the figure. 25 1 Preparations Remove the headphone holder. 1 Preparations 1.3.2 Removing the Stand Disassembly is...