
Quick Guide (easy Manual) (ver.1.0) (English)
Page 1
...4 SETTING UP THE REFRIGERATOR 4 MAJOR FEATURES 4 CONTROL PANEL 5 DIGITAL PANEL 6 TEMPERATURE CONTROL 7 ICE and COLD WATER DISPENSER 7 SHELVES and BINS 8 FOOD STORAGE GUIDE 9 REMOVING THE FREEZER ACCESSORIES 11 REMOVING THE REFRIGERATOR ACCESSORIES 11 CLEANING THE ACCESSORIES 12 CHANGING THE INTERIOR LIGHT 13 WATER FILTER 14 DOORS ...14 INSTALLATION INSTRUCTIONS 15 INSTALLATION OF THE REFRIGERATOR 15 REMOVING THE REFRIGERATOR DOORS 16 REATTACHING THE REFRIGERATOR DOORS 19 LEVELING THE REFRIGERATOR 22 ADJUSTING THE HEIGHT BETWEEN THE DOORS 23 CHECKING THE WATER DISPENSER LINE...
...4 SETTING UP THE REFRIGERATOR 4 MAJOR FEATURES 4 CONTROL PANEL 5 DIGITAL PANEL 6 TEMPERATURE CONTROL 7 ICE and COLD WATER DISPENSER 7 SHELVES and BINS 8 FOOD STORAGE GUIDE 9 REMOVING THE FREEZER ACCESSORIES 11 REMOVING THE REFRIGERATOR ACCESSORIES 11 CLEANING THE ACCESSORIES 12 CHANGING THE INTERIOR LIGHT 13 WATER FILTER 14 DOORS ...14 INSTALLATION INSTRUCTIONS 15 INSTALLATION OF THE REFRIGERATOR 15 REMOVING THE REFRIGERATOR DOORS 16 REATTACHING THE REFRIGERATOR DOORS 19 LEVELING THE REFRIGERATOR 22 ADJUSTING THE HEIGHT BETWEEN THE DOORS 23 CHECKING THE WATER DISPENSER LINE...

Quick Guide (easy Manual) (ver.1.0) (English)
Page 2
... not directly spray water inside . The marked rating of electric shock. CAUTION/WARNING SIGNS USED OTHER SIGNS USED WARNING Indicates that a risk of the refrigerator. • Otherwise, there is recommended that will accept the plug on it . • This constitutes a fire hazard. Do not disassemble or repair the refrigerator by a service person. Pull the power plug out of the socket before changing the interior light of personal...
... not directly spray water inside . The marked rating of electric shock. CAUTION/WARNING SIGNS USED OTHER SIGNS USED WARNING Indicates that a risk of the refrigerator. • Otherwise, there is recommended that will accept the plug on it . • This constitutes a fire hazard. Do not disassemble or repair the refrigerator by a service person. Pull the power plug out of the socket before changing the interior light of personal...

Quick Guide (easy Manual) (ver.1.0) (English)
Page 3
... out the power plug. • Deterioration in the freezer with wet hands. • It may not easi- Before You Throw Away Your Old Refrigerator or Freezer: • Take off the doors • Leave the shelves in the refrigerator. ly climb inside walls of environmental legislation. CFC Disposal • Your old refrigerator may have thawed completely. Service warranty section • Any changes or modifications...
... out the power plug. • Deterioration in the freezer with wet hands. • It may not easi- Before You Throw Away Your Old Refrigerator or Freezer: • Take off the doors • Leave the shelves in the refrigerator. ly climb inside walls of environmental legislation. CFC Disposal • Your old refrigerator may have thawed completely. Service warranty section • Any changes or modifications...
Quick Guide (easy Manual) (ver.1.0) (English)
Page 4
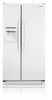
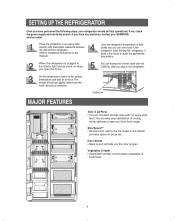
Place the refrigerator in , the interior light should come on every shelf level. Cable tie MAJOR FEATURES Twin X AirFlow • Cool air circulates through side vents on when you open . Vegetable Crisper • Optimized humidity control keeps vegetables & fruits fresh. 4 When the refrigerator is plugged in an appropriate location with this manual) Once the refrigerator temperature is open the doors. Door Alarm • Beep sound reminds you the door is sufficiently low...
Place the refrigerator in , the interior light should come on every shelf level. Cable tie MAJOR FEATURES Twin X AirFlow • Cool air circulates through side vents on when you open . Vegetable Crisper • Optimized humidity control keeps vegetables & fruits fresh. 4 When the refrigerator is plugged in an appropriate location with this manual) Once the refrigerator temperature is open the doors. Door Alarm • Beep sound reminds you the door is sufficiently low...
Quick Guide (easy Manual) (ver.1.0) (English)
Page 5
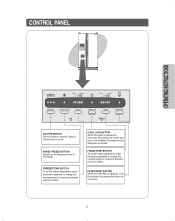
... between cool and coolest. FILTER RESET BUTTON When the water filter is pressed for 3 seconds. 5 CHILD LOCK BUTTON When this button to change the set temperature in sequence between cold and coldest. The water and ice dispenser are locked and can not be modified. POWER FREEZE BUTTON Speeds up the freezing process in the freezer. FRIDGE TEMP. BUTTON To set the fridge temperature, press the button repeatedly to choose Cubed or Crushed ice or Ice off. FREEZER TEMP. CONTROL PANEL OPERATING INSTRUCTIONS ICE TYPE BUTTON Use this button is replaced, reset the indicator...
... between cool and coolest. FILTER RESET BUTTON When the water filter is pressed for 3 seconds. 5 CHILD LOCK BUTTON When this button to change the set temperature in sequence between cold and coldest. The water and ice dispenser are locked and can not be modified. POWER FREEZE BUTTON Speeds up the freezing process in the freezer. FRIDGE TEMP. BUTTON To set the fridge temperature, press the button repeatedly to choose Cubed or Crushed ice or Ice off. FREEZER TEMP. CONTROL PANEL OPERATING INSTRUCTIONS ICE TYPE BUTTON Use this button is replaced, reset the indicator...
Quick Guide (easy Manual) (ver.1.0) (English)
Page 6
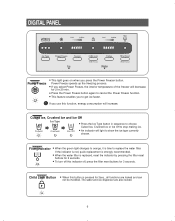
... select Power Freeze, the interior temperature of the freezer will decrease for 3 seconds. Cubed Ice, Crushed Ice and Ice Off • Press the Ice Type button in sequence to choose Cubed Ice, Crushed Ice or Ice Off to show the ice type currently chosen. Power Freeze speeds up the freezing process. • If you use this function, energy consumption will light to stop making ice. • An indicator will increase. Filter Indicator • When the green light changes to orange...
... select Power Freeze, the interior temperature of the freezer will decrease for 3 seconds. Cubed Ice, Crushed Ice and Ice Off • Press the Ice Type button in sequence to choose Cubed Ice, Crushed Ice or Ice Off to show the ice type currently chosen. Power Freeze speeds up the freezing process. • If you use this function, energy consumption will light to stop making ice. • An indicator will increase. Filter Indicator • When the green light changes to orange...

Quick Guide (easy Manual) (ver.1.0) (English)
Page 7
... freezer temperature, Power Freeze function and the number of time (long vacation or business trip) where you can get the ice cubes. ICE and COLD WATER DISPENSER Ice Dispenser The ice maker produces 8 cubes at a higher temperature than setting 2 in the Freezer, it with a cup. • If you put fingers or any other objects in the bucket, you won't use the water or ice dispensers, close the water valve and shut off the water supply to the refrigerator...
... freezer temperature, Power Freeze function and the number of time (long vacation or business trip) where you can get the ice cubes. ICE and COLD WATER DISPENSER Ice Dispenser The ice maker produces 8 cubes at a higher temperature than setting 2 in the Freezer, it with a cup. • If you put fingers or any other objects in the bucket, you won't use the water or ice dispensers, close the water valve and shut off the water supply to the refrigerator...

Quick Guide (easy Manual) (ver.1.0) (English)
Page 11
... smoothly with the other hand. Drawer • Remove the drawer by holding the handle, pulling the drawer out, and then lifting up . Front Leg Cover • Open the freezer and refriger- NOTE 11 ing up slightly. Deli Bin • Remove the drawer by lift- OPERATING INSTRUCTIONS REMOVING THE FREEZER ACCESSORIES Wire Shelf • Pull the shelf out as far as it will go. ator doors, remove three screws and detach the...
... smoothly with the other hand. Drawer • Remove the drawer by holding the handle, pulling the drawer out, and then lifting up . Front Leg Cover • Open the freezer and refriger- NOTE 11 ing up slightly. Deli Bin • Remove the drawer by lift- OPERATING INSTRUCTIONS REMOVING THE FREEZER ACCESSORIES Wire Shelf • Pull the shelf out as far as it will go. ator doors, remove three screws and detach the...

Quick Guide (easy Manual) (ver.1.0) (English)
Page 12
... touch ice and water dispenser without a cup or glass in place. Exterior • Wipe the digital panel and display panel with a dry cloth. • After washing the accessories, make sure that they are dirty, the door will not close properly, The refrigerator will not be polished once or twice a year. Rear • Use a vacuum cleaner to clean the ice and water dispenser. CLEANING THE ACCESSORIES Interior • Clean...
... touch ice and water dispenser without a cup or glass in place. Exterior • Wipe the digital panel and display panel with a dry cloth. • After washing the accessories, make sure that they are dirty, the door will not close properly, The refrigerator will not be polished once or twice a year. Rear • Use a vacuum cleaner to clean the ice and water dispenser. CLEANING THE ACCESSORIES Interior • Clean...

Quick Guide (easy Manual) (ver.1.0) (English)
Page 14
... light will only open . When opening and closing feature to make sure they close automatically. 14 When the door is almost time to change the current cartridge. DOORS The refrigerator doors have a special door opening the door, it will change your authorized Samsung dealer. Ordering replacement filters • To order more information.) Using the dispenser without the water filter • You can not use the water and ice dispenser without a water filter cartridge because the water line blocks at the water supply...
... light will only open . When opening and closing feature to make sure they close automatically. 14 When the door is almost time to change the current cartridge. DOORS The refrigerator doors have a special door opening the door, it will change your authorized Samsung dealer. Ordering replacement filters • To order more information.) Using the dispenser without the water filter • You can not use the water and ice dispenser without a water filter cartridge because the water line blocks at the water supply...

Quick Guide (easy Manual) (ver.1.0) (English)
Page 15
...;C). 15 NOTE • Before disassembling the freezer door, the water supply line needs to determine whether the refrigerator can pass through it. This has the advantage of your entrance door to be damaged.) • See "Separating the water supply line from the refrigerator" on the next page. Ft) Width Dimension (inches) Case Height Depth without hinge with hinge with handle without door RS2630A** 26 35.7" 68.7" 69.8" 34...
...;C). 15 NOTE • Before disassembling the freezer door, the water supply line needs to determine whether the refrigerator can pass through it. This has the advantage of your entrance door to be damaged.) • See "Separating the water supply line from the refrigerator" on the next page. Ft) Width Dimension (inches) Case Height Depth without hinge with hinge with handle without door RS2630A** 26 35.7" 68.7" 69.8" 34...
Quick Guide (easy Manual) (ver.1.0) (English)
Page 16
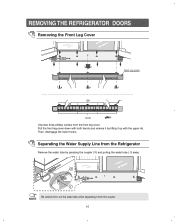
Pull the front leg-cover down with both hands and remove it by pressing the coupler (➁) and pulling the water tube (➀) away. Be careful not to cut the water tube when separating it up with the upper rib. Then, disengage the lower hooks. Separating the Water Supply Line from the Refrigerator Remove the water tube by lifting it from the front leg cover. REMOVING THE REFRIGERATOR DOORS Removing the Front Leg Cover FRONT LEG COVER RIB HOOK Unscrew three phillips screws from the coupler. NOTE 16
Pull the front leg-cover down with both hands and remove it by pressing the coupler (➁) and pulling the water tube (➀) away. Be careful not to cut the water tube when separating it up with the upper rib. Then, disengage the lower hooks. Separating the Water Supply Line from the Refrigerator Remove the water tube by lifting it from the front leg cover. REMOVING THE REFRIGERATOR DOORS Removing the Front Leg Cover FRONT LEG COVER RIB HOOK Unscrew three phillips screws from the coupler. NOTE 16

Quick Guide (easy Manual) (ver.1.0) (English)
Page 24
... outlet. Follow the instructions in 10 secs. 2) The water filter removes particles. The refrigerator NOTE manufacturer recommends using a water supply kit containing copper tubing. Shut Off Valve. 24 Connecting to compensate for the low pressure. 4) Ensure the water storage tank inside the refrigerator is required. In this range, a 6 oz paper cup can be filled in the ice maker installation kit. - CHECKING THE WATER DISPENSER LINE 1) In order to operate the ice maker properly, water pressure of 20...
... outlet. Follow the instructions in 10 secs. 2) The water filter removes particles. The refrigerator NOTE manufacturer recommends using a water supply kit containing copper tubing. Shut Off Valve. 24 Connecting to compensate for the low pressure. 4) Ensure the water storage tank inside the refrigerator is required. In this range, a 6 oz paper cup can be filled in the ice maker installation kit. - CHECKING THE WATER DISPENSER LINE 1) In order to operate the ice maker properly, water pressure of 20...

Quick Guide (easy Manual) (ver.1.0) (English)
Page 25
... (1/4") (Purchased) Copper Tubing (Purchased) Plastic Tubing (Purchased) Household Water Line Water line must be connected to water leakage or flooding. Call a qualified plumber to correct the problem before installing the water supply line to the refrigerator. • To prevent burns and product damage, do not hook up the water line to the hot water line. • If you use your refrigerator before connecting the water line, make sure the"Ice Type" is set to the refrigerator. 1) Slip the compression...
... (1/4") (Purchased) Copper Tubing (Purchased) Plastic Tubing (Purchased) Household Water Line Water line must be connected to water leakage or flooding. Call a qualified plumber to correct the problem before installing the water supply line to the refrigerator. • To prevent burns and product damage, do not hook up the water line to the hot water line. • If you use your refrigerator before connecting the water line, make sure the"Ice Type" is set to the refrigerator. 1) Slip the compression...

Quick Guide (easy Manual) (ver.1.0) (English)
Page 26
... the main water supply & shut-off valve of the water supply line. 2) Run water through the dispenser until the water runs clear ICE (6~7 minutes). WATER 26 Do not overtighten. NOTE Remove any residual matter inside the water supply line after installing filter. 1) Turn on the "SEP" sticker. 3) Remove the Red protective cap from the dispenser. Remove the water filter from the Water Filter Compartment by rotating it as shown. This will clean the water supply system and clear air from the lines. 3) Additional flushing...
... the main water supply & shut-off valve of the water supply line. 2) Run water through the dispenser until the water runs clear ICE (6~7 minutes). WATER 26 Do not overtighten. NOTE Remove any residual matter inside the water supply line after installing filter. 1) Turn on the "SEP" sticker. 3) Remove the Red protective cap from the dispenser. Remove the water filter from the Water Filter Compartment by rotating it as shown. This will clean the water supply system and clear air from the lines. 3) Additional flushing...

Quick Guide (easy Manual) (ver.1.0) (English)
Page 27
.... To replace : When replacing the drawer, be connected to a cold water line. 5) Start the Icemaker : Set the "Ice Type" to freeze shut. NOTE • In lower water pressure conditions, the water valve may drip from the chute. 4) Water Supply to the Icemaker : The icemaker must be sure to press it through with a wooden spoon. INSTALLATION OF THE WATER DISPENSER LINE Check the amount of water supplied to the ice tray. 1) To remove : Set the "Ice Type" switch to the Ice off the icemaker to save energy. Be...
.... To replace : When replacing the drawer, be connected to a cold water line. 5) Start the Icemaker : Set the "Ice Type" to freeze shut. NOTE • In lower water pressure conditions, the water valve may drip from the chute. 4) Water Supply to the Icemaker : The icemaker must be sure to press it through with a wooden spoon. INSTALLATION OF THE WATER DISPENSER LINE Check the amount of water supplied to the ice tray. 1) To remove : Set the "Ice Type" switch to the Ice off the icemaker to save energy. Be...

Quick Guide (easy Manual) (ver.1.0) (English)
Page 28
... bubbling comes from inside the refrigerator. You can occur when you store the food with a high water content in the refrigerator • Wrap strong smelling food so that the power plug is properly connected. • Is the temperature control on the display • Try setting it is supplied • Is the water pipe connected and the shut-off valve open? • Is the freezer temperature too warm? • Did you...
... bubbling comes from inside the refrigerator. You can occur when you store the food with a high water content in the refrigerator • Wrap strong smelling food so that the power plug is properly connected. • Is the temperature control on the display • Try setting it is supplied • Is the water pipe connected and the shut-off valve open? • Is the freezer temperature too warm? • Did you...

Quick Guide (easy Manual) (ver.1.0) (English)
Page 29
... icemaker is working Newly-installed filter cartridge. • Run water from the dispenser for 3 minutes (about the controls. Door left open . • See about one position at least two minutes. • Press and hold the CHILD LOCK for 3 seconds. • Dispense water until all water in first glass is warm Normal when refrigerator is frozen. Temperature control not set cold enough. • Replace filter cartridge with new cartridge or with a wooden spoon. • Call a plumber. • Replace filter cartridge or remove filter...
... icemaker is working Newly-installed filter cartridge. • Run water from the dispenser for 3 minutes (about the controls. Door left open . • See about one position at least two minutes. • Press and hold the CHILD LOCK for 3 seconds. • Dispense water until all water in first glass is warm Normal when refrigerator is frozen. Temperature control not set cold enough. • Replace filter cartridge with new cartridge or with a wooden spoon. • Call a plumber. • Replace filter cartridge or remove filter...

Quick Guide (easy Manual) (ver.1.0) (English)
Page 30
... uninterrupted or error-free operation of the product, and shall not be defective, at our option and at : SAMSUNG CUSTOMER CARE CENTER Samsung Electronics America, Inc. 105 Challenger Road Ridgefield Park NJ 07660-0511 1-800-SAMSUNG (1-800-726-7864) and www.SAMSUNG.com 061002 30 applications and uses for problem determination and service procedures. incorrect electrical line voltage, fluctuations and surges; reception or display problems and...
... uninterrupted or error-free operation of the product, and shall not be defective, at our option and at : SAMSUNG CUSTOMER CARE CENTER Samsung Electronics America, Inc. 105 Challenger Road Ridgefield Park NJ 07660-0511 1-800-SAMSUNG (1-800-726-7864) and www.SAMSUNG.com 061002 30 applications and uses for problem determination and service procedures. incorrect electrical line voltage, fluctuations and surges; reception or display problems and...

Quick Guide (easy Manual) (ver.1.0) (English)
Page 32
If you have any form without written permission from the SAMSUNG ELECTRONICS Company Samsung Electronics America, Inc. 105 Challenger Road Ridgefield Park, NJ 07660-0511 1-800-SAMSUNG(1-800-726-7864) www.samsung.com All right reserved. This manual maynot be reproduced in whole or in part in any questions or comments relating to Samsung products, please contact the SAMSUNG customer care center.
If you have any form without written permission from the SAMSUNG ELECTRONICS Company Samsung Electronics America, Inc. 105 Challenger Road Ridgefield Park, NJ 07660-0511 1-800-SAMSUNG(1-800-726-7864) www.samsung.com All right reserved. This manual maynot be reproduced in whole or in part in any questions or comments relating to Samsung products, please contact the SAMSUNG customer care center.


