
User Manual (user Manual) (ver.9.0) (English)
Page 1
...18 WATER FILTER 19 DOORS ...19 INSTALLATION INSTRUCTIONS 20 INSTALLATION OF THE REFRIGERATOR 20 REMOVING THE REFRIGERATOR DOORS 22 REATTACHING THE REFRIGERATOR DOORS 23 ADJUSTING THE HEIGHT BETWEEN THE DOORS 28 CHECKING THE WATER ...DISPENSER LINE 30 INSTALLING THE WATER DISPENSER LINE 31 BEFORE YOU CALL FOR SERVICE 34 CONSUMER SUPPORT 36 WARRANTY 36 In the U.S.A, for questions about features, operation/performance, parts, accessories or service, call: 1-800-726-7864 (1-800-SAMSUNG) www.samsung...
...18 WATER FILTER 19 DOORS ...19 INSTALLATION INSTRUCTIONS 20 INSTALLATION OF THE REFRIGERATOR 20 REMOVING THE REFRIGERATOR DOORS 22 REATTACHING THE REFRIGERATOR DOORS 23 ADJUSTING THE HEIGHT BETWEEN THE DOORS 28 CHECKING THE WATER ...DISPENSER LINE 30 INSTALLING THE WATER DISPENSER LINE 31 BEFORE YOU CALL FOR SERVICE 34 CONSUMER SUPPORT 36 WARRANTY 36 In the U.S.A, for questions about features, operation/performance, parts, accessories or service, call: 1-800-726-7864 (1-800-SAMSUNG) www.samsung...
User Manual (user Manual) (ver.9.0) (English)
Page 2
...slightly from those described in this action be handled by the back of death or serious injury exists. Represents something you must ground the refrigerator to prevent electric shock. CAUTION Indicates that this manual • The appliance is not squashed or damaged by a service person. It ...by children or infirm persons without adult supervision. • Children should be grounded. • You must disconnect the power plug from the refrigerator. Do not insert the power plug with the appliance. Make sure that will accept the plug on the appliance. Do not bend the...
...slightly from those described in this action be handled by the back of death or serious injury exists. Represents something you must ground the refrigerator to prevent electric shock. CAUTION Indicates that this manual • The appliance is not squashed or damaged by a service person. It ...by children or infirm persons without adult supervision. • Children should be grounded. • You must disconnect the power plug from the refrigerator. Do not insert the power plug with the appliance. Make sure that will accept the plug on the appliance. Do not bend the...

User Manual (user Manual) (ver.9.0) (English)
Page 3
...into the bottom area under provisions of environmental legislation. Do not store pharmaceutical products, scientific materials and temperature-sensitive products in the refrigerator. • Products with require strict temperature controls must be replaced by a 3rd party on the door, a serious injury may... is damaged, it must be subject to harm stratospheric ozone. • If you are necessarily small. Do not insert your SAMSUNG Electronics service center. etc • The appliance must be replaced by young children or infirm persons without supervision. Do not disconnect...
...into the bottom area under provisions of environmental legislation. Do not store pharmaceutical products, scientific materials and temperature-sensitive products in the refrigerator. • Products with require strict temperature controls must be replaced by a 3rd party on the door, a serious injury may... is damaged, it must be subject to harm stratospheric ozone. • If you are necessarily small. Do not insert your SAMSUNG Electronics service center. etc • The appliance must be replaced by young children or infirm persons without supervision. Do not disconnect...

User Manual (user Manual) (ver.9.0) (English)
Page 4
...run smoothly. Vegetable Crisper • Optimized humidity control keeps vegetables & fruits fresh. 4 You can store food in the refrigerator. This provides even distribution of cooling inside cabinets to reach the appropriate temperature. Set the temperature control to installation instructions in ...this Cable tie, after you plug in the refrigerator. If not, check the power supply and electricity source. SETTING UP THE REFRIGERATOR Once you have any questions, contact your SAMSUNG service center. Place the refrigerator in an appropriate location with reasonable clearance between...
...run smoothly. Vegetable Crisper • Optimized humidity control keeps vegetables & fruits fresh. 4 You can store food in the refrigerator. This provides even distribution of cooling inside cabinets to reach the appropriate temperature. Set the temperature control to installation instructions in ...this Cable tie, after you plug in the refrigerator. If not, check the power supply and electricity source. SETTING UP THE REFRIGERATOR Once you have any questions, contact your SAMSUNG service center. Place the refrigerator in an appropriate location with reasonable clearance between...
User Manual (user Manual) (ver.9.0) (English)
Page 13
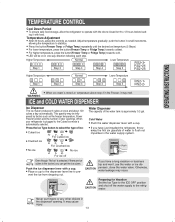
... RRSS22**12** • When ice cream is stored at once and about 120 cubes a day automatically. CAUTION If you have just installed the refrigerator, throw away the first six glassfuls of the water tank is approximely 0.3 gal. Otherwise, water leakage may melt. Preparing for 8 to 12... Cubed ice mode is automatically selected . OPERATING INSTRUCTIONS TEMPERATURE CONTROL Cool Down Period • To ensure safe food storage, allow the refrigerator to operate with the doors closed for Vacation Push Set the Ice Type to the ICE OFF position and shut off Even though "...
... RRSS22**12** • When ice cream is stored at once and about 120 cubes a day automatically. CAUTION If you have just installed the refrigerator, throw away the first six glassfuls of the water tank is approximely 0.3 gal. Otherwise, water leakage may melt. Preparing for 8 to 12... Cubed ice mode is automatically selected . OPERATING INSTRUCTIONS TEMPERATURE CONTROL Cool Down Period • To ensure safe food storage, allow the refrigerator to operate with the doors closed for Vacation Push Set the Ice Type to the ICE OFF position and shut off Even though "...
User Manual (user Manual) (ver.9.0) (English)
Page 14
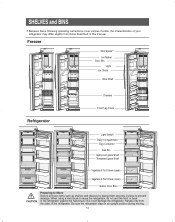
... in place to prevent damage. Freezer Xtra SpaceTM Ice Maker Door Bin Light Ice Chute Wire Shelf Refrigerator Drawers Front Leg Cover Light Switch Dairy Compartment Egg Container Deli Bin Spill-proof glass Shelf Tempered glass Shelf Vegetable & Fruit Drawer (upper) Vegetable... & Fruit Drawer (lower) Gallon Door Bins CAUTION Preparing to move the refrigerator, do not rest the front or back of the refrigerator. When using a hand truck to Move Secure all loose items such as shelves and drawers by taping them securely in an...
... in place to prevent damage. Freezer Xtra SpaceTM Ice Maker Door Bin Light Ice Chute Wire Shelf Refrigerator Drawers Front Leg Cover Light Switch Dairy Compartment Egg Container Deli Bin Spill-proof glass Shelf Tempered glass Shelf Vegetable & Fruit Drawer (upper) Vegetable... & Fruit Drawer (lower) Gallon Door Bins CAUTION Preparing to move the refrigerator, do not rest the front or back of the refrigerator. When using a hand truck to Move Secure all loose items such as shelves and drawers by taping them securely in an...
User Manual (user Manual) (ver.9.0) (English)
Page 16
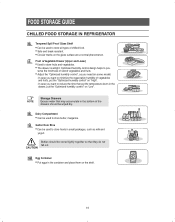
... stored tightly together so that may accumulate in small packages, such as you want to store butter, margarine. FOOD STORAGE GUIDE CHILLED FOOD STORAGE IN REFRIGERATOR Tempered Spill Proof Glass Shelf • Can be used to store fruits and vegetables. • The drawer is airtight. Fruit & Vegetable Drawer (Upper and Lower...
... stored tightly together so that may accumulate in small packages, such as you want to store butter, margarine. FOOD STORAGE GUIDE CHILLED FOOD STORAGE IN REFRIGERATOR Tempered Spill Proof Glass Shelf • Can be used to store fruits and vegetables. • The drawer is airtight. Fruit & Vegetable Drawer (Upper and Lower...
User Manual (user Manual) (ver.9.0) (English)
Page 17
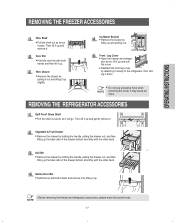
... Front Leg Cover • Open the freezer and refriger- NOTE 17 Wire Drawer • Remove the drawer by attaching it closely to the refrigerator, then sliding it up slightly. ator doors, lift it up and pull the cover. • Reattach the front leg cover by pulling it ...Bucket • Remove the bucket by holding the handle, pulling the drawer out, and then lifting up . • Before removing the freezer and refrigerator accessories, please move the stored foods. Door Bin • Hold the door bin with the other hand. OPERATING INSTRUCTIONS REMOVING THE FREEZER ACCESSORIES Wire ...
... Front Leg Cover • Open the freezer and refriger- NOTE 17 Wire Drawer • Remove the drawer by attaching it closely to the refrigerator, then sliding it up slightly. ator doors, lift it up and pull the cover. • Reattach the front leg cover by pulling it ...Bucket • Remove the bucket by holding the handle, pulling the drawer out, and then lifting up . • Before removing the freezer and refrigerator accessories, please move the stored foods. Door Bin • Hold the door bin with the other hand. OPERATING INSTRUCTIONS REMOVING THE FREEZER ACCESSORIES Wire ...
User Manual (user Manual) (ver.9.0) (English)
Page 18
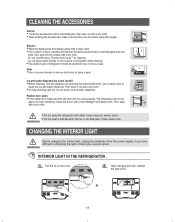
... out with a dry cloth. • After washing the accessories, make sure that they are dirty, the door will not close properly, The refrigerator will not be able to function efficiently. Rear • Use a vacuum cleaner to clean the ice and water dispenser. Ice and water dispenser(...water dispenser. After changing the bulb, reattach the light cover. 18 WARNING CHANGING THE INTERIOR LIGHT Before changing the interior light, unplug the refrigerator from the power supply. Do not use Benzene, Thinner and CloroxTM for cleaning - If you have difficulty in changing the light, contact ...
... out with a dry cloth. • After washing the accessories, make sure that they are dirty, the door will not close properly, The refrigerator will not be able to function efficiently. Rear • Use a vacuum cleaner to clean the ice and water dispenser. Ice and water dispenser(...water dispenser. After changing the bulb, reattach the light cover. 18 WARNING CHANGING THE INTERIOR LIGHT Before changing the interior light, unplug the refrigerator from the power supply. Do not use Benzene, Thinner and CloroxTM for cleaning - If you have difficulty in changing the light, contact ...
User Manual (user Manual) (ver.9.0) (English)
Page 19
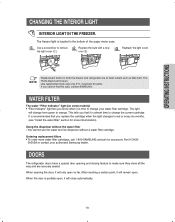
...When opening and closing feature to red or every six months. (see "Install the water filter" section for both the freezer and refrigerator are securely sealed. After reaching a certain point, it will remain open so far. OPERATING INSTRUCTIONS CHANGING THE INTERIOR LIGHT INTERIOR LIGHT IN... THE FREEZER. NOTE Replacement bulbs for more water filter cartridges, call 1-800-SAMSUNG and ask for accessory Part # DA29- 00003A or contact your water filter cartridge. This tells you that you replace the cartridge ...
...When opening and closing feature to red or every six months. (see "Install the water filter" section for both the freezer and refrigerator are securely sealed. After reaching a certain point, it will remain open so far. OPERATING INSTRUCTIONS CHANGING THE INTERIOR LIGHT INTERIOR LIGHT IN... THE FREEZER. NOTE Replacement bulbs for more water filter cartridges, call 1-800-SAMSUNG and ask for accessory Part # DA29- 00003A or contact your water filter cartridge. This tells you that you replace the cartridge ...
User Manual (user Manual) (ver.9.0) (English)
Page 20
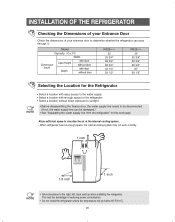
...Allow clearance to sunlight. This has the advantage of your entrance door to determine whether the refrigerator can be damaged.) • See "Separating the water supply line from the refrigerator" on the next page. NOTE • Before disassembling the freezer door, the water ...water supply. • Select a location with enough space for the refrigerator. • Select a location without direct exposure to the right, left, back and top when installing the refrigerator. INSTALLATION OF THE REFRIGERATOR Checking the Dimensions of your Entrance Door Check the dimensions of reducing...
...Allow clearance to sunlight. This has the advantage of your entrance door to determine whether the refrigerator can be damaged.) • See "Separating the water supply line from the refrigerator" on the next page. NOTE • Before disassembling the freezer door, the water ...water supply. • Select a location with enough space for the refrigerator. • Select a location without direct exposure to the right, left, back and top when installing the refrigerator. INSTALLATION OF THE REFRIGERATOR Checking the Dimensions of your Entrance Door Check the dimensions of reducing...
User Manual (user Manual) (ver.9.0) (English)
Page 21
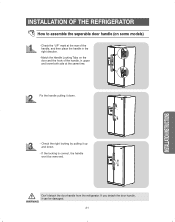
...Handle Locking Tabs on some models) - WARNING 21 Check the right locking by pulling it up and down . - Don't detach the door handle from the refrigerator. If you detach the door handle, it down . - If the locking is correct, the handle won't be damaged. Fix the handle pulling it can... be removed. INSTALLATION INSTRUCTIONS INSTALLATION OF THE REFRIGERATOR How to assemble the seperable door handle (on the door and the hook of the handle, in upper and lower both side at the rear...
...Handle Locking Tabs on some models) - WARNING 21 Check the right locking by pulling it up and down . - Don't detach the door handle from the refrigerator. If you detach the door handle, it down . - If the locking is correct, the handle won't be damaged. Fix the handle pulling it can... be removed. INSTALLATION INSTRUCTIONS INSTALLATION OF THE REFRIGERATOR How to assemble the seperable door handle (on the door and the hook of the handle, in upper and lower both side at the rear...
User Manual (user Manual) (ver.9.0) (English)
Page 22
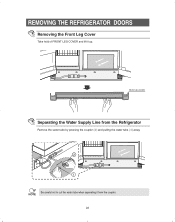
NOTE 22 REMOVING THE REFRIGERATOR DOORS Removing the Front Leg Cover Take hold of FRONT LEG COVER and lift it from the Refrigerator Remove the water tube by pressing the coupler (➁) and pulling the water tube (➀) away. Be careful not to cut the water tube when separating it up. FRONT LEG COVER Separating the Water Supply Line from the coupler.
NOTE 22 REMOVING THE REFRIGERATOR DOORS Removing the Front Leg Cover Take hold of FRONT LEG COVER and lift it from the Refrigerator Remove the water tube by pressing the coupler (➁) and pulling the water tube (➀) away. Be careful not to cut the water tube when separating it up. FRONT LEG COVER Separating the Water Supply Line from the coupler.
User Manual (user Manual) (ver.9.0) (English)
Page 23
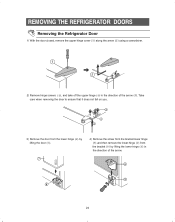
... a screwdriver, and then disconnect the wires (➁). Take care when removing the door to ensure that it does not fall on a protected surface. REMOVING THE REFRIGERATOR DOORS NOTE • Lift the door straight up. • Be careful not to pinch the water tubing and wire harness on the door. • Place...
... a screwdriver, and then disconnect the wires (➁). Take care when removing the door to ensure that it does not fall on a protected surface. REMOVING THE REFRIGERATOR DOORS NOTE • Lift the door straight up. • Be careful not to pinch the water tubing and wire harness on the door. • Place...
User Manual (user Manual) (ver.9.0) (English)
Page 24
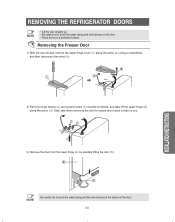
... remove the lower hinge (➇) from the bracket (➈) by lifting the lower hinge (➇) in the direction of the arrow. 24 REMOVING THE REFRIGERATOR DOORS Removing the Refrigerator Door 1) With the door closed, remove the upper hinge cover (➀) along the arrow (➁) using a screwdriver. 2) Remove hinge screws (➂), and take...
... remove the lower hinge (➇) from the bracket (➈) by lifting the lower hinge (➇) in the direction of the arrow. 24 REMOVING THE REFRIGERATOR DOORS Removing the Refrigerator Door 1) With the door closed, remove the upper hinge cover (➀) along the arrow (➁) using a screwdriver. 2) Remove hinge screws (➂), and take...
User Manual (user Manual) (ver.9.0) (English)
Page 25
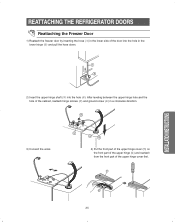
... (➆) on the front part of the upper hinge (➇) and reattach from the front part of the door into the hole (➃). REATTACHING THE REFRIGERATOR DOORS Reattaching the Freezer Door 1) Reattach the freezer door by inserting the hose (➀) in the lower side of the upper hinge cover first. 7 8 25...
... (➆) on the front part of the upper hinge (➇) and reattach from the front part of the door into the hole (➃). REATTACHING THE REFRIGERATOR DOORS Reattaching the Freezer Door 1) Reattach the freezer door by inserting the hose (➀) in the lower side of the upper hinge cover first. 7 8 25...

User Manual (user Manual) (ver.9.0) (English)
Page 26
After leveling between the upper hinge hole and the cabinet hole. REATTACHING THE REFRIGERATOR DOORS Reattaching the Refrigerator Door 1) Insert the lower hinge (➀) in the bracket lower hinge (➁). 2) Place the hole in the clockwise direction. 4) Put the front part of the ... (➉) and reattach it from the front part of the upper hinge cover first. 9 26 Reattach hinge screws (➆) and gound screw (➇) in the refrigerator door (➂) over the lower hinge (➃). 3) Insert the upper hinge shaft (➄) into the hole (➅).
After leveling between the upper hinge hole and the cabinet hole. REATTACHING THE REFRIGERATOR DOORS Reattaching the Refrigerator Door 1) Insert the lower hinge (➀) in the bracket lower hinge (➁). 2) Place the hole in the clockwise direction. 4) Put the front part of the ... (➉) and reattach it from the front part of the upper hinge cover first. 9 26 Reattach hinge screws (➆) and gound screw (➇) in the refrigerator door (➂) over the lower hinge (➃). 3) Insert the upper hinge shaft (➄) into the hole (➅).
User Manual (user Manual) (ver.9.0) (English)
Page 27
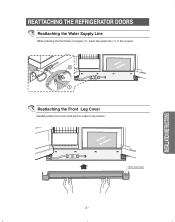
Reattaching the Front Leg Cover Carefully place front cover and push to snap it into position. FRONT LEG COVER 27 INSTALLATION INSTRUCTIONS REATTACHING THE REFRIGERATOR DOORS Reattaching the Water Supply Line While pressing the front face of coupler (➁), insert the water line (➀) in the coupler.
Reattaching the Front Leg Cover Carefully place front cover and push to snap it into position. FRONT LEG COVER 27 INSTALLATION INSTRUCTIONS REATTACHING THE REFRIGERATOR DOORS Reattaching the Water Supply Line While pressing the front face of coupler (➁), insert the water line (➀) in the coupler.
User Manual (user Manual) (ver.9.0) (English)
Page 28
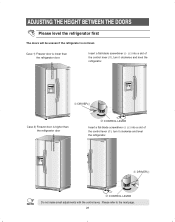
.... Insert a flat-blade screwdriver (-) (➀) into a slot of the control lever (➁), turn it clockwise and level the refrigerator. DIFFERANCE OF HEIGHT ➀ DRIVER(-) NOTE ➁ CONTROL LEVER Do not make small adjustments with the control lever, Please refer... to the next page. 28 ADJUSTING THE HEIGHT BETWEEN THE DOORS Please level the refrigerator first The doors will be uneven if the refrigerator is lower than the refrigerator door ➁ CONTROL LEVER Insert a flat-blade screwdriver (-) (➀) into a slot of the control ...
.... Insert a flat-blade screwdriver (-) (➀) into a slot of the control lever (➁), turn it clockwise and level the refrigerator. DIFFERANCE OF HEIGHT ➀ DRIVER(-) NOTE ➁ CONTROL LEVER Do not make small adjustments with the control lever, Please refer... to the next page. 28 ADJUSTING THE HEIGHT BETWEEN THE DOORS Please level the refrigerator first The doors will be uneven if the refrigerator is lower than the refrigerator door ➁ CONTROL LEVER Insert a flat-blade screwdriver (-) (➀) into a slot of the control ...

User Manual (user Manual) (ver.9.0) (English)
Page 29
...When you do not fix the nut (①)firmly, the bolt (➁) may be released. If the freezer door is lower than the refrigerator door. Loosen the nut(①) with the wrench (➂) to turn the nut (①) clockwise( bolt again with your finger. ➁...; BOLT ➂ WRENCH ➀ NUT 2) Please adjust the height difference between doors If the freezer door is higher than the refrigerator door. NOTE 29 ADJUST THE HEIGHT BETWEEN THE DOORS Making small level adjustments between the doors turning the bolt (➁) clockwise( ( ). Adjustment...
...When you do not fix the nut (①)firmly, the bolt (➁) may be released. If the freezer door is lower than the refrigerator door. Loosen the nut(①) with the wrench (➂) to turn the nut (①) clockwise( bolt again with your finger. ➁...; BOLT ➂ WRENCH ➀ NUT 2) Please adjust the height difference between doors If the freezer door is higher than the refrigerator door. NOTE 29 ADJUST THE HEIGHT BETWEEN THE DOORS Making small level adjustments between the doors turning the bolt (➁) clockwise( ( ). Adjustment...


