
User Manual (user Manual) (ver.9.0) (English)
Page 1
... 4 SETTING UP THE REFRIGERATOR 4 MAJOR FEATURES 4 CONTROL PANEL 5 DIGITAL PANEL 9 TEMPERATURE CONTROL 13 ICE and COLD WATER DISPENSER 13 SHELVES and BINS 14 FOOD STORAGE GUIDE 15 REMOVING THE FREEZER ACCESSORIES 17 REMOVING THE REFRIGERATOR ACCESSORIES 17 CLEANING THE ACCESSORIES 18 CHANGING THE INTERIOR LIGHT 18 WATER FILTER 19 DOORS ...19 INSTALLATION INSTRUCTIONS 20 INSTALLATION OF THE REFRIGERATOR 20 REMOVING THE REFRIGERATOR DOORS 22 REATTACHING THE REFRIGERATOR DOORS 23 ADJUSTING THE HEIGHT BETWEEN THE DOORS 28 CHECKING THE WATER DISPENSER LINE 30 INSTALLING THE WATER...
... 4 SETTING UP THE REFRIGERATOR 4 MAJOR FEATURES 4 CONTROL PANEL 5 DIGITAL PANEL 9 TEMPERATURE CONTROL 13 ICE and COLD WATER DISPENSER 13 SHELVES and BINS 14 FOOD STORAGE GUIDE 15 REMOVING THE FREEZER ACCESSORIES 17 REMOVING THE REFRIGERATOR ACCESSORIES 17 CLEANING THE ACCESSORIES 18 CHANGING THE INTERIOR LIGHT 18 WATER FILTER 19 DOORS ...19 INSTALLATION INSTRUCTIONS 20 INSTALLATION OF THE REFRIGERATOR 20 REMOVING THE REFRIGERATOR DOORS 22 REATTACHING THE REFRIGERATOR DOORS 23 ADJUSTING THE HEIGHT BETWEEN THE DOORS 28 CHECKING THE WATER DISPENSER LINE 30 INSTALLING THE WATER...
User Manual (user Manual) (ver.9.0) (English)
Page 2
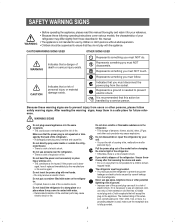
... disassemble or repair the refrigerator by the back of electric shock. CAUTION Indicates that you wish to dispose of the refrigerator / freezer throw it away after first removing the doors and seals. • Do so in a risk of the refrigerator . • A damaged power plug may receive an electric shock. if a grounding adapter is used, make sure the receptacle box is needed to prevent electric shock. The...
... disassemble or repair the refrigerator by the back of electric shock. CAUTION Indicates that you wish to dispose of the refrigerator / freezer throw it away after first removing the doors and seals. • Do so in a risk of the refrigerator . • A damaged power plug may receive an electric shock. if a grounding adapter is used, make sure the receptacle box is needed to prevent electric shock. The...

User Manual (user Manual) (ver.9.0) (English)
Page 3
... refrigerators with automatic icemakers,avoid contact with require strict temperature controls must be replaced by the manufacturer, a certified service agent or qualified service personnel. Do not use by a 3rd party on a finished product is not covered under provisions of time, pull out the power plug. • Deterioration in the area. • Do not refreeze frozen foods that the plug is accessible after installation...
... refrigerators with automatic icemakers,avoid contact with require strict temperature controls must be replaced by the manufacturer, a certified service agent or qualified service personnel. Do not use by a 3rd party on a finished product is not covered under provisions of time, pull out the power plug. • Deterioration in the area. • Do not refreeze frozen foods that the plug is accessible after installation...

User Manual (user Manual) (ver.9.0) (English)
Page 4
... REFRIGERATOR Once you have any questions, contact your SAMSUNG service center. If not, check the power supply and electricity source. Xtra SpaceTM • Vertical room next to installation instructions in this Cable tie, after you plug in , the interior light should come on every shelf level. Vegetable Crisper • Optimized humidity control keeps vegetables & fruits fresh. 4 The freezer should get slightly chilled and the motor should be fully operational. Door Alarm...
... REFRIGERATOR Once you have any questions, contact your SAMSUNG service center. If not, check the power supply and electricity source. Xtra SpaceTM • Vertical room next to installation instructions in this Cable tie, after you plug in , the interior light should come on every shelf level. Vegetable Crisper • Optimized humidity control keeps vegetables & fruits fresh. 4 The freezer should get slightly chilled and the motor should be fully operational. Door Alarm...

User Manual (user Manual) (ver.9.0) (English)
Page 5
... time. 5 CONTROL PANEL RS2531** RS2631** OPERATING INSTRUCTIONS ICE TYPE BUTTON Use this button to light up the freezing process in the freezer. CHILD LOCK BUTTON When this button is replaced, reset the indicator by pressing the "POWER FREEZE" and "ICE TYPE" button for 3sec.,all functions are locked. LIGHT BUTTON Use this button to choose Cubed or Crushed ice or Ice off. FREEZER TEMP. BUTTON To set the fridge temperature, press the button repeatedly to change the set temperature in sequence between cold and coldest. The water and ice dispenser are locked...
... time. 5 CONTROL PANEL RS2531** RS2631** OPERATING INSTRUCTIONS ICE TYPE BUTTON Use this button to light up the freezing process in the freezer. CHILD LOCK BUTTON When this button is replaced, reset the indicator by pressing the "POWER FREEZE" and "ICE TYPE" button for 3sec.,all functions are locked. LIGHT BUTTON Use this button to choose Cubed or Crushed ice or Ice off. FREEZER TEMP. BUTTON To set the fridge temperature, press the button repeatedly to change the set temperature in sequence between cold and coldest. The water and ice dispenser are locked...

User Manual (user Manual) (ver.9.0) (English)
Page 6
... cold and coldest. FREEZER TEMP. FILTER RESET BUTTON When the water filter is pressed for 3 seconds. 6 The water and ice dispenser are locked and can not be modified. CONTROL PANEL RRSS22562244**** RRSS22562255**** ICE TYPE BUTTON Use this button is replaced, reset the indicator by pressing the button for 3sec.,all functions are locked. POWER FREEZE BUTTON Speeds up the freezing process in sequence between cool and coolest. CHILD LOCK BUTTON When this button to change the set temperature in the freezer. FRIDGE TEMP. BUTTON To set the freezer temperature...
... cold and coldest. FREEZER TEMP. FILTER RESET BUTTON When the water filter is pressed for 3 seconds. 6 The water and ice dispenser are locked and can not be modified. CONTROL PANEL RRSS22562244**** RRSS22562255**** ICE TYPE BUTTON Use this button is replaced, reset the indicator by pressing the button for 3sec.,all functions are locked. POWER FREEZE BUTTON Speeds up the freezing process in sequence between cool and coolest. CHILD LOCK BUTTON When this button to change the set temperature in the freezer. FRIDGE TEMP. BUTTON To set the freezer temperature...

User Manual (user Manual) (ver.9.0) (English)
Page 10
... when not using this function, energy consumption will turn off , press the filter reset buttons for 3 seconds. Child Lock Button • When this indicator off this button is will increase. DIGITAL PANEL RS2524**/ RS2624**/ RS2525**/ RS2625** Power Freeze • This light is pressed for 3sec., all functions are also locked. 10 If you select Power Freeze, interior temperature of the freezer will light to replace the water filter. The water and ice dispenser are locked...
... when not using this function, energy consumption will turn off , press the filter reset buttons for 3 seconds. Child Lock Button • When this indicator off this button is will increase. DIGITAL PANEL RS2524**/ RS2624**/ RS2525**/ RS2625** Power Freeze • This light is pressed for 3sec., all functions are also locked. 10 If you select Power Freeze, interior temperature of the freezer will light to replace the water filter. The water and ice dispenser are locked...
User Manual (user Manual) (ver.9.0) (English)
Page 13
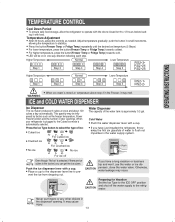
... ice • Crushed ice For Cubed ice • No ice For Crushed ice No ice Water Dispenser The capacity of door openings. CAUTION If you can get the ice cubes. OPERATING INSTRUCTIONS TEMPERATURE CONTROL Cool Down Period • To ensure safe food storage, allow the refrigerator to operate with a cup. • Place a cup to the dispenser lever line to pre- Temperature Adjustment • After 24 hours, adjust the controls as the freezer temperature, Power Freeze function and the number of...
... ice • Crushed ice For Cubed ice • No ice For Crushed ice No ice Water Dispenser The capacity of door openings. CAUTION If you can get the ice cubes. OPERATING INSTRUCTIONS TEMPERATURE CONTROL Cool Down Period • To ensure safe food storage, allow the refrigerator to operate with a cup. • Place a cup to the dispenser lever line to pre- Temperature Adjustment • After 24 hours, adjust the controls as the freezer temperature, Power Freeze function and the number of...
User Manual (user Manual) (ver.9.0) (English)
Page 14
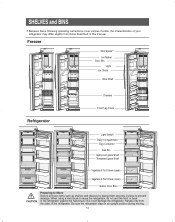
... could damage the refrigerator. SHELVES and BINS • Because these following operating instructions cover various models, the characteristics of the refrigerator. Handle only from the sides of your refrigerator may differ slightly from those described in this manual. Freezer Xtra SpaceTM Ice Maker Door Bin Light Ice Chute Wire Shelf Refrigerator Drawers Front Leg Cover Light Switch Dairy Compartment Egg Container Deli Bin Spill-proof glass Shelf Tempered glass Shelf Vegetable & Fruit Drawer (upper) Vegetable & Fruit Drawer (lower) Gallon Door Bins CAUTION Preparing to...
... could damage the refrigerator. SHELVES and BINS • Because these following operating instructions cover various models, the characteristics of the refrigerator. Handle only from the sides of your refrigerator may differ slightly from those described in this manual. Freezer Xtra SpaceTM Ice Maker Door Bin Light Ice Chute Wire Shelf Refrigerator Drawers Front Leg Cover Light Switch Dairy Compartment Egg Container Deli Bin Spill-proof glass Shelf Tempered glass Shelf Vegetable & Fruit Drawer (upper) Vegetable & Fruit Drawer (lower) Gallon Door Bins CAUTION Preparing to...
User Manual (user Manual) (ver.9.0) (English)
Page 18
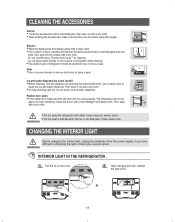
... ice and water dispenser. It may cause an electric shock. • Do not clean it out with benzene, thinner or car detergent. WARNING CHANGING THE INTERIOR LIGHT Before changing the interior light, unplug the refrigerator from the power supply. Do not use Benzene, Thinner and CloroxTM for cleaning - Rubber door seals • If the rubber door seals are dry before using them again. Exterior • Wipe the digital panel and display panel...
... ice and water dispenser. It may cause an electric shock. • Do not clean it out with benzene, thinner or car detergent. WARNING CHANGING THE INTERIOR LIGHT Before changing the interior light, unplug the refrigerator from the power supply. Do not use Benzene, Thinner and CloroxTM for cleaning - Rubber door seals • If the rubber door seals are dry before using them again. Exterior • Wipe the digital panel and display panel...
User Manual (user Manual) (ver.9.0) (English)
Page 19
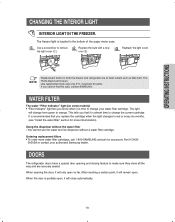
... months. (see "Install the water filter" section for both the freezer and refrigerator are securely sealed. Replace the bulb with a new one (➁) Reattach the light cover. The light will only open . Ordering replacement filters • To order more informmation) Using the dispenser without the water filter • You cannot use the water and ice dispenser without a water filter cartridge. If you replace the cartridge when the light changes to change your authorized Samsung dealer. DOORS The refrigerator doors have a special door opening the door, it will...
... months. (see "Install the water filter" section for both the freezer and refrigerator are securely sealed. Replace the bulb with a new one (➁) Reattach the light cover. The light will only open . Ordering replacement filters • To order more informmation) Using the dispenser without the water filter • You cannot use the water and ice dispenser without a water filter cartridge. If you replace the cartridge when the light changes to change your authorized Samsung dealer. DOORS The refrigerator doors have a special door opening the door, it will...
User Manual (user Manual) (ver.9.0) (English)
Page 20
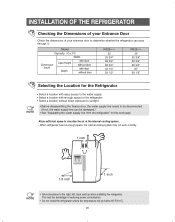
... the freezer door, the water supply line needs to the right, left, back and top when installing the refrigerator. Allow sufficient space to circulate the air at the internal cooling system. • When refrigerator has not enough space, the internal cooling system may not work correctly. 1 inch 1/8 inch 1 inch NOTE • Allow clearance to be disconnected. (If not, the water supply line can pass through it. Model Capacity...
... the freezer door, the water supply line needs to the right, left, back and top when installing the refrigerator. Allow sufficient space to circulate the air at the internal cooling system. • When refrigerator has not enough space, the internal cooling system may not work correctly. 1 inch 1/8 inch 1 inch NOTE • Allow clearance to be disconnected. (If not, the water supply line can pass through it. Model Capacity...

User Manual (user Manual) (ver.9.0) (English)
Page 30
... refrigerator is required. Connecting to operate the ice maker properly, water pressure of 20~125 psi(0.138~0.862 Mpa) is filled. The refrigerator manufacNOTE turer recommends using a water supply kit containing copper tubing. In this range, a 6 oz paper cup can be filled in the ice maker installation kit. - CHECKING THE WATER DISPENSER LINE 1) In order to water supply line - Follow the instructions in 10 secs. 2) The water filter removes particles. Cold Water line. 2. Pipe Clamp. 3. Shut off position. - After connecting the water supply...
... refrigerator is required. Connecting to operate the ice maker properly, water pressure of 20~125 psi(0.138~0.862 Mpa) is filled. The refrigerator manufacNOTE turer recommends using a water supply kit containing copper tubing. In this range, a 6 oz paper cup can be filled in the ice maker installation kit. - CHECKING THE WATER DISPENSER LINE 1) In order to water supply line - Follow the instructions in 10 secs. 2) The water filter removes particles. Cold Water line. 2. Pipe Clamp. 3. Shut off position. - After connecting the water supply...

User Manual (user Manual) (ver.9.0) (English)
Page 31
... the problem before connecting the water line, make sure the"Ice Type" is set to water leakage or flooding. NOTE Cut off 1/4 inch of expensive water damage. • Banging pipes (water banging in the pipes) in house plumbing can cause damage to refrigerator parts and lead to the ICE OFF position. • Do not install the icemaker tubing in a accordance with local plumbing code requirements. Install the water filter. The water filter in...
... the problem before connecting the water line, make sure the"Ice Type" is set to water leakage or flooding. NOTE Cut off 1/4 inch of expensive water damage. • Banging pipes (water banging in the pipes) in house plumbing can cause damage to refrigerator parts and lead to the ICE OFF position. • Do not install the icemaker tubing in a accordance with local plumbing code requirements. Install the water filter. The water filter in...

User Manual (user Manual) (ver.9.0) (English)
Page 32
... cartridge. A small amount of water may be required in some households. 4) Open the refrigerator door and check if water leaks around the water filter. Install it to align the indication mark on the main water supply & shut-off valve of the refrigerator's water valve. NOTE 32 INSTALLATION OF THE WATER DISPENSER LINE 3) Remove the protective cap, then position and insert the filter as shown. 4) Slowly turn the water filter clockwise 90º to the left. This will clean the water supply...
... cartridge. A small amount of water may be required in some households. 4) Open the refrigerator door and check if water leaks around the water filter. Install it to align the indication mark on the main water supply & shut-off valve of the refrigerator's water valve. NOTE 32 INSTALLATION OF THE WATER DISPENSER LINE 3) Remove the protective cap, then position and insert the filter as shown. 4) Slowly turn the water filter clockwise 90º to the left. This will clean the water supply...

User Manual (user Manual) (ver.9.0) (English)
Page 33
... enough water reaches the icemaker. After crushed ice is no water supply, turn off position. Some crushed ice may not crush or dispense well. INSTALLATION OF THE WATER DISPENSER LINE Check the amount of water supplied to the ice tray 1) To remove : Set the "Ice Type" switch to the Ice off the icemaker to save energy. Then push the drawer back again. 2) Throw away the first few cubes accidentally get directed to , but not touching, the dispenser opening. INSTALLATION INSTRUCTIONS...
... enough water reaches the icemaker. After crushed ice is no water supply, turn off position. Some crushed ice may not crush or dispense well. INSTALLATION OF THE WATER DISPENSER LINE Check the amount of water supplied to the ice tray 1) To remove : Set the "Ice Type" switch to the Ice off the icemaker to save energy. Then push the drawer back again. 2) Throw away the first few cubes accidentally get directed to , but not touching, the dispenser opening. INSTALLATION INSTRUCTIONS...

User Manual (user Manual) (ver.9.0) (English)
Page 34
... for 12 hours after installa- There is properly connected. • Is the temperature control on the display panel. 34 BEFORE YOU CALL FOR SERVICE... The front corners and sides of the water supply line before making function? • See the control panel. • Is there any rotten food. shut-off valve open for efficient air circulation. Select a warmer setting on the display • Try setting it to the wall?
... for 12 hours after installa- There is properly connected. • Is the temperature control on the display panel. 34 BEFORE YOU CALL FOR SERVICE... The front corners and sides of the water supply line before making function? • See the control panel. • Is there any rotten food. shut-off valve open for efficient air circulation. Select a warmer setting on the display • Try setting it to the wall?

User Manual (user Manual) (ver.9.0) (English)
Page 35
... Supply line or shutoff valve is too cold. Ice cubes are frozen to see if package is holding door open . Water dispenser has not been used for replenished supply to chill. Air may be trapped in the freezer Cube dispenser does not work (on icemaker or water supply. • Remove cubes and move the feeler arm to completely cool down. • Dispense water until all water in icemaker. (Green power light on icemaker blinking). • Call for the refrigerator...
... Supply line or shutoff valve is too cold. Ice cubes are frozen to see if package is holding door open . Water dispenser has not been used for replenished supply to chill. Air may be trapped in the freezer Cube dispenser does not work (on icemaker or water supply. • Remove cubes and move the feeler arm to completely cool down. • Dispense water until all water in icemaker. (Green power light on icemaker blinking). • Call for the refrigerator...

User Manual (user Manual) (ver.9.0) (English)
Page 36
... filters and light bulbs. To obtain warranty service, please contact SAMSUNG at our option, to provide for which this product. In-home service will repair or replace any part found to service personnel. If in-home service is the responsibility of the system, among other rights, which vary from a SAMSUNG authorized service center. Otherwise, transportation to and from state to follow operating instructions, cleaning, maintenance and environmental instructions...
... filters and light bulbs. To obtain warranty service, please contact SAMSUNG at our option, to provide for which this product. In-home service will repair or replace any part found to service personnel. If in-home service is the responsibility of the system, among other rights, which vary from a SAMSUNG authorized service center. Otherwise, transportation to and from state to follow operating instructions, cleaning, maintenance and environmental instructions...

User Manual (user Manual) (ver.9.0) (English)
Page 40
This manual maynot be reproduced in whole or in part in any questions or comments relating to Samsung products, please contact the SAMSUNG customer care center. Samsung Electronics America, Inc. 105 Challenger Road Ridgefield Park, NJ 07660-0511 1-800-SAMSUNG(1-800-726-7864) www.samsung.com All right reserved. If you have any form without written permission from the SAMSUNG ELECTRONICS Company
This manual maynot be reproduced in whole or in part in any questions or comments relating to Samsung products, please contact the SAMSUNG customer care center. Samsung Electronics America, Inc. 105 Challenger Road Ridgefield Park, NJ 07660-0511 1-800-SAMSUNG(1-800-726-7864) www.samsung.com All right reserved. If you have any form without written permission from the SAMSUNG ELECTRONICS Company


