

User Manual (user Manual) (ver.1.0) (English)
Page 1
... WATER DISPENSER 8 SHELVES AND BINS 9 FOOD STORAGE GUIDE 10 CoolSelect ZoneTM Drawer GUIDE 12 REMOVING FREEZER ACCESSORIES 14 REMOVING REFRIGERATOR ACCESSORIES 14 BEVERAGE STATIONTM (optional 15 CLEANING ACCESSORIES 16 CHANGING THE INTERIOR LIGHT 16 WATER FILTER 17 DOORS ...17 INSTALLATION ...INSTRUCTIONS 18 INSTALLATION OF THE REFRIGERATOR 18 REMOVING THE REFRIGERATOR DOORS 19 REATTACHING THE REFRIGERATOR DOORS 22 ADJUSTING THE CLEARANCE BETWEEN THE DOORS 25 CHECKING THE WATER DISPENSER LINE 27 INSTALLAING...
... WATER DISPENSER 8 SHELVES AND BINS 9 FOOD STORAGE GUIDE 10 CoolSelect ZoneTM Drawer GUIDE 12 REMOVING FREEZER ACCESSORIES 14 REMOVING REFRIGERATOR ACCESSORIES 14 BEVERAGE STATIONTM (optional 15 CLEANING ACCESSORIES 16 CHANGING THE INTERIOR LIGHT 16 WATER FILTER 17 DOORS ...17 INSTALLATION ...INSTRUCTIONS 18 INSTALLATION OF THE REFRIGERATOR 18 REMOVING THE REFRIGERATOR DOORS 19 REATTACHING THE REFRIGERATOR DOORS 22 ADJUSTING THE CLEARANCE BETWEEN THE DOORS 25 CHECKING THE WATER DISPENSER LINE 27 INSTALLAING...

User Manual (user Manual) (ver.1.0) (English)
Page 2
...it replaced immediately by yourself. • You run the risk of causing a fire, malfunctions and/or personal injury. Never use aerosols near the refrigerator . • There is a risk of electric shock. CAUTION Indicates that a danger of death or serious injury exists. Represents a ground is ... with water. • Deteriorated insulation electrical parts may cause electric shock or fire. 2 Do not store volatile or flammable substances in the refrigerator. • The storage of benzene, thinner, alcohol, ether, LP gas and other potential lightening rods as ground. • Improper use...
...it replaced immediately by yourself. • You run the risk of causing a fire, malfunctions and/or personal injury. Never use aerosols near the refrigerator . • There is a risk of electric shock. CAUTION Indicates that a danger of death or serious injury exists. Represents a ground is ... with water. • Deteriorated insulation electrical parts may cause electric shock or fire. 2 Do not store volatile or flammable substances in the refrigerator. • The storage of benzene, thinner, alcohol, ether, LP gas and other potential lightening rods as ground. • Improper use...

User Manual (user Manual) (ver.1.0) (English)
Page 3
... the freezer or products stored in the insulation may cause fire. 3 Do not store pharmaceuticals products, scientific materials or temperature-sensitive products in the refrigerator. • Products that require strict temperature controls must be used for a long period of the appliance . • When you open the door... your hands into the dispenser hole and ice chute. Do not let children hang on the door. Do not insert your SAMSUNG Electronics service center. If the refrigerator is not to the cord may cause a short-circuit, fire and/or electric shock. • If the power cord ...
... the freezer or products stored in the insulation may cause fire. 3 Do not store pharmaceuticals products, scientific materials or temperature-sensitive products in the refrigerator. • Products that require strict temperature controls must be used for a long period of the appliance . • When you open the door... your hands into the dispenser hole and ice chute. Do not let children hang on the door. Do not insert your SAMSUNG Electronics service center. If the refrigerator is not to the cord may cause a short-circuit, fire and/or electric shock. • If the power cord ...

User Manual (user Manual) (ver.1.0) (English)
Page 4
... freezer due to keep your appliance may differ slightly from those described in this independent system, the freezer and the refrigerator are cooled individually as required and are, therefore, more efficient. This provides even distribution of cooling inside cabinets to ... in the refrigerator. When the refrigerator is left open the doors. SETTING UP THE REFRIGERATOR Once you have performed the following steps, your SAMSUNG service center. MAJOR FEATURES Twin Cooling System • The refrigerator and the freezer have any questions, contact your refrigerator should be fully...
... freezer due to keep your appliance may differ slightly from those described in this independent system, the freezer and the refrigerator are cooled individually as required and are, therefore, more efficient. This provides even distribution of cooling inside cabinets to ... in the refrigerator. When the refrigerator is left open the doors. SETTING UP THE REFRIGERATOR Once you have performed the following steps, your SAMSUNG service center. MAJOR FEATURES Twin Cooling System • The refrigerator and the freezer have any questions, contact your refrigerator should be fully...

User Manual (user Manual) (ver.1.0) (English)
Page 5
... allow for 3 sec., the Power Freeze, Power Cool, Freeze Temp. ICE TYPE BUTTON Use this button is pressed for usage. 5 If the moisture in the refrigerator MOISTURE CONTROL BUTTON Initially the light of moisture control button is found, press this button. are not locked as to change the set temperature in...
... allow for 3 sec., the Power Freeze, Power Cool, Freeze Temp. ICE TYPE BUTTON Use this button is pressed for usage. 5 If the moisture in the refrigerator MOISTURE CONTROL BUTTON Initially the light of moisture control button is found, press this button. are not locked as to change the set temperature in...

User Manual (user Manual) (ver.1.0) (English)
Page 7
... of the CoolSelect ZoneTMDrawer Power Freeze • This light is on when you press the Power Cool button. Press the button to quickly return the refrigerator to the set temperature. • If you need much ice, you can get ice faster. • Press the button again to cancel the Power Cool...
... of the CoolSelect ZoneTMDrawer Power Freeze • This light is on when you press the Power Cool button. Press the button to quickly return the refrigerator to the set temperature. • If you need much ice, you can get ice faster. • Press the button again to cancel the Power Cool...

User Manual (user Manual) (ver.1.0) (English)
Page 8
...way as the freezer temperature, the Power Freeze function and the number of the water tank is plugged in the temperature dis- TEMPERATURE CONTROL Freezer Refrigerator • The freezer temperature can be set between 7°C and 1°C. • Press the Fridge Temp. This quantity may melt. •...the desired temperature is shown in , the Cubed Ice mode is obtained. WARNING It may occur leakage. When the display reaches • The refrigerator temperature can be influenced by factors such as the freezer. 14°C, it may be set between -14°C and -25°C. &#...
...way as the freezer temperature, the Power Freeze function and the number of the water tank is plugged in the temperature dis- TEMPERATURE CONTROL Freezer Refrigerator • The freezer temperature can be set between 7°C and 1°C. • Press the Fridge Temp. This quantity may melt. •...the desired temperature is shown in , the Cubed Ice mode is obtained. WARNING It may occur leakage. When the display reaches • The refrigerator temperature can be influenced by factors such as the freezer. 14°C, it may be set between -14°C and -25°C. &#...
User Manual (user Manual) (ver.1.0) (English)
Page 9
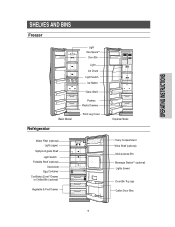
OPERATING INSTRUCTIONS SHELVES AND BINS Freezer Refrigerator Basic Model Water Filter (optional) Light (upper) Spill-proof glass Shelf Light Switch Foldable Shelf (optional) Deodorizer Egg Container CoolSelect ZoneTM Drawer or Chilled Bin (optional) Vegetable & Fruit Drawer Light Xtra SpaceTM Door Bin Light Ice Chute Light Switch Ice Maker Glass Shelf Pockets Plastic Drawers Front Leg Cover Dispenser Model Dairy Compartment Wine Shelf (optional) Muti-purpose Bin Beverage StationTM (optional) Lights (lower) Door Bin Top Lips Gallon Door Bins 9
OPERATING INSTRUCTIONS SHELVES AND BINS Freezer Refrigerator Basic Model Water Filter (optional) Light (upper) Spill-proof glass Shelf Light Switch Foldable Shelf (optional) Deodorizer Egg Container CoolSelect ZoneTM Drawer or Chilled Bin (optional) Vegetable & Fruit Drawer Light Xtra SpaceTM Door Bin Light Ice Chute Light Switch Ice Maker Glass Shelf Pockets Plastic Drawers Front Leg Cover Dispenser Model Dairy Compartment Wine Shelf (optional) Muti-purpose Bin Beverage StationTM (optional) Lights (lower) Door Bin Top Lips Gallon Door Bins 9

User Manual (user Manual) (ver.1.0) (English)
Page 11
... as canned bev- Wipe WARNING excess moisture from the inside and leave the doors open. OPERATING INSTRUCTIONS FOOD STORAGE GUIDE CHILLED FOOD STORAGE IN REFRIGERATOR Tempered Spill Proof Glass Shelf • Can be used quickly. Gallon Door Bins • Can be used to store the frequently used to... these items without opening the refrigerator door. Otherwise, odor and mold may develop. 11 Beverage Station (optional) • Can be used items, such as milk and yogurt. erages ...
... as canned bev- Wipe WARNING excess moisture from the inside and leave the doors open. OPERATING INSTRUCTIONS FOOD STORAGE GUIDE CHILLED FOOD STORAGE IN REFRIGERATOR Tempered Spill Proof Glass Shelf • Can be used quickly. Gallon Door Bins • Can be used to store the frequently used to... these items without opening the refrigerator door. Otherwise, odor and mold may develop. 11 Beverage Station (optional) • Can be used items, such as milk and yogurt. erages ...

User Manual (user Manual) (ver.1.0) (English)
Page 12
...When "Cool" is chosen, the temperature will be the same as that of the display panel. • The CoolSelect ZoneTM Drawer allows extra refrigerator space. 12 Chill • When "Chill" is chosen, the temperature of the CoolSe- The digital panel shows the same temperature as the set... temperature of the refrigerator. lect ZoneTM Drawer is kept at -1oC regardless of the set refrigerator temperature. • "Chill" temperature helps keep meats and fishes fresh longer. • Can cut meat ...
...When "Cool" is chosen, the temperature will be the same as that of the display panel. • The CoolSelect ZoneTM Drawer allows extra refrigerator space. 12 Chill • When "Chill" is chosen, the temperature of the CoolSe- The digital panel shows the same temperature as the set... temperature of the refrigerator. lect ZoneTM Drawer is kept at -1oC regardless of the set refrigerator temperature. • "Chill" temperature helps keep meats and fishes fresh longer. • Can cut meat ...

User Manual (user Manual) (ver.1.0) (English)
Page 14
...up . Then lift it up and remove it up . Ice maker bucket (optional) • Remove the bucket by lifting it softly. REMOVING THE REFRIGERATOR ACCESSORIES Spill Proof glass shelf • Pull the shelf out as far as it back to original position and tighten the three screws. • ...shelf in the direction of the arrow as shown. • Simply take the shelf out of the tabs. • Before removing the freezer and refrigerator accessories, please move the stored foods to the cabinet wall. Front leg cover • Open the freezer and refriger- WARNING 14 ator doors, ...
...up . Then lift it up and remove it up . Ice maker bucket (optional) • Remove the bucket by lifting it softly. REMOVING THE REFRIGERATOR ACCESSORIES Spill Proof glass shelf • Pull the shelf out as far as it back to original position and tighten the three screws. • ...shelf in the direction of the arrow as shown. • Simply take the shelf out of the tabs. • Before removing the freezer and refrigerator accessories, please move the stored foods to the cabinet wall. Front leg cover • Open the freezer and refriger- WARNING 14 ator doors, ...

User Manual (user Manual) (ver.1.0) (English)
Page 15
...StationTM door handle and pull it downward. • The Beverage StationTM is convenient and reduces energy consumption, because you do not need to open the refrigerator door to access stored beverages and snacks. • It is a risk of personal injury or material damage. • When you use the ... can be careful not to put your hands or fingers around the door frame where they are dirty, the door will not close properly, The refrigerator will not be polished once or twice a year. Ice and water dispenser (optional) • Use a damp cloth to function efficiently. Clean the...
...StationTM door handle and pull it downward. • The Beverage StationTM is convenient and reduces energy consumption, because you do not need to open the refrigerator door to access stored beverages and snacks. • It is a risk of personal injury or material damage. • When you use the ... can be careful not to put your hands or fingers around the door frame where they are dirty, the door will not close properly, The refrigerator will not be polished once or twice a year. Ice and water dispenser (optional) • Use a damp cloth to function efficiently. Clean the...

User Manual (user Manual) (ver.1.0) (English)
Page 16
... • Take out the cartridge from the cover and soak it is dried in the direction of the arrows. WARNING INTERIOR LIGHT IN THE REFRIGERATOR . After changing the bulb, reattach the light cover and screw it again. 16 If you have difficulty in again. Take the lamp cover ...out in a confined area, odor may drink water. CHANGING THE INTERIOR LIGHT Before changing the interior light, unplug the refrigerator from yellow water, they may be spread to that area. NOTE • Keep the children away from the power supply. After changing the bulb,...
... • Take out the cartridge from the cover and soak it is dried in the direction of the arrows. WARNING INTERIOR LIGHT IN THE REFRIGERATOR . After changing the bulb, reattach the light cover and screw it again. 16 If you have difficulty in again. Take the lamp cover ...out in a confined area, odor may drink water. CHANGING THE INTERIOR LIGHT Before changing the interior light, unplug the refrigerator from yellow water, they may be spread to that area. NOTE • Keep the children away from the power supply. After changing the bulb,...

User Manual (user Manual) (ver.1.0) (English)
Page 17
...sure that you know when it is partially open, it in the direction of the water line block at the water supply. DOORS The refrigerator doors have a special door opening the door, it will close all the way and are securely sealed. After reaching a certain point, ... cartridge because of the arrows. Change the bulb with a new one (➁) Reattach the light cover To replace freezer and refrigerator light bulbs (Bulb size E14), please contact SAMSUNG dealer. CHANGING THE INTERIOR LIGHT INTERIOR LIGHT IN THE FREEZER (Dispenser Model) Use a screwdriver to red. (see "Install the...
...sure that you know when it is partially open, it in the direction of the water line block at the water supply. DOORS The refrigerator doors have a special door opening the door, it will close all the way and are securely sealed. After reaching a certain point, ... cartridge because of the arrows. Change the bulb with a new one (➁) Reattach the light cover To replace freezer and refrigerator light bulbs (Bulb size E14), please contact SAMSUNG dealer. CHANGING THE INTERIOR LIGHT INTERIOR LIGHT IN THE FREEZER (Dispenser Model) Use a screwdriver to red. (see "Install the...

User Manual (user Manual) (ver.1.0) (English)
Page 18
... door to determine whether the refrigerator can be damaged.) Caution • See "Separating the water supply line from the refrigerator" on a flat surface. • If your refrigerator is bigger, removes refrigerator doors. NOTE This has the advantage of refrigerator is not level, the internal... or width of reducing power consumption. 18 Selecting the Location for the Refrigerator • Select a location with easy access to the water supply. • Select a location with enough space for the refrigerator. • Select a location without direct exposure to sunlight. •...
... door to determine whether the refrigerator can be damaged.) Caution • See "Separating the water supply line from the refrigerator" on a flat surface. • If your refrigerator is bigger, removes refrigerator doors. NOTE This has the advantage of refrigerator is not level, the internal... or width of reducing power consumption. 18 Selecting the Location for the Refrigerator • Select a location with easy access to the water supply. • Select a location with enough space for the refrigerator. • Select a location without direct exposure to sunlight. •...

User Manual (user Manual) (ver.1.0) (English)
Page 19
REMOVING THE REFRIGERATOR DOORS Removing the Front Leg Cover (Optional) Open the freezer and refrigerator doors, and then take off the front leg cover assembly by pressing the coupler (➁) and pulling the water tube (➀) away. a FRONT LEG COVER SCREW Separating the water supply line from the refrigerator (Optional) 1) Remove the screw from the coupler. Do not cut the water tube but separate it from clamp ( a ). 2) Remove the water tube by turning the three screws counter-clockwise. WARNING 19 INSTALLATION INSTRUCTIONS
REMOVING THE REFRIGERATOR DOORS Removing the Front Leg Cover (Optional) Open the freezer and refrigerator doors, and then take off the front leg cover assembly by pressing the coupler (➁) and pulling the water tube (➀) away. a FRONT LEG COVER SCREW Separating the water supply line from the refrigerator (Optional) 1) Remove the screw from the coupler. Do not cut the water tube but separate it from clamp ( a ). 2) Remove the water tube by turning the three screws counter-clockwise. WARNING 19 INSTALLATION INSTRUCTIONS

User Manual (user Manual) (ver.1.0) (English)
Page 20
... the lower hinge (➈) from the bracket lower hinge (➉) by lifting the lower hinge (➈) in the direction of the arrow. 20 REMOVING THE REFRIGERATOR DOORS NOTE • Lift the door straight up. • Be careful not to ensure that it does not fall on a protected surface. Removing the Freezer...
... the lower hinge (➈) from the bracket lower hinge (➉) by lifting the lower hinge (➈) in the direction of the arrow. 20 REMOVING THE REFRIGERATOR DOORS NOTE • Lift the door straight up. • Be careful not to ensure that it does not fall on a protected surface. Removing the Freezer...

User Manual (user Manual) (ver.1.0) (English)
Page 21
INSTALLATION INSTRUCTIONS 21 REMOVING THE REFRIGERATOR DOORS Removing the Refrigerator Door 1) With the door closed, remove the upper hinge cover (➀) using a screwdriver, and then disconnect the wires (➁). 2) Remove hinge screws (➂) and ground ...
INSTALLATION INSTRUCTIONS 21 REMOVING THE REFRIGERATOR DOORS Removing the Refrigerator Door 1) With the door closed, remove the upper hinge cover (➀) using a screwdriver, and then disconnect the wires (➁). 2) Remove hinge screws (➂) and ground ...

User Manual (user Manual) (ver.1.0) (English)
Page 22
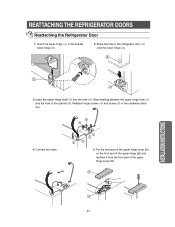
... (➄) into the hole (➅). After levelling between the upper hinge hole (➆) and the hole of the upper hinge cover first. 22 REATTACHING THE REFRIGERATOR DOORS Reattaching the Freezer Door 1) Insert the lower hinge (➀) in the bracket lower hinge (➁). 2) Reattach the freezer door by inserting the hose (➂...
... (➄) into the hole (➅). After levelling between the upper hinge hole (➆) and the hole of the upper hinge cover first. 22 REATTACHING THE REFRIGERATOR DOORS Reattaching the Freezer Door 1) Insert the lower hinge (➀) in the bracket lower hinge (➁). 2) Reattach the freezer door by inserting the hose (➂...
User Manual (user Manual) (ver.1.0) (English)
Page 23
... the lower hinge (➃). After levelling between the upper hinge hole (➆) and the hole of the upper hinge cover first. 23 REATTACHING THE REFRIGERATOR DOORS Reattaching the Refrigerator Door 1) Insert the lower hinge (➀) in the bracket lower hinge (➁). 2) Place the hole in the clockwise direction. 4) Connect the wires. 5) Put...
... the lower hinge (➃). After levelling between the upper hinge hole (➆) and the hole of the upper hinge cover first. 23 REATTACHING THE REFRIGERATOR DOORS Reattaching the Refrigerator Door 1) Insert the lower hinge (➀) in the bracket lower hinge (➁). 2) Place the hole in the clockwise direction. 4) Connect the wires. 5) Put...


