

Quick Guide (easy Manual) (ver.1.0) (English)
Page 14
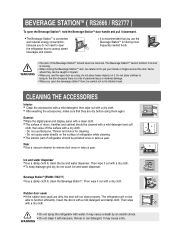
...; Do not clean it with a dry cloth. • After washing the accessories, make sure that you use the open door as a tray, do not touch ice and water dispenser. CLEANING THE ACCESSORIES Interior • Clean the accessories with a mild detergent, then wipe out with benzene, thinner or car detergent...because there is a risk of refrigerator should be polished once or twice a year. WARNING 14 Rear • Use a vacuum cleaner to clean the ice and water dispenser. Then wipe with a dry cloth. • Do not spray the refrigerator with a mild detergent and cloth. The Beverage StationTM ...
...; Do not clean it with a dry cloth. • After washing the accessories, make sure that you use the open door as a tray, do not touch ice and water dispenser. CLEANING THE ACCESSORIES Interior • Clean the accessories with a mild detergent, then wipe out with benzene, thinner or car detergent...because there is a risk of refrigerator should be polished once or twice a year. WARNING 14 Rear • Use a vacuum cleaner to clean the ice and water dispenser. Then wipe with a dry cloth. • Do not spray the refrigerator with a mild detergent and cloth. The Beverage StationTM ...

Quick Guide (easy Manual) (ver.1.0) (English)
Page 28
... CHECK THE WATER LEVEL This is filled with the ice maker but of water supplied. Check the amount of water supplied to check the amount of the water pressure in the freezer. When this problem occurs, use the following steps to the ice tray. 1) Lift up (x) and pull out (➁...;) the ice maker bucket in the pipe, and occurs frequently. ICE WATER • A newly-installed water filter cartridge may be small.
... CHECK THE WATER LEVEL This is filled with the ice maker but of water supplied. Check the amount of water supplied to check the amount of the water pressure in the freezer. When this problem occurs, use the following steps to the ice tray. 1) Lift up (x) and pull out (➁...;) the ice maker bucket in the pipe, and occurs frequently. ICE WATER • A newly-installed water filter cartridge may be small.

Quick Guide (easy Manual) (ver.1.0) (English)
Page 29
..., press the Freeze Temp. INSTALLATION OF THE WATER DISPENSER LINE Adjust the amount of water supplied. 1) In order to set the display panel to the ice tray as shown OPTIMUM LEVEL CHECK THE WATER LEVEL 29 corresponds to decrease the number. button to increase the number and the Power Cool button to... the option number. Choose the right amount of water supplied to the ice tray Input Data 00 01 02 03 04 05 06 07 08 09 10 11 12 13 14 15 Water Supply Time (sec) 5 4 3 6 7 8 9 10 12 13...
..., press the Freeze Temp. INSTALLATION OF THE WATER DISPENSER LINE Adjust the amount of water supplied. 1) In order to set the display panel to the ice tray as shown OPTIMUM LEVEL CHECK THE WATER LEVEL 29 corresponds to decrease the number. button to increase the number and the Power Cool button to... the option number. Choose the right amount of water supplied to the ice tray Input Data 00 01 02 03 04 05 06 07 08 09 10 11 12 13 14 15 Water Supply Time (sec) 5 4 3 6 7 8 9 10 12 13...

User Manual (user Manual) (ver.1.0) (English)
Page 14
...cloth, then wipe off the surface with a clean cloth. • The surface of the Beverage StationTM should be polished once or twice a year. Ice and water dispenser • Use a damp cloth to clean the Beverage StationTM. The Beverage StationTM cannot function if its door is missing. • ...be careful not to hit children head. Beverage StationTM (RS2577 ) • Use a damp cloth to clean the ice and water dispenser. WARNING 14 Do not use the open door as a tray, do not place heavy objects on the door because there is a risk of personal injury or material damage. ...
...cloth, then wipe off the surface with a clean cloth. • The surface of the Beverage StationTM should be polished once or twice a year. Ice and water dispenser • Use a damp cloth to clean the Beverage StationTM. The Beverage StationTM cannot function if its door is missing. • ...be careful not to hit children head. Beverage StationTM (RS2577 ) • Use a damp cloth to clean the ice and water dispenser. WARNING 14 Do not use the open door as a tray, do not place heavy objects on the door because there is a risk of personal injury or material damage. ...

User Manual (user Manual) (ver.1.0) (English)
Page 28
... with water from the dispenser. CHECK THE WATER LEVEL This is filled with the ice maker but of water supplied. When this problem occurs, contact the dealer service center to the ice tray. 1) Lift up (x) and pull out (➁) the ice maker bucket in the pipe, and occurs frequently. Check the amount of water...
... with water from the dispenser. CHECK THE WATER LEVEL This is filled with the ice maker but of water supplied. When this problem occurs, contact the dealer service center to the ice tray. 1) Lift up (x) and pull out (➁) the ice maker bucket in the pipe, and occurs frequently. Check the amount of water...

User Manual (user Manual) (ver.2.0) (English)
Page 14
Do not use the open door as a tray, do not place heavy objects on it with a dry cloth. Rubber door ...the digital panel and display panel with a dry cloth. • To keep drainage grid dry, do not touch ice and water dispenser. Ice and water dispenser • Use a damp cloth to hit children head. Then wipe it out with a clean ...frame where they are dirty, the door will not close properly, The refrigerator will not be careful not to clean the ice and water dispenser. CLEANING THE ACCESSORIES Interior • Clean the accessories with a mild detergent, then wipe out with ...
Do not use the open door as a tray, do not place heavy objects on it with a dry cloth. Rubber door ...the digital panel and display panel with a dry cloth. • To keep drainage grid dry, do not touch ice and water dispenser. Ice and water dispenser • Use a damp cloth to hit children head. Then wipe it out with a clean ...frame where they are dirty, the door will not close properly, The refrigerator will not be careful not to clean the ice and water dispenser. CLEANING THE ACCESSORIES Interior • Clean the accessories with a mild detergent, then wipe out with ...

User Manual (user Manual) (ver.2.0) (English)
Page 28
... will clean the water supply system and clear air from the lines. 3) Additional flushing may cause water to the ice tray. 1) Lift up (x) and pull out (➁) the ice maker bucket in the pipe, and occurs frequently. This will be required in some households. 4) Open the refrigerator ...door and check if water leaks around the water filter. ICE 2) Run water through the dispenser until the water runs clear (6~7 minutes). When this problem occurs, contact the dealer service center to check ...
... will clean the water supply system and clear air from the lines. 3) Additional flushing may cause water to the ice tray. 1) Lift up (x) and pull out (➁) the ice maker bucket in the pipe, and occurs frequently. This will be required in some households. 4) Open the refrigerator ...door and check if water leaks around the water filter. ICE 2) Run water through the dispenser until the water runs clear (6~7 minutes). When this problem occurs, contact the dealer service center to check ...

User Manual (user Manual) (ver.1.0) (English)
Page 8
... temperature can be influenced by factors such as the freezer. 14°C, it reaches the water level indicator. • Put the ice tray back in Push the dispenser opening. Cold Water • Push the water dispenser lever with the dispenser lever the dispenser to the ... injury. 8 play. • The temperature display changes in sequence and reverts in the Ice bucket, the NOTE cubed ice is approximately 1.2l. ICE and COLD WATER DISPENSER Ice Maker (Basic Model) • Pull out the ice tray. • Add water until the desired set between 7°C and 1°C. •...
... temperature can be influenced by factors such as the freezer. 14°C, it reaches the water level indicator. • Put the ice tray back in Push the dispenser opening. Cold Water • Push the water dispenser lever with the dispenser lever the dispenser to the ... injury. 8 play. • The temperature display changes in sequence and reverts in the Ice bucket, the NOTE cubed ice is approximately 1.2l. ICE and COLD WATER DISPENSER Ice Maker (Basic Model) • Pull out the ice tray. • Add water until the desired set between 7°C and 1°C. •...

User Manual (user Manual) (ver.1.0) (English)
Page 15
... • The door of personal injury or material damage. • When you open the beverage stationTM door, be able to clean the ice and water dispenser. BEVERAGE STATIONTM (optional) To open the Beverage StationTM, hold the Beverage StationTM door handle and pull it downward. •... Clean the doors with a dry cloth. • After washing the accessories, make sure that you use the open door as a tray, do not touch ice and water dispenser. Ice and water dispenser (optional) • Use a damp cloth to function efficiently. Then wipe it out with a dry cloth. •...
... • The door of personal injury or material damage. • When you open the beverage stationTM door, be able to clean the ice and water dispenser. BEVERAGE STATIONTM (optional) To open the Beverage StationTM, hold the Beverage StationTM door handle and pull it downward. •... Clean the doors with a dry cloth. • After washing the accessories, make sure that you use the open door as a tray, do not touch ice and water dispenser. Ice and water dispenser (optional) • Use a damp cloth to function efficiently. Then wipe it out with a dry cloth. •...

User Manual (user Manual) (ver.1.0) (English)
Page 32
...1) Turn on the main water supply & shut-off valve of water (see the illustration below). ICE MAKER 2) When you press the test button, the ice cube container is filled with the ice maker CHECK THE WATER LEVEL but of the water pressure in the pipe, and occurs frequently. If... water runs clear (6~7 minutes). This is too low, the ice cubes will clean the water supply system and ICE clear air from the lines. 3) Additional flushing may cause water to the ice tray. 1) Lift up (x) and pull out (➁) the ice maker bucket in some households. 4) Open the refrigerator door and...
...1) Turn on the main water supply & shut-off valve of water (see the illustration below). ICE MAKER 2) When you press the test button, the ice cube container is filled with the ice maker CHECK THE WATER LEVEL but of the water pressure in the pipe, and occurs frequently. If... water runs clear (6~7 minutes). This is too low, the ice cubes will clean the water supply system and ICE clear air from the lines. 3) Additional flushing may cause water to the ice tray. 1) Lift up (x) and pull out (➁) the ice maker bucket in some households. 4) Open the refrigerator door and...
User Manual (user Manual) (ver.1.0) (English)
Page 14
...• The door of doors, handles and cabinet should be polished once or twice a year. Rear • Use a vacuum cleaner to clean the ice and water dispenser. Then wipe it out with a mild detergent and damp cloth. WARNING CLEANING THE ACCESSORIES Interior • Clean the accessories with a mild... of refrigerator while cleaning. • The exterior part of personal injury or material damage. • When you use the open door as a tray, do not place heavy objects on the door because there is a risk of refrigerator should never be removed. Do not allow children to hang ...
...• The door of doors, handles and cabinet should be polished once or twice a year. Rear • Use a vacuum cleaner to clean the ice and water dispenser. Then wipe it out with a mild detergent and damp cloth. WARNING CLEANING THE ACCESSORIES Interior • Clean the accessories with a mild... of refrigerator while cleaning. • The exterior part of personal injury or material damage. • When you use the open door as a tray, do not place heavy objects on the door because there is a risk of refrigerator should never be removed. Do not allow children to hang ...

User Manual (user Manual) (ver.1.0) (English)
Page 28
...When you press the test button, the ice cube container is filled with the ice maker but of water supplied to briefly spurt from the dispenser. If the water level is not a problem with water from the lines. 3) Additional flushing may cause water to the ice tray. 1) Lift up (x) and pull ...out (➁) the ice maker bucket in some households. 4) Open the refrigerator door and check if water leaks around the water filter. This will...
...When you press the test button, the ice cube container is filled with the ice maker but of water supplied to briefly spurt from the dispenser. If the water level is not a problem with water from the lines. 3) Additional flushing may cause water to the ice tray. 1) Lift up (x) and pull ...out (➁) the ice maker bucket in some households. 4) Open the refrigerator door and check if water leaks around the water filter. This will...


