

Quick Guide (easy Manual) (ver.1.0) (English)
Page 1
...CONTROL 7 ICE and COLD WATER DISPENSER 7 SHELVES and BINS 8 FOOD STORAGE GUIDE 9 CoolSelect ZoneTM Drawer GUIDE 11 REMOVING THE FREEZER ACCESSORIES 13 REMOVING THE REFRIGERATOR ACCESSORIES 13 CLEANING THE ACCESSORIES 14 CHANGING THE INTERIOR LIGHT 15 WATER FILTER 16 DOORS ...16 INSTALLATION INSTRUCTIONS 17 INSTALLATION OF THE REFRIGERATOR 17 REMOVING THE REFRIGERATOR DOORS 18 REATTACHING THE REFRIGERATOR DOORS 21 LEVELING THE REFRIGERATOR 24 ADJUSTING THE CLEARANCE BETWEEN THE DOORS 25 CHECKING THE WATER DISPENSER LINE 26 INSTALLING THE WATER DISPENSER LINE 26 TROUBLESHOOTING...
...CONTROL 7 ICE and COLD WATER DISPENSER 7 SHELVES and BINS 8 FOOD STORAGE GUIDE 9 CoolSelect ZoneTM Drawer GUIDE 11 REMOVING THE FREEZER ACCESSORIES 13 REMOVING THE REFRIGERATOR ACCESSORIES 13 CLEANING THE ACCESSORIES 14 CHANGING THE INTERIOR LIGHT 15 WATER FILTER 16 DOORS ...16 INSTALLATION INSTRUCTIONS 17 INSTALLATION OF THE REFRIGERATOR 17 REMOVING THE REFRIGERATOR DOORS 18 REATTACHING THE REFRIGERATOR DOORS 21 LEVELING THE REFRIGERATOR 24 ADJUSTING THE CLEARANCE BETWEEN THE DOORS 25 CHECKING THE WATER DISPENSER LINE 26 INSTALLING THE WATER DISPENSER LINE 26 TROUBLESHOOTING...
Quick Guide (easy Manual) (ver.1.0) (English)
Page 2
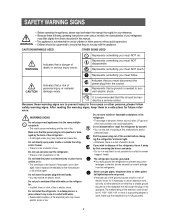
... for future reference. Because these following operating instructions cover various models, the characteristics of electric shock. Make sure that you must ground the refrigerator to use an extension cord, use by the manufacturer or its service agent. Represents something you must NOT touch. Do not directly spray water inside . Represents something you must disconnect the power plug from users or other potential lightening rods as...
... for future reference. Because these following operating instructions cover various models, the characteristics of electric shock. Make sure that you must ground the refrigerator to use an extension cord, use by the manufacturer or its service agent. Represents something you must NOT touch. Do not directly spray water inside . Represents something you must disconnect the power plug from users or other potential lightening rods as...
Quick Guide (easy Manual) (ver.1.0) (English)
Page 3
..., scientific materials and temperature-sensitive products in the refrigerator. • Products that the plug is accessible after installation. • If the power cord is damaged, it must not be replaced by a 3rd party on the door because a serious injury may break and cause personal injury. Do not insert your SAMSUNG Electronics service center. Service warranty section • Any changes or modifications performed...
..., scientific materials and temperature-sensitive products in the refrigerator. • Products that the plug is accessible after installation. • If the power cord is damaged, it must not be replaced by a 3rd party on the door because a serious injury may break and cause personal injury. Do not insert your SAMSUNG Electronics service center. Service warranty section • Any changes or modifications performed...
Quick Guide (easy Manual) (ver.1.0) (English)
Page 4
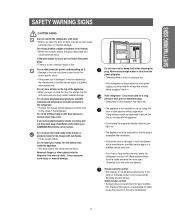
... open the doors. Multi-Flow System • Cool air circulates through multiple vents on when you that the door is plugged in, the interior light should run smoothly. Food odor from the refrigerator does not affect food in this inde- Door Alarm • Beeper reminds you open . If not, check the power supply and electricity source. Given this mannal) Set the temperature control to keep your refrigerator should be fully operational...
... open the doors. Multi-Flow System • Cool air circulates through multiple vents on when you that the door is plugged in, the interior light should run smoothly. Food odor from the refrigerator does not affect food in this inde- Door Alarm • Beeper reminds you open . If not, check the power supply and electricity source. Given this mannal) Set the temperature control to keep your refrigerator should be fully operational...
Quick Guide (easy Manual) (ver.1.0) (English)
Page 5
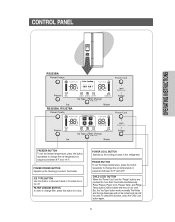
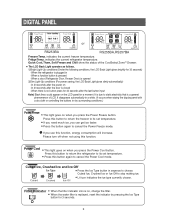
...CONTROL PANEL OPERATING INSTRUCTIONS RS253BA RS255BA, RS257BA FREEZER BUTTON To set the freezer temperature, press the button repeatedly to change the set temperature in sequence between 34°F and 46°F. To cancel this button for more than 3 seconds simultaneously, Power Freeze, Power Cool, Freezer Temp. POWER COOL BUTTON Speeds up the freezing process in sequence between 8°F and -14°F. and Fridge Temp. POWER FREEZE BUTTON Speeds up the cooling process in the refrigerator FRIDGE BUTTON To set the fridge temperature, press the button repeatedly to change...
...CONTROL PANEL OPERATING INSTRUCTIONS RS253BA RS255BA, RS257BA FREEZER BUTTON To set the freezer temperature, press the button repeatedly to change the set temperature in sequence between 34°F and 46°F. To cancel this button for more than 3 seconds simultaneously, Power Freeze, Power Cool, Freezer Temp. POWER COOL BUTTON Speeds up the freezing process in sequence between 8°F and -14°F. and Fridge Temp. POWER FREEZE BUTTON Speeds up the cooling process in the refrigerator FRIDGE BUTTON To set the fridge temperature, press the button repeatedly to change...
Quick Guide (easy Manual) (ver.1.0) (English)
Page 6
... the display panel with a dry cloth or controlling the buttons in seqence to choose Cubed Ice, Crushed Ice or Ice Off to static electricity that is due to stop making ice. • Lit icon indicates the ice type currently chosen. indicates the current freezer temperature. Please turn off when not using this function, energy consumption will increase. Quick Cool, Thaw, Soft Freeze and Chill show the status of LCD. Power Cool • This light goes...
... the display panel with a dry cloth or controlling the buttons in seqence to choose Cubed Ice, Crushed Ice or Ice Off to static electricity that is due to stop making ice. • Lit icon indicates the ice type currently chosen. indicates the current freezer temperature. Please turn off when not using this function, energy consumption will increase. Quick Cool, Thaw, Soft Freeze and Chill show the status of LCD. Power Cool • This light goes...
Quick Guide (easy Manual) (ver.1.0) (English)
Page 7
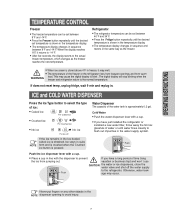
... installed the refrigerator or installed a new water filter, throw away the first six glassfuls of water or until water flows cleanly to select the type of ice: • Cubed ice • Crushed ice • No ice No ice Water Dispenser The capacity of time (long the ice from warm WARNING food. Cold Water • Push the water dispenser lever with the dispenser to blink . OPERATING INSTRUCTIONS TEMPERATURE CONTROL Freezer • The freezer temperature can be set between 8°F and -14°F. • Press the Freezer button...
... installed the refrigerator or installed a new water filter, throw away the first six glassfuls of water or until water flows cleanly to select the type of ice: • Cubed ice • Crushed ice • No ice No ice Water Dispenser The capacity of time (long the ice from warm WARNING food. Cold Water • Push the water dispenser lever with the dispenser to blink . OPERATING INSTRUCTIONS TEMPERATURE CONTROL Freezer • The freezer temperature can be set between 8°F and -14°F. • Press the Freezer button...
Quick Guide (easy Manual) (ver.1.0) (English)
Page 8
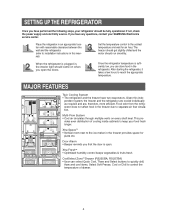
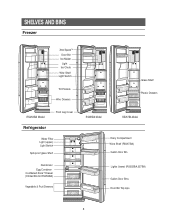
SHELVES AND BINS Freezer Xtra SpaceTM Door Bin Ice Maker Light Ice Chute Wire Shelf Light Switch Tilt Pockets Wire Drawers RS253BA Model Refrigerator Front Leg Cover Water Filter Light (upper) Light Switch Spill-proof glass Shelf Deodorizer Egg Container CoolSelect ZoneTM Drawer (Chilled Bin for RS253BA) Vegetable & Fruit Drawers Glass Shelf Plastic Drawers RS255BA Model RS257BA Model Dairy Compartment Wine Shelf (RS257BA) Gallon Door Bin Lights (lower) (RS255BA,257BA) Gallon Door Bins Door Bin Top Lips 8
SHELVES AND BINS Freezer Xtra SpaceTM Door Bin Ice Maker Light Ice Chute Wire Shelf Light Switch Tilt Pockets Wire Drawers RS253BA Model Refrigerator Front Leg Cover Water Filter Light (upper) Light Switch Spill-proof glass Shelf Deodorizer Egg Container CoolSelect ZoneTM Drawer (Chilled Bin for RS253BA) Vegetable & Fruit Drawers Glass Shelf Plastic Drawers RS255BA Model RS257BA Model Dairy Compartment Wine Shelf (RS257BA) Gallon Door Bin Lights (lower) (RS255BA,257BA) Gallon Door Bins Door Bin Top Lips 8
Quick Guide (easy Manual) (ver.1.0) (English)
Page 11
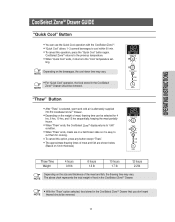
... thawed should be removed. OPERATING INSTRUCTIONS CoolSelect ZoneTM Drawer GUIDE "Quick Cool" Button • You can be selected for cooking. • To cancel this operation, press the "Quick Cool" button again. NOTE • For "Quick Cool" operation, the food stored in a half-frozen state so it returns to the "Cool" temperature set- ting. CoolSelect ZoneTM returns to the previous temperature. • When "Quick Cool" ends, it is...
... thawed should be removed. OPERATING INSTRUCTIONS CoolSelect ZoneTM Drawer GUIDE "Quick Cool" Button • You can be selected for cooking. • To cancel this operation, press the "Quick Cool" button again. NOTE • For "Quick Cool" operation, the food stored in a half-frozen state so it returns to the "Cool" temperature set- ting. CoolSelect ZoneTM returns to the previous temperature. • When "Quick Cool" ends, it is...
Quick Guide (easy Manual) (ver.1.0) (English)
Page 13
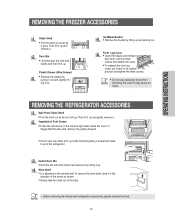
... the refrigerator. Gallon Door Bin • Hold the bin with one hand, lift it up . Wine Shelf • It is attached to the cabinet wall. Front Leg Cover • Open the freezer and refriger- ator doors, remove three screws and detach the cover. • To reattach the front leg cover, put it up and remove it goes. Then lift it up . REMOVING THE FREEZER ACCESSORIES Glass Shelf •...
... the refrigerator. Gallon Door Bin • Hold the bin with one hand, lift it up . Wine Shelf • It is attached to the cabinet wall. Front Leg Cover • Open the freezer and refriger- ator doors, remove three screws and detach the cover. • To reattach the front leg cover, put it up and remove it goes. Then lift it up . REMOVING THE FREEZER ACCESSORIES Glass Shelf •...
Quick Guide (easy Manual) (ver.1.0) (English)
Page 14
... the refrigerator while cleaning. • The exterior part of shock. WARNING Ice and water dispenser • Use a damp cloth to remove dust once or twice a year. • Do not remove cover, risk of the refrigerator should be cleaned with a mild detergent and soft cloth, then wiped off with a dry cloth. • After washing the accessories, make sure that they are dirty, the door will...
... the refrigerator while cleaning. • The exterior part of shock. WARNING Ice and water dispenser • Use a damp cloth to remove dust once or twice a year. • Do not remove cover, risk of the refrigerator should be cleaned with a mild detergent and soft cloth, then wiped off with a dry cloth. • After washing the accessories, make sure that they are dirty, the door will...

Quick Guide (easy Manual) (ver.1.0) (English)
Page 15
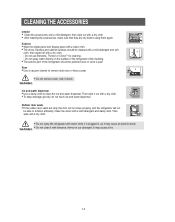
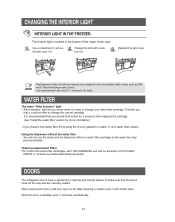
OPERATING INSTRUCTIONS CLEANING THE ACCESSORIES Twin Deodorizer • Remove the cover with a flat blade screw driver as shown. • Take out the cartridge from the cover and soak it again. 15 CHANGING THE INTERIOR LIGHT Before changing the interior light, unplug the refrigerator from contaminated water while the cartridge is dried in changing the light, contact your service center. Completely dry out the cartridge in sunlight for at least 8 hrs in an...
OPERATING INSTRUCTIONS CLEANING THE ACCESSORIES Twin Deodorizer • Remove the cover with a flat blade screw driver as shown. • Take out the cartridge from the cover and soak it again. 15 CHANGING THE INTERIOR LIGHT Before changing the interior light, unplug the refrigerator from contaminated water while the cartridge is dried in changing the light, contact your service center. Completely dry out the cartridge in sunlight for at least 8 hrs in an...
Quick Guide (easy Manual) (ver.1.0) (English)
Page 16
Use replacement bulb size E17, maximum 30 watts. Ordering replacement filters • To order more information) • If you that you should hold button for 3 seconds after replaced the cartridge. (see "Install the water filter" section for both the freezer and refrigerator are securely sealed. This tells you install a new water filter, throw away the first six glassfuls of the auger motor case. CHANGING THE INTERIOR LIGHT INTERIOR LIGHT IN THE FREEZER. The freezer light is time to make sure that...
Use replacement bulb size E17, maximum 30 watts. Ordering replacement filters • To order more information) • If you that you should hold button for 3 seconds after replaced the cartridge. (see "Install the water filter" section for both the freezer and refrigerator are securely sealed. This tells you install a new water filter, throw away the first six glassfuls of the auger motor case. CHANGING THE INTERIOR LIGHT INTERIOR LIGHT IN THE FREEZER. The freezer light is time to make sure that...
Quick Guide (easy Manual) (ver.1.0) (English)
Page 17
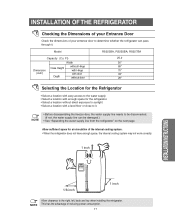
... INSTALLATION INSTRUCTIONS 1/8 inch 1 inch NOTE Allow clearance to the right, left, back and top when installing the refrigerator. Allow sufficient space for the refrigerator. • Select a location without direct exposure to sunlight. • Select a location with a level floor or close to it . Model Capacity (Cu. This has the advantage of reducing power consumption. 17 NOTE • Before disassembling the freezer door, the water supply line needs to...
... INSTALLATION INSTRUCTIONS 1/8 inch 1 inch NOTE Allow clearance to the right, left, back and top when installing the refrigerator. Allow sufficient space for the refrigerator. • Select a location without direct exposure to sunlight. • Select a location with a level floor or close to it . Model Capacity (Cu. This has the advantage of reducing power consumption. 17 NOTE • Before disassembling the freezer door, the water supply line needs to...

Quick Guide (easy Manual) (ver.1.0) (English)
Page 20
... careful when removing the door to ensure that it does not fall on you. 3 2 4 5 3) Remove the door from the bracket in the direction of the arrow. 8 9 6 20 REMOVING THE REFRIGERATOR DOORS Removing the Refrigerator Door 1) With the door closed, remove the upper hinge cover (➀) using a screwdriver. 2) Remove hinge screws (➁) and ground screw (➂) counter-clockwise, and take off the upper hinge (➃) in (➈) by lifting the door...
... careful when removing the door to ensure that it does not fall on you. 3 2 4 5 3) Remove the door from the bracket in the direction of the arrow. 8 9 6 20 REMOVING THE REFRIGERATOR DOORS Removing the Refrigerator Door 1) With the door closed, remove the upper hinge cover (➀) using a screwdriver. 2) Remove hinge screws (➁) and ground screw (➂) counter-clockwise, and take off the upper hinge (➃) in (➈) by lifting the door...
Quick Guide (easy Manual) (ver.1.0) (English)
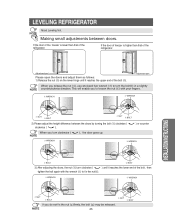
Page 25
...; BOLT 2) Please adjust the height difference between doors. If the door of the freezer is higher than that of the refrigerator. INSTALLATION INSTRUCTIONS Adjustment part Please open the doors and adjust them as follows: 1) Release the nut (①) on the lower hinge until it reaches the...(①), use enclosed hex wrench (➂) to turn the bolt(➁) in a slightly NOTE counterclockwise direction. NOTE Making small adjustments between the doors by turning the bolt (➁) clockwise ( clockwise ( ). ) or counter When you turn clockwise ( NOTE ), the door goes up....
...; BOLT 2) Please adjust the height difference between doors. If the door of the freezer is higher than that of the refrigerator. INSTALLATION INSTRUCTIONS Adjustment part Please open the doors and adjust them as follows: 1) Release the nut (①) on the lower hinge until it reaches the...(①), use enclosed hex wrench (➂) to turn the bolt(➁) in a slightly NOTE counterclockwise direction. NOTE Making small adjustments between the doors by turning the bolt (➁) clockwise ( clockwise ( ). ) or counter When you turn clockwise ( NOTE ), the door goes up....
Quick Guide (easy Manual) (ver.1.0) (English)
Page 26
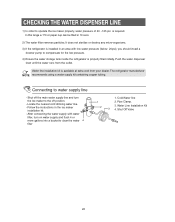
... the instructions in 10 secs. 2) The water filter removes particles. Cold Water line 2. Water Line Installation Kit 4. The refrigerator manufacturer NOTE recommends using a water supply kit containing copper tubing. Pipe Clamp. 3. Shut Off Valve 26 In this range a 170 cc paper cup can be filled in the ice maker installation kit. - Shut off the main water supply line and turn on water supply and flush 4 or more gallons into a bucket to clear the water filter 1. CHECKING THE WATER DISPENSER LINE 1) In order to operate the ice maker properly, water...
... the instructions in 10 secs. 2) The water filter removes particles. Cold Water line 2. Water Line Installation Kit 4. The refrigerator manufacturer NOTE recommends using a water supply kit containing copper tubing. Pipe Clamp. 3. Shut Off Valve 26 In this range a 170 cc paper cup can be filled in the ice maker installation kit. - Shut off the main water supply line and turn on water supply and flush 4 or more gallons into a bucket to clear the water filter 1. CHECKING THE WATER DISPENSER LINE 1) In order to operate the ice maker properly, water...
Quick Guide (easy Manual) (ver.1.0) (English)
Page 27
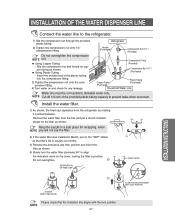
.... Remove the water filter from the refrigerator by rotating it counterclockwise. Using Plastic Tubing - NOTE 27 ALIGN THE INDICATION MARK WITH LOCK POSITION. Install the water filter. 1) As shown, the fixed cap separates from the box and put on the filter as shown. INSTALLATION OF THE WATER DISPENSER LINE Connect the water line to prevent leaks when reconnect. Do not overtighten the compression NOTE nut. Using Copper Tubing - SEPARATION OF RED CAP (A) COVER FILTER INSTALLATION INSTRUCTIONS...
.... Remove the water filter from the refrigerator by rotating it counterclockwise. Using Plastic Tubing - NOTE 27 ALIGN THE INDICATION MARK WITH LOCK POSITION. Install the water filter. 1) As shown, the fixed cap separates from the box and put on the filter as shown. INSTALLATION OF THE WATER DISPENSER LINE Connect the water line to prevent leaks when reconnect. Do not overtighten the compression NOTE nut. Using Copper Tubing - SEPARATION OF RED CAP (A) COVER FILTER INSTALLATION INSTRUCTIONS...
Quick Guide (easy Manual) (ver.1.0) (English)
Page 28
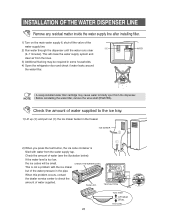
... shelf (RS257BA). ICE MAKER 2) When you press the test button, the ice cube container is not a problem with water from the dispenser. ICE 2) Run water through the dispenser until the water runs clear (6~7 minutes). Check the amount of the water supply line. WATER • A newly-installed water filter cartridge may be small. CHECK THE WATER LEVEL This is filled with the ice maker but of water supplied. INSTALLATION OF THE WATER DISPENSER LINE Remove any residual matter inside the water supply line after installing filter. 1) Turn on the main water supply & shut...
... shelf (RS257BA). ICE MAKER 2) When you press the test button, the ice cube container is not a problem with water from the dispenser. ICE 2) Run water through the dispenser until the water runs clear (6~7 minutes). Check the amount of the water supply line. WATER • A newly-installed water filter cartridge may be small. CHECK THE WATER LEVEL This is filled with the ice maker but of water supplied. INSTALLATION OF THE WATER DISPENSER LINE Remove any residual matter inside the water supply line after installing filter. 1) Turn on the main water supply & shut...
Quick Guide (easy Manual) (ver.1.0) (English)
Page 29
... 12 hours after installation of the refrigerator? You hear unusual noises or sounds • Check that the floor is supplied • Is the water line connected and the shut-off valve open? • Is the freezer temperature too warm? (Set the temperature lower) • Did you stop the ice making ice? No water is leveled and stable. Try setting it to a lower temperature. • Is the refrigerator in direct sunlight or located near a heat source...
... 12 hours after installation of the refrigerator? You hear unusual noises or sounds • Check that the floor is supplied • Is the water line connected and the shut-off valve open? • Is the freezer temperature too warm? (Set the temperature lower) • Did you stop the ice making ice? No water is leveled and stable. Try setting it to a lower temperature. • Is the refrigerator in direct sunlight or located near a heat source...


