User Manual (user Manual) (ver.1.0) (English)
Page 2
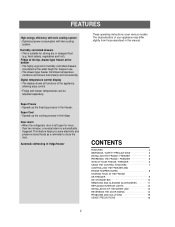
... the cooling process in fridge/freezer CONTENTS FEATURES 2 WARNINGS / SAFETY PRECAUTIONS 3 INSTALLING THE FRIDGE / FREEZER 5 PREPARING THE FRIDGE / FREEZER 6 VIEW OF YOUR FRIDGE / FREEZER 6 USING THE CONTROL FEATURES 7 CONTROLLING THE FREEZER AND FRIDGE TEMPERATURES 8 STORING FOOD IN THE FRIDGE OR FREEZER 9 ICE STORAGE BIN 10 REMOVING AND CLEANING ACCESSORIES 11 REPLACING INTERIOR LIGHTS 12 INSTALLATION OF THE WATER LINE 13 REVERSING THE DOOR SWING 14 PROBLEMS AND SOLUTIONS 19 USAGE PRECAUTIONS 19 2 Door alarm • When the refrigerator door is left open...
... the cooling process in fridge/freezer CONTENTS FEATURES 2 WARNINGS / SAFETY PRECAUTIONS 3 INSTALLING THE FRIDGE / FREEZER 5 PREPARING THE FRIDGE / FREEZER 6 VIEW OF YOUR FRIDGE / FREEZER 6 USING THE CONTROL FEATURES 7 CONTROLLING THE FREEZER AND FRIDGE TEMPERATURES 8 STORING FOOD IN THE FRIDGE OR FREEZER 9 ICE STORAGE BIN 10 REMOVING AND CLEANING ACCESSORIES 11 REPLACING INTERIOR LIGHTS 12 INSTALLATION OF THE WATER LINE 13 REVERSING THE DOOR SWING 14 PROBLEMS AND SOLUTIONS 19 USAGE PRECAUTIONS 19 2 Door alarm • When the refrigerator door is left open...

User Manual (user Manual) (ver.1.0) (English)
Page 3
...; In this way, it away after installation. Do not insert the power plug with liquid on top of the appliance. • If the water spills on it . • Keep ventilation openings in the insulation material required special disposal procedure. 3 Pull the power plug out of the socket before replacing the interior light in the refrigerator. • The storage of benzene, thinner...
...; In this way, it away after installation. Do not insert the power plug with liquid on top of the appliance. • If the water spills on it . • Keep ventilation openings in the insulation material required special disposal procedure. 3 Pull the power plug out of the socket before replacing the interior light in the refrigerator. • The storage of benzene, thinner...

User Manual (user Manual) (ver.1.0) (English)
Page 4
... ground plug and a 3-slot receptacle that require strict temperature controls must be stored in the refrigerator. Do not touch any power leakages or electric shocks caused by this appliance. • This appliance must not be properly grounded. If a grounding adapter is used, make sure the receptacle box is not to be unusual noises and poor cooling. • Wait for the user...
... ground plug and a 3-slot receptacle that require strict temperature controls must be stored in the refrigerator. Do not touch any power leakages or electric shocks caused by this appliance. • This appliance must not be properly grounded. If a grounding adapter is used, make sure the receptacle box is not to be unusual noises and poor cooling. • Wait for the user...

User Manual (user Manual) (ver.1.0) (English)
Page 5
... plate and bury it . Clean the fridge/freezer. • Wipe and clean the appliance inside and outside with a flat head screwdriver until the appliance is accessible after installation. 10 inch When installing the refrigerator, you wait for the appliance to the left adjusting leg in the direction of the refrigerator. Use of a non-grounded socket: • Connect the "grounding wire" to the right. Place...
... plate and bury it . Clean the fridge/freezer. • Wipe and clean the appliance inside and outside with a flat head screwdriver until the appliance is accessible after installation. 10 inch When installing the refrigerator, you wait for the appliance to the left adjusting leg in the direction of the refrigerator. Use of a non-grounded socket: • Connect the "grounding wire" to the right. Place...

User Manual (user Manual) (ver.1.0) (English)
Page 6
..., set the temperature control to remove any dust that it with frozen food until the freezer temperature is sufficiently low. Your appliance is new, it may be slightly noisy. This is closed. It takes a few hours after starting the refrigerator to maintain the internal temperature. This interior light will light up to five months. VIEW OF YOUR FRIDGE / FREEZER Fridge Light Fridge Fridge Shelves Deli Drawer Multi-Purpose Door Bins Humidity Controlled Drawer Door Switch Ice Maker and Ice Storage Bin Wire Drawer...
..., set the temperature control to remove any dust that it with frozen food until the freezer temperature is sufficiently low. Your appliance is new, it may be slightly noisy. This is closed. It takes a few hours after starting the refrigerator to maintain the internal temperature. This interior light will light up to five months. VIEW OF YOUR FRIDGE / FREEZER Fridge Light Fridge Fridge Shelves Deli Drawer Multi-Purpose Door Bins Humidity Controlled Drawer Door Switch Ice Maker and Ice Storage Bin Wire Drawer...

User Manual (user Manual) (ver.1.0) (English)
Page 8
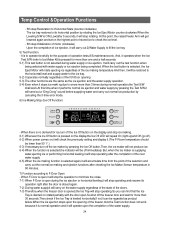
... the temperature display. • The temperature display changes in the same way as the freezer reaches the new temperature. Temperature Display Displays the current and selected fridge temperatures. Then the indicator of ice is stopped. 8 Ice Off • Press Ice off button to stop making of "Ice Off" button will turn on when you press the Super Cool button. • Press this button to quickly return the fridge to its set temperature. • This feature is useful if the freezer door has been left open...
... the temperature display. • The temperature display changes in the same way as the freezer reaches the new temperature. Temperature Display Displays the current and selected fridge temperatures. Then the indicator of ice is stopped. 8 Ice Off • Press Ice off button to stop making of "Ice Off" button will turn on when you press the Super Cool button. • Press this button to quickly return the fridge to its set temperature. • This feature is useful if the freezer door has been left open...

User Manual (user Manual) (ver.1.0) (English)
Page 10
...FRIDGE OR FREEZER Freezer drawer • You can store packed frozen foods, such as the glass will explode. Suitable wrapping materials: Plastic bags, cling-film, aluminium foil and freezer containers. It is better maintained when defrosting and preparing the food. Throw away the first few batches of ice to allow the water line to the level of door openings... securely using a special sealing iron or press. When the bin fills to clear. After the icemaker has been turned on freezer compartment temperature, room temperature, number of the feeler arm, the icemaker will ...
...FRIDGE OR FREEZER Freezer drawer • You can store packed frozen foods, such as the glass will explode. Suitable wrapping materials: Plastic bags, cling-film, aluminium foil and freezer containers. It is better maintained when defrosting and preparing the food. Throw away the first few batches of ice to allow the water line to the level of door openings... securely using a special sealing iron or press. When the bin fills to clear. After the icemaker has been turned on freezer compartment temperature, room temperature, number of the feeler arm, the icemaker will ...
User Manual (user Manual) (ver.1.0) (English)
Page 13
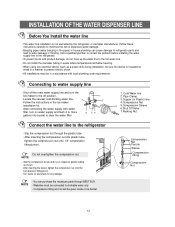
... - Cold Water line 2. Follow these instructions carefully to minimize the risk of ice bucket. 1. NOTE - INSTALLATION OF THE WATER DISPENSER LINE Before You Install the water line • This water line installation is insulated or wired in a manner to prevent electric shock. • All installations must be connected to water supply line - Shut off position. - Locate the nearest cold drinking water line. - Do not overtighten the compression nut. Pipe Clamp. 3.Copper (or Plastic) line 4.Compression Nut 5.Compression Sleeve 6.Shut Off Valve...
... - Cold Water line 2. Follow these instructions carefully to minimize the risk of ice bucket. 1. NOTE - INSTALLATION OF THE WATER DISPENSER LINE Before You Install the water line • This water line installation is insulated or wired in a manner to prevent electric shock. • All installations must be connected to water supply line - Shut off position. - Locate the nearest cold drinking water line. - Do not overtighten the compression nut. Pipe Clamp. 3.Copper (or Plastic) line 4.Compression Nut 5.Compression Sleeve 6.Shut Off Valve...

User Manual (user Manual) (ver.1.0) (English)
Page 14
... all door guards / racks. 1. Handle parts carefully to avoid using them in the wrong places. 5. ADDITIONAL PARTS screwdriver 10 inch wrench Hinge Mid - Cover Hinge 2. Disconnect electric wire on the top of the refrigerator. 4. Set screws down by their related parts to avoid scrathing paint. 4. After removing the screw with oil. - TOOLS YOU WILL NEED - If you want to change the door direction, call 1-800-SAMSUNG. 2. Provide a non-scratching work...
... all door guards / racks. 1. Handle parts carefully to avoid using them in the wrong places. 5. ADDITIONAL PARTS screwdriver 10 inch wrench Hinge Mid - Cover Hinge 2. Disconnect electric wire on the top of the refrigerator. 4. Set screws down by their related parts to avoid scrathing paint. 4. After removing the screw with oil. - TOOLS YOU WILL NEED - If you want to change the door direction, call 1-800-SAMSUNG. 2. Provide a non-scratching work...

User Manual (user Manual) (ver.1.0) (English)
Page 19
... operating at the front of a refrigerator shelf. The food in sealed containers. There are unusual noises • Check that the power plug is a layer of frost on the front panel set ? • Does the sun shine on the inside the appliance • Do not wrap food with adequate ventilation. There is correctly connected. • Is the temperature control on the front panel correctly set...
... operating at the front of a refrigerator shelf. The food in sealed containers. There are unusual noises • Check that the power plug is a layer of frost on the front panel set ? • Does the sun shine on the inside the appliance • Do not wrap food with adequate ventilation. There is correctly connected. • Is the temperature control on the front panel correctly set...

User Manual (user Manual) (ver.1.0) (English)
Page 20
..., services, parts, supplies, accessories, applications, installations, repairs, external plumbing and leaks, external wiring, circuit breakers, fuses or connectors not supplied and authorized by SAMSUNG against manufacturing defects in materials and workmanship for problem determination and service procedures. This limited warranty covers manufacturing defects in materials and workmanship encountered in normal, noncommercial use of the purchaser. Warranty service can only be necessary to remove, repair and return the product. SAMSUNG REFRIGERATOR...
..., services, parts, supplies, accessories, applications, installations, repairs, external plumbing and leaks, external wiring, circuit breakers, fuses or connectors not supplied and authorized by SAMSUNG against manufacturing defects in materials and workmanship for problem determination and service procedures. This limited warranty covers manufacturing defects in materials and workmanship encountered in normal, noncommercial use of the purchaser. Warranty service can only be necessary to remove, repair and return the product. SAMSUNG REFRIGERATOR...
Service Manual
Page 4
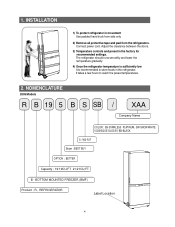
...:19CU,FT 21:21CU,FT B - Connect power cord. BOTTOM MOUNTED FREEZER (BMF) Product ; SB-STAINLESS PLATINUM, SW-SNOW WHITE VQ-BISQUE GLOSSY, BB-BLACK S : W2-PJT Buyer : BEST BUY OPTION ; REFRIGERATOR Label Location 4 1. Adjust the clearance between the doors. 3) Temperature controls and preset in the refrigerator. INSTALLATION 1) To protect refrigerator in movement Use padded hand truck from side only. 2) Remove all protective tape and pad from...
...:19CU,FT 21:21CU,FT B - Connect power cord. BOTTOM MOUNTED FREEZER (BMF) Product ; SB-STAINLESS PLATINUM, SW-SNOW WHITE VQ-BISQUE GLOSSY, BB-BLACK S : W2-PJT Buyer : BEST BUY OPTION ; REFRIGERATOR Label Location 4 1. Adjust the clearance between the doors. 3) Temperature controls and preset in the refrigerator. INSTALLATION 1) To protect refrigerator in movement Use padded hand truck from side only. 2) Remove all protective tape and pad from...
Service Manual
Page 17
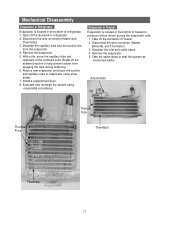
Remove the evaporator. 5. Evaporator in Freezer Evaporator is located in the bottom of refrigerator. 1. Place a new evaporator and braze the suction and capillary tube to help prevent solder from the evaporator. 4. Take the same steps to produce cold air driven across the evaporator coils. 1. Disconnect the wire connector.(Heater and Thermistor) 3. Break off the soldered section to evaporator using reasonable procedures. With a file, score the capillary tube just upstream...
Remove the evaporator. 5. Evaporator in Freezer Evaporator is located in the bottom of refrigerator. 1. Place a new evaporator and braze the suction and capillary tube to help prevent solder from the evaporator. 4. Take the same steps to produce cold air driven across the evaporator coils. 1. Disconnect the wire connector.(Heater and Thermistor) 3. Break off the soldered section to evaporator using reasonable procedures. With a file, score the capillary tube just upstream...
Service Manual
Page 24
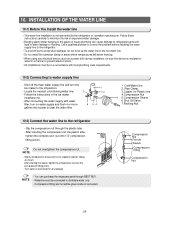
.... INSTALLATION OF THE WATER LINE 10-1) Before You Install the water line • This water line installation is insulated or wired in a manner to prevent electric shock. • All installations must be in the ice maker installation kit. - Shut off position. - Follow the instructions in a accordance with water filter, turn the Ice maker to drinkable water only - NOTE - You can cause damage to refrigerator parts and lead to minimize the risk of ice bucket. Locate the nearest cold drinking water line...
.... INSTALLATION OF THE WATER LINE 10-1) Before You Install the water line • This water line installation is insulated or wired in a manner to prevent electric shock. • All installations must be in the ice maker installation kit. - Shut off position. - Follow the instructions in a accordance with water filter, turn the Ice maker to drinkable water only - NOTE - You can cause damage to refrigerator parts and lead to minimize the risk of ice bucket. Locate the nearest cold drinking water line...
Service Manual
Page 29
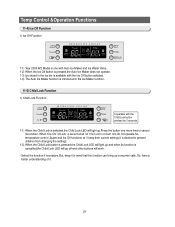
... W2 Model is one with Auto Ice Maker and Ice Water Valve. 1-2) When the Ice Off button is pressed,the Auto Ice Maker does not operate. 1-3) Ice stored in the ice bin is available with the Child Lock button pressed for 3 seconds. 1-1) When the Child Lock is selected,the Child Lock LED will light up.Press the button one more time to prevent children from changing the settings. 1-2) When...
... W2 Model is one with Auto Ice Maker and Ice Water Valve. 1-2) When the Ice Off button is pressed,the Auto Ice Maker does not operate. 1-3) Ice stored in the ice bin is available with the Child Lock button pressed for 3 seconds. 1-1) When the Child Lock is selected,the Child Lock LED will light up.Press the button one more time to prevent children from changing the settings. 1-2) When...
Service Manual
Page 33
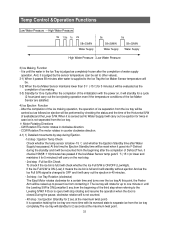
... CW Rotation:The motor rotates in case ice is sensed as the completion of ice making operation, the operation of ice separation from the ice tray will is below -15 ℃ and whether the Ejection Standby time after water is supplied to the Leveling S/W.If F-Door is open,it goes into F-Defrost during Ejection. -1st step : Ejection Temp Check Check whether the temp sensor is not counted...
... CW Rotation:The motor rotates in case ice is sensed as the completion of ice making operation, the operation of ice separation from the ice tray will is below -15 ℃ and whether the Ejection Standby time after water is supplied to the Leveling S/W.If F-Door is open,it goes into F-Defrost during Ejection. -1st step : Ejection Temp Check Check whether the temp sensor is not counted...
Service Manual
Page 34
... horizontal level and supply water to the ice tray. 5-2) It operates normally regardless of the F,R-Door opening of the freezer door,the Test function does not work .At this point, the raised Feeler Arm will get lowered again and set on the water supply regardless of the state of ice ejection, it will stop operating.So you can be off ). 6-2) When power comes on,it will check the previously setting and display...
... horizontal level and supply water to the ice tray. 5-2) It operates normally regardless of the F,R-Door opening of the freezer door,the Test function does not work .At this point, the raised Feeler Arm will get lowered again and set on the water supply regardless of the state of ice ejection, it will stop operating.So you can be off ). 6-2) When power comes on,it will check the previously setting and display...
Service Manual
Page 45
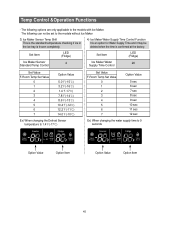
... Defrost Sensor temperature to 1.4℉(-17℃) Set Value F-Room Temp Set Value 0 1 2 3 4 5 6 7 Option Value 5 sec 6 sec 7 sec 8 sec 9 sec 10 sec 11 sec 12 sec Ex) When changing the water supply time to the models with Ice Maker. The following can not be set to the models without Ice Maker 3) Ice Maker Sensor Temp Shift This is the standard temperature checking if ice in the ice tray is frozen completely. 4) Ice Maker Water Supply Time Control...
... Defrost Sensor temperature to 1.4℉(-17℃) Set Value F-Room Temp Set Value 0 1 2 3 4 5 6 7 Option Value 5 sec 6 sec 7 sec 8 sec 9 sec 10 sec 11 sec 12 sec Ex) When changing the water supply time to the models with Ice Maker. The following can not be set to the models without Ice Maker 3) Ice Maker Sensor Temp Shift This is the standard temperature checking if ice in the ice tray is frozen completely. 4) Ice Maker Water Supply Time Control...
Service Manual
Page 71
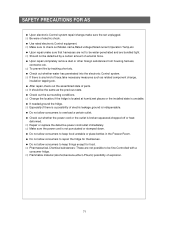
.... ● Check out whether the power cord or the outlet is a possibility of explosion. 71 SAFETY PRECAUTIONS FOR AS ● Upon electronic Control system repair/change,make sure the set unplugged. � Be ware of electric shock. ● Use rated electronic Control equipment. � Make sure to check out ModeL name,Rated voltage,Rated current,Operation Temp,etc. ● Upon repair,make sure that harnesses are bundled tight...
.... ● Check out whether the power cord or the outlet is a possibility of explosion. 71 SAFETY PRECAUTIONS FOR AS ● Upon electronic Control system repair/change,make sure the set unplugged. � Be ware of electric shock. ● Use rated electronic Control equipment. � Make sure to check out ModeL name,Rated voltage,Rated current,Operation Temp,etc. ● Upon repair,make sure that harnesses are bundled tight...
Service Manual
Page 74
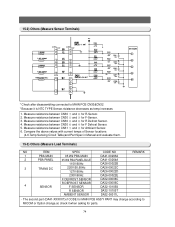
...; and ④ for F Defrost Sensor. 5. Measure resistance between CN30 ⑧ and ⑥ for parts. 74 The second part (DA41-XXXXX?)of Sensor locations (4-6.Temp Sensing Circuit Table)and Part Spec in Manual and evaluate them. 15-3) Others (Measure Load Terminals) NO ITEM SPEC CODE NO 1 PBA MAIN 05 W2 PBA MAIN DA41-00293A 2 PBA PANEL 05 W2 PBA PANEL,BLUE DA41-00264A...
...; and ④ for F Defrost Sensor. 5. Measure resistance between CN30 ⑧ and ⑥ for parts. 74 The second part (DA41-XXXXX?)of Sensor locations (4-6.Temp Sensing Circuit Table)and Part Spec in Manual and evaluate them. 15-3) Others (Measure Load Terminals) NO ITEM SPEC CODE NO 1 PBA MAIN 05 W2 PBA MAIN DA41-00293A 2 PBA PANEL 05 W2 PBA PANEL,BLUE DA41-00264A...


