User Manual
Page 2
... this appliance only for its intended purpose as a refrigerant. Check the compressor label on the rear of the appliance or the rating label inside the fridge to use common sense, caution, and care when installing, maintaining, and operating your appliance. • Because these following operating instructions cover various models, the characteristics...
... this appliance only for its intended purpose as a refrigerant. Check the compressor label on the rear of the appliance or the rating label inside the fridge to use common sense, caution, and care when installing, maintaining, and operating your appliance. • Because these following operating instructions cover various models, the characteristics...

User Manual
Page 9
.... • Do not attempt to ensure that they do not fall out. • This product is a Risk of food in a domestic environment. • Never put fridge shelf in an electric shock or injury. -- It may occur. • There is intended only for the storage of children entrapment. If not, a serious injury...
.... • Do not attempt to ensure that they do not fall out. • This product is a Risk of food in a domestic environment. • Never put fridge shelf in an electric shock or injury. -- It may occur. • There is intended only for the storage of children entrapment. If not, a serious injury...

User Manual
Page 18
... ONLY) The handles are included in the direction of the arrow until the appliance is level. Align each handle hole on the other freezer or fridge door. 4. Insert the Cap-Handle Screws (x2) into the door holes of the opposite side of the door where no handle is installed. Cap screw...
... ONLY) The handles are included in the direction of the arrow until the appliance is level. Align each handle hole on the other freezer or fridge door. 4. Insert the Cap-Handle Screws (x2) into the door holes of the opposite side of the door where no handle is installed. Cap screw...

User Manual
Page 19
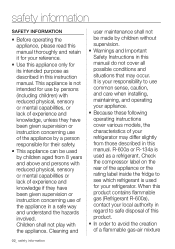
By completing the following steps, your Samsung Electronics service center. 1. If you have your refrigerator during transportation). 3. Once the refrigerator is sufficiently cool, you can store food and drink in , make sure ... will take a few hours to reach the appropriate temperature. The freezer should get slightly chilled and the motor should be fully operational. Press Freezer or Fridge button. (Only for Coolselect Zone function model and RB37 series) Refer to the coldest temperature and wait for an hour. setting up and enjoy the...
By completing the following steps, your Samsung Electronics service center. 1. If you have your refrigerator during transportation). 3. Once the refrigerator is sufficiently cool, you can store food and drink in , make sure ... will take a few hours to reach the appropriate temperature. The freezer should get slightly chilled and the motor should be fully operational. Press Freezer or Fridge button. (Only for Coolselect Zone function model and RB37 series) Refer to the coldest temperature and wait for an hour. setting up and enjoy the...
User Manual
Page 20
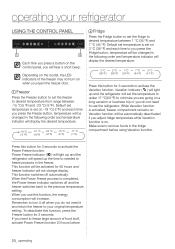
.... -19 °C (-2 ºF) -21 °C (-6 ºF) -23 °C (-8 ºF) -15 °C (5 ºF) -17 °C (1 ºF) 2 Fridge Press the Fridge button to set on . This function switches off and the freezer switches back to activate the Power Freeze function. Default set temperature is set... the fridge to remove foods in the following order and temperature indicator will increase. When you press the Freeze button, temperature will be...
.... -19 °C (-2 ºF) -21 °C (-6 ºF) -23 °C (-8 ºF) -15 °C (5 ºF) -17 °C (1 ºF) 2 Fridge Press the Fridge button to set on . This function switches off and the freezer switches back to activate the Power Freeze function. Default set temperature is set... the fridge to remove foods in the following order and temperature indicator will increase. When you press the Freeze button, temperature will be...

User Manual
Page 21
... and Fresh Zone. (Optional) • To freeze large quantities of food quickly, use the very bottom drawer ( 2 ) where food freezes particularly quickly. Press Freezer or Fridge button to a power failure. • Some of the feature such as Water tank and Cool Select Zone ( 1 ) can be available depending on . -- operating _21 02...
... and Fresh Zone. (Optional) • To freeze large quantities of food quickly, use the very bottom drawer ( 2 ) where food freezes particularly quickly. Press Freezer or Fridge button to a power failure. • Some of the feature such as Water tank and Cool Select Zone ( 1 ) can be available depending on . -- operating _21 02...
User Manual
Page 24
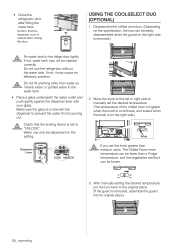
... box can only be easily disassembled when the guard on this setting. 2. After manually setting the desired temperature, put the box back to the fridge door tightly. USING THE COOLSELECT DUO (OPTIONAL) 1. Water can be dispensed on the right side is removed.) Fix water tank to the original ... can be lower than water as CAUTION mineral water or purified water in line with your glass. Do not fill anything other than a Fridge temperature, and the vegetables and fruit can be operate correctly. Confirm that the locking device is removed, assemble the guard into its original place...
... box can only be easily disassembled when the guard on this setting. 2. After manually setting the desired temperature, put the box back to the fridge door tightly. USING THE COOLSELECT DUO (OPTIONAL) 1. Water can be dispensed on the right side is removed.) Fix water tank to the original ... can be lower than water as CAUTION mineral water or purified water in line with your glass. Do not fill anything other than a Fridge temperature, and the vegetables and fruit can be operate correctly. Confirm that the locking device is removed, assemble the guard into its original place...
User Manual
Page 25
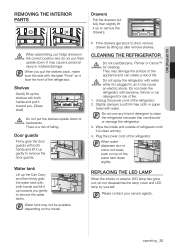
... assembling, put them upside down. Unplug the power cord of the refrigerator. Wipe the inside and outside of fire. 1. When water dispenser do not put fridge shelves in , as it face the front of the refrigerator. When you put the shelves upside down slightly. There is a risk of fire. Water tank...
... assembling, put them upside down. Unplug the power cord of the refrigerator. Wipe the inside and outside of fire. 1. When water dispenser do not put fridge shelves in , as it face the front of the refrigerator. When you put the shelves upside down slightly. There is a risk of fire. Water tank...
User Manual
Page 27
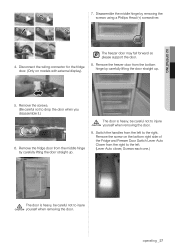
...Be careful not to injure CAUTION yourself when removing the door. 9. operating _27 Disconnect the wiring connector for the fridge door. (Only on the bottom right side of the Fridge and Freezer Door Switch Lever Auto Closer from the bottom hinge by carefully lifting the door straight up . Remove... hinge by removing the screws using a Phillips Head (+) screwdriver. (5) 4. The freezer door may fall forward so please support the door. 8. Remove the fridge door from the left . (Lever Auto closer, Screws each one.) The door is heavy, be careful not to the right. The door is heavy,...
...Be careful not to injure CAUTION yourself when removing the door. 9. operating _27 Disconnect the wiring connector for the fridge door. (Only on the bottom right side of the Fridge and Freezer Door Switch Lever Auto Closer from the bottom hinge by carefully lifting the door straight up . Remove... hinge by removing the screws using a Phillips Head (+) screwdriver. (5) 4. The freezer door may fall forward so please support the door. 8. Remove the fridge door from the left . (Lever Auto closer, Screws each one.) The door is heavy, be careful not to the right. The door is heavy,...

User Manual
Page 29
...disassemble the Cover control (2), Switch the Wire door (3) direction to opposite side on the Cabinet. 4. Insert the Top Hinge on Fridge Door (Door Display type only). Assemble the screw. Flip the Top hinge and reattach the Top hinge shaft. 02 OPERATING 16.Put... the Cap-Control out from the Cover Control like a Picture (4). (1) (1-1) (1-2) 18-1.Use 11 mm wrench to assemble the Fridge door. (1-3) (1-4) (2) (1-5) (3) (4) Assembly steps 1. Assemble the Cover-Control with Screw like the picture (1). 15.Switch the position of Bottom hinge and ...
...disassemble the Cover control (2), Switch the Wire door (3) direction to opposite side on the Cabinet. 4. Insert the Top Hinge on Fridge Door (Door Display type only). Assemble the screw. Flip the Top hinge and reattach the Top hinge shaft. 02 OPERATING 16.Put... the Cap-Control out from the Cover Control like a Picture (4). (1) (1-1) (1-2) 18-1.Use 11 mm wrench to assemble the Fridge door. (1-3) (1-4) (2) (1-5) (3) (4) Assembly steps 1. Assemble the Cover-Control with Screw like the picture (1). 15.Switch the position of Bottom hinge and ...

User Manual
Page 30
Check the wire position that should be located the back side of Fridge door and then push it to assemble completely. 20.Connect the wire and then insert it into the Cover Hinge and then the white taping ...
Check the wire position that should be located the back side of Fridge door and then push it to assemble completely. 20.Connect the wire and then insert it into the Cover Hinge and then the white taping ...

User Manual
Page 31
Make sure the door gaskets are working properly. Attach the Freezer door gasket after rotating 180°. If not, there can be a noise or dew can be formed which affects perfomance of the unit. 26.Make sure the doors are properly arranged. When you reverse the Freezer Door, detach the Freezer Door gasket and the inside gasket to the right ( B ). 24.Assemble the Cap Control. 25.Detach the Fridge and Freezer gaskets and attach them after rotating it 180˚. ( A ) ( B ) operating _31 02 OPERATING And then attach the inside left gasket ( A ).
Make sure the door gaskets are working properly. Attach the Freezer door gasket after rotating 180°. If not, there can be a noise or dew can be formed which affects perfomance of the unit. 26.Make sure the doors are properly arranged. When you reverse the Freezer Door, detach the Freezer Door gasket and the inside gasket to the right ( B ). 24.Assemble the Cap Control. 25.Detach the Fridge and Freezer gaskets and attach them after rotating it 180˚. ( A ) ( B ) operating _31 02 OPERATING And then attach the inside left gasket ( A ).

User Manual
Page 32
troubleshooting Before calling for service, review the checkpoints below. Fridge/freezer does not operate. Fridge/freezer is over-cooling. • Temperature control is not set correctly. • Set the temperature higher. Any service calls regarding ...the refrigerator has heatproof piping in the power cord. • Set the temperature lower. • Refrigerator is not a system failure. 32_ troubleshooting Fridge/freezer temperature is blocking the refrigerator vents. • Do not overload the refrigerator. If the ambient temperature rises, this equipment may not work ...
troubleshooting Before calling for service, review the checkpoints below. Fridge/freezer does not operate. Fridge/freezer is over-cooling. • Temperature control is not set correctly. • Set the temperature higher. Any service calls regarding ...the refrigerator has heatproof piping in the power cord. • Set the temperature lower. • Refrigerator is not a system failure. 32_ troubleshooting Fridge/freezer temperature is blocking the refrigerator vents. • Do not overload the refrigerator. If the ambient temperature rises, this equipment may not work ...

User Manual
Page 33
... is blocking the vents. meat/fish. Possible causes • If door is warm. • Food with high moisture content. 03 TROUBLESHOOTING Odors Symptom Possible causes Fridge/freezer does not operate. • Spoiled food. Fridge/freezer temperature is left open the door for Fresh/Chef Zone. Frost on the interior walls.
... is blocking the vents. meat/fish. Possible causes • If door is warm. • Food with high moisture content. 03 TROUBLESHOOTING Odors Symptom Possible causes Fridge/freezer does not operate. • Spoiled food. Fridge/freezer temperature is left open the door for Fresh/Chef Zone. Frost on the interior walls.


