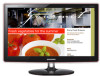
User Manual (ENGLISH)
Page 2
... 2-9 Connecting AV Devices 2-10 Connecting to an Amplifier 2-11 Connecting Headphones 2-12 Kensington Lock 2-13 USING THE PRODUCT Plug & Play Feature 3-1 Viewing the Control panel 3-2 Remote Control 3-3 Using the Screen Adjustment Menu (OSD: On Screen Display) . . . . 3-4 Installing the Device Driver 3-5 Standard Signal Mode Table 3-6 INSTALLING THE SOFTWARE Natural Color 4-1 MultiScreen 4-2 TROUBLESHOOTING...
... 2-9 Connecting AV Devices 2-10 Connecting to an Amplifier 2-11 Connecting Headphones 2-12 Kensington Lock 2-13 USING THE PRODUCT Plug & Play Feature 3-1 Viewing the Control panel 3-2 Remote Control 3-3 Using the Screen Adjustment Menu (OSD: On Screen Display) . . . . 3-4 Installing the Device Driver 3-5 Standard Signal Mode Table 3-6 INSTALLING THE SOFTWARE Natural Color 4-1 MultiScreen 4-2 TROUBLESHOOTING...
User Manual (ENGLISH)
Page 10
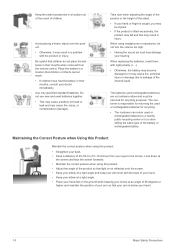
... product may fall and this product. • Straighten your eyes to a store selling the same type of 45~50 cm (15~19 inches) from the remote control. Avoid placing a heavy object over the product. • Otherwise, it may result in injury. The batteries (and rechargeable batteries) are not ordinary refuse and...
... product may fall and this product. • Straighten your eyes to a store selling the same type of 45~50 cm (15~19 inches) from the remote control. Avoid placing a heavy object over the product. • Otherwise, it may result in injury. The batteries (and rechargeable batteries) are not ordinary refuse and...

User Manual (ENGLISH)
Page 11
... in case you need to move the product at a later stage. CONTENTS Installation Manual Product Warranty (Not available in all locations) Stand Connector Stand Base Remote Control Cleaning Cloth SOLD SEPARATELY D-Sub Cable HDMI Cable Stereo Cable The cleaning cloth is supplied with black high-glossy models only.
... in case you need to move the product at a later stage. CONTENTS Installation Manual Product Warranty (Not available in all locations) Stand Connector Stand Base Remote Control Cleaning Cloth SOLD SEPARATELY D-Sub Cable HDMI Cable Stereo Cable The cleaning cloth is supplied with black high-glossy models only.
User Manual (ENGLISH)
Page 20
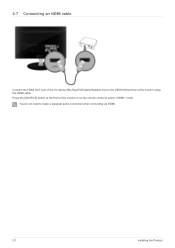
2-7 Connecting an HDMI cable Connect the HDMI OUT port of the AV device (Blu-Ray/DVD/Cable/Satellite box) to the [HDMI IN] terminal of the monitor or on the remote control to make a separate audio connection when connecting via HDMI. 2-7 Installing the Product Press the [SOURCE] button at the front of the monitor using the HDMI cable. You do not need to select mode.
2-7 Connecting an HDMI cable Connect the HDMI OUT port of the AV device (Blu-Ray/DVD/Cable/Satellite box) to the [HDMI IN] terminal of the monitor or on the remote control to make a separate audio connection when connecting via HDMI. 2-7 Installing the Product Press the [SOURCE] button at the front of the monitor using the HDMI cable. You do not need to select mode.
User Manual (ENGLISH)
Page 21
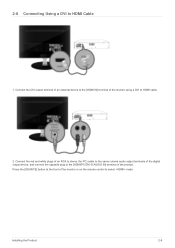
Connect the DVI output terminal of an external device to HDMI cable. 2. Installing the Product 2-8 Connect the red and white plugs of an RCA to stereo (for PC) cable to the same colored audio output terminals of the digital output device, and connect the opposite plug to the [HDMI/PC/DVI-D AUDIO IN] terminal of the monitor using a DVI to the [HDMI IN] terminal of the product. 2-8 Connecting Using a DVI to select mode. Press the [SOURCE] button at the front of the monitor or on the remote control to HDMI Cable 1.
Connect the DVI output terminal of an external device to HDMI cable. 2. Installing the Product 2-8 Connect the red and white plugs of an RCA to stereo (for PC) cable to the same colored audio output terminals of the digital output device, and connect the opposite plug to the [HDMI/PC/DVI-D AUDIO IN] terminal of the monitor using a DVI to the [HDMI IN] terminal of the product. 2-8 Connecting Using a DVI to select mode. Press the [SOURCE] button at the front of the monitor or on the remote control to HDMI Cable 1.
User Manual (ENGLISH)
Page 22
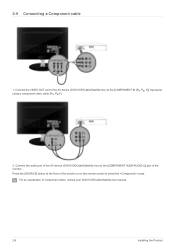
Connect the VIDEO OUT port of Component video, consult your DVD/VCR/Cable/Satellite box manual. 2-9 Installing the Product For an explanation of the AV device (DVD/VCR/Cable/Satellite box) to select the mode. 2-9 Connecting a Component cable 1. Press the [SOURCE] button at the front of the monitor. Connect the audio port of the AV device (DVD/VCR/Cable/Satellite box) to the [COMPONENT IN [[R-AUDIO-L]] port of the monitor or on the remote control to the [COMPONENT IN [PR, PB, Y]] input ports using a component video cable [PR, PB,Y]. 2.
Connect the VIDEO OUT port of Component video, consult your DVD/VCR/Cable/Satellite box manual. 2-9 Installing the Product For an explanation of the AV device (DVD/VCR/Cable/Satellite box) to select the mode. 2-9 Connecting a Component cable 1. Press the [SOURCE] button at the front of the monitor. Connect the audio port of the AV device (DVD/VCR/Cable/Satellite box) to the [COMPONENT IN [[R-AUDIO-L]] port of the monitor or on the remote control to the [COMPONENT IN [PR, PB, Y]] input ports using a component video cable [PR, PB,Y]. 2.
User Manual (ENGLISH)
Page 23
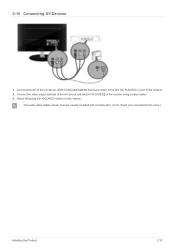
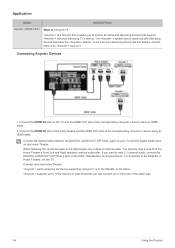
2-10 Connecting AV Devices 1. Select [AV]using a video cable. 3. Connect the port of the AV device (DVD/VCR/Cable/Satellite box/Camcorder) to the [AV IN [ R-AUDIO-L ] port of the monitor using the button on the remote. • The audio-video cables shown here are usually included with a Camcorder. (If not, check your local electronics store.) Installing the Product 2-10 Connect the video output terminal of the AV device and the [AV IN [VIDEO]] of the product. 2.
2-10 Connecting AV Devices 1. Select [AV]using a video cable. 3. Connect the port of the AV device (DVD/VCR/Cable/Satellite box/Camcorder) to the [AV IN [ R-AUDIO-L ] port of the monitor using the button on the remote. • The audio-video cables shown here are usually included with a Camcorder. (If not, check your local electronics store.) Installing the Product 2-10 Connect the video output terminal of the AV device and the [AV IN [VIDEO]] of the product. 2.
User Manual (ENGLISH)
Page 27
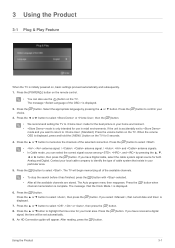
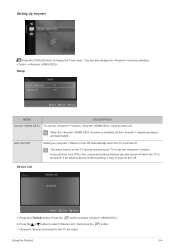
... the [ ] button. If you can also use in your local area. 3 Using the Product 3-1 Plug & Play Feature When the TV is initially powered on the remote control. • You can select the correct signal source among , , and by pressing the ▲ or ▼ button.
... the [ ] button. If you can also use in your local area. 3 Using the Product 3-1 Plug & Play Feature When the TV is initially powered on the remote control. • You can select the correct signal source among , , and by pressing the ▲ or ▼ button.
User Manual (ENGLISH)
Page 30
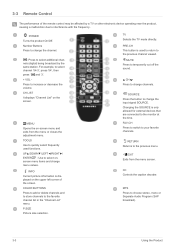
3-3 Remote Control The performance of the screen. For example, to select channel '54-3', press '54', then press ' ' and '3'. + VOL Press to change the input signal SOURCE. P.... Controls the caption decoder. MTS Press to temporarily cut off the sound. INFO Current picture information is displayed on the upper left corner of the remote control may be affected by the same station. PRE-CH This button is only allowed for external devices that are connected to the favorite channel...
3-3 Remote Control The performance of the screen. For example, to select channel '54-3', press '54', then press ' ' and '3'. + VOL Press to change the input signal SOURCE. P.... Controls the caption decoder. MTS Press to temporarily cut off the sound. INFO Current picture information is displayed on the upper left corner of the remote control may be affected by the same station. PRE-CH This button is only allowed for external devices that are connected to the favorite channel...

User Manual (ENGLISH)
Page 31
...drained? • Is there a power outage or is the power cord unplugged? • Is there a special fluorescent light or neon sign nearby? If the remote control doesn't work, check the following : • Is the TV power on? • Are the plus and minus ends of the batteries with the diagram...compartment. 3. Remove the batteries and store them in the figure. 2. Lift the cover at the back of the remote control upward as shown in a cool, dry place if you won't be using the remote control for a long time. Make sure to match the +and - Using the Product 3-3 Installing Batteries in ...
...drained? • Is there a power outage or is the power cord unplugged? • Is there a special fluorescent light or neon sign nearby? If the remote control doesn't work, check the following : • Is the TV power on? • Are the plus and minus ends of the batteries with the diagram...compartment. 3. Remove the batteries and store them in the figure. 2. Lift the cover at the back of the remote control upward as shown in a cool, dry place if you won't be using the remote control for a long time. Make sure to match the +and - Using the Product 3-3 Installing Batteries in ...

User Manual (ENGLISH)
Page 36
... depth. is supported in , (480i / 1080i) and (480i / 1080i) • - The direct button on the screen. • - Magnifies the size of the picture on the remote control is [P.SIZE] button. • - You can initialize the setting. • Settings can be compatible with all external devices. • - • The feature offers you...
... depth. is supported in , (480i / 1080i) and (480i / 1080i) • - The direct button on the screen. • - Magnifies the size of the picture on the remote control is [P.SIZE] button. • - You can initialize the setting. • Settings can be compatible with all external devices. • - • The feature offers you...
User Manual (ENGLISH)
Page 37
... being broadcast. Press the [TOOLS] button to suit your personal preferences. • - Equalizer You can also set the by pressing the MTS button on the remote control. • Preferred Language is fully compatible with all multichannel formats. • - You can adjust the left and right sound balance and equalizer settings as...
... being broadcast. Press the [TOOLS] button to suit your personal preferences. • - Equalizer You can also set the by pressing the MTS button on the remote control. • Preferred Language is fully compatible with all multichannel formats. • - You can adjust the left and right sound balance and equalizer settings as...
User Manual (ENGLISH)
Page 40
... multiple channel lists. hand side of the selected channels. • : Displays the (or ), (or ), , , (or ) and menus (The Options menus may differ depending on the remote control • - You can also set the add to select Reset, then press the [ ] button. Press the [TOOLS] button to the left of the channel... [ ] button. Shows all added channels. • - Only Analog TV channels can watch the selected channel. • Using the Color buttons with an asterisk on the remote control. • -
... multiple channel lists. hand side of the selected channels. • : Displays the (or ), (or ), , , (or ) and menus (The Options menus may differ depending on the remote control • - You can also set the add to select Reset, then press the [ ] button. Press the [TOOLS] button to the left of the channel... [ ] button. Shows all added channels. • - Only Analog TV channels can watch the selected channel. • Using the Color buttons with an asterisk on the remote control. • -

User Manual (ENGLISH)
Page 41
... manually. • This function is only available when is set the month, day, year, hour and minute directly by pressing the number buttons on the remote control. • Select your time zone. Setup MENU Plug & Play Language Time DESCRIPTION This brings up the current time manually or automatically. • - • Depending...
... manually. • This function is only available when is set the month, day, year, hour and minute directly by pressing the number buttons on the remote control. • Select your time zone. Setup MENU Plug & Play Language Time DESCRIPTION This brings up the current time manually or automatically. • - • Depending...

User Manual (ENGLISH)
Page 42
... connecting to a game console such as PlayStation™ or Xbox™, you can enjoy a more realistic gaming experience by pressing the number buttons on the remote control. • Auto Power Off When you 've chosen, set the Antenna by selecting →. • Select the desired channel. • Select , , , , or . • When...
... connecting to a game console such as PlayStation™ or Xbox™, you can enjoy a more realistic gaming experience by pressing the number buttons on the remote control. • Auto Power Off When you 've chosen, set the Antenna by selecting →. • Select the desired channel. • Select , , , , or . • When...
User Manual (ENGLISH)
Page 43
... the Confirm screen disappears, your PIN and enter them. If the TV is 0-0-0-0 • If you forget the PIN, press the remote-control buttons in the following sequence, which films are watching. • - Parental restriction information can block rated TV Programs. • ...- • - If you forget the PIN, press the remote-control buttons in the following sequence, which resets the pin to 0-0-0-0 : [POWER](off )→[MUTE]→8→2→4→[POWER] (on ). ...
... the Confirm screen disappears, your PIN and enter them. If the TV is 0-0-0-0 • If you forget the PIN, press the remote-control buttons in the following sequence, which films are watching. • - Parental restriction information can block rated TV Programs. • ...- • - If you forget the PIN, press the remote-control buttons in the following sequence, which resets the pin to 0-0-0-0 : [POWER](off )→[MUTE]→8→2→4→[POWER] (on ). ...

User Manual (ENGLISH)
Page 45
... Off. • - - - MENU Source List Edit Name DESCRIPTION Use to select , or an external input source connected to the Monitor.Use to come on the remote control. • - - - - - You can be set the mode option to to reduce eye fatigue as well as power consumption. • : Turns off the energy saving...
... Off. • - - - MENU Source List Edit Name DESCRIPTION Use to select , or an external input source connected to the Monitor.Use to come on the remote control. • - - - - - You can be set the mode option to to reduce eye fatigue as well as power consumption. • : Turns off the energy saving...
User Manual (ENGLISH)
Page 46
... Device 1 or 2) directly to the Amplifier or Home Theatre, not the TV. Connect only one Home Theatre. supports up to control all connected Samsung devices that support with Samsung devices that you can be sure your TV and the Digital Audio Input on the Home Theatre. To be used only with your... Samsung TV's remote. Connect the Optical cable between the [DIGITAL AUDIO OUT (OPTICAL)] jack on the TV and the HDMI OUT jack of the same type. 3-4 Using the ...
... Device 1 or 2) directly to the Amplifier or Home Theatre, not the TV. Connect only one Home Theatre. supports up to control all connected Samsung devices that support with Samsung devices that you can be sure your TV and the Digital Audio Input on the Home Theatre. To be used only with your... Samsung TV's remote. Connect the Optical cable between the [DIGITAL AUDIO OUT (OPTICAL)] jack on the TV and the HDMI OUT jack of the same type. 3-4 Using the ...
User Manual (ENGLISH)
Page 47
Device List 1. The active source on the TV remote must be set to TV to turn off . Press the [ ] button to display the Tools menu. If you set to Yes, connected external devices are ...
Device List 1. The active source on the TV remote must be set to TV to turn off . Press the [ ] button to display the Tools menu. If you set to Yes, connected external devices are ...
User Manual (ENGLISH)
Page 56
... the resolution and frequency set for the computer video card falls in port on your monitor and the audio-out port on your nearest Samsung Electronics Service Center. If not, reset them referring to the recommended ranges. PROBLEMS RELATED TO AUDIO No sound The sound level is securely... extension cable, etc.) Set resolution and frequency to the current under the monitor menu and Standard Signal Mode Table. PROBLEMS RELATED TO REMOTE CONTROL The remote control buttons do not respond. Check if a special fluorescent or neon lamp is firmly connected to ensure that the audio cable is ...
... the resolution and frequency set for the computer video card falls in port on your monitor and the audio-out port on your nearest Samsung Electronics Service Center. If not, reset them referring to the recommended ranges. PROBLEMS RELATED TO AUDIO No sound The sound level is securely... extension cable, etc.) Set resolution and frequency to the current under the monitor menu and Standard Signal Mode Table. PROBLEMS RELATED TO REMOTE CONTROL The remote control buttons do not respond. Check if a special fluorescent or neon lamp is firmly connected to ensure that the audio cable is ...


