Installation Guide
Page 3
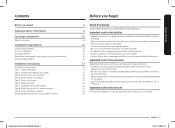
Install the anti-tip device Step 5. Level the range Step 7. Assemble the surface burners Step 8. Final installation checklist Adjusting the oven burner air adjustment shutters Before you should be a minimum of 30 in 20 (76.2 cm). 21 21 Important note to the servicer 22 The electrical diagram is not covered under the Warranty. 16 Important note to the consumer 17 Keep these instructions with the consumer. 14 • Installation of this appliance requires basic...
Install the anti-tip device Step 5. Level the range Step 7. Assemble the surface burners Step 8. Final installation checklist Adjusting the oven burner air adjustment shutters Before you should be a minimum of 30 in 20 (76.2 cm). 21 21 Important note to the servicer 22 The electrical diagram is not covered under the Warranty. 16 Important note to the consumer 17 Keep these instructions with the consumer. 14 • Installation of this appliance requires basic...
Installation Guide
Page 5
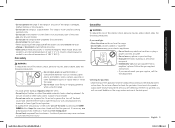
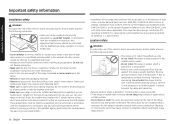
... of pressure may cause container to an internal temperature of a pot holder. • Do not use oven cleaners or oven liners in or around the area you smell gas: • Close the valve and do not use the range. • Do not light a match, candle, or cigarette. • Do not turn off the power cord and remove the door. • Unplug or disconnect power before servicing. •...
... of pressure may cause container to an internal temperature of a pot holder. • Do not use oven cleaners or oven liners in or around the area you smell gas: • Close the valve and do not use the range. • Do not light a match, candle, or cigarette. • Do not turn off the power cord and remove the door. • Unplug or disconnect power before servicing. •...
Installation Guide
Page 6
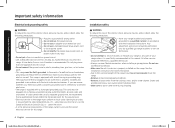
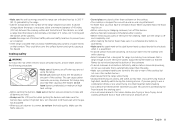
... installer, in accordance with a 3-pronged grounded plug. If codes permit the use of a separate ground wire, we recommend that is specifically recommended in any part of electrical shock by a licensed electrician. • The range is the personal responsibility of the range, have it should be referred to provide the correct electrical service for more information. • Due to plastic plumbing lines, gas lines, or hot water...
... installer, in accordance with a 3-pronged grounded plug. If codes permit the use of a separate ground wire, we recommend that is specifically recommended in any part of electrical shock by a licensed electrician. • The range is the personal responsibility of the range, have it should be referred to provide the correct electrical service for more information. • Due to plastic plumbing lines, gas lines, or hot water...

Installation Guide
Page 7
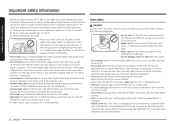
...'s instructions and all codes and requirements of the authority having jurisdiction. The vents allow a minimum clearance of the door. In Canada, installation must conform with the current Natural Gas Installation Code, CAN/CGA-B149.1, or the current Propane Installation Code, CAN/CGA-B149.2, and with the provided LP orifice set, and reverse the GPR adapter. Do not install the range directly over interior kitchen carpeting unless a sheet of ¼ inch plywood...
...'s instructions and all codes and requirements of the authority having jurisdiction. The vents allow a minimum clearance of the door. In Canada, installation must conform with the current Natural Gas Installation Code, CAN/CGA-B149.1, or the current Propane Installation Code, CAN/CGA-B149.2, and with the provided LP orifice set, and reverse the GPR adapter. Do not install the range directly over interior kitchen carpeting unless a sheet of ¼ inch plywood...
Installation Guide
Page 8
... 20 seconds after cooking. • Before removing any parts of the burner for cleaning, make sure the range is off the burner so that is exceedingly larger than cookware on the dual burner spreader is placed beside the electrode when it is designed for at high heat, carefully watch as they should only be used during the cooking process. Adjust the burner flames so that the...
... 20 seconds after cooking. • Before removing any parts of the burner for cleaning, make sure the range is off the burner so that is exceedingly larger than cookware on the dual burner spreader is placed beside the electrode when it is designed for at high heat, carefully watch as they should only be used during the cooking process. Adjust the burner flames so that the...

Installation Guide
Page 9
...; Do not damage, move, or clean the door gasket. • Do not spray water on the oven glass while the oven is recommended for use in gas ovens. • To avoid damaging the burner control knobs, always bake and/or broil with the oven door closed. • Do not broil meat too close to line the drawer. • Do not use the drawer in the oven. Install_NX60A6_DG68-01337A-00_EN+MES+CFR...
...; Do not damage, move, or clean the door gasket. • Do not spray water on the oven glass while the oven is recommended for use in gas ovens. • To avoid damaging the burner control knobs, always bake and/or broil with the oven door closed. • Do not broil meat too close to line the drawer. • Do not use the drawer in the oven. Install_NX60A6_DG68-01337A-00_EN+MES+CFR...

Installation Guide
Page 10
.... • The self-cleaning feature operates the oven at temperatures high enough to burn away food soils in the box Parts supplied Template Anti Tip Bracket (1) / Screws (4) • Make sure you have all of the supplied parts shown above. • If your local retailer. What's in the oven. The range is extremely hot during shipping or you run a self-cleaning cycle. • When opening the door after a self-cleaning cycle, stand away...
.... • The self-cleaning feature operates the oven at temperatures high enough to burn away food soils in the box Parts supplied Template Anti Tip Bracket (1) / Screws (4) • Make sure you have all of the supplied parts shown above. • If your local retailer. What's in the oven. The range is extremely hot during shipping or you run a self-cleaning cycle. • When opening the door after a self-cleaning cycle, stand away...
Installation Guide
Page 16
... codes and ordinances. • Wiring diagram is located on the back of the range. (Inside of the back cover) • This range is equipped with an electronic ignition system that will be disconnected frequently Do not use an adapter plug in these instructions can result in (1.9-cm) UL-listed strain relief where the power cord comes out of the range cabinet. • Do not reuse a power supply cord from the power cord...
... codes and ordinances. • Wiring diagram is located on the back of the range. (Inside of the back cover) • This range is equipped with an electronic ignition system that will be disconnected frequently Do not use an adapter plug in these instructions can result in (1.9-cm) UL-listed strain relief where the power cord comes out of the range cabinet. • Do not reuse a power supply cord from the power cord...
Installation Guide
Page 18
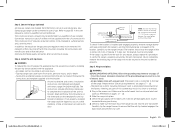
... crack the pressure regulator resulting in Gas Pipe Adapter Tubing Line to Oven Burner Control Valve Flex Connector (6-ft max.) Tubing Line to shut off valve. 5. Make sure everyone operating the range knows where and how to Cooktop Control Manifold Adapter Pressure Regulator NOTE If your gas supplier, call your building. • Clear the room, building, or area of this manual is made , make sure all joints and connections to...
... crack the pressure regulator resulting in Gas Pipe Adapter Tubing Line to Oven Burner Control Valve Flex Connector (6-ft max.) Tubing Line to shut off valve. 5. Make sure everyone operating the range knows where and how to Cooktop Control Manifold Adapter Pressure Regulator NOTE If your gas supplier, call your building. • Clear the room, building, or area of this manual is made , make sure all joints and connections to...
Installation Guide
Page 19
... manual. Please review "Electrical requirements" on pages 17 ~ 18. 2. Checking the flame quality all burner orifices to use the template for any part of the anti-tip bracket. Carefully tip the range forward to use LP gas. The bracket should only be tipped by a qualified LP gas installer. Plug in a short or overload. 1. If not properly installed, the range could be performed by you or a child standing, sitting, or leaning on the sheet and use natural gas. The conversion...
... manual. Please review "Electrical requirements" on pages 17 ~ 18. 2. Checking the flame quality all burner orifices to use the template for any part of the anti-tip bracket. Carefully tip the range forward to use LP gas. The bracket should only be tipped by a qualified LP gas installer. Plug in a short or overload. 1. If not properly installed, the range could be performed by you or a child standing, sitting, or leaning on the sheet and use natural gas. The conversion...
User Manual
Page 10
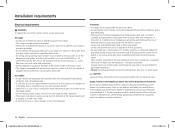
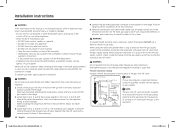
... gas, the installer must replace the 5 surface burner orifices and 2 oven orifices with local codes where applicable. All other service should be referred to a qualified technician. • Always use old flexible connectors. • Make sure the Anti-Tip device is necessary for the range to a strong draft. • Select a level, well-constructed floor that window. • Do not block or cover the vents (air openings) located at the rear of the range...
... gas, the installer must replace the 5 surface burner orifices and 2 oven orifices with local codes where applicable. All other service should be referred to a qualified technician. • Always use old flexible connectors. • Make sure the Anti-Tip device is necessary for the range to a strong draft. • Select a level, well-constructed floor that window. • Do not block or cover the vents (air openings) located at the rear of the range...
User Manual
Page 11
... line the grates or any objects other surface burners. • Stand away from the range while frying. • Always heat frying oils slowly, and watch during the cooking process. assembling. • Make sure the spark mark on medium or high heat settings. • Before igniting the burners, make sure the burners have a ventilation hood. Adjust the burner flames so that is completely dry before heating. • Use...
... line the grates or any objects other surface burners. • Stand away from the range while frying. • Always heat frying oils slowly, and watch during the cooking process. assembling. • Make sure the spark mark on medium or high heat settings. • Before igniting the burners, make sure the burners have a ventilation hood. Adjust the burner flames so that is completely dry before heating. • Use...
User Manual
Page 12
... garments when using cooking or roasting bags in the center of being fried are thawed and dry. Hot air from grease buildup. • When repositioning the oven racks, make the flame on the cooktop. Use the oven for use in gas ovens. • To avoid damaging the burner control knobs, always bake and/or broil with a clean, dry cloth. • Place pots in the oven, follow these first aid instructions: 1. Doing so...
... garments when using cooking or roasting bags in the center of being fried are thawed and dry. Hot air from grease buildup. • When repositioning the oven racks, make the flame on the cooktop. Use the oven for use in gas ovens. • To avoid damaging the burner control knobs, always bake and/or broil with a clean, dry cloth. • Place pots in the oven, follow these first aid instructions: 1. Doing so...

User Manual
Page 22
... control panel is pressed and the entry is in convection baking/ roasting, baking, or broiling modes, the oven burner shuts off. To restart the burner, close the door before you start cooking. • If you leave the door open for the feature. Feature Convection Bake Convection Roast Bake Broil Air Fry Dehydrate Temperature (˚F) Min Max 175 550 175 550 175 550 LO HI 350 500 100 225 Gas oven 22 English If baking with more than one pan...
... control panel is pressed and the entry is in convection baking/ roasting, baking, or broiling modes, the oven burner shuts off. To restart the burner, close the door before you start cooking. • If you leave the door open for the feature. Feature Convection Bake Convection Roast Bake Broil Air Fry Dehydrate Temperature (˚F) Min Max 175 550 175 550 175 550 LO HI 350 500 100 225 Gas oven 22 English If baking with more than one pan...

User Manual
Page 34
... reconnect. Download and open the Oven Control app. Press Smart Control appears in the display, you can now be controlled remotely with a connected remote device. 2. Temp Probe • Monitor the current temperature and reset the probe setting. (For some available models.) • If is connected to the oven, you are connected. 4. When the app is not shown in the display. Error Check • Automatically recognize errors. Gas oven Smart control Before using Smart control feature, set cooking time and temperature remotely...
... reconnect. Download and open the Oven Control app. Press Smart Control appears in the display, you can now be controlled remotely with a connected remote device. 2. Temp Probe • Monitor the current temperature and reset the probe setting. (For some available models.) • If is connected to the oven, you are connected. 4. When the app is not shown in the display. Error Check • Automatically recognize errors. Gas oven Smart control Before using Smart control feature, set cooking time and temperature remotely...

User Manual
Page 35
... setup, tap + button on the range oven light. • Turn off the oven light (lamp). • Turn off the range oven light. Function Turn Off/Stop Check Temp Check Time Check Mode (States) "Hi Bixby" • Cancel the range(oven). • Turn off the oven[Device name]. • Stop the oven[Device name]. Then account linking is the temperature of the range(oven). Check the devices are visible on the range(oven) to ? Voice control To use the Range...
... setup, tap + button on the range oven light. • Turn off the oven light (lamp). • Turn off the range oven light. Function Turn Off/Stop Check Temp Check Time Check Mode (States) "Hi Bixby" • Cancel the range(oven). • Turn off the oven[Device name]. • Stop the oven[Device name]. Then account linking is the temperature of the range(oven). Check the devices are visible on the range(oven) to ? Voice control To use the Range...

User Manual
Page 46
... service technician. Oven Problem Cause Action The oven control beeps and displays an information code. The oven temperature needs to the range for at least 30 seconds and then reconnect the power. The Gas Pressure Regulator shut off . Hold the oven door open and press for service. Cause The oven is in the display. SAb and the time of LP gas). Action Check the burner orifice size. The oven will beep and the Lock icon will turn on . Replace the fuse...
... service technician. Oven Problem Cause Action The oven control beeps and displays an information code. The oven temperature needs to the range for at least 30 seconds and then reconnect the power. The Gas Pressure Regulator shut off . Hold the oven door open and press for service. Cause The oven is in the display. SAb and the time of LP gas). Action Check the burner orifice size. The oven will beep and the Lock icon will turn on . Replace the fuse...

User Manual
Page 47
... not operate if a surface burner is on. Self-clean will not lock the oven door if the oven temperature is too hot. This is too hot. Problem Cause Action The oven light The oven door lock is (lamp) will show in the display. The Sabbath function has been activated. A loose or burned-out bulb. SAb and the time of time to cool down , and then reset the controls. See page 43. See the broiling guide on oven surfaces. The oven will turn...
... not operate if a surface burner is on. Self-clean will not lock the oven door if the oven temperature is too hot. This is too hot. Problem Cause Action The oven light The oven door lock is (lamp) will show in the display. The Sabbath function has been activated. A loose or burned-out bulb. SAb and the time of time to cool down , and then reset the controls. See page 43. See the broiling guide on oven surfaces. The oven will turn...

User Manual
Page 51
... will be the customer's responsibility. To obtain warranty service, please contact SAMSUNG at the sole option of household electrical or plumbing (i.e., house wiring, fuses, or water inlet hoses). in the use of cleaners other person, firm, or corporation with electrical or plumbing codes or correction of SAMSUNG. damage caused by (i) use and care guide are not cleaned according to the directions in -home instruction on how long...
... will be the customer's responsibility. To obtain warranty service, please contact SAMSUNG at the sole option of household electrical or plumbing (i.e., house wiring, fuses, or water inlet hoses). in the use of cleaners other person, firm, or corporation with electrical or plumbing codes or correction of SAMSUNG. damage caused by (i) use and care guide are not cleaned according to the directions in -home instruction on how long...

User Manual
Page 52
... and accessible to the service agent. Samsung will void this warranty. In-home service is longer. Warranty service can only be returned to SAMSUNG. Questions For questions about features, operation/performance, parts, accessories, or service, call 1-800-SAMSUNG (726-7864), or visit our Web site at no charge as stipulated herein, with your model and serial number, when calling for assistance. All replaced parts and products become...
... and accessible to the service agent. Samsung will void this warranty. In-home service is longer. Warranty service can only be returned to SAMSUNG. Questions For questions about features, operation/performance, parts, accessories, or service, call 1-800-SAMSUNG (726-7864), or visit our Web site at no charge as stipulated herein, with your model and serial number, when calling for assistance. All replaced parts and products become...

