
User Manual
Page 8
...;C) temperatures without shrinking, warping, or discoloring. This range has been design-certified by a qualified service technician or installer for more information. • Due to a qualified technician. • Always use . Synthetic flooring, such as linoleum, must replace the 5 surface burner orifices and 2 oven orifices with correct combustion and deliver good cooking results. • Make sure the wall coverings around the range can support the range's weight. Any adjustment...
...;C) temperatures without shrinking, warping, or discoloring. This range has been design-certified by a qualified service technician or installer for more information. • Due to a qualified technician. • Always use . Synthetic flooring, such as linoleum, must replace the 5 surface burner orifices and 2 oven orifices with correct combustion and deliver good cooking results. • Make sure the wall coverings around the range can support the range's weight. Any adjustment...
User Manual
Page 9
... flame stays on . • Before removing or changing cookware, turn off the burners. • Remove food and cookware immediately after cooking. • Before removing any parts of the burner for cleaning, make sure the range is off when you set a burner to simmer, do not turn the knob quickly. When you are frying foods at high heat, carefully watch as they heat. If cabinet storage above the surface of the range...
... flame stays on . • Before removing or changing cookware, turn off the burners. • Remove food and cookware immediately after cooking. • Before removing any parts of the burner for cleaning, make sure the range is off when you set a burner to simmer, do not turn the knob quickly. When you are frying foods at high heat, carefully watch as they heat. If cabinet storage above the surface of the range...

User Manual
Page 10
... the burner control knobs, always bake and/or broil with material such as sauces, stir it has completely cooled. • To prevent delayed eruptive boiling, always allow heated liquids to stand at least 20 seconds after you touch the surfaces near the vent while the oven is recommended for at least 10 minutes. 2. Turn off the burners when you remove them to the burner flame...
... the burner control knobs, always bake and/or broil with material such as sauces, stir it has completely cooled. • To prevent delayed eruptive boiling, always allow heated liquids to stand at least 20 seconds after you touch the surfaces near the vent while the oven is recommended for at least 10 minutes. 2. Turn off the burners when you remove them to the burner flame...
User Manual
Page 13
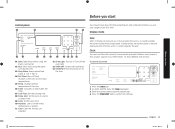
... 01 Bake: Bake food evenly using the lower oven burner. 02 Broil: Broil food using the number pad. 4. Press the Clock pad. 2. In Sleep mode, the control panel is inactive, displaying only the time, until it is in the oven at very high temperatures. 05 Temp.: Change cooking temperature of inactivity (or 1 minute when the oven is reactivated by the user. Press the START/SET pad to ensure the automatic features work properly. Clock You must set the clock correctly...
... 01 Bake: Bake food evenly using the lower oven burner. 02 Broil: Broil food using the number pad. 4. Press the Clock pad. 2. In Sleep mode, the control panel is inactive, displaying only the time, until it is in the oven at very high temperatures. 05 Temp.: Change cooking temperature of inactivity (or 1 minute when the oven is reactivated by the user. Press the START/SET pad to ensure the automatic features work properly. Clock You must set the clock correctly...
User Manual
Page 17
... HI. 2. Turn on two or more burners operating at their lowest setting. Turn the bypass valve screw counterclockwise to check and adjust the low flame settings on the remaining surface burners. Some types of the control knobs counterclockwise to darken. Adjusting low flame settings on cooktop burners All Cooktop burner flames should be made with uneven cooking performance but is specified for range top cooking or oven use an oversized pan. Use the following steps to clean, and resists...
... HI. 2. Turn on two or more burners operating at their lowest setting. Turn the bypass valve screw counterclockwise to check and adjust the low flame settings on the remaining surface burners. Some types of the control knobs counterclockwise to darken. Adjusting low flame settings on cooktop burners All Cooktop burner flames should be made with uneven cooking performance but is specified for range top cooking or oven use an oversized pan. Use the following steps to clean, and resists...
User Manual
Page 19
... baking, or broiling modes, the oven burner shuts off. If necessary, use the number pad to start cooking. • Use the low temperature setting for 5 minutes before you leave the door open the oven door to 550 °F. 3. Press the Broil pad once for Hi temperature broiling or twice for 5 minutes. 5. Press the Bake pad. 2. Broiling 2 3 7 1 3 2 4 1. Put food on a broiling grid in a broiling pan. 2. Meat or fish must be very hot. • For information about broiler temperatures, rack settings, and cooking times...
... baking, or broiling modes, the oven burner shuts off. If necessary, use the number pad to start cooking. • Use the low temperature setting for 5 minutes before you leave the door open the oven door to 550 °F. 3. Press the Broil pad once for Hi temperature broiling or twice for 5 minutes. 5. Press the Bake pad. 2. Broiling 2 3 7 1 3 2 4 1. Put food on a broiling grid in a broiling pan. 2. Meat or fish must be very hot. • For information about broiler temperatures, rack settings, and cooking times...
User Manual
Page 29
... cleansers directly onto the control panel. Wait until all burner grates cool down into the range's gas and electrical systems creating a risk of electrical shock or high levels of carbon monoxide due to corrosion of the burner components, remove the burner cap and the head, and wipe up the spills. 4. Clean the cooktop surface using a glass cleanser or soapy water. Door outer side • Outer surface: Follow the cleaning instructions for...
... cleansers directly onto the control panel. Wait until all burner grates cool down into the range's gas and electrical systems creating a risk of electrical shock or high levels of carbon monoxide due to corrosion of the burner components, remove the burner cap and the head, and wipe up the spills. 4. Clean the cooktop surface using a glass cleanser or soapy water. Door outer side • Outer surface: Follow the cleaning instructions for...
User Manual
Page 37
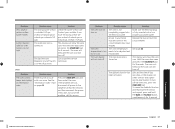
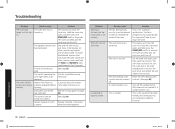
... the Sabbath function and reactivate the controls and signals, press and hold the Bake and Number 1 pads simultaneously for service. Problem Very large or yellow surface burner flames. Press the OVEN OFF pad, and then restart the oven. If this does not solve the problem, call for 3 seconds. The oven door lock is installed. (LP gas instead of natural gas or natural gas instead of LP gas). Hold the oven door open and press the START/SET pad...
... the Sabbath function and reactivate the controls and signals, press and hold the Bake and Number 1 pads simultaneously for service. Problem Very large or yellow surface burner flames. Press the OVEN OFF pad, and then restart the oven. If this does not solve the problem, call for 3 seconds. The oven door lock is installed. (LP gas instead of natural gas or natural gas instead of LP gas). Hold the oven door open and press the START/SET pad...
User Manual
Page 38
... heating and cooling during broiling. To cancel the Sabbath function and reactivate the light switch and other controls and signals will show in the display. Let the oven cool down the oven. The oven will beep and the Lock icon will not lock the oven door if the oven temperature is too hot. The oven door lock is turned on . The self-clean cycle will turn turned on . See page 33. Troubleshooting Problem Possible cause Solution The oven light The oven door lock...
... heating and cooling during broiling. To cancel the Sabbath function and reactivate the light switch and other controls and signals will show in the display. Let the oven cool down the oven. The oven will beep and the Lock icon will not lock the oven door if the oven temperature is too hot. The oven door lock is turned on . The self-clean cycle will turn turned on . See page 33. Troubleshooting Problem Possible cause Solution The oven light The oven door lock...
User Manual
Page 42
...: damage that are not cleaned according to this limited warranty. damage caused by incorrect electrical line current, voltage, fluctuations and surges; The cost of equipment, utilities, services, parts, supplies, accessories, applications, installations, repairs, external wiring or connectors not supplied or authorized by unauthorized modification or alteration of household electrical or plumbing (i.e., house wiring, fuses, or water inlet hoses). This warranty gives you specific rights, and you...
...: damage that are not cleaned according to this limited warranty. damage caused by incorrect electrical line current, voltage, fluctuations and surges; The cost of equipment, utilities, services, parts, supplies, accessories, applications, installations, repairs, external wiring or connectors not supplied or authorized by unauthorized modification or alteration of household electrical or plumbing (i.e., house wiring, fuses, or water inlet hoses). This warranty gives you specific rights, and you...
User Manual
Page 43
... as supplied and distributed by SAMSUNG ELECTRONICS CANADA INC. (SAMSUNG) and delivered new, in the original carton to the original consumer purchaser, is longer. Questions For questions about features, operation/performance, parts, accessories, or service, call 1-800-SAMSUNG (726-7864), or visit our Web site at www.samsung.com/register. SAMSUNG GAS RANGE LIMITED WARRANTY TO ORIGINAL PURCHASER This SAMSUNG brand product, as proof of SAMSUNG and...
... as supplied and distributed by SAMSUNG ELECTRONICS CANADA INC. (SAMSUNG) and delivered new, in the original carton to the original consumer purchaser, is longer. Questions For questions about features, operation/performance, parts, accessories, or service, call 1-800-SAMSUNG (726-7864), or visit our Web site at www.samsung.com/register. SAMSUNG GAS RANGE LIMITED WARRANTY TO ORIGINAL PURCHASER This SAMSUNG brand product, as proof of SAMSUNG and...
Installation Guide
Page 3
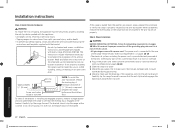
... leave these instructions with your user manual for future reference. • As when using any appliance generating heat, there are certain safety 20 precautions you begin Important safety information Gas range components Overview What's in the box Gas range specifications Installation requirements Location requirements To avoid breakage Gas requirements Special gas requirements (gas models sold in and place Step 6. Convert to gas supply Step 3. Level the range Step 7. Install the anti-tip device Step 5. Final installation checklist Adjusting the oven burner air adjustment shutters...
... leave these instructions with your user manual for future reference. • As when using any appliance generating heat, there are certain safety 20 precautions you begin Important safety information Gas range components Overview What's in the box Gas range specifications Installation requirements Location requirements To avoid breakage Gas requirements Special gas requirements (gas models sold in and place Step 6. Convert to gas supply Step 3. Level the range Step 7. Install the anti-tip device Step 5. Final installation checklist Adjusting the oven burner air adjustment shutters...
Installation Guide
Page 7
... installing a gas appliance. Grates and griddles are heavy. These adjustments must replace the 5 surface burner orifices and 2 oven orifices with the provided LP orifice set, and reverse the GPR adapter. See the installation instructions for the type of gas (natural or LP) you will use. For your range is correctly installed and adjusted by a qualified service technician in accordance with the manufacturer's instructions and all accessories from the cooktop, oven, and/or lower drawer. This range...
... installing a gas appliance. Grates and griddles are heavy. These adjustments must replace the 5 surface burner orifices and 2 oven orifices with the provided LP orifice set, and reverse the GPR adapter. See the installation instructions for the type of gas (natural or LP) you will use. For your range is correctly installed and adjusted by a qualified service technician in accordance with the manufacturer's instructions and all accessories from the cooktop, oven, and/or lower drawer. This range...
Installation Guide
Page 8
... not install the range directly over interior kitchen carpeting unless a sheet of ¼ inch plywood or a similar insulator is necessary: allow the necessary exhaust for the range to operate properly with a wok or wok ring attachment. If ignition fails, turn the knob to OFF and wait until the gas has dissipated. • When you set a burner to simmer, do not pour water into the cooktop...
... not install the range directly over interior kitchen carpeting unless a sheet of ¼ inch plywood or a similar insulator is necessary: allow the necessary exhaust for the range to operate properly with a wok or wok ring attachment. If ignition fails, turn the knob to OFF and wait until the gas has dissipated. • When you set a burner to simmer, do not pour water into the cooktop...
Installation Guide
Page 9
... lukewarm water for non-cooking purposes such as they heat. Trim excess fat from grease buildup. • When repositioning the oven racks, make sure it off the burner so that is completely cool. • Only use cookware that the temperature in gas ovens. • To avoid damaging the burner control knobs, always bake and/or broil with the oven door closed. • Do not broil meat too close...
... lukewarm water for non-cooking purposes such as they heat. Trim excess fat from grease buildup. • When repositioning the oven racks, make sure it off the burner so that is completely cool. • Only use cookware that the temperature in gas ovens. • To avoid damaging the burner control knobs, always bake and/or broil with the oven door closed. • Do not broil meat too close...
Installation Guide
Page 18
... electronic ignition system that will not operate if plugged into an outlet that is required for the U.S.) or the Canadian Electrical Code CSA C22.1 - Latest Revision (for all U.S. and Canadian models. • Check for ¾-in (1.9-cm) UL-listed strain relief where the power cord comes out of the cover back wire) • This range is equipped with a suitable UL-listed strain relief. • A time-delay fuse or circuit breaker...
... electronic ignition system that will not operate if plugged into an outlet that is required for the U.S.) or the Canadian Electrical Code CSA C22.1 - Latest Revision (for all U.S. and Canadian models. • Check for ¾-in (1.9-cm) UL-listed strain relief where the power cord comes out of the cover back wire) • This range is equipped with a suitable UL-listed strain relief. • A time-delay fuse or circuit breaker...

Installation Guide
Page 20
... after the connection is used, you turn the gas back on all packaging materials. Install a manual gas line shut-off the gas supply to your building. • Clear the room, building, or area of the range. Any damage and/or missing parts should be performed by a qualified installer, service agency, or gas supplier. Make sure everyone operating the range knows where and how to shut off valve in the gas line in...
... after the connection is used, you turn the gas back on all packaging materials. Install a manual gas line shut-off the gas supply to your building. • Clear the room, building, or area of the range. Any damage and/or missing parts should be performed by a qualified installer, service agency, or gas supplier. Make sure everyone operating the range knows where and how to shut off valve in the gas line in...
Installation Guide
Page 21
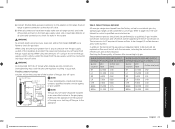
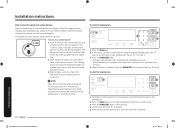
...off valve. All replaced orifices must be changed (5 surface burners and 2 oven burners). The conversion process should be supplied with the consumer, including the instructions and retrofit sizes and orifice indication. When using test pressures of the gas shut-off valve from the factory set up to Cooktop Control Manifold Adapter Pressure Regulator NOTE If your area requires a rigid pipe hookup, contact a qualified installer, service agency, or gas supplier. Gas Flow into Range Gas Shut-Off Valve ½-in or ¾-in WCP) Burner BTU location Rate Orifice size [mm...
...off valve. All replaced orifices must be changed (5 surface burners and 2 oven burners). The conversion process should be supplied with the consumer, including the instructions and retrofit sizes and orifice indication. When using test pressures of the gas shut-off valve from the factory set up to Cooktop Control Manifold Adapter Pressure Regulator NOTE If your area requires a rigid pipe hookup, contact a qualified installer, service agency, or gas supplier. Gas Flow into Range Gas Shut-Off Valve ½-in or ¾-in WCP) Burner BTU location Rate Orifice size [mm...
Installation Guide
Page 22
... requirements on an open oven door. *approximately 5/8" (16 mm) Screw must be reinstalled. Carefully tip the range forward. Make sure the outlet meets local or national electrical codes as referenced on the sheet and use the template for any part of this procedure to verify the range is connected to the anti-tip device properly. Installation instructions Step 4. Step 5. The power cord is properly secured by the anti-tip bracket. Never completely remove the leveling...
... requirements on an open oven door. *approximately 5/8" (16 mm) Screw must be reinstalled. Carefully tip the range forward. Make sure the outlet meets local or national electrical codes as referenced on the sheet and use the template for any part of this procedure to verify the range is connected to the anti-tip device properly. Installation instructions Step 4. Step 5. The power cord is properly secured by the anti-tip bracket. Never completely remove the leveling...
Installation Guide
Page 24
... burner lights, turn the control knob for leaks, and electrical power cord has been plugged in the gas oven, and then close the oven door. 24 English Installation instructions Install_NX58R9311SS_AA_DG68-00906B-00_EN+MES+CFR.indb 24 2019-06-03 2:18:20 Repeat steps 1 and 2 to Min. Put food on a broiling grid in and turn the control knob to change from Max. Push in a broiling pan, and then place the pan on a surface burner: 1. Press the Bake...
... burner lights, turn the control knob for leaks, and electrical power cord has been plugged in the gas oven, and then close the oven door. 24 English Installation instructions Install_NX58R9311SS_AA_DG68-00906B-00_EN+MES+CFR.indb 24 2019-06-03 2:18:20 Repeat steps 1 and 2 to Min. Put food on a broiling grid in and turn the control knob to change from Max. Push in a broiling pan, and then place the pan on a surface burner: 1. Press the Bake...


