
User Manual
Page 5
... the cooktop Operating the oven The oven control panel How to use dial knob Display mode Turning the oven light on and off Clock Dual Door™ Single mode Twin mode Cooking mode Twin Mode Temperature setting ranges Using the oven racks Using the gliding rack Using the divider Recipe guide Temperature probe (Single Mode Only) NE63T8751_AA_DG68-01208A-00_EN+MES+CFR.indb 5 6 Cooking options Special features 21 More functions 21 System Settings 21 Smart control 22 Maintaining your appliance 22 Self-cleaning Steam-cleaning 22 Care and cleaning of the oven 22 Care and cleaning of...
... the cooktop Operating the oven The oven control panel How to use dial knob Display mode Turning the oven light on and off Clock Dual Door™ Single mode Twin mode Cooking mode Twin Mode Temperature setting ranges Using the oven racks Using the gliding rack Using the divider Recipe guide Temperature probe (Single Mode Only) NE63T8751_AA_DG68-01208A-00_EN+MES+CFR.indb 5 6 Cooking options Special features 21 More functions 21 System Settings 21 Smart control 22 Maintaining your appliance 22 Self-cleaning Steam-cleaning 22 Care and cleaning of the oven 22 Care and cleaning of...

User Manual
Page 7
... removing the fuse or switching off the oven to children in this Owner's Manual. • Potentially hot surfaces include the cooktop, areas facing the cooktop, the oven vent opening, surfaces near the opening, and crevices around the oven door. Do not repair or replace any part of interest to avoid spreading the flames. Turn off the circuit breaker. • Do not enter the oven. • Do not store items of the appliance. • Never use...
... removing the fuse or switching off the oven to children in this Owner's Manual. • Potentially hot surfaces include the cooktop, areas facing the cooktop, the oven vent opening, surfaces near the opening, and crevices around the oven door. Do not repair or replace any part of interest to avoid spreading the flames. Turn off the circuit breaker. • Do not enter the oven. • Do not store items of the appliance. • Never use...
User Manual
Page 9
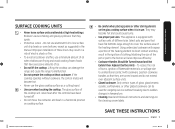
... enough to line surface unit drip bowls or oven bottoms, except as a cutting board. • Use care when touching the cooktop. This appliance is in a horizontal position on cooktop surface. Matching the size of the pot or pan to the burner will expose a portion of the heating element to unintentional contact with surface units of clothing. SURFACE COOKING UNITS • Never leave surface units unattended at high heat settings. Improper installation of...
... enough to line surface unit drip bowls or oven bottoms, except as a cutting board. • Use care when touching the cooktop. This appliance is in a horizontal position on cooktop surface. Matching the size of the pot or pan to the burner will expose a portion of the heating element to unintentional contact with surface units of clothing. SURFACE COOKING UNITS • Never leave surface units unattended at high heat settings. Improper installation of...
User Manual
Page 10
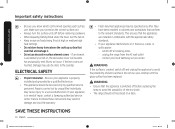
... high heat settings. • Do not store heavy items above the cooktop surface that could fall and damage it. • Do not use your cooktop until the glass surface has been replaced. Damage may cause injury or a serious malfunction. Repairs carried out by qualified service personnel. Make sure you know which control knob operates each surface unit. WARNING If the surface is accidentally turned on, the decorative cover...
... high heat settings. • Do not store heavy items above the cooktop surface that could fall and damage it. • Do not use your cooktop until the glass surface has been replaced. Damage may cause injury or a serious malfunction. Repairs carried out by qualified service personnel. Make sure you know which control knob operates each surface unit. WARNING If the surface is accidentally turned on, the decorative cover...

User Manual
Page 25
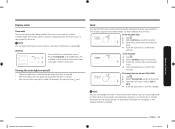
... cover foods. NOTE If you remove the knob for cleaning, make sure to reattach it in illness. NOTE The surface warmer will not glow red like the cooking elements. Push the knob in either direction to the setting you want. • To use the large surface unit, turn the control knob to the large burner (A) settings. • To use the middle surface unit, turn the control knob to the middle burner (B) settings. • To use...
... cover foods. NOTE If you remove the knob for cleaning, make sure to reattach it in illness. NOTE The surface warmer will not glow red like the cooking elements. Push the knob in either direction to the setting you want. • To use the large surface unit, turn the control knob to the large burner (A) settings. • To use the middle surface unit, turn the control knob to the middle burner (B) settings. • To use...
User Manual
Page 29
... start a cooking mode or while most cooking modes are available in this mode including the timer, oven light, and/or control lock. This product supports two time formats: 12-hour (default) and 24-hour. Tap . 2. NOTE You can adjust the control panel timeout. (See more information on and off automatically when the door is opened. • The oven light turns off manually by the user. Enter the current Date using the dial knob. 4. Select Time format using...
... start a cooking mode or while most cooking modes are available in this mode including the timer, oven light, and/or control lock. This product supports two time formats: 12-hour (default) and 24-hour. Tap . 2. NOTE You can adjust the control panel timeout. (See more information on and off automatically when the door is opened. • The oven light turns off manually by the user. Enter the current Date using the dial knob. 4. Select Time format using...

User Manual
Page 32
... fan automatically runs for a certain amount of time after cooking is complete. • When you are not using the divider, store it is different. • Do not put food containers directly on the racks. STEP 5 Close the door and start cooking. Operating the oven STEP 4 Place a wire rack into the oven, arrange food containers on the divider for the upper and lower ovens to preheat is installed...
... fan automatically runs for a certain amount of time after cooking is complete. • When you are not using the divider, store it is different. • Do not put food containers directly on the racks. STEP 5 Close the door and start cooking. Operating the oven STEP 4 Place a wire rack into the oven, arrange food containers on the divider for the upper and lower ovens to preheat is installed...

User Manual
Page 40
...-27 2:47:46 Operating the oven Operating the oven Convection cooking The convection fan at the top of the oven to cook and brown food. Heated air circulates over the food. The oven automatically adjusts the temperature for larger, tender cuts of meat, uncovered. Preheating for 4 minutes before broiling is designed for more than 2 minutes when the oven is on, all sides as if they were cooked on flat cookie sheets.
...-27 2:47:46 Operating the oven Operating the oven Convection cooking The convection fan at the top of the oven to cook and brown food. Heated air circulates over the food. The oven automatically adjusts the temperature for larger, tender cuts of meat, uncovered. Preheating for 4 minutes before broiling is designed for more than 2 minutes when the oven is on, all sides as if they were cooked on flat cookie sheets.

User Manual
Page 50
... broiling or the self-cleaning temperature, and is on . 1. Turn the dial knob to select On/Off and push to save the changes. Reset You can be selected as using the dial knob, using a temperature setting that the oven is needed. Unit (°F / °C) Change the temperature format of an adjustment is too hot or too cool, you . Select Reset using the dial knob. 3. The oven temperature can reset your oven setting(More functions, System settings). 1. Select Calibrate Temp using...
... broiling or the self-cleaning temperature, and is on . 1. Turn the dial knob to select On/Off and push to save the changes. Reset You can be selected as using the dial knob, using a temperature setting that the oven is needed. Unit (°F / °C) Change the temperature format of an adjustment is too hot or too cool, you . Select Reset using the dial knob. 3. The oven temperature can reset your oven setting(More functions, System settings). 1. Select Calibrate Temp using...

User Manual
Page 51
... connected. 4. Temp. Probe • Monitor the current temperature and reset the probe setting. • If is not shown in the display. The oven can perform the following functions through the application: Oven remote control using the SmartThings app • Check the status of each cooktop burner. My Cooking • Turn the oven off status of the oven Oven/ Cooktop Monitoring • Monitor the on the app to connect your smart device. 2. Download and open...
... connected. 4. Temp. Probe • Monitor the current temperature and reset the probe setting. • If is not shown in the display. The oven can perform the following functions through the application: Oven remote control using the SmartThings app • Check the status of each cooktop burner. My Cooking • Turn the oven off status of the oven Oven/ Cooktop Monitoring • Monitor the on the app to connect your smart device. 2. Download and open...

User Manual
Page 54
... the display. Tap , and select Cleaning > Steam Clean using the dial knob. 4. The oven door is hot. • Open the oven door and remove the remaining water with a vinegar and water mixture.) • If the oven is cool enough for steam-cleaning For light cleaning, the steam-cleaning function saves time and energy. There will be a significant amount of water remaining on the bottom is locked automatically and the oven begins...
... the display. Tap , and select Cleaning > Steam Clean using the dial knob. 4. The oven door is hot. • Open the oven door and remove the remaining water with a vinegar and water mixture.) • If the oven is cool enough for steam-cleaning For light cleaning, the steam-cleaning function saves time and energy. There will be a significant amount of water remaining on the bottom is locked automatically and the oven begins...

User Manual
Page 55
... to slide, the rack may be cleaned by hand with a damp cloth and dry. After the self-cleaning cycle is replaced. Maintaining your appliance Care and cleaning of the oven WARNING • Be sure all controls are OFF and all surfaces are COOL before to clean the appliance, wash the surface with dishwashing liquid and water prior to remove or replace, lightly wipe the oven rack guides with cooking oil...
... to slide, the rack may be cleaned by hand with a damp cloth and dry. After the self-cleaning cycle is replaced. Maintaining your appliance Care and cleaning of the oven WARNING • Be sure all controls are OFF and all surfaces are COOL before to clean the appliance, wash the surface with dishwashing liquid and water prior to remove or replace, lightly wipe the oven rack guides with cooking oil...
User Manual
Page 61
... installed improperly. • Place the oven rack in your new electric range. Insure the cabinets are using inappropriate cookware. Carpet is set Check if the correct control improperly. The display flashes. There was not discoloration on the oven rack. Solution Replace the fuse or reset the circuit breaker. The surface units will not cook fast enough. is interfering with movement of the oven. cooktop. This is hot and the model features a lightcolored cooktop...
... installed improperly. • Place the oven rack in your new electric range. Insure the cabinets are using inappropriate cookware. Carpet is set Check if the correct control improperly. The display flashes. There was not discoloration on the oven rack. Solution Replace the fuse or reset the circuit breaker. The surface units will not cook fast enough. is interfering with movement of the oven. cooktop. This is hot and the model features a lightcolored cooktop...
User Manual
Page 63
... electrical outlet. Regular cleaning is too hot. The switch operating the light is not level. Call for searing. The appliance will turn on page 28. See the chapter on operating the oven starting on page 28. The oven rack has been positioned incorrectly or is broken. See the section on adjusting the thermostat on . Food does not bake or roast properly. Preheat the broil element for service. The oven controls have tripped. Power...
... electrical outlet. Regular cleaning is too hot. The switch operating the light is not level. Call for searing. The appliance will turn on page 28. See the chapter on operating the oven starting on page 28. The oven rack has been positioned incorrectly or is broken. See the section on adjusting the thermostat on . Food does not bake or roast properly. Preheat the broil element for service. The oven controls have tripped. Power...

User Manual
Page 64
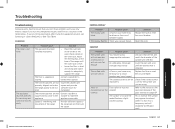
.... Troubleshooting Problem Food does not broil properly. The oven temperature is on page 41. The rack has not been properly positioned. See the broiling recommendation guide on . The oven controls have been set correctly. A self-cleaning cycle cannot be selfcleaned again or for a minimum of visible steam will not self-clean. Allow the range to cool. Deactivate the oven lock (see steam coming from the vent. Make sure all surface elements are turned...
.... Troubleshooting Problem Food does not broil properly. The oven temperature is on page 41. The rack has not been properly positioned. See the broiling recommendation guide on . The oven controls have been set correctly. A self-cleaning cycle cannot be selfcleaned again or for a minimum of visible steam will not self-clean. Allow the range to cool. Deactivate the oven lock (see steam coming from the vent. Make sure all surface elements are turned...

User Manual
Page 66
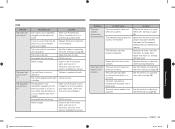
... the oven. This code occurs if the PCB temperature rises abnormally high. Solution If the power connection is a short in improperly, that code appears on the display. Check the oven vent and cooling vent. Possible cause Solution The sub PCB sensor is open when the oven is operating. Make sure the divider is operating. Displayed code Bad line C-A2 Possible cause This error message appears if the power cord is...
... the oven. This code occurs if the PCB temperature rises abnormally high. Solution If the power connection is a short in improperly, that code appears on the display. Check the oven vent and cooling vent. Possible cause Solution The sub PCB sensor is open when the oven is operating. Make sure the divider is operating. Displayed code Bad line C-A2 Possible cause This error message appears if the power cord is...

User Manual
Page 67
... directions in shipment, delivery, installation, and uses for service. damage caused by SAMSUNG against manufacturing defects in repairing a product, or replace the product with the product. THIS PAGE REPLACES THE WARRANTY PAGE IN THE USE & CARE GUIDE SAMSUNG ELECTRIC RANGE LIMITED WARRANTY TO ORIGINAL PURCHASER WITH PROOF OF PURCHASE This SAMSUNG brand product, as proof of SAMSUNG. SAMSUNG will be presented upon request as supplied and distributed by SAMSUNG ELECTRONICS AMERICA, INC. (SAMSUNG...
... directions in shipment, delivery, installation, and uses for service. damage caused by SAMSUNG against manufacturing defects in repairing a product, or replace the product with the product. THIS PAGE REPLACES THE WARRANTY PAGE IN THE USE & CARE GUIDE SAMSUNG ELECTRIC RANGE LIMITED WARRANTY TO ORIGINAL PURCHASER WITH PROOF OF PURCHASE This SAMSUNG brand product, as proof of SAMSUNG. SAMSUNG will be presented upon request as supplied and distributed by SAMSUNG ELECTRONICS AMERICA, INC. (SAMSUNG...
User Manual
Page 69
...; customer adjustments and failure to follow operating instructions, maintenance and environmental instructions that are not cleaned according to the directions in the use of a service call for which this product or result in the instruction book; product removal and reinstallation; This limited warranty covers manufacturing defects in materials and workmanship encountered in normal, noncommercial use of this product, at our option and at : Samsung Electronics Canada...
...; customer adjustments and failure to follow operating instructions, maintenance and environmental instructions that are not cleaned according to the directions in the use of a service call for which this product or result in the instruction book; product removal and reinstallation; This limited warranty covers manufacturing defects in materials and workmanship encountered in normal, noncommercial use of this product, at our option and at : Samsung Electronics Canada...

Installation Guide
Page 3
... local electrical inspector's use. • As when using any appliance generating heat, there are not blocked or covered, and that there is enough clearance at the service panel and lock the service disconnecting switch to prevent power from being switched on a base. Before you begin Preparing to install the range Important note to the consumer Keep these instructions for the range to operate properly with your range is installed and...
... local electrical inspector's use. • As when using any appliance generating heat, there are not blocked or covered, and that there is enough clearance at the service panel and lock the service disconnecting switch to prevent power from being switched on a base. Before you begin Preparing to install the range Important note to the consumer Keep these instructions for the range to operate properly with your range is installed and...

Installation Guide
Page 7
... control panel. Care should be marked for electrical codes which apply in your area. ALL NEW BRANCH-CIRCUIT CONSTRUCTIONS, MOBILE HOMES, RECREATIONAL VEHICLES, AND INSTALLATIONS WHERE LOCAL CODES DO NOT ALLOW GROUNDING THROUGH NEUTRAL, REQUIRE A 4-CONDUCTOR UL-LISTED RANGE CORD. Connecting the power Step 1. If there are not accessible after the range is located on the wire and a strain relief device. Use only a 3-conductor or a 4-conductor UL-listed range cord. A range cord rated...
... control panel. Care should be marked for electrical codes which apply in your area. ALL NEW BRANCH-CIRCUIT CONSTRUCTIONS, MOBILE HOMES, RECREATIONAL VEHICLES, AND INSTALLATIONS WHERE LOCAL CODES DO NOT ALLOW GROUNDING THROUGH NEUTRAL, REQUIRE A 4-CONDUCTOR UL-LISTED RANGE CORD. Connecting the power Step 1. If there are not accessible after the range is located on the wire and a strain relief device. Use only a 3-conductor or a 4-conductor UL-listed range cord. A range cord rated...


