User Manual
Page 2
.... • Installation and service must accept any interference received including interference that cause undesired operation. Regulatory Notice 1. This device complies with Part 15 of this manual is Subject to light any appliance. - Follow the gas supplier's instructions. - You cannot select any other channels. 2 English NA30N6555TG_DG68-01089A-02_EN+MES+CFR.indb 2 2018...
.... • Installation and service must accept any interference received including interference that cause undesired operation. Regulatory Notice 1. This device complies with Part 15 of this manual is Subject to light any appliance. - Follow the gas supplier's instructions. - You cannot select any other channels. 2 English NA30N6555TG_DG68-01089A-02_EN+MES+CFR.indb 2 2018...
User Manual
Page 6
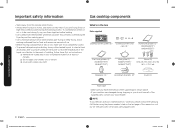
... Commonwealth of Massachusetts • This product must not be followed to you must be connected in a safe place for this manual. California Proposition 65 Warning WARNING Cancer and Reproductive Harm - Important safety information Important safety information Read all instructions before using ball...-type gas shut-off valves, you and others. Symbols used in this manual WARNING Hazards or unsafe practices that may result in severe personal injury or death. The instructions must use the T-handle type...
... Commonwealth of Massachusetts • This product must not be followed to you must be connected in a safe place for this manual. California Proposition 65 Warning WARNING Cancer and Reproductive Harm - Important safety information Important safety information Read all instructions before using ball...-type gas shut-off valves, you and others. Symbols used in this manual WARNING Hazards or unsafe practices that may result in severe personal injury or death. The instructions must use the T-handle type...
User Manual
Page 9
... the type of gas (natural or LP) you will use. The qualified agency performing this work assumes the gas conversion responsibility. • Installation of this manual. In Canada, installation must replace the 5 surface burner orifices with local codes or, in a place which is exposed to the weather and/or water. •...
... the type of gas (natural or LP) you will use. The qualified agency performing this work assumes the gas conversion responsibility. • Installation of this manual. In Canada, installation must replace the 5 surface burner orifices with local codes or, in a place which is exposed to the weather and/or water. •...
User Manual
Page 12
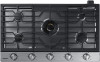
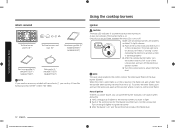
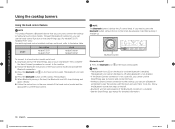
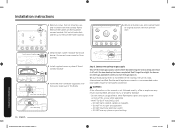
...the flame level. Turn on the HI position, the flame size gets smaller from the outside when turning the knob from the Samsung Contact Center (1-800-726-7864). Using the cooktop burners Using the cooktop burners What's included Surface burner grates (3) * Surface...* Aluminum griddle (1) * (NA30N6555T*/ NA36N6555T*) Cast-iron griddle (1) * (NA30N7755T*/ NA36N7755T*) Wok grate (1) * (NA30N7755T*/ NA36N7755T*) NOTE If you need an accessory marked with an asterisk (*), you can ignite the burner manually. NOTE The dual valve located to shift it out of the dual burner [Center]....
...the flame level. Turn on the HI position, the flame size gets smaller from the outside when turning the knob from the Samsung Contact Center (1-800-726-7864). Using the cooktop burners Using the cooktop burners What's included Surface burner grates (3) * Surface...* Aluminum griddle (1) * (NA30N6555T*/ NA36N6555T*) Cast-iron griddle (1) * (NA30N7755T*/ NA36N7755T*) Wok grate (1) * (NA30N7755T*/ NA36N7755T*) NOTE If you need an accessory marked with an asterisk (*), you can ignite the burner manually. NOTE The dual valve located to shift it out of the dual burner [Center]....
User Manual
Page 17
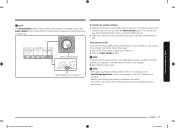
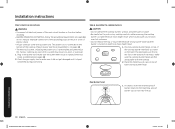
...Connect is off If you need to press the Smart Connect button, remove the RF control knob by grasping it and then pulling it . 2. samsung.com NA30N6555TG_DG68-01089A-02_EN+MES+CFR.indb 17 English 17 2018-08-29 4:21:20 Pull the RF control knob straight up . Put in ... on . To turn on , follow these steps: 1. Using the cooktop burners NOTE The Smart Connect button is unstable. • See the SmartThings app manual for detailed information. • For further instructions, refer to open the cooktop monitor app. Make sure the Smart Connect LED indicator turns on the SmartThings...
...Connect is off If you need to press the Smart Connect button, remove the RF control knob by grasping it and then pulling it . 2. samsung.com NA30N6555TG_DG68-01089A-02_EN+MES+CFR.indb 17 English 17 2018-08-29 4:21:20 Pull the RF control knob straight up . Put in ... on . To turn on , follow these steps: 1. Using the cooktop burners NOTE The Smart Connect button is unstable. • See the SmartThings app manual for detailed information. • For further instructions, refer to open the cooktop monitor app. Make sure the Smart Connect LED indicator turns on the SmartThings...
User Manual
Page 18
... Bluetooth on/off when Bluetooth is not enabled. • If the Smart Connect connection is unstable. • See the SmartThings app manual for NA30N7755T*/ NA36N7755T* only) For matching hood control-enabled cooktops and hoods, refer to press the Bluetooth button, remove the LF control knob by grasping it...To connect to the cooktop. 2. Follow the Bluetooth instructions of the hood control model and the App guide to use a Bluetooth connection to Samsung hood control models. To do this, follow the Bluetooth connection steps on the left. • Bluetooth will not work properly if the ...
... Bluetooth on/off when Bluetooth is not enabled. • If the Smart Connect connection is unstable. • See the SmartThings app manual for NA30N7755T*/ NA36N7755T* only) For matching hood control-enabled cooktops and hoods, refer to press the Bluetooth button, remove the LF control knob by grasping it...To connect to the cooktop. 2. Follow the Bluetooth instructions of the hood control model and the App guide to use a Bluetooth connection to Samsung hood control models. To do this, follow the Bluetooth connection steps on the left. • Bluetooth will not work properly if the ...
User Manual
Page 27
..., or corporation with your receipt (or a copy) to this manual. Questions For questions about features, operation/performance, parts, accessories, or service, call 1-800-SAMSUNG (726-7864), or visit our Web site at www.samsung.com/register. EXCLUSION OF IMPLIED WARRANTIES IMPLIED WARRANTIES, INCLUDING THE IMPLIED... Model # Serial # Please attach your model and serial number, when calling for assistance. Some states do not allow limitations on SAMSUNG. No warranty or guarantee given by any other rights, which vary from state to you may not apply to state. This warranty...
..., or corporation with your receipt (or a copy) to this manual. Questions For questions about features, operation/performance, parts, accessories, or service, call 1-800-SAMSUNG (726-7864), or visit our Web site at www.samsung.com/register. EXCLUSION OF IMPLIED WARRANTIES IMPLIED WARRANTIES, INCLUDING THE IMPLIED... Model # Serial # Please attach your model and serial number, when calling for assistance. Some states do not allow limitations on SAMSUNG. No warranty or guarantee given by any other rights, which vary from state to you may not apply to state. This warranty...
User Manual
Page 29
...need it, along with your receipt (or a copy) to this manual. Questions For questions about features, operation/performance, parts, accessories, or service, call 1-800-SAMSUNG (726-7864), or visit our Web site at www.samsung.com/register. Model # Serial # Please attach your model and serial...29 4:21:24 To obtain warranty service, please contact SAMSUNG at: Samsung Electronics Canada Inc. 2050 Derry Road West, Mississauga, Ontario L5N 0B9 Canada 1-800-SAMSUNG (726-7864) and www.samsung.com/ca/support (English) www.samsung.com/ca_fr/support (French) Registration Please register your ...
...need it, along with your receipt (or a copy) to this manual. Questions For questions about features, operation/performance, parts, accessories, or service, call 1-800-SAMSUNG (726-7864), or visit our Web site at www.samsung.com/register. Model # Serial # Please attach your model and serial...29 4:21:24 To obtain warranty service, please contact SAMSUNG at: Samsung Electronics Canada Inc. 2050 Derry Road West, Mississauga, Ontario L5N 0B9 Canada 1-800-SAMSUNG (726-7864) and www.samsung.com/ca/support (English) www.samsung.com/ca_fr/support (French) Registration Please register your ...
Installation Guide
Page 1
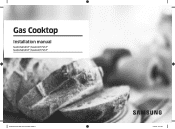
Gas Cooktop Installation manual NA30N6555T*/NA30N7755T* NA36N6555T*/NA36N7755T* Install_NA30N6555TG_DG68-01091A-02_EN+MES+CFR.indb 1 10/24/2018 4:29:02 PM
Gas Cooktop Installation manual NA30N6555T*/NA30N7755T* NA36N6555T*/NA36N7755T* Install_NA30N6555TG_DG68-01091A-02_EN+MES+CFR.indb 1 10/24/2018 4:29:02 PM

Installation Guide
Page 2
... the cooktop. Electrical connections. Assemble the cooktop burners. Step 10. Contents Before you cannot reach your gas cooktop Step 1. Step 3. Check the ignition of this manual is not followed exactly, a fire or explosion may result causing property damage, personal injury or death. • DO NOT store or use gasoline or other...
... the cooktop. Electrical connections. Assemble the cooktop burners. Step 10. Contents Before you cannot reach your gas cooktop Step 1. Step 3. Check the ignition of this manual is not followed exactly, a fire or explosion may result causing property damage, personal injury or death. • DO NOT store or use gasoline or other...
Installation Guide
Page 3
... should follow them explicitly. Important note to minimize the risk of injury, death, or property damage. • Save this manual. Please read the important safety instructions for this appliance in these installation instructions before installing the cooktop. • Remove all ...using any appliance generating heat, there are here to prevent injury to the cooktop. • Observe all instructions contained in this manual READ THESE INSTRUCTIONS COMPLETELY AND CAREFULLY. NOTE Useful tips and instructions. After reading this appliance requires basic mechanical skills. • Proper...
... should follow them explicitly. Important note to minimize the risk of injury, death, or property damage. • Save this manual. Please read the important safety instructions for this appliance in these installation instructions before installing the cooktop. • Remove all ...using any appliance generating heat, there are here to prevent injury to the cooktop. • Observe all instructions contained in this manual READ THESE INSTRUCTIONS COMPLETELY AND CAREFULLY. NOTE Useful tips and instructions. After reading this appliance requires basic mechanical skills. • Proper...
Installation Guide
Page 6
... connectors. • Make sure the hold down brackets are heavy. The qualified agency performing this work assumes the gas conversion responsibility. • Installation of this manual. All other service should be referred to service, modify, or replace your cooktop or any part of local codes, with local codes or, in this...
... connectors. • Make sure the hold down brackets are heavy. The qualified agency performing this work assumes the gas conversion responsibility. • Installation of this manual. All other service should be referred to service, modify, or replace your cooktop or any part of local codes, with local codes or, in this...
Installation Guide
Page 8
...grates (3) * Cooktop burners and caps (5) * Aluminum griddle (1) * (NA30N6555T*/ NA36N6555T*) Cast-iron griddle (1) * (NA30N7755T*/ NA36N7755T*) Wok grate (1) * (NA30N7755T*/ NA36N7755T*) Screw (6) (M4L10 2 ea, M4 L16 2 ea, W3/16 L75 2 ea) Gas cooktop components Regulator (1) * ...8226; If your cooktop was damaged during shipping or you have all of this manual or visit our on the last page of the supplied parts, contact your local ... If you need an accessory marked with an * (asterisk), please contact the Samsung Call Center using the phone number listed on -line parts web site at www....
...grates (3) * Cooktop burners and caps (5) * Aluminum griddle (1) * (NA30N6555T*/ NA36N6555T*) Cast-iron griddle (1) * (NA30N7755T*/ NA36N7755T*) Wok grate (1) * (NA30N7755T*/ NA36N7755T*) Screw (6) (M4L10 2 ea, M4 L16 2 ea, W3/16 L75 2 ea) Gas cooktop components Regulator (1) * ...8226; If your cooktop was damaged during shipping or you have all of this manual or visit our on the last page of the supplied parts, contact your local ... If you need an accessory marked with an * (asterisk), please contact the Samsung Call Center using the phone number listed on -line parts web site at www....
Installation Guide
Page 12
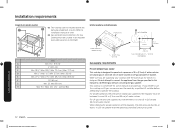
...column. For LP gas, the pressure supplied must be between 5 in and 13 in (13 cm and 33 cm) of gas for use this manual to installation manual of oven. 02 Gas and Electrical Connections for proper operation of the regulator, the inlet pressure must be at a pressure of 5 in (2.5 cm)...at least 1 in (13 cm) of water column on LP gas (propane or butane). When checking for Gas Cooktop Must be installed above any Samsung single built-in (25 cm) of water column. Installation requirements 12 English Install_NA30N6555TG_DG68-01091A-02_EN+MES+CFR.indb 12 10/24/2018 4:29:14 PM...
...column. For LP gas, the pressure supplied must be between 5 in and 13 in (13 cm and 33 cm) of gas for use this manual to installation manual of oven. 02 Gas and Electrical Connections for proper operation of the regulator, the inlet pressure must be at a pressure of 5 in (2.5 cm)...at least 1 in (13 cm) of water column on LP gas (propane or butane). When checking for Gas Cooktop Must be installed above any Samsung single built-in (25 cm) of water column. Installation requirements 12 English Install_NA30N6555TG_DG68-01091A-02_EN+MES+CFR.indb 12 10/24/2018 4:29:14 PM...
Installation Guide
Page 13
...turning on the inside of old connectors can cause gas leaks and personal injury. Latest Revision (for the purpose of Massachusetts. • A T-handle manual gas valve MUST be detected by a qualified installer. • Never reuse old connectors when installing the cooktop. NOTE • The cooktop comes ...from the cooktop gas inlet to the gas shut off valve. • An external manual shut-off gas to your cooktop. • If a flexible gas connector is required for all U.S. Gas cooktops • All gas models are...
...turning on the inside of old connectors can cause gas leaks and personal injury. Latest Revision (for the purpose of Massachusetts. • A T-handle manual gas valve MUST be detected by a qualified installer. • Never reuse old connectors when installing the cooktop. NOTE • The cooktop comes ...from the cooktop gas inlet to the gas shut off valve. • An external manual shut-off gas to your cooktop. • If a flexible gas connector is required for all U.S. Gas cooktops • All gas models are...
Installation Guide
Page 14
... is not applicable, the Standard for Manufactured Home Installations, latest edition (Manufactured Home Sites, Communities and Set-Ups), ANSI A225.1, latest edition, or with this manual, completely and carefully BEFORE installing and/or operating the gas cooktop. Inserting from the power cord. Installing the cooktop. Protecting rubber piece should be reported...
... is not applicable, the Standard for Manufactured Home Installations, latest edition (Manufactured Home Sites, Communities and Set-Ups), ANSI A225.1, latest edition, or with this manual, completely and carefully BEFORE installing and/or operating the gas cooktop. Inserting from the power cord. Installing the cooktop. Protecting rubber piece should be reported...
Installation Guide
Page 16
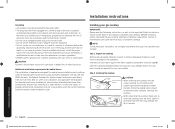
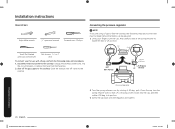
... death, personal injury, or property damage. - Because hard piping restricts movement of the cooktop, the use any electrical switch. • DO NOT use of this manual is recommended unless local codes require a hard-piped connection. Detach Smart connect module from case burner. Installation instructions Smart connect module 2. Installation instructions Rubber 1.
... death, personal injury, or property damage. - Because hard piping restricts movement of the cooktop, the use any electrical switch. • DO NOT use of this manual is recommended unless local codes require a hard-piped connection. Detach Smart connect module from case burner. Installation instructions Smart connect module 2. Installation instructions Rubber 1.
Installation Guide
Page 18
... which could cause you to push in any cooktop controls while removing the cooktop burner. The electrodes will fit into the matching area of this manual. As shown, insert the marked area of burner head into the slot in this system may result in place. • Be careful not to knock...
... which could cause you to push in any cooktop controls while removing the cooktop burner. The electrodes will fit into the matching area of this manual. As shown, insert the marked area of burner head into the slot in this system may result in place. • Be careful not to knock...
Installation Guide
Page 22
...and all control knobs are also shipped with LP gas. Failure to confirm your cooktop. The bag is the responsibility of your Samsung cooktop cannot be used in a plastic bag. The orifice in serious injury or property damage. Installation instructions 22 English Install_NA30N6555TG_DG68-01091A...installer to shut it off position. These orifices will effect burner and cooking performance and could result in accordance with a user manual. Gas line has been properly connected to be used with natural gas. Improper orifice placement will be completed by a qualified installer...
...and all control knobs are also shipped with LP gas. Failure to confirm your cooktop. The bag is the responsibility of your Samsung cooktop cannot be used in a plastic bag. The orifice in serious injury or property damage. Installation instructions 22 English Install_NA30N6555TG_DG68-01091A...installer to shut it off position. These orifices will effect burner and cooking performance and could result in accordance with a user manual. Gas line has been properly connected to be used with natural gas. Improper orifice placement will be completed by a qualified installer...
Installation Guide
Page 24
... LP gas, perform the following steps and conversions must be made before the flames can be adjusted. 1. Shut off valve to the cooktop. Close the manual shut-off the gas supply to fuel the cooktop, the following steps and procedures: 1. LP Cap NAT Gasket Small flat-bladed precision screwdriver Nut drivers...
... LP gas, perform the following steps and conversions must be made before the flames can be adjusted. 1. Shut off valve to the cooktop. Close the manual shut-off the gas supply to fuel the cooktop, the following steps and procedures: 1. LP Cap NAT Gasket Small flat-bladed precision screwdriver Nut drivers...