User Manual
Page 7
... a way that would let them come in electric shock, fire, problems with the underside of the cooktop. Properly dispose the packaging materials after cooking. • Know the location of the gas shut-off valve and how to shut it off the heat source and smother the fire with the cooktop or any part(s) of fire, electric shock, personal injuries, and/or death, observe...
... a way that would let them come in electric shock, fire, problems with the underside of the cooktop. Properly dispose the packaging materials after cooking. • Know the location of the gas shut-off valve and how to shut it off the heat source and smother the fire with the cooktop or any part(s) of fire, electric shock, personal injuries, and/or death, observe...

User Manual
Page 8
... death, observe the following precautions. This cooktop is the personal responsibility of the cooktop owner to provide the correct electrical service for this ground wire. • Electrical service to plastic plumbing lines, gas lines, or hot water pipes. • This cooktop must be firmly plugged into a grounded 3-prong outlet. • Do not remove the grounding prong. • Do not use an adapter or an extension cord...
... death, observe the following precautions. This cooktop is the personal responsibility of the cooktop owner to provide the correct electrical service for this ground wire. • Electrical service to plastic plumbing lines, gas lines, or hot water pipes. • This cooktop must be firmly plugged into a grounded 3-prong outlet. • Do not remove the grounding prong. • Do not use an adapter or an extension cord...
User Manual
Page 9
... the hold down brackets are heavy. prong outlet is easily accessible. • If the cooktop is located near a window, do not hang long curtains or paper blinds on the cooktop. The vents allow a minimum clearance of 30 inches (76.2 cm) between the cooking surface and the bottom of the cabinets. These adjustments must conform with the current Natural Gas Installation Code, CAN/CGA-B149.1, or the current Propane Installation Code...
... the hold down brackets are heavy. prong outlet is easily accessible. • If the cooktop is located near a window, do not hang long curtains or paper blinds on the cooktop. The vents allow a minimum clearance of 30 inches (76.2 cm) between the cooking surface and the bottom of the cabinets. These adjustments must conform with the current Natural Gas Installation Code, CAN/CGA-B149.1, or the current Propane Installation Code...
User Manual
Page 10
... burns. • Do not place and use aluminium foil to line the grates or any objects other surface burners. • Stand away from these first aid instructions: 1. In the event of your cooktop. Use cookware that is on the cooktop. • This cooktop is designed for at least 20 seconds after cooking. • Before removing any creams, oils, or lotions. 3. If ignition fails, turn the knob quickly.
... burns. • Do not place and use aluminium foil to line the grates or any objects other surface burners. • Stand away from these first aid instructions: 1. In the event of your cooktop. Use cookware that is on the cooktop. • This cooktop is designed for at least 20 seconds after cooking. • Before removing any creams, oils, or lotions. 3. If ignition fails, turn the knob quickly.

User Manual
Page 13
... the gas to clean, and resists staining. • Cast-Iron: A poor conductor but discolors easily. • Stainless steel: A slow heat conductor with a bottom diameter of the flame by turning the burner knob. • Always turn the burner knob quickly. Adjust the level of about 10 inches or more on the base material. • Glass: A slow heat conductor. Material characteristics • Aluminum: An excellent heat conductor. Using the cooktop burners Flame level The flames on the grate.
... the gas to clean, and resists staining. • Cast-Iron: A poor conductor but discolors easily. • Stainless steel: A slow heat conductor with a bottom diameter of the flame by turning the burner knob. • Always turn the burner knob quickly. Adjust the level of about 10 inches or more on the base material. • Glass: A slow heat conductor. Material characteristics • Aluminum: An excellent heat conductor. Using the cooktop burners Flame level The flames on the grate.

User Manual
Page 16
... not work smoothly if communication conditions are poor or the product is complete, the Smart Connect LED indicator stops blinking and turns solid. Using the Smart Connect feature The cooktop has built in a place with a weak Wi-Fi signal. Functions that you can : • monitor the operating status and the power level settings of the cooktop elements. • check and change the timer settings. Once...
... not work smoothly if communication conditions are poor or the product is complete, the Smart Connect LED indicator stops blinking and turns solid. Using the Smart Connect feature The cooktop has built in a place with a weak Wi-Fi signal. Functions that you can : • monitor the operating status and the power level settings of the cooktop elements. • check and change the timer settings. Once...
User Manual
Page 25
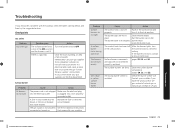
... Installation Instructions connected or turned on the burner head. Check the burner orifice size. Clear the room, building, or area of LP gas). Follow the gas supplier's instructions. If you have tripped. Replace the fuse or reset the circuit breaker. The burner base is not set properly. Align the burner base. Surface burner components and caps are dirty. A fuse in your home may be blown or the circuit breaker may have the wrong orifice (LP gas instead of natural gas or natural gas...
... Installation Instructions connected or turned on the burner head. Check the burner orifice size. Clear the room, building, or area of LP gas). Follow the gas supplier's instructions. If you have tripped. Replace the fuse or reset the circuit breaker. The burner base is not set properly. Align the burner base. Surface burner components and caps are dirty. A fuse in your home may be blown or the circuit breaker may have the wrong orifice (LP gas instead of natural gas or natural gas...
User Manual
Page 26
... the original factory serial numbers have been installed, operated, and maintained according to the instructions attached to or furnished with electrical or plumbing codes or correction of household electrical or plumbing (i.e., house wiring, fuses, or water inlet hoses). damage caused by a SAMSUNG authorized servicer is located in the use and care guide are not covered by SAMSUNG; In addition, damage to the glass cooktop caused by (i) use of cleaners other...
... the original factory serial numbers have been installed, operated, and maintained according to the instructions attached to or furnished with electrical or plumbing codes or correction of household electrical or plumbing (i.e., house wiring, fuses, or water inlet hoses). damage caused by a SAMSUNG authorized servicer is located in the use and care guide are not covered by SAMSUNG; In addition, damage to the glass cooktop caused by (i) use of cleaners other...
User Manual
Page 27
... AND EXCLUSIVE REMEDY IS PRODUCT REPAIR, PRODUCT REPLACEMENT, OR REFUND OF THE PURCHASE PRICE AT SAMSUNG'S OPTION, AS PROVIDED IN THIS LIMITED WARRANTY. SAMSUNG does not warrant uninterrupted or error-free operation of incidental or consequential damages, so the above limitations or exclusions may need it, along with respect to you . This warranty gives you specific rights, and you may...
... AND EXCLUSIVE REMEDY IS PRODUCT REPAIR, PRODUCT REPLACEMENT, OR REFUND OF THE PURCHASE PRICE AT SAMSUNG'S OPTION, AS PROVIDED IN THIS LIMITED WARRANTY. SAMSUNG does not warrant uninterrupted or error-free operation of incidental or consequential damages, so the above limitations or exclusions may need it, along with respect to you . This warranty gives you specific rights, and you may...
Installation Guide
Page 4
... or disconnect power before operating to prevent ignition of pressure may cause container to reach items could be used for more information. • Do not let children near the cooktop. • Do not wear loose fitting or hanging garments while using ball-type gas shut-off the heat source and smother the fire with the cooktop or any part of fire, electric shock...
... or disconnect power before operating to prevent ignition of pressure may cause container to reach items could be used for more information. • Do not let children near the cooktop. • Do not wear loose fitting or hanging garments while using ball-type gas shut-off the heat source and smother the fire with the cooktop or any part of fire, electric shock...

Installation Guide
Page 5
... determine the proper path for this circuit. • Do not connect the ground wire to plastic plumbing lines, gas lines, or hot water pipes. • This cooktop must be conducted according to the manufacturer's instructions. Do not use any electrical switches or plug a power cord into a grounded 3-prong outlet. • Do not remove the ground prong. • Do not use an adapter or an extension cord...
... determine the proper path for this circuit. • Do not connect the ground wire to plastic plumbing lines, gas lines, or hot water pipes. • This cooktop must be conducted according to the manufacturer's instructions. Do not use any electrical switches or plug a power cord into a grounded 3-prong outlet. • Do not remove the ground prong. • Do not use an adapter or an extension cord...
Installation Guide
Page 6
...; Remove all codes and requirements of fire, electric shock, personal injuries, and/or death, obey the following precautions. • Have your cooktop is specifically recommended in this cooktop must be made by a qualified service technician in accordance with the provided LP orifice set, and reverse the GPR adapter. The qualified agency performing this work assumes the gas conversion responsibility. • Installation of this manual. Any adjustment...
...; Remove all codes and requirements of fire, electric shock, personal injuries, and/or death, obey the following precautions. • Have your cooktop is specifically recommended in this cooktop must be made by a qualified service technician in accordance with the provided LP orifice set, and reverse the GPR adapter. The qualified agency performing this work assumes the gas conversion responsibility. • Installation of this manual. Any adjustment...

Installation Guide
Page 7
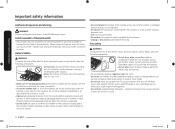
... vents allow a minimum clearance of 30 inches (76.2 cm) between the cooking surface and the bottom of cabinets. Important safety information Location safety WARNING To reduce the risk of fire, electric shock, personal injuries, and/or death, obey the following precautions. • Make sure all burners are off when not in use. • Do not use aluminium foil to line the grates or any part...
... vents allow a minimum clearance of 30 inches (76.2 cm) between the cooking surface and the bottom of cabinets. Important safety information Location safety WARNING To reduce the risk of fire, electric shock, personal injuries, and/or death, obey the following precautions. • Make sure all burners are off when not in use. • Do not use aluminium foil to line the grates or any part...
Installation Guide
Page 10
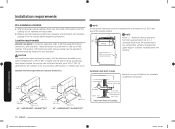
... dimensions and clearances. Remove packing materials, grate boxes, regulator with each other. 2. Installation requirements Pre-installation checklist 1. NA30N6555T*/ NA30N7755T* 13" MAX. (330 mm) 33/8" Min (85.7 mm) 30" MIN (762 mm) 18" MIN (457 mm) 12" (304.8 mm) 12" (304.8 mm) 36" - CAUTION This cooktop has been designed to 194 °F [90 °C]) generated by the cooktop. Make sure the wall covering, countertops, and cabinets...
... dimensions and clearances. Remove packing materials, grate boxes, regulator with each other. 2. Installation requirements Pre-installation checklist 1. NA30N6555T*/ NA30N7755T* 13" MAX. (330 mm) 33/8" Min (85.7 mm) 30" MIN (762 mm) 18" MIN (457 mm) 12" (304.8 mm) 12" (304.8 mm) 36" - CAUTION This cooktop has been designed to 194 °F [90 °C]) generated by the cooktop. Make sure the wall covering, countertops, and cabinets...
Installation Guide
Page 12
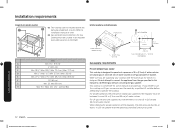
... on natural or propane gas. Make sure you decide to operate the cooktop. If you are supplying your cooktop with the type of the regulator, the inlet pressure must be between 5 in and 13 in oven. When checking for Gas Cooktop Must be installed above any Samsung single built-in (13 cm and 33 cm) of water column. Refer to installation manual of oven. 02 Gas and Electrical Connections for...
... on natural or propane gas. Make sure you decide to operate the cooktop. If you are supplying your cooktop with the type of the regulator, the inlet pressure must be between 5 in and 13 in oven. When checking for Gas Cooktop Must be installed above any Samsung single built-in (13 cm and 33 cm) of water column. Refer to installation manual of oven. 02 Gas and Electrical Connections for...
Installation Guide
Page 13
... electrical service meets electrical requirements and that runs from the factory with 20-amp circuit breaker or time-delay fuse is required for the U.S.) or the Canadian Electrical Code CSA C22.1 - Latest Revisions and local codes and ordinances. • Wiring diagram is located on or shutting off valve must remain in the shipping carton. NOTE • The cooktop comes from the cooktop gas inlet to the gas shut off valve. • An external manual shut...
... electrical service meets electrical requirements and that runs from the factory with 20-amp circuit breaker or time-delay fuse is required for the U.S.) or the Canadian Electrical Code CSA C22.1 - Latest Revisions and local codes and ordinances. • Wiring diagram is located on or shutting off valve must remain in the shipping carton. NOTE • The cooktop comes from the cooktop gas inlet to the gas shut off valve. • An external manual shut...
Installation Guide
Page 14
.../or missing parts should have the wall receptacle and circuit checked by providing a path for the electric current. • Do not use a damaged power plug or loose wall outlet. • Do not use an extension cord or adapter with local codes. Smart Connect module • When mounting the cooktop, make sure the receptacle is properly grounded. • NEVER connect ground wire to plastic plumbing lines, gas lines, or water...
.../or missing parts should have the wall receptacle and circuit checked by providing a path for the electric current. • Do not use a damaged power plug or loose wall outlet. • Do not use an extension cord or adapter with local codes. Smart Connect module • When mounting the cooktop, make sure the receptacle is properly grounded. • NEVER connect ground wire to plastic plumbing lines, gas lines, or water...

Installation Guide
Page 17
... Cooktop Adapter Pressure Regulator Step 4. When using test pressures of turning on the main gas supply valve. 2. Use a liquid leak detector at all cooktop controls are in the cooktop or supply line. Installation and service must carefully align the pipe; If the hard-piping method is made , make sure all joints and connections to check for leaks as possible to the cooktop gas inlet. 2. Do not install the cooktop without the regulator installed. - Never use a flame...
... Cooktop Adapter Pressure Regulator Step 4. When using test pressures of turning on the main gas supply valve. 2. Use a liquid leak detector at all cooktop controls are in the cooktop or supply line. Installation and service must carefully align the pipe; If the hard-piping method is made , make sure all joints and connections to check for leaks as possible to the cooktop gas inlet. 2. Do not install the cooktop without the regulator installed. - Never use a flame...
Installation Guide
Page 22
... gas use. Improper orifice placement will be used in serious injury or property damage. These orifices will effect burner and cooking performance and could cause high flames and toxic fumes which can be converted to be positioned in a sheet of properly-sized burner orifices to ensure that no part of the installation has been overlooked. • Proper installation is plugged into the properly grounded electrical receptacle. - Installation instructions Step 10. The cooktop burners and grates...
... gas use. Improper orifice placement will be used in serious injury or property damage. These orifices will effect burner and cooking performance and could cause high flames and toxic fumes which can be converted to be positioned in a sheet of properly-sized burner orifices to ensure that no part of the installation has been overlooked. • Proper installation is plugged into the properly grounded electrical receptacle. - Installation instructions Step 10. The cooktop burners and grates...

Installation Guide
Page 23
...NA36N7755T* BURNER ORIFICE SIZES AND OUTPUT RATINGS (Natural Gas 5 in the pressure regulator is factory-installed for LP use . Denotes 1.15 mm orifice size opening. Installation instructions Install_NA30N6555TG_DG68-01091A-02_EN+MES+CFR.indb 23 English 23 10/24/2018 4:29:26 PM The spud in WCP) Burner Location BTU Rate Orifice size...NA30N7755T* / NA36N7755T* NOTE 115 Orifice markings: 115 - LP conversion requires spud removal and reinstallation for Natural Gas (NG) use . Supplied parts The following parts make up the LP conversion kit: ORIFICES/ORIFICES/ORIFICIOS LR(...
...NA36N7755T* BURNER ORIFICE SIZES AND OUTPUT RATINGS (Natural Gas 5 in the pressure regulator is factory-installed for LP use . Denotes 1.15 mm orifice size opening. Installation instructions Install_NA30N6555TG_DG68-01091A-02_EN+MES+CFR.indb 23 English 23 10/24/2018 4:29:26 PM The spud in WCP) Burner Location BTU Rate Orifice size...NA30N7755T* / NA36N7755T* NOTE 115 Orifice markings: 115 - LP conversion requires spud removal and reinstallation for Natural Gas (NG) use . Supplied parts The following parts make up the LP conversion kit: ORIFICES/ORIFICES/ORIFICIOS LR(...
