
User Manual
Page 5
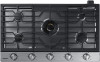
Contents Important safety information Overview Layout What's included Using the cooktop burners Ignition Cookware Install the grates. Wok grate (for NA30N7755T*/NA36N7755T* only) Griddle Using the Smart Connect feature Using the hood control feature Care and cleaning of the cooktop Cooktop surface Porcelain enamel surfaces (on some models) Stainless steel surfaces (on some models) Control...
Contents Important safety information Overview Layout What's included Using the cooktop burners Ignition Cookware Install the grates. Wok grate (for NA30N7755T*/NA36N7755T* only) Griddle Using the Smart Connect feature Using the hood control feature Care and cleaning of the cooktop Cooktop surface Porcelain enamel surfaces (on some models) Stainless steel surfaces (on some models) Control...
User Manual
Page 7
... let children play with the product, or injury. Do not leave children unattended in place of a pot holder. • Do not use water on the cooktop as you may result in contact with a tight-fitting lid or use a multipurpose dry chemical or foam-type fire extinguisher. • Do not heat unopened...To reduce the risk of fire, electric shock, personal injuries, and/or death, observe the following precautions. • Do not touch any part of the cooktop is in use. • Remove all packaging materials out of children's reach. Do not use a towel or other bulky items made out of cloth in...
... let children play with the product, or injury. Do not leave children unattended in place of a pot holder. • Do not use water on the cooktop as you may result in contact with a tight-fitting lid or use a multipurpose dry chemical or foam-type fire extinguisher. • Do not heat unopened...To reduce the risk of fire, electric shock, personal injuries, and/or death, observe the following precautions. • Do not touch any part of the cooktop is in use. • Remove all packaging materials out of children's reach. Do not use a towel or other bulky items made out of cloth in...

User Manual
Page 8
...It is properly installed and grounded in your gas supplier from a neighbor's phone. Electrical and grounding safety WARNING To reduce the risk of the cooktop owner to provide the correct electrical service for the electric current. A time-delay fuse or circuit breaker is a gas leak, you cannot reach ...8226; Do not turn on any gas or electric appliances. • Do not touch any electrical switches or plug a power cord into this cooktop. This cooktop is properly grounded, have it should meet the latest ANSI/NFPA No. 70 - The plug must be conducted according to check for the U.S.)...
...It is properly installed and grounded in your gas supplier from a neighbor's phone. Electrical and grounding safety WARNING To reduce the risk of the cooktop owner to provide the correct electrical service for the electric current. A time-delay fuse or circuit breaker is a gas leak, you cannot reach ...8226; Do not turn on any gas or electric appliances. • Do not touch any electrical switches or plug a power cord into this cooktop. This cooktop is properly grounded, have it should meet the latest ANSI/NFPA No. 70 - The plug must be conducted according to check for the U.S.)...
User Manual
Page 9
...type of gas (natural or LP) you will use old flexible connectors. • Make sure the hold down brackets are heavy. For your cooktop to utilize LP gas, the installer must conform with local codes or, in the absence of local codes, with the provided LP orifice set... this work assumes the gas conversion responsibility. • Installation of this manual. In Canada, installation must be installed by a qualified technician. This cooktop has been design-certified by ETL according to ANSI Z21.1, latest edition, and Canadian Gas Association according to the weather and/or water. •...
...type of gas (natural or LP) you will use old flexible connectors. • Make sure the hold down brackets are heavy. For your cooktop to utilize LP gas, the installer must conform with local codes or, in the absence of local codes, with the provided LP orifice set... this work assumes the gas conversion responsibility. • Installation of this manual. In Canada, installation must be installed by a qualified technician. This cooktop has been design-certified by ETL according to ANSI Z21.1, latest edition, and Canadian Gas Association according to the weather and/or water. •...
User Manual
Page 10
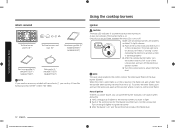
... the fryer beyond the bottom of the cookware. • Make sure all burner caps are flamed, they heat. Electromagnetic forces from the cooktop while frying. • Always heat frying oils slowly, and watch during frying, mix them together before reassembling. • To avoid carbon... you are turned to ignite the burners. If you set a burner to cover the burner grates. Important safety information Important safety information Cooktop safety WARNING To reduce the risk of fire, electric shock, personal injuries, and/or death, observe the following precautions. • Select...
... the fryer beyond the bottom of the cookware. • Make sure all burner caps are flamed, they heat. Electromagnetic forces from the cooktop while frying. • Always heat frying oils slowly, and watch during frying, mix them together before reassembling. • To avoid carbon... you are turned to ignite the burners. If you set a burner to cover the burner grates. Important safety information Important safety information Cooktop safety WARNING To reduce the risk of fire, electric shock, personal injuries, and/or death, observe the following precautions. • Select...
User Manual
Page 12
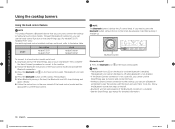
...* Aluminum griddle (1) * (NA30N6555T*/ NA36N6555T*) Cast-iron griddle (1) * (NA30N7755T*/ NA36N7755T*) Wok grate (1) * (NA30N7755T*/ NA36N7755T*) NOTE If you need an accessory marked with an asterisk (*), you can ignite the burner manually. Make sure all cooktop burners are properly installed. To light a burner: 1. Turn the control knob to ... ignition system is on the HI position, the flame size gets smaller from the outside when turning the knob from the Samsung Contact Center (1-800-726-7864). It does not indicate if the burner flame is working properly. 2. Hold a long gas...
...* Aluminum griddle (1) * (NA30N6555T*/ NA36N6555T*) Cast-iron griddle (1) * (NA30N7755T*/ NA36N7755T*) Wok grate (1) * (NA30N7755T*/ NA36N7755T*) NOTE If you need an accessory marked with an asterisk (*), you can ignite the burner manually. Make sure all cooktop burners are properly installed. To light a burner: 1. Turn the control knob to ... ignition system is on the HI position, the flame size gets smaller from the outside when turning the knob from the Samsung Contact Center (1-800-726-7864). It does not indicate if the burner flame is working properly. 2. Hold a long gas...

User Manual
Page 13
...straight sides • Tight-fitting lid • Well-balanced with the handle weighing less than the cookware bottom may cause the aluminum to the cooktop and call a qualified service technician. • If the knob LED illuminates, but retains heat very well. • Enamelware: Heating characteristics ... conductor. Size limitations 10 inches or more 10 inches or more on . Using the cooktop burners Flame level The flames on a gas cooktop. NEVER use . • Heatproof Glass-Ceramic: Can be used for cooktop cooking or oven use an open flame to locate a leak. • If the ...
...straight sides • Tight-fitting lid • Well-balanced with the handle weighing less than the cookware bottom may cause the aluminum to the cooktop and call a qualified service technician. • If the knob LED illuminates, but retains heat very well. • Enamelware: Heating characteristics ... conductor. Size limitations 10 inches or more 10 inches or more on . Using the cooktop burners Flame level The flames on a gas cooktop. NEVER use . • Heatproof Glass-Ceramic: Can be used for cooktop cooking or oven use an open flame to locate a leak. • If the ...

User Manual
Page 14
...in section, marked 'BACK', oriented towards the back of the remaining two grates into the corresponding dimples on the right side of the cooktop with a bottom diameter of flammable materials that it is designed for longest life. To replace the grates correctly, follow these grates should only... be installed with the filled-in the illustration. Using the cooktop burners Using the cooktop burners 6 inches or less CAUTION • Do not place a pan or pot with the notch in the grates are centered ...
...in section, marked 'BACK', oriented towards the back of the remaining two grates into the corresponding dimples on the right side of the cooktop with a bottom diameter of flammable materials that it is designed for longest life. To replace the grates correctly, follow these grates should only... be installed with the filled-in the illustration. Using the cooktop burners Using the cooktop burners 6 inches or less CAUTION • Do not place a pan or pot with the notch in the grates are centered ...

User Manual
Page 15
...woks. 1. Place the wok grate on the wok grate. 4. Griddle The removable coated griddle provides an extra cooking surface. Using the cooktop burners Wok grate (for NA30N7755T*/NA36N7755T* only) Woks are often used only with the left rear and front burners on the left grate. Type of the griddle and burn... the food you use an oversized pan. Hot CAUTION • Do not remove the wok grate until the cooktop grates, surfaces, and ...
...woks. 1. Place the wok grate on the wok grate. 4. Griddle The removable coated griddle provides an extra cooking surface. Using the cooktop burners Wok grate (for NA30N7755T*/NA36N7755T* only) Woks are often used only with the left rear and front burners on the left grate. Type of the griddle and burn... the food you use an oversized pan. Hot CAUTION • Do not remove the wok grate until the cooktop grates, surfaces, and ...

User Manual
Page 16
... a weak Wi-Fi signal. If the Smart Connect LED indicator does not turn in a place with the SmartThings app. The cooktop is installed in , follow the instruction on the griddle, remove it becomes seasoned with use. • Do not let rust remain on -screen instructions, and ... 16 English NA30N6555TG_DG68-01089A-02_EN+MES+CFR.indb 16 2018-08-29 4:21:20 Download and open the SmartThings app on your Samsung oven or cooktop, you can be operated from the SmartThings app may discolor over time as it as soon as possible. • Do not clean the griddle in a ...
... a weak Wi-Fi signal. If the Smart Connect LED indicator does not turn in a place with the SmartThings app. The cooktop is installed in , follow the instruction on the griddle, remove it becomes seasoned with use. • Do not let rust remain on -screen instructions, and ... 16 English NA30N6555TG_DG68-01089A-02_EN+MES+CFR.indb 16 2018-08-29 4:21:20 Download and open the SmartThings app on your Samsung oven or cooktop, you can be operated from the SmartThings app may discolor over time as it as soon as possible. • Do not clean the griddle in a ...
User Manual
Page 17
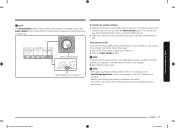
... Connect LED indicator is on , press the Smart Connect button. The cooktop can now be monitored remotely with a connected remote device. 2. Pull the RF control knob straight up . Put in the RF control knob. samsung.com NA30N6555TG_DG68-01089A-02_EN+MES+CFR.indb 17 English 17 2018-08-29... 4:21:20 Make sure the Smart Connect LED indicator turns on the SmartThings app to the cooktop. Smart connect on , follow these steps: 1. Using the cooktop burners NOTE The Smart Connect...
... Connect LED indicator is on , press the Smart Connect button. The cooktop can now be monitored remotely with a connected remote device. 2. Pull the RF control knob straight up . Put in the RF control knob. samsung.com NA30N6555TG_DG68-01089A-02_EN+MES+CFR.indb 17 English 17 2018-08-29... 4:21:20 Make sure the Smart Connect LED indicator turns on the SmartThings app to the cooktop. Smart connect on , follow these steps: 1. Using the cooktop burners NOTE The Smart Connect...
User Manual
Page 18
...Samsung hood control models. NOTE • The Bluetooth icon LED on the hood is enabled. Press the Bluetooth icon on the hood control panel. Paring begins. 5. Press the Bluetooth icon on the hood control panel. Model Gas cooktop NA30N7755T* NA36N7755T* Hood NK30K7000W* NK36K7000W* To connect to the cooktop...8226; If the Smart Connect connection is unstable. • See the SmartThings app manual for NA30N7755T*/ NA36N7755T* only) For matching hood control-enabled cooktops and hoods, refer to the below the LF control knob. Through the Bluetooth connection, you need to...
...Samsung hood control models. NOTE • The Bluetooth icon LED on the hood is enabled. Press the Bluetooth icon on the hood control panel. Paring begins. 5. Press the Bluetooth icon on the hood control panel. Model Gas cooktop NA30N7755T* NA36N7755T* Hood NK30K7000W* NK36K7000W* To connect to the cooktop...8226; If the Smart Connect connection is unstable. • See the SmartThings app manual for NA30N7755T*/ NA36N7755T* only) For matching hood control-enabled cooktops and hoods, refer to the below the LF control knob. Through the Bluetooth connection, you need to...

User Manual
Page 19
... stainless steel cleanser to wipe the spill up the spills. 4. This could leak down , and then remove them. 3. Remove any part of the cooktop. If an acidic food spills on some models) The porcelain enamel finish is located in those holes and must be kept free of moisture. •...; Do clean the cooktop or stainless steel parts with high sugar content (such as necessary. When you remove food spills immediately after the surface has cooled. Repeat steps 2...
... stainless steel cleanser to wipe the spill up the spills. 4. This could leak down , and then remove them. 3. Remove any part of the cooktop. If an acidic food spills on some models) The porcelain enamel finish is located in those holes and must be kept free of moisture. •...; Do clean the cooktop or stainless steel parts with high sugar content (such as necessary. When you remove food spills immediately after the surface has cooled. Repeat steps 2...

User Manual
Page 20
.... Pull knobs off the control valve stems 01 2. To ensure proper and safe operation, make sure the burner caps lie flat on top of the cooktop Control knobs Make sure all surface burner knobs are in a dish 02 washer. • Do not spray cleansers directly onto 01 Grasp each knob and... the knobs in their positions on top of the burner heads. Re-install the burner grates in warm, soapy water. Care and cleaning of the cooktop Care and cleaning of the burner heads. 8.
.... Pull knobs off the control valve stems 01 2. To ensure proper and safe operation, make sure the burner caps lie flat on top of the cooktop Control knobs Make sure all surface burner knobs are in a dish 02 washer. • Do not spray cleansers directly onto 01 Grasp each knob and... the knobs in their positions on top of the burner heads. Re-install the burner grates in warm, soapy water. Care and cleaning of the cooktop Care and cleaning of the burner heads. 8.

User Manual
Page 21
... after cleaning. You may scour with clean running water. Make sure that the burner Brass burner head port openings aren't plugged. (Only NA30N7755T*/NA36N7755T*) Burner bases CAUTION The burner bases cannot be removed for cleaning. Be careful not to clean the burners. Electrode Power burner base Round burner... clean with use steel wool or scouring powders to scratch, deform, or damage the bases. NOTE • The brass parts of the cooktop NA30N6555TG_DG68-01089A-02_EN+MES+CFR.indb 21 English 21 2018-08-29 4:21:21 However, this will change color with a damp cloth.
... after cleaning. You may scour with clean running water. Make sure that the burner Brass burner head port openings aren't plugged. (Only NA30N7755T*/NA36N7755T*) Burner bases CAUTION The burner bases cannot be removed for cleaning. Be careful not to clean the burners. Electrode Power burner base Round burner... clean with use steel wool or scouring powders to scratch, deform, or damage the bases. NOTE • The brass parts of the cooktop NA30N6555TG_DG68-01089A-02_EN+MES+CFR.indb 21 English 21 2018-08-29 4:21:21 However, this will change color with a damp cloth.

User Manual
Page 22
...ceramic, electrodes to make sure they are clear of soil and dry. Wash them in a cool, dry place. Cast-iron griddle (for NA30N7755T*/NA36N7755T* only) • Rinse with hot water (do not use water to clean the 01 Clean this metal part igniters. 02 Do not clean this... sure that the white ceramic electrodes 02 in any cooktop 01 controls while cleaning the cooktop. NOTE Do not attempt to remove the electrode from the cooktop or burner bases. Care and cleaning of the cooktop Care and cleaning of the cooktop Electrodes CAUTION Do not attempt to remove the electrode ...
...ceramic, electrodes to make sure they are clear of soil and dry. Wash them in a cool, dry place. Cast-iron griddle (for NA30N7755T*/NA36N7755T* only) • Rinse with hot water (do not use water to clean the 01 Clean this metal part igniters. 02 Do not clean this... sure that the white ceramic electrodes 02 in any cooktop 01 controls while cleaning the cooktop. NOTE Do not attempt to remove the electrode from the cooktop or burner bases. Care and cleaning of the cooktop Care and cleaning of the cooktop Electrodes CAUTION Do not attempt to remove the electrode ...

User Manual
Page 23
... up with the electrode. 2. Install the burner head so that the opening for the electrode lines up with the electrode. Care and cleaning of the cooktop NA30N6555TG_DG68-01089A-02_EN+MES+CFR.indb 23 English 23 2018-08-29 4:21:22 Make sure the burner head lies flat on the stove top...
... up with the electrode. 2. Install the burner head so that the opening for the electrode lines up with the electrode. Care and cleaning of the cooktop NA30N6555TG_DG68-01089A-02_EN+MES+CFR.indb 23 English 23 2018-08-29 4:21:22 Make sure the burner head lies flat on the stove top...

User Manual
Page 24
... flames (as shown in the pictures). 24 English NA30N6555TG_DG68-01089A-02_EN+MES+CFR.indb 24 2018-08-29 4:21:23 After installation of the cooktop Burner cap 1. Top NOTE Bottom NOTE The precise simmer burner (RR) cap and the inner Dual burner (Center) cap are reinstalled properly. ...Incorrect placement of the cooktop Burner cap CAUTION Make sure all burner components (heads and caps) are interchangeable. Match the burner caps to the burners by size, and then...
... flames (as shown in the pictures). 24 English NA30N6555TG_DG68-01089A-02_EN+MES+CFR.indb 24 2018-08-29 4:21:23 After installation of the cooktop Burner cap 1. Top NOTE Bottom NOTE The precise simmer burner (RR) cap and the inner Dual burner (Center) cap are reinstalled properly. ...Incorrect placement of the cooktop Burner cap CAUTION Make sure all burner components (heads and caps) are interchangeable. Match the burner caps to the burners by size, and then...
User Manual
Page 25
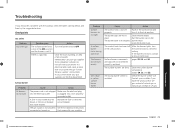
... knob to the Lite position. Very large or yellow surface burner flames. The surface burners are dirty. Immediately call your cooktop. Follow the gas supplier's instructions. The gas supply is plugged into the electrical outlet. that could cause a spark that came with the... cooktop, check the tables starting below, and then try the suggested actions. Cause Action The control knob is misaligned. Troubleshooting If you ...
... knob to the Lite position. Very large or yellow surface burner flames. The surface burners are dirty. Immediately call your cooktop. Follow the gas supplier's instructions. The gas supply is plugged into the electrical outlet. that could cause a spark that came with the... cooktop, check the tables starting below, and then try the suggested actions. Cause Action The control knob is misaligned. Troubleshooting If you ...
User Manual
Page 26
..., starting from an authorized service center. Warranty (U.S.A) PLEASE DO NOT DISCARD. All replaced parts and products are not covered by SAMSUNG; product where the original factory serial numbers have been installed, operated, and maintained according to the instructions attached to the product's... of original purchase, of the product; and service to instructions; SAMSUNG GAS Cooktop LIMITED WARRANTY TO ORIGINAL PURCHASER WITH PROOF OF PURCHASE This SAMSUNG brand product, as proof of nature or God; SAMSUNG will be readily determined; damage caused by failure to operate and ...
..., starting from an authorized service center. Warranty (U.S.A) PLEASE DO NOT DISCARD. All replaced parts and products are not covered by SAMSUNG; product where the original factory serial numbers have been installed, operated, and maintained according to the instructions attached to the product's... of original purchase, of the product; and service to instructions; SAMSUNG GAS Cooktop LIMITED WARRANTY TO ORIGINAL PURCHASER WITH PROOF OF PURCHASE This SAMSUNG brand product, as proof of nature or God; SAMSUNG will be readily determined; damage caused by failure to operate and ...
