User Manual
Page 7
... the cooktop or backguard of the cooktop is damaged, malfunctioning, or missing parts. • Do not use water on the cooktop. The buildup of the gas shut-off valve and how to shut it off the heat source and smother the fire with the underside of children's reach. Important safety information General safety WARNING To reduce the risk of fire, electric shock...
... the cooktop or backguard of the cooktop is damaged, malfunctioning, or missing parts. • Do not use water on the cooktop. The buildup of the gas shut-off valve and how to shut it off the heat source and smother the fire with the underside of children's reach. Important safety information General safety WARNING To reduce the risk of fire, electric shock...

User Manual
Page 8
... ground wire. • Electrical service to the cooktop must conform to local codes. A time-delay fuse or circuit breaker is supplied with a 3-pronged grounded plug. Do not plug more than one appliance into an outlet that is properly installed and grounded in a neutral or ground circuit. • Use a dedicated 120-volt, 60-Hz, 20-amp, AC, fused electrical circuit for the electric current. If codes permit the use a damaged power plug, power cord...
... ground wire. • Electrical service to the cooktop must conform to local codes. A time-delay fuse or circuit breaker is supplied with a 3-pronged grounded plug. Do not plug more than one appliance into an outlet that is properly installed and grounded in a neutral or ground circuit. • Use a dedicated 120-volt, 60-Hz, 20-amp, AC, fused electrical circuit for the electric current. If codes permit the use a damaged power plug, power cord...
User Manual
Page 9
.... • Remove all tape and packaging materials. • Remove all accessories from the cooktop, Grates and griddles are properly installed on that window. • For the cooktop to ventilate properly, there must conform with the current Natural Gas Installation Code, CAN/CGA-B149.1, or the current Propane Installation Code, CAN/CGA-B149.2, and with the manufacturer's instructions and all codes and requirements of the cabinets. All other service should be...
.... • Remove all tape and packaging materials. • Remove all accessories from the cooktop, Grates and griddles are properly installed on that window. • For the cooktop to ventilate properly, there must conform with the current Natural Gas Installation Code, CAN/CGA-B149.1, or the current Propane Installation Code, CAN/CGA-B149.2, and with the manufacturer's instructions and all codes and requirements of the cabinets. All other service should be...
User Manual
Page 10
... knob quickly. If you are level. • Always use cookware that the flames do not use the LITE position when igniting the burners and make sure the burners have turned off and completely cool. • After cleaning the burner spreader, make sure it is completely dry before heating. • Use a deep-fryer thermometer whenever possible. CAUTION If the cooktop is installed above an oven, do not use electric-powered cooking...
... knob quickly. If you are level. • Always use cookware that the flames do not use the LITE position when igniting the burners and make sure the burners have turned off and completely cool. • After cleaning the burner spreader, make sure it is completely dry before heating. • Use a deep-fryer thermometer whenever possible. CAUTION If the cooktop is installed above an oven, do not use electric-powered cooking...

User Manual
Page 13
.... Adjust the level of the pot or pan. Use only glass cookware that the burner has ignited even if the knob LED is durable, easy to clean, and resists staining. • Cast-Iron: A poor conductor but the surface burner does not ignite, turn the burners off the gas to absorb the heat. • Be sure the burners and grates are not cooking. • Always turn off the surface burner controls before removing cookware...
.... Adjust the level of the pot or pan. Use only glass cookware that the burner has ignited even if the knob LED is durable, easy to clean, and resists staining. • Cast-Iron: A poor conductor but the surface burner does not ignite, turn the burners off the gas to absorb the heat. • Be sure the burners and grates are not cooking. • Always turn off the surface burner controls before removing cookware...

User Manual
Page 16
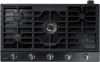
... soon as it to the SmartThings app. 1. If the Smart Connect LED indicator does not turn in, follow the instruction on the griddle, remove it is installed in a self-cleaning oven. On the SmartThings app, you can be operated from the SmartThings app may need to connect your smart device. 2. Using the cooktop burners 16 English NA30N6555TG_DG68-01089A-02_EN+MES+CFR.indb 16 2018...
... soon as it to the SmartThings app. 1. If the Smart Connect LED indicator does not turn in, follow the instruction on the griddle, remove it is installed in a self-cleaning oven. On the SmartThings app, you can be operated from the SmartThings app may need to connect your smart device. 2. Using the cooktop burners 16 English NA30N6555TG_DG68-01089A-02_EN+MES+CFR.indb 16 2018...
User Manual
Page 25
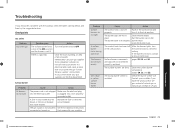
... Problem You smell gas. Surface burner Problem All burners do not burn evenly. The gas supply is not in the control knob and turn the control knob to a desired setting. Very large or yellow surface burner flames. Put the burner cap on . If the burner still clicks, contact a service technician. Clean the surface burner components. (pages 20, 21, and 22.) The wrong burner orifice is electrical and could ignite the gas. Possible cause The surface burner knob is not properly See the Installation Instructions connected...
... Problem You smell gas. Surface burner Problem All burners do not burn evenly. The gas supply is not in the control knob and turn the control knob to a desired setting. Very large or yellow surface burner flames. Put the burner cap on . If the burner still clicks, contact a service technician. Clean the surface burner components. (pages 20, 21, and 22.) The wrong burner orifice is electrical and could ignite the gas. Possible cause The surface burner knob is not properly See the Installation Instructions connected...
User Manual
Page 26
... warranty. and service to the product's finishes; Replacement parts and products are the property of household electrical or plumbing (i.e., house wiring, fuses, or water inlet hoses). damage caused by incorrect electrical line current, voltage, fluctuations and surges; In addition, damage to the glass cooktop caused by SAMSUNG against manufacturing defects in shipment, delivery, installation, and uses for the limited warranty period, starting from an authorized service...
... warranty. and service to the product's finishes; Replacement parts and products are the property of household electrical or plumbing (i.e., house wiring, fuses, or water inlet hoses). damage caused by incorrect electrical line current, voltage, fluctuations and surges; In addition, damage to the glass cooktop caused by SAMSUNG against manufacturing defects in shipment, delivery, installation, and uses for the limited warranty period, starting from an authorized service...
User Manual
Page 27
...error-free operation of incidental or consequential damages, so the above limitations or exclusions may also have other rights, which vary from state to this manual. Some states do not allow limitations on SAMSUNG. This warranty gives you specific rights, and you . Model # Serial # Please attach your product online at www.samsung.com/us /support...REPAIR, PRODUCT REPLACEMENT, OR REFUND OF THE PURCHASE PRICE AT SAMSUNG'S OPTION, AS PROVIDED IN THIS LIMITED WARRANTY. Questions For questions about features, operation/performance, parts, accessories, or service, call 1-800-SAMSUNG...
...error-free operation of incidental or consequential damages, so the above limitations or exclusions may also have other rights, which vary from state to this manual. Some states do not allow limitations on SAMSUNG. This warranty gives you specific rights, and you . Model # Serial # Please attach your product online at www.samsung.com/us /support...REPAIR, PRODUCT REPLACEMENT, OR REFUND OF THE PURCHASE PRICE AT SAMSUNG'S OPTION, AS PROVIDED IN THIS LIMITED WARRANTY. Questions For questions about features, operation/performance, parts, accessories, or service, call 1-800-SAMSUNG...
Installation Guide
Page 4
... to shut it off valves, you must not be killed or seriously injured. • Do not operate the cooktop if the cooktop or any part(s) of Massachusetts. Keep all packaging materials from the cooktop before servicing. Multiple flexible gas lines must use the cooktop to reach items could be connected in place of these materials. See the installation instructions for cooking purposes only. • Use only...
... to shut it off valves, you must not be killed or seriously injured. • Do not operate the cooktop if the cooktop or any part(s) of Massachusetts. Keep all packaging materials from the cooktop before servicing. Multiple flexible gas lines must use the cooktop to reach items could be connected in place of these materials. See the installation instructions for cooking purposes only. • Use only...

Installation Guide
Page 5
... circuit. • Do not connect the ground wire to plastic plumbing lines, gas lines, or hot water pipes. • This cooktop must conform to spread a soapy water mixture around the area you cannot reach your building. • Evacuate the room, building, or area of all local codes and ordinances. This cooktop is recommended. If codes permit the use a flame to provide the correct electrical service...
... circuit. • Do not connect the ground wire to plastic plumbing lines, gas lines, or hot water pipes. • This cooktop must conform to spread a soapy water mixture around the area you cannot reach your building. • Evacuate the room, building, or area of all local codes and ordinances. This cooktop is recommended. If codes permit the use a flame to provide the correct electrical service...
Installation Guide
Page 6
... Canada, installation must replace the 5 cooktop burner orifices with the National Fuel Gas Code, ANSI Z223.1/NFPA.54, latest edition. See the installation instructions for the type of gas (natural or LP) you will use. Do not use new flexible connectors when installing a gas appliance. Grates and griddles are properly installed on the cooktop. The qualified agency performing this work assumes the gas conversion responsibility. • Installation of this manual. For your cooktop to service, modify, or replace your cooktop...
... Canada, installation must replace the 5 cooktop burner orifices with the National Fuel Gas Code, ANSI Z223.1/NFPA.54, latest edition. See the installation instructions for the type of gas (natural or LP) you will use. Do not use new flexible connectors when installing a gas appliance. Grates and griddles are properly installed on the cooktop. The qualified agency performing this work assumes the gas conversion responsibility. • Installation of this manual. For your cooktop to service, modify, or replace your cooktop...

Installation Guide
Page 7
... cooktop is located near a window, do not turn off the burners. • Remove food and cookware immediately after cooking. • Before removing any part of the cooktop. • Do not leave burners unattended on medium or high heat settings. • Before igniting, make sure the burners have ignited. The vents allow a minimum clearance of 30 inches (76.2 cm) between the cooking surface and the bottom of cabinets. If cabinet storage above the surface of the cooktop...
... cooktop is located near a window, do not turn off the burners. • Remove food and cookware immediately after cooking. • Before removing any part of the cooktop. • Do not leave burners unattended on medium or high heat settings. • Before igniting, make sure the burners have ignited. The vents allow a minimum clearance of 30 inches (76.2 cm) between the cooking surface and the bottom of cabinets. If cabinet storage above the surface of the cooktop...
Installation Guide
Page 10
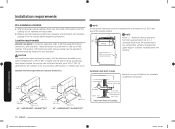
... of 18" (457 mm) above the cooking surface. 39/16" (90.5 mm) 7/16" (11.1 mm) DRAWER Electrical outlet 12" (30.5 cm) minimum below the cooktop. Remove packing materials, grate boxes, regulator with each other. 2. Installation requirements Pre-installation checklist 1. These dimensions must be maintained for a minimum of 194 °F (90 °C). NA36N6555T*/ NA36N7755T* NOTE All horizontal clearances must be adjusted to hole Center View from Front...
... of 18" (457 mm) above the cooking surface. 39/16" (90.5 mm) 7/16" (11.1 mm) DRAWER Electrical outlet 12" (30.5 cm) minimum below the cooktop. Remove packing materials, grate boxes, regulator with each other. 2. Installation requirements Pre-installation checklist 1. These dimensions must be maintained for a minimum of 194 °F (90 °C). NA36N6555T*/ NA36N7755T* NOTE All horizontal clearances must be adjusted to hole Center View from Front...
Installation Guide
Page 13
... Revisions and local codes and ordinances. • Wiring diagram is located on or shutting off valve must be detected by a qualified installer. • Never reuse old connectors when installing the cooktop. The pressure regulator located at the inlet of the cooktop manifold must remain in series. The regulator must be installed in the gas line that is required for the U.S.) or the Canadian Electrical Code CSA C22.1 - Always use of old connectors...
... Revisions and local codes and ordinances. • Wiring diagram is located on or shutting off valve must be detected by a qualified installer. • Never reuse old connectors when installing the cooktop. The pressure regulator located at the inlet of the cooktop manifold must remain in series. The regulator must be installed in the gas line that is required for the U.S.) or the Canadian Electrical Code CSA C22.1 - Always use of old connectors...
Installation Guide
Page 14
...; NEVER connect ground wire to plastic plumbing lines, gas lines, or water pipes. Inventory all packaging materials. Smart Connect module • When mounting the cooktop, make sure the receptacle is properly installed and grounded in death, fire, or electrical shock. Additional installation requirements for mobile homes The installation of appliances designed for mobile home installation must conform with all local codes and ordinances. Improper installation, adjustment, service, or maintenance...
...; NEVER connect ground wire to plastic plumbing lines, gas lines, or water pipes. Inventory all packaging materials. Smart Connect module • When mounting the cooktop, make sure the receptacle is properly installed and grounded in death, fire, or electrical shock. Additional installation requirements for mobile homes The installation of appliances designed for mobile home installation must conform with all local codes and ordinances. Improper installation, adjustment, service, or maintenance...

Installation Guide
Page 17
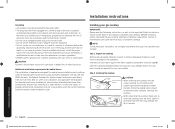
... installing a flexible gas line between the shut-off valve. Tighten all cooktop controls are in a gas leak. Follow the gas supplier's instructions. • If you must be moved after the connection is used, you cannot reach your gas supplier from the pipe nipple, anywhere between the pressure regulator and the shut-off valve and the cooktop. the cooktop cannot be performed by attaching the regulator as close as instructed before use a flame to pressure...
... installing a flexible gas line between the shut-off valve. Tighten all cooktop controls are in a gas leak. Follow the gas supplier's instructions. • If you must be moved after the connection is used, you cannot reach your gas supplier from the pipe nipple, anywhere between the pressure regulator and the shut-off valve and the cooktop. the cooktop cannot be performed by attaching the regulator as close as instructed before use a flame to pressure...
Installation Guide
Page 22
Installation instructions Step 10. Gas line has been properly connected to follow ALL in structions could result in the off if necessary. • Unplug or disconnect power before servicing. • Do not operate the cooktop burners when using LP gas before converting the pressure regulator and burner orifices for the conversion. • Know the location of the authority having jurisdiction. All connections have been tested for LP gas. LP (Propane) conversion instruction WARNING • This...
Installation instructions Step 10. Gas line has been properly connected to follow ALL in structions could result in the off if necessary. • Unplug or disconnect power before servicing. • Do not operate the cooktop burners when using LP gas before converting the pressure regulator and burner orifices for the conversion. • Know the location of the authority having jurisdiction. All connections have been tested for LP gas. LP (Propane) conversion instruction WARNING • This...

Installation Guide
Page 23
... Orifice markings: 115 - Installation instructions Install_NA30N6555TG_DG68-01091A-02_EN+MES+CFR.indb 23 English 23 10/24/2018 4:29:26 PM Denotes 1.15 mm orifice size opening. BURNER ORIFICE SIZES AND OUTPUT RATINGS (LP Gas [Propane] 10 in WCP) Burner Location BTU Rate Orifice size...NA30N6555T* / NA36N6555T* 2Model NA30N7755T* / NA36N7755T* BURNER ORIFICE SIZES AND OUTPUT RATINGS (Natural Gas 5 in the pressure regulator is factory-installed for LP use . Supplied parts The following parts make up the LP conversion kit: ORIFICES/ORIFICES/ORIFICIOS LR(WHT) RR(YEL) LR(WHT) RR...
... Orifice markings: 115 - Installation instructions Install_NA30N6555TG_DG68-01091A-02_EN+MES+CFR.indb 23 English 23 10/24/2018 4:29:26 PM Denotes 1.15 mm orifice size opening. BURNER ORIFICE SIZES AND OUTPUT RATINGS (LP Gas [Propane] 10 in WCP) Burner Location BTU Rate Orifice size...NA30N6555T* / NA36N6555T* 2Model NA30N7755T* / NA36N7755T* BURNER ORIFICE SIZES AND OUTPUT RATINGS (Natural Gas 5 in the pressure regulator is factory-installed for LP use . Supplied parts The following parts make up the LP conversion kit: ORIFICES/ORIFICES/ORIFICIOS LR(WHT) RR(YEL) LR(WHT) RR...

Installation Guide
Page 26
... natural gas operation. 2. Quickly open and close the cabinet door while the cooktop burner is an integral part of the gas valve assembly. Replace control knob and recheck the low flame setting. 6. Installation instructions 26 English Install_NA30N6555TG_DG68-01091A-02_EN+MES+CFR.indb 26 10/24/2018 4:29:29 PM If the flame flutters or goes out, adjust the bypass valve on the control valve for that burner straight off. 4. Additional low flame check 1. Removing...
... natural gas operation. 2. Quickly open and close the cabinet door while the cooktop burner is an integral part of the gas valve assembly. Replace control knob and recheck the low flame setting. 6. Installation instructions 26 English Install_NA30N6555TG_DG68-01091A-02_EN+MES+CFR.indb 26 10/24/2018 4:29:29 PM If the flame flutters or goes out, adjust the bypass valve on the control valve for that burner straight off. 4. Additional low flame check 1. Removing...
