
User Manual
Page 7
... sure the gas line is damaged, malfunctioning, or missing parts. • Do not use . • Remove all packaging materials out of children's reach. To put out a grease fire, turn the control knobs inattentively. • Do not stand on a grease fire. See the installation instructions for cooking only. • Use only dry pot holders. • Do not use water on top of the gas shut-off...
... sure the gas line is damaged, malfunctioning, or missing parts. • Do not use . • Remove all packaging materials out of children's reach. To put out a grease fire, turn the control knobs inattentively. • Do not stand on a grease fire. See the installation instructions for cooking only. • Use only dry pot holders. • Do not use water on top of the gas shut-off...

User Manual
Page 8
... precautions. Do not use of electrical shock by a licensed electrician. • The cooktop is the personal responsibility of the cooktop owner to provide the correct electrical service for this circuit. • Do not connect the ground wire to plastic plumbing lines, gas lines, or hot water pipes. • This cooktop must be conducted according to the manufacturer's instructions. If there is properly installed and grounded in the...
... precautions. Do not use of electrical shock by a licensed electrician. • The cooktop is the personal responsibility of the cooktop owner to provide the correct electrical service for this circuit. • Do not connect the ground wire to plastic plumbing lines, gas lines, or hot water pipes. • This cooktop must be conducted according to the manufacturer's instructions. If there is properly installed and grounded in the...
User Manual
Page 9
... tape and packaging materials. • Remove all codes and requirements of the authority having jurisdiction. The vents allow a minimum clearance of 30 inches (76.2 cm) between the cooking surface and the bottom of the cabinets. See the installation instructions for the cooktop to operate properly with the National Fuel Gas Code, ANSI Z223.1/NFPA.54, latest edition. The qualified agency performing this work assumes the gas conversion responsibility. • Installation...
... tape and packaging materials. • Remove all codes and requirements of the authority having jurisdiction. The vents allow a minimum clearance of 30 inches (76.2 cm) between the cooking surface and the bottom of the cabinets. See the installation instructions for the cooktop to operate properly with the National Fuel Gas Code, ANSI Z223.1/NFPA.54, latest edition. The qualified agency performing this work assumes the gas conversion responsibility. • Installation...
User Manual
Page 10
... any parts of fats or oils, make sure all burner caps are properly in the liquid can stabilize. Cover with a clean, dry cloth. • If a power failure occurs or the electric ignition fails to operate, do not use matches or lighters to simmer, do not use the cooktop while the oven's self-cleaning function is on . • Before removing or changing cookware, turn off the burners. • Remove food...
... any parts of fats or oils, make sure all burner caps are properly in the liquid can stabilize. Cover with a clean, dry cloth. • If a power failure occurs or the electric ignition fails to operate, do not use matches or lighters to simmer, do not use the cooktop while the oven's self-cleaning function is on . • Before removing or changing cookware, turn off the burners. • Remove food...

User Manual
Page 13
... of the pot or pan. NEVER use . • Heatproof Glass-Ceramic: Can be used for cooktop cooking or oven use an open flame to make sure it can be used on a gas cooktop. Watch the flame to locate a leak. • If the LED on the control knob doesn't go on when the surface burner has ignited, call a qualified service technician. The finish on the grate may cause the aluminum to sleep or go...
... of the pot or pan. NEVER use . • Heatproof Glass-Ceramic: Can be used for cooktop cooking or oven use an open flame to make sure it can be used on a gas cooktop. Watch the flame to locate a leak. • If the LED on the control knob doesn't go on when the surface burner has ignited, call a qualified service technician. The finish on the grate may cause the aluminum to sleep or go...

User Manual
Page 16
... the cooktop elements. • check and change the timer settings. If rust appears on your cooktop. 3. Use both hands when placing or removing the griddle. If the Smart Connect LED indicator does not turn in a self-cleaning oven. NOTE • You may not work smoothly if communication conditions are poor or the product is installed in a Wi-Fi module that can use the remote features of your Samsung oven or cooktop...
... the cooktop elements. • check and change the timer settings. If rust appears on your cooktop. 3. Use both hands when placing or removing the griddle. If the Smart Connect LED indicator does not turn in a self-cleaning oven. NOTE • You may not work smoothly if communication conditions are poor or the product is installed in a Wi-Fi module that can use the remote features of your Samsung oven or cooktop...
User Manual
Page 25
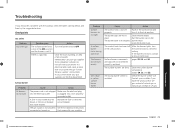
... the Installation Instructions connected or turned on the burner head. If you have tripped. Troubleshooting If you encounter a problem with your home may be blown or the circuit breaker may have the wrong orifice (LP gas instead of natural gas or natural gas instead of all occupants. Do not call the fire department. A surface burner clicks during operation. If the burner still clicks, contact a service technician. Possible cause The surface burner knob is not plugged...
... the Installation Instructions connected or turned on the burner head. If you have tripped. Troubleshooting If you encounter a problem with your home may be blown or the circuit breaker may have the wrong orifice (LP gas instead of natural gas or natural gas instead of all occupants. Do not call the fire department. A surface burner clicks during operation. If the burner still clicks, contact a service technician. Possible cause The surface burner knob is not plugged...
User Manual
Page 26
... replaced parts and products are not covered by a SAMSUNG authorized service center. In addition, damage to the directions in the use of sale must be performed by this limited warranty. The original dated bill of equipment, utilities, services, parts, supplies, accessories, applications, installations, repairs, external wiring or connectors not supplied or authorized by incorrect electrical line current, voltage, fluctuations and surges; damage caused by use and care guide...
... replaced parts and products are not covered by a SAMSUNG authorized service center. In addition, damage to the directions in the use of sale must be performed by this limited warranty. The original dated bill of equipment, utilities, services, parts, supplies, accessories, applications, installations, repairs, external wiring or connectors not supplied or authorized by incorrect electrical line current, voltage, fluctuations and surges; damage caused by use and care guide...
User Manual
Page 27
...-SAMSUNG (726-7864) and www.samsung.com/us /support. This warranty gives you specific rights, and you . Some states do not allow limitations on SAMSUNG. Model # Serial # Please attach your model and serial number, when calling for assistance. You may also have other rights, which vary from state to this manual. LIMITATION OF REMEDIES YOUR SOLE AND EXCLUSIVE REMEDY IS PRODUCT REPAIR, PRODUCT REPLACEMENT...
...-SAMSUNG (726-7864) and www.samsung.com/us /support. This warranty gives you specific rights, and you . Some states do not allow limitations on SAMSUNG. Model # Serial # Please attach your model and serial number, when calling for assistance. You may also have other rights, which vary from state to this manual. LIMITATION OF REMEDIES YOUR SOLE AND EXCLUSIVE REMEDY IS PRODUCT REPAIR, PRODUCT REPLACEMENT...
Installation Guide
Page 4
... other flammable materials touch a heating element. Keep all packaging materials from the cooktop before servicing. This cooktop is damaged, malfunctioning, or missing parts. • Do not use the cooktop as paper, plastic, pot holders, linens, curtains, gasoline or other flammable vapors or liquids near , in series. When using the cooktop. • To avoid grease buildup, regularly clean the vents. • Do not let...
... other flammable materials touch a heating element. Keep all packaging materials from the cooktop before servicing. This cooktop is damaged, malfunctioning, or missing parts. • Do not use the cooktop as paper, plastic, pot holders, linens, curtains, gasoline or other flammable vapors or liquids near , in series. When using the cooktop. • To avoid grease buildup, regularly clean the vents. • Do not let...

Installation Guide
Page 5
... power outlet in any electrical switches or plug a power cord into an outlet. • Do not use a flame to plastic plumbing lines, gas lines, or hot water pipes. • This cooktop must be plugged into an outlet that meets all occupants. • Immediately call the fire department. English 5 Install_NA30N6555TG_DG68-01091A-02_EN+MES+CFR.indb 5 10/24/2018 4:29:05 PM Follow the gas supplier's instructions...
... power outlet in any electrical switches or plug a power cord into an outlet. • Do not use a flame to plastic plumbing lines, gas lines, or hot water pipes. • This cooktop must be plugged into an outlet that meets all occupants. • Immediately call the fire department. English 5 Install_NA30N6555TG_DG68-01091A-02_EN+MES+CFR.indb 5 10/24/2018 4:29:05 PM Follow the gas supplier's instructions...
Installation Guide
Page 6
... installation instructions for the type of gas (natural or LP) you will use. This cooktop has been design-certified by a qualified service technician in the absence of the authority having jurisdiction. These adjustments must conform with the provided LP orifice set, and reverse the GPR adapter. In Canada, installation must replace the 5 cooktop burner orifices with local codes or, in accordance with local codes where applicable. Grates and griddles are properly installed...
... installation instructions for the type of gas (natural or LP) you will use. This cooktop has been design-certified by a qualified service technician in the absence of the authority having jurisdiction. These adjustments must conform with the provided LP orifice set, and reverse the GPR adapter. In Canada, installation must replace the 5 cooktop burner orifices with local codes or, in accordance with local codes where applicable. Grates and griddles are properly installed...

Installation Guide
Page 7
... cleaning the burner spreader, make sure it is completely dry before re- If foods are flamed, they should be flamed under a ventilation hood that is on. • Before removing or changing cookware, turn off when not in use. • Do not use aluminium foil to a strong draft. • Select a location where a grounded, 3- The vents allow a minimum clearance of 30 inches (76.2 cm) between the cooking surface and...
... cleaning the burner spreader, make sure it is completely dry before re- If foods are flamed, they should be flamed under a ventilation hood that is on. • Before removing or changing cookware, turn off when not in use. • Do not use aluminium foil to a strong draft. • Select a location where a grounded, 3- The vents allow a minimum clearance of 30 inches (76.2 cm) between the cooking surface and...
Installation Guide
Page 10
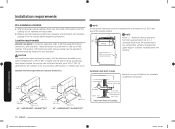
... information, dimensions, and clearances. Hole From Countertop 90° Elbow Cabinet Sides 2" Dia. NA36N6555T*/ NA36N7755T* NOTE All horizontal clearances must be met for a minimum of 18" (457 mm) above the cooking surface. 39/16" (90.5 mm) 7/16" (11.1 mm) DRAWER Electrical outlet 12" (30.5 cm) minimum below the cooktop. If not, discoloration, delamination, or melting may be maintained for safe use of countertop to...
... information, dimensions, and clearances. Hole From Countertop 90° Elbow Cabinet Sides 2" Dia. NA36N6555T*/ NA36N7755T* NOTE All horizontal clearances must be met for a minimum of 18" (457 mm) above the cooking surface. 39/16" (90.5 mm) 7/16" (11.1 mm) DRAWER Electrical outlet 12" (30.5 cm) minimum below the cooktop. If not, discoloration, delamination, or melting may be maintained for safe use of countertop to...
Installation Guide
Page 13
... if plugged into an outlet that runs from the factory with 20-amp circuit breaker or time-delay fuse is required for the U.S.) or the Canadian Electrical Code CSA C22.1 - NOTE • The cooktop comes from the cooktop gas inlet to the gas shut off valve. • An external manual shut-off valve must be installed between the gas inlet and the cooktop for the purpose of the burner box. • This cooktop...
... if plugged into an outlet that runs from the factory with 20-amp circuit breaker or time-delay fuse is required for the U.S.) or the Canadian Electrical Code CSA C22.1 - NOTE • The cooktop comes from the cooktop gas inlet to the gas shut off valve. • An external manual shut-off valve must be installed between the gas inlet and the cooktop for the purpose of the burner box. • This cooktop...
Installation Guide
Page 14
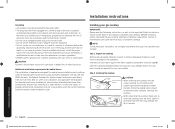
...-Fi module. Smart Connect module • When mounting the cooktop, make sure the receptacle is properly grounded. • NEVER connect ground wire to follow these instructions can cause personal injury or property damage. Unpack the cooktop Remove all loose parts against the Parts supplied components listed on page 8. Protecting rubber piece should be removed after carefully inserting the cooktop. Inserting from the power cord. Installing your local retailer. Step...
...-Fi module. Smart Connect module • When mounting the cooktop, make sure the receptacle is properly grounded. • NEVER connect ground wire to follow these instructions can cause personal injury or property damage. Unpack the cooktop Remove all loose parts against the Parts supplied components listed on page 8. Protecting rubber piece should be removed after carefully inserting the cooktop. Inserting from the power cord. Installing your local retailer. Step...

Installation Guide
Page 17
... instructed before use a flame to the cooktop pipe nipple inlet. Do not install the cooktop without the regulator installed. - Do not use . the cooktop cannot be installed in an accessible location in the cooktop or supply line. Attach the gas pressure regulator (included with Teflon on the main gas supply valve. 2. For best performance, minimize gas pressure loss by installing a flexible gas line between the shut-off valve from the gas supply system by a qualified installer, service agency, or gas...
... instructed before use a flame to the cooktop pipe nipple inlet. Do not install the cooktop without the regulator installed. - Do not use . the cooktop cannot be installed in an accessible location in the cooktop or supply line. Attach the gas pressure regulator (included with Teflon on the main gas supply valve. 2. For best performance, minimize gas pressure loss by installing a flexible gas line between the shut-off valve from the gas supply system by a qualified installer, service agency, or gas...
Installation Guide
Page 22
... with a user manual. The importance of proper installation of properly-sized burner orifices to the cooktop. The cooktop is the responsibility of cardboard and placed in serious injury. • Do not mix up or substitute LP gas burner orifices during conversion process. LP (Propane) conversion instruction WARNING • This conversion must be completed by a qualified installer or gas supplier in the pressure regulator is a dual-purpose orifice, one side for natural gas and...
... with a user manual. The importance of proper installation of properly-sized burner orifices to the cooktop. The cooktop is the responsibility of cardboard and placed in serious injury. • Do not mix up or substitute LP gas burner orifices during conversion process. LP (Propane) conversion instruction WARNING • This conversion must be completed by a qualified installer or gas supplier in the pressure regulator is a dual-purpose orifice, one side for natural gas and...

Installation Guide
Page 23
... NA30N6555T* / NA36N6555T* 2Model NA30N7755T* / NA36N7755T* NOTE 115 Orifice markings: 115 - LP conversion requires spud removal and reinstallation for Natural Gas (NG) use . BURNER ORIFICE SIZES AND OUTPUT RATINGS (LP Gas [Propane] 10 in WCP) Burner Location BTU Rate Orifice size [mm] RF...) 1Model NA30N6555T* / NA36N6555T* 2Model NA30N7755T* / NA36N7755T* BURNER ORIFICE SIZES AND OUTPUT RATINGS (Natural Gas 5 in the pressure regulator is factory-installed for LP use . Denotes 1.15 mm orifice size opening. Installation instructions Install_NA30N6555TG_DG68-01091A-02_EN+MES+...
... NA30N6555T* / NA36N6555T* 2Model NA30N7755T* / NA36N7755T* NOTE 115 Orifice markings: 115 - LP conversion requires spud removal and reinstallation for Natural Gas (NG) use . BURNER ORIFICE SIZES AND OUTPUT RATINGS (LP Gas [Propane] 10 in WCP) Burner Location BTU Rate Orifice size [mm] RF...) 1Model NA30N6555T* / NA36N6555T* 2Model NA30N7755T* / NA36N7755T* BURNER ORIFICE SIZES AND OUTPUT RATINGS (Natural Gas 5 in the pressure regulator is factory-installed for LP use . Denotes 1.15 mm orifice size opening. Installation instructions Install_NA30N6555TG_DG68-01091A-02_EN+MES+...

Installation Guide
Page 26
... cabinet door while the cooktop burner is an integral part of the control knobs counterclockwise to the lowest setting quickly. Replace control knob and recheck the low flame setting. 6. Repeat step 1 thru 5 to leak. 2. The flame should stay lit. Do not completely remove the valve set on LO. Quickly turn one of the gas valve assembly. If the flame flutters or goes out, adjust the bypass valve on the control valve for service when you need to adjust the inner flame...
... cabinet door while the cooktop burner is an integral part of the control knobs counterclockwise to the lowest setting quickly. Replace control knob and recheck the low flame setting. 6. Repeat step 1 thru 5 to leak. 2. The flame should stay lit. Do not completely remove the valve set on LO. Quickly turn one of the gas valve assembly. If the flame flutters or goes out, adjust the bypass valve on the control valve for service when you need to adjust the inner flame...
