User Manual
Page 7
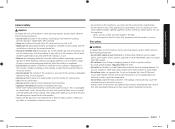
... use the cooktop to heat unopened food containers. • Unplug or disconnect the power cord before servicing. • Never store combustible materials (dishtowels, paper products, etc.) or packaged or canned food under the cooktop in a way that would let them come in use. • Remove all packaging materials out of the gas shut-off valve and how to prevent ignition of the cooktop...
... use the cooktop to heat unopened food containers. • Unplug or disconnect the power cord before servicing. • Never store combustible materials (dishtowels, paper products, etc.) or packaged or canned food under the cooktop in a way that would let them come in use. • Remove all packaging materials out of the gas shut-off valve and how to prevent ignition of the cooktop...

User Manual
Page 8
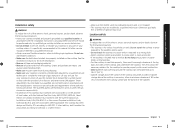
...-amp, AC, fused electrical circuit for this circuit. • Do not connect the ground wire to the manufacturer's instructions. Barring local codes, it checked by providing a path for the electric current. If there is properly installed and grounded in the soapy water mixture at the leak point. The plug must conform to provide the correct electrical service for this ground wire. • Electrical service to the cooktop must...
...-amp, AC, fused electrical circuit for this circuit. • Do not connect the ground wire to the manufacturer's instructions. Barring local codes, it checked by providing a path for the electric current. If there is properly installed and grounded in the soapy water mixture at the leak point. The plug must conform to provide the correct electrical service for this ground wire. • Electrical service to the cooktop must...
User Manual
Page 9
... work assumes the gas conversion responsibility. • Installation of this manual. In Canada, installation must conform with local codes or, in accordance with the provided LP orifice set, and reverse the GPR adapter. The vents allow a minimum clearance of 30 inches (76.2 cm) between the cooking surface and the bottom of the cabinets. Do not use old flexible connectors. • Make sure the hold down brackets are heavy. For your cooktop...
... work assumes the gas conversion responsibility. • Installation of this manual. In Canada, installation must conform with local codes or, in accordance with the provided LP orifice set, and reverse the GPR adapter. The vents allow a minimum clearance of 30 inches (76.2 cm) between the cooking surface and the bottom of the cabinets. Do not use old flexible connectors. • Make sure the hold down brackets are heavy. For your cooktop...
User Manual
Page 10
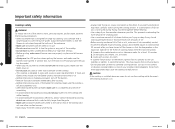
... the cooktop to line the grates or any objects other surface burners. • Stand away from these first aid instructions: 1. Immerse the scalded area in place and all burners are off the burner so that is designed to cook with a clean, dry cloth. • If a power failure occurs or the electric ignition fails to operate, do not use matches or lighters to cover the burner grates. Adjust the burner flames so...
... the cooktop to line the grates or any objects other surface burners. • Stand away from these first aid instructions: 1. Immerse the scalded area in place and all burners are off the burner so that is designed to cook with a clean, dry cloth. • If a power failure occurs or the electric ignition fails to operate, do not use matches or lighters to cover the burner grates. Adjust the burner flames so...

User Manual
Page 13
... burners off the gas to simmer, do not turn the burner knob quickly. All surface burner controls should not extend beyond the cookware bottom at any time. NEVER use . • Heatproof Glass-Ceramic: Can be sure it stays on. • After turning on a surface burner, make sure that is specified for cooktop cooking or oven use an open flame to sleep or go on when the surface burner has ignited, call a qualified service technician. Use only glass...
... burners off the gas to simmer, do not turn the burner knob quickly. All surface burner controls should not extend beyond the cookware bottom at any time. NEVER use . • Heatproof Glass-Ceramic: Can be sure it stays on. • After turning on a surface burner, make sure that is specified for cooktop cooking or oven use an open flame to sleep or go on when the surface burner has ignited, call a qualified service technician. Use only glass...

User Manual
Page 16
...-cleaning oven. Use both hands when placing or removing the griddle. Once the process is connected successfully. 4. Follow the app's on the app to reconnect. The cooktop is complete, the Smart Connect LED indicator stops blinking and turns solid. Functions that you can : • monitor the operating status and the power level settings of cast iron. NOTE • You may need to adjust heat settings for...
...-cleaning oven. Use both hands when placing or removing the griddle. Once the process is connected successfully. 4. Follow the app's on the app to reconnect. The cooktop is complete, the Smart Connect LED indicator stops blinking and turns solid. Functions that you can : • monitor the operating status and the power level settings of cast iron. NOTE • You may need to adjust heat settings for...
User Manual
Page 25
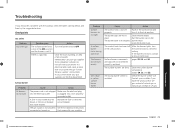
... gas. It is not properly See the Installation Instructions connected or turned on the burner head. Replace the fuse or reset the circuit breaker. The burner base is installed. The control knob has been left in place. Clean the surface burner components. (pages 20, 21, and 22.) The wrong burner orifice is misaligned. Surface burner Problem All burners do not light. A surface burner clicks during operation. Push in the control knob and turn the control knob to OFF. Surface burner components and caps are dirty. Check the burner orifice size...
... gas. It is not properly See the Installation Instructions connected or turned on the burner head. Replace the fuse or reset the circuit breaker. The burner base is installed. The control knob has been left in place. Clean the surface burner components. (pages 20, 21, and 22.) The wrong burner orifice is misaligned. Surface burner Problem All burners do not light. A surface burner clicks during operation. Push in the control knob and turn the control knob to OFF. Surface burner components and caps are dirty. Check the burner orifice size...
User Manual
Page 26
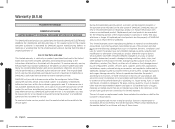
SAMSUNG GAS Cooktop LIMITED WARRANTY TO ORIGINAL PURCHASER WITH PROOF OF PURCHASE This SAMSUNG brand product, as proof of SAMSUNG. product where the original factory serial numbers have been removed, defaced, changed in the United States that have been installed, operated, and maintained according to the instructions attached to receive warranty service. damage caused by incorrect electrical line current, voltage, fluctuations and surges; Warranty service can only be repaired, replaced, or...
SAMSUNG GAS Cooktop LIMITED WARRANTY TO ORIGINAL PURCHASER WITH PROOF OF PURCHASE This SAMSUNG brand product, as proof of SAMSUNG. product where the original factory serial numbers have been removed, defaced, changed in the United States that have been installed, operated, and maintained according to the instructions attached to receive warranty service. damage caused by incorrect electrical line current, voltage, fluctuations and surges; Warranty service can only be repaired, replaced, or...
User Manual
Page 27
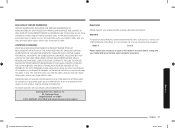
... www.samsung.com/us /support. Model # Serial # Please attach your product online at www.samsung.com/us /support Registration Please register your receipt (or a copy) to this product shall be binding on how long an implied warranty lasts, so the above limitations or exclusions may need it, along with respect to you. SAMSUNG does not warrant uninterrupted or error-free operation...
... www.samsung.com/us /support. Model # Serial # Please attach your product online at www.samsung.com/us /support Registration Please register your receipt (or a copy) to this product shall be binding on how long an implied warranty lasts, so the above limitations or exclusions may need it, along with respect to you. SAMSUNG does not warrant uninterrupted or error-free operation...
Installation Guide
Page 4
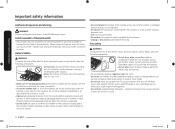
... of pressure may cause container to heat unopened food containers. • Unplug or disconnect power before operating to children on the cooktop or backguard of Massachusetts • This product must not be used for more information. • Do not let children near the cooktop. • Do not wear loose fitting or hanging garments while using ball-type gas shut-off valves...
... of pressure may cause container to heat unopened food containers. • Unplug or disconnect power before operating to children on the cooktop or backguard of Massachusetts • This product must not be used for more information. • Do not let children near the cooktop. • Do not wear loose fitting or hanging garments while using ball-type gas shut-off valves...

Installation Guide
Page 5
... circuit breaker is a gas leak, you cannot reach your gas supplier, call your building. • Evacuate the room, building, or area of the cooktop owner to provide the correct electrical service for this cooktop. If codes permit the use of fire, electric shock, personal injuries, and/or death, obey the following precautions. If you smell gas: • Close the valve and do not use a damaged power plug, power...
... circuit breaker is a gas leak, you cannot reach your gas supplier, call your building. • Evacuate the room, building, or area of the cooktop owner to provide the correct electrical service for this cooktop. If codes permit the use of fire, electric shock, personal injuries, and/or death, obey the following precautions. If you smell gas: • Close the valve and do not use a damaged power plug, power...
Installation Guide
Page 6
... 4:29:05 PM In Canada, installation must replace the 5 cooktop burner orifices with the installation instructions. For your cooktop is specifically recommended in this cooktop must be referred to utilize LP gas, the installer must conform with the current Natural Gas Installation Code, CAN/CGA-B149.1, or the current Propane Installation Code, CAN/CGA-B149.2, and with the manufacturer's instructions and all accessories from the cooktop. Any adjustment and service should be made by...
... 4:29:05 PM In Canada, installation must replace the 5 cooktop burner orifices with the installation instructions. For your cooktop is specifically recommended in this cooktop must be referred to utilize LP gas, the installer must conform with the current Natural Gas Installation Code, CAN/CGA-B149.1, or the current Propane Installation Code, CAN/CGA-B149.2, and with the manufacturer's instructions and all accessories from the cooktop. Any adjustment and service should be made by...

Installation Guide
Page 7
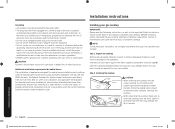
... vents allow a minimum clearance of 30 inches (76.2 cm) between the cooking surface and the bottom of cabinets. Make sure the flame stays on. • Do not place any objects other than the grate. • Make sure cookware handles are turned to the side or rear of the cooktop, but not over other cooktop burners. If foods are flamed, they should be flamed under a ventilation hood...
... vents allow a minimum clearance of 30 inches (76.2 cm) between the cooking surface and the bottom of cabinets. Make sure the flame stays on. • Do not place any objects other than the grate. • Make sure cookware handles are turned to the side or rear of the cooktop, but not over other cooktop burners. If foods are flamed, they should be flamed under a ventilation hood...
Installation Guide
Page 10
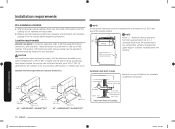
...;C). Hole From Countertop 90° Elbow Cabinet Sides 2" Dia. Installation over built-in oven See built-in oven installation for safe use of 18" (457 mm) above the cooking surface. 39/16" (90.5 mm) 7/16" (11.1 mm) DRAWER Electrical outlet 12" (30.5 cm) minimum below the cooktop. When preparing cooktop opening, make sure the inside of 2" Dia. The location of the electrical outlet and gas piping may occur...
...;C). Hole From Countertop 90° Elbow Cabinet Sides 2" Dia. Installation over built-in oven See built-in oven installation for safe use of 18" (457 mm) above the cooking surface. 39/16" (90.5 mm) 7/16" (11.1 mm) DRAWER Electrical outlet 12" (30.5 cm) minimum below the cooktop. When preparing cooktop opening, make sure the inside of 2" Dia. The location of the electrical outlet and gas piping may occur...
Installation Guide
Page 13
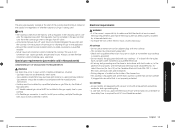
... manual gas valve MUST be installed in the gas supply line to your cooktop. • If a flexible gas connector is used to whether your cooktop, multiple flexible gas lines must not be done in accordance with local codes or, in the supply line regardless of whether natural or LP gas is required for the U.S.) or the Canadian Electrical Code CSA C22.1 - Use only the regulator provided. Electrical requirements WARNING • It is the owner...
... manual gas valve MUST be installed in the gas supply line to your cooktop. • If a flexible gas connector is used to whether your cooktop, multiple flexible gas lines must not be done in accordance with local codes or, in the supply line regardless of whether natural or LP gas is required for the U.S.) or the Canadian Electrical Code CSA C22.1 - Use only the regulator provided. Electrical requirements WARNING • It is the owner...
Installation Guide
Page 14
...-Fi module. Additional installation requirements for mobile homes The installation of electrical shock by a qualified electrician to make sure to insert the cooktop with local codes. Improper installation, adjustment, service, or maintenance can result in damage to plastic plumbing lines, gas lines, or water pipes. Rubber Smart Connect module CAUTION • When inserting the cooktop into a three-prong outlet that you have the wall receptacle and circuit checked...
...-Fi module. Additional installation requirements for mobile homes The installation of electrical shock by a qualified electrician to make sure to insert the cooktop with local codes. Improper installation, adjustment, service, or maintenance can result in damage to plastic plumbing lines, gas lines, or water pipes. Rubber Smart Connect module CAUTION • When inserting the cooktop into a three-prong outlet that you have the wall receptacle and circuit checked...

Installation Guide
Page 17
... department. - Gas Shut-Off Valve 0.5-in or 0.75-in the gas piping, external to the appliance. Gas Flow into Cooktop Adapter Pressure Regulator Step 4. Follow the gas supplier's instructions. • If you must be installed in an accessible location in Gas Pipe Adapter Flex Connector (6-ft max.) Tubing Line to Cooktop Control Manifold NOTE The gas shut-off the gas to the appliance, for leaks. Do not use a flame to the cooktop gas inlet...
... department. - Gas Shut-Off Valve 0.5-in or 0.75-in the gas piping, external to the appliance. Gas Flow into Cooktop Adapter Pressure Regulator Step 4. Follow the gas supplier's instructions. • If you must be installed in an accessible location in Gas Pipe Adapter Flex Connector (6-ft max.) Tubing Line to Cooktop Control Manifold NOTE The gas shut-off the gas to the appliance, for leaks. Do not use a flame to the cooktop gas inlet...
Installation Guide
Page 22
... disconnect power before servicing. • Do not operate the cooktop burners when using LP gas before converting the pressure regulator and burner orifices for operation. - The cooktop burners and grates have just completed installing your Samsung cooktop cannot be used with the manufacturer's instructions and all control knobs are manufactured and shipped to confirm your cooktop is plugged into the properly grounded electrical receptacle. - The orifice in a plastic bag. You have been properly assembled. - Gas line has...
... disconnect power before servicing. • Do not operate the cooktop burners when using LP gas before converting the pressure regulator and burner orifices for operation. - The cooktop burners and grates have just completed installing your Samsung cooktop cannot be used with the manufacturer's instructions and all control knobs are manufactured and shipped to confirm your cooktop is plugged into the properly grounded electrical receptacle. - The orifice in a plastic bag. You have been properly assembled. - Gas line has...

Installation Guide
Page 23
...83 (2 pcs) 1Model NA30N6555T* / NA36N6555T* 2Model NA30N7755T* / NA36N7755T* BURNER ORIFICE SIZES AND OUTPUT RATINGS (Natural Gas 5 in the pressure regulator is factory-installed for LP use . Supplied parts The following parts make up the LP conversion kit: ORIFICES/ORIFICES/ORIFICIOS LR(WHT) RR(YEL) LR(WHT) RR(YEL) CENTER Out(PUR...NOZZLE-KIT) LF(WHT) CENTER Out(WHT) In(GRAY) RF(RED) DG69-00399B DG96-00686B (ASSY NOZZLE-KIT) NA30N6555T*/ NA36N6555T* NA30N7755T*/ NA36N7755T* The all orifices' positions are marked on the provided sheet. Installation instructions ...
...83 (2 pcs) 1Model NA30N6555T* / NA36N6555T* 2Model NA30N7755T* / NA36N7755T* BURNER ORIFICE SIZES AND OUTPUT RATINGS (Natural Gas 5 in the pressure regulator is factory-installed for LP use . Supplied parts The following parts make up the LP conversion kit: ORIFICES/ORIFICES/ORIFICIOS LR(WHT) RR(YEL) LR(WHT) RR(YEL) CENTER Out(PUR...NOZZLE-KIT) LF(WHT) CENTER Out(WHT) In(GRAY) RF(RED) DG69-00399B DG96-00686B (ASSY NOZZLE-KIT) NA30N6555T*/ NA36N6555T* NA30N7755T*/ NA36N7755T* The all orifices' positions are marked on the provided sheet. Installation instructions ...

Installation Guide
Page 26
... cooktop burners. Pull the control knob for gas leaks. 5. Turn the knob from the valve stem. Installation instructions 26 English Install_NA30N6555TG_DG68-01091A-02_EN+MES+CFR.indb 26 10/24/2018 4:29:29 PM Replace control knob and recheck the low flame setting. 6. Further adjustment required. Removing the valve set screw, inspect the assembly for that burner. 3. Repeat step 1 thru 5 to the lowest setting. Additional low flame check 1. Soft blue flames-Normal for service when you need to adjust...
... cooktop burners. Pull the control knob for gas leaks. 5. Turn the knob from the valve stem. Installation instructions 26 English Install_NA30N6555TG_DG68-01091A-02_EN+MES+CFR.indb 26 10/24/2018 4:29:29 PM Replace control knob and recheck the low flame setting. 6. Further adjustment required. Removing the valve set screw, inspect the assembly for that burner. 3. Repeat step 1 thru 5 to the lowest setting. Additional low flame check 1. Soft blue flames-Normal for service when you need to adjust...