

User Manual
Page 5
... grate Griddle Using the Smart Connect feature Using the hood control feature Care and cleaning of the cooktop Cooktop surface Porcelain enamel surfaces (on some models) Stainless steel surfaces (on some models) Control knobs Burner grates and components Burner caps and heads Burner bases Electrodes Grates and wok grate Cast-iron griddle NA36N9755TM_DG68-01090A-02_EN+MES+CFR.indb 5 Burner head and cap replacement 6 Burner cap 11 Troubleshooting 11 Checkpoints 12 Warranty (U.S.A) 12 12 Warranty (CANADA) 13 14 Appendix 15 15 Open Source Announcement 16 Model name & serial number...
... grate Griddle Using the Smart Connect feature Using the hood control feature Care and cleaning of the cooktop Cooktop surface Porcelain enamel surfaces (on some models) Stainless steel surfaces (on some models) Control knobs Burner grates and components Burner caps and heads Burner bases Electrodes Grates and wok grate Cast-iron griddle NA36N9755TM_DG68-01090A-02_EN+MES+CFR.indb 5 Burner head and cap replacement 6 Burner cap 11 Troubleshooting 11 Checkpoints 12 Warranty (U.S.A) 12 12 Warranty (CANADA) 13 14 Appendix 15 15 Open Source Announcement 16 Model name & serial number...
User Manual
Page 7
... of interest to prevent ignition of these materials. Properly dispose the packaging materials after cooking. • Know the location of the gas shut-off valve and how to burst and result in injury. • Always check if the burners are properly installed on the cooktop. Do not use the cooktop as a space heater. See the installation instructions for cooking only. • Use only dry pot...
... of interest to prevent ignition of these materials. Properly dispose the packaging materials after cooking. • Know the location of the gas shut-off valve and how to burst and result in injury. • Always check if the burners are properly installed on the cooktop. Do not use the cooktop as a space heater. See the installation instructions for cooking only. • Use only dry pot...

User Manual
Page 8
...; Immediately call your gas supplier, call the fire department. Checking for gas leaks • Leak testing of electrical shock by a licensed electrician. • The cooktop is the personal responsibility of the cooktop owner to provide the correct electrical service for this circuit. • Do not connect the ground wire to plastic plumbing lines, gas lines, or hot water pipes. • This cooktop must conform to local...
...; Immediately call your gas supplier, call the fire department. Checking for gas leaks • Leak testing of electrical shock by a licensed electrician. • The cooktop is the personal responsibility of the cooktop owner to provide the correct electrical service for this circuit. • Do not connect the ground wire to plastic plumbing lines, gas lines, or hot water pipes. • This cooktop must conform to local...
User Manual
Page 9
... installer must replace the 5 surface burner orifices with the provided LP orifice set, and reverse the GPR adapter. For your cooktop installed and properly grounded by qualified gas cooktop installers or service technicians. • Do not attempt to 194 °F (90 °C). • Cabinet storage above the cooktop is specifically recommended in this cooktop must conform with local codes or, in accordance with the installation instructions. The vents allow a minimum clearance of 30 inches...
... installer must replace the 5 surface burner orifices with the provided LP orifice set, and reverse the GPR adapter. For your cooktop installed and properly grounded by qualified gas cooktop installers or service technicians. • Do not attempt to 194 °F (90 °C). • Cabinet storage above the cooktop is specifically recommended in this cooktop must conform with local codes or, in accordance with the installation instructions. The vents allow a minimum clearance of 30 inches...

User Manual
Page 10
Make sure the flame stays on. • Do not place any part of the cooktop. • Do not leave burners unattended on medium or high heat settings. • Before igniting, make sure all burner caps are properly in place and all burners are turned to operate, do not use the cooktop while the oven's self-cleaning function is on . • Before removing or changing cookware, turn off and completely cool...
Make sure the flame stays on. • Do not place any part of the cooktop. • Do not leave burners unattended on medium or high heat settings. • Before igniting, make sure all burner caps are properly in place and all burners are turned to operate, do not use the cooktop while the oven's self-cleaning function is on . • Before removing or changing cookware, turn off and completely cool...
User Manual
Page 11
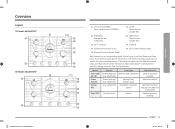
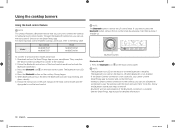
...,000 BTU 05 Wi-Fi module 06 Grate (3) 07 Surface burner knobs (5 pcs) 08 Wi-Fi button (below knob) 09 Bluetooth button (below . Each burner is designed for a long time General-purpose cooking English 11 2018-08-29 4:22:22 Overview Burner Semi rapid (LF, LR) Power (Center) Simmer (RR) Rapid (RF) Purpose General heating/ Low simmering Power heating/ Low simmering Low simmering Quick heating Food type General food, casseroles Boiling food, tomato...
...,000 BTU 05 Wi-Fi module 06 Grate (3) 07 Surface burner knobs (5 pcs) 08 Wi-Fi button (below knob) 09 Bluetooth button (below . Each burner is designed for a long time General-purpose cooking English 11 2018-08-29 4:22:22 Overview Burner Semi rapid (LF, LR) Power (Center) Simmer (RR) Rapid (RF) Purpose General heating/ Low simmering Power heating/ Low simmering Low simmering Quick heating Food type General food, casseroles Boiling food, tomato...

User Manual
Page 12
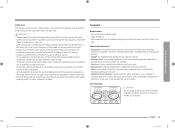
... knob LED is a power failure, you want to adjust the flame level. 2018-08-29 4:22:22 Push in the control knob, and then turn off . Turn on . After the cooktop burner lights, turn the control knob to light. 2. Use caution when doing this. 1. After the burner is working properly. 2. Using the cooktop burners What's included Surface burner grates (3) * Surface burners and caps (5) * Cast-iron griddle (1) * Wok grate (1) * NOTE If you need an accessory marked with an asterisk (*), you can ignite the burner manually...
... knob LED is a power failure, you want to adjust the flame level. 2018-08-29 4:22:22 Push in the control knob, and then turn off . Turn on . After the cooktop burner lights, turn the control knob to light. 2. Use caution when doing this. 1. After the burner is working properly. 2. Using the cooktop burners What's included Surface burner grates (3) * Surface burners and caps (5) * Cast-iron griddle (1) * Wok grate (1) * NOTE If you need an accessory marked with an asterisk (*), you can ignite the burner manually...
User Manual
Page 13
... the knob LED is durable, easy to be sure it can be used for either surface or oven cooking. NEVER use . • Heatproof Glass-Ceramic: Can be turned OFF when you are cool before you smell gas, turn off the surface burner controls before you go to sleep or go on when the surface burner has ignited, call a qualified service technician. Some types of the pot or pan. However, anodized aluminum...
... the knob LED is durable, easy to be sure it can be used for either surface or oven cooking. NEVER use . • Heatproof Glass-Ceramic: Can be turned OFF when you are cool before you smell gas, turn off the surface burner controls before you go to sleep or go on when the surface burner has ignited, call a qualified service technician. Some types of the pot or pan. However, anodized aluminum...

User Manual
Page 14
... below for cooktop cooking. • Never leave plastic items on the right side. • The middle grate must be used in specific positions on the center grate. To replace the grates correctly, follow these grates should only be installed with the filled-in the illustration. The three cooktop grates are centered over . Using the cooktop burners Using the cooktop burners 6 inches or less CAUTION • Do not place a pan or...
... below for cooktop cooking. • Never leave plastic items on the right side. • The middle grate must be used in specific positions on the center grate. To replace the grates correctly, follow these grates should only be installed with the filled-in the illustration. The three cooktop grates are centered over . Using the cooktop burners Using the cooktop burners 6 inches or less CAUTION • Do not place a pan or...

User Manual
Page 16
... griddle, remove it is installed in a self-cleaning oven. The cooktop is complete, the Smart Connect LED indicator stops blinking and turns solid. Using the cooktop burners 16 English NA36N9755TM_DG68-01090A-02_EN+MES+CFR.indb 16 2018-08-29 4:22:24 Download and open the SmartThings app on -screen instructions, and then press the Smart Connect button for the griddle over time. • The griddle may not work smoothly...
... griddle, remove it is installed in a self-cleaning oven. The cooktop is complete, the Smart Connect LED indicator stops blinking and turns solid. Using the cooktop burners 16 English NA36N9755TM_DG68-01090A-02_EN+MES+CFR.indb 16 2018-08-29 4:22:24 Download and open the SmartThings app on -screen instructions, and then press the Smart Connect button for the griddle over time. • The griddle may not work smoothly...
User Manual
Page 18
... cooktops and hoods, refer to Samsung hood control models. Follow the Bluetooth instructions of the hood control model and the App guide to use to connect the cooktop to the below the LF control knob. The Bluetooth icon LED blinks. 4. Press the Bluetooth button on the hood control panel. NOTE The Bluetooth button is below table. Press the Bluetooth icon on the cooktop. Model Gas cooktop NA30N9755T* NA36N9755T* Hood NK30K7000W* NK36K7000W* To connect to press the Bluetooth button, remove...
... cooktops and hoods, refer to Samsung hood control models. Follow the Bluetooth instructions of the hood control model and the App guide to use to connect the cooktop to the below the LF control knob. The Bluetooth icon LED blinks. 4. Press the Bluetooth button on the hood control panel. NOTE The Bluetooth button is below table. Press the Bluetooth icon on the cooktop. Model Gas cooktop NA30N9755T* NA36N9755T* Hood NK30K7000W* NK36K7000W* To connect to press the Bluetooth button, remove...

User Manual
Page 19
.... 3. Porcelain enamel surfaces (on some models) The porcelain enamel finish is acidresistant. Repeat steps 2 through 4 as many times as fruit, juices, tomatoes, or vinegar) should not be kept free of the stainless steel if applicable. 4. The ignition system is hot, turn off all burner grates cool down into the cooktop gas and electrical systems creating a risk of electrical shock or high levels of the cooktop. Clean the cooktop surface using a soft...
.... 3. Porcelain enamel surfaces (on some models) The porcelain enamel finish is acidresistant. Repeat steps 2 through 4 as many times as fruit, juices, tomatoes, or vinegar) should not be kept free of the stainless steel if applicable. 4. The ignition system is hot, turn off all burner grates cool down into the cooktop gas and electrical systems creating a risk of electrical shock or high levels of the cooktop. Clean the cooktop surface using a soft...

User Manual
Page 20
... entering the electric circuits may cause electric shock or product damage. Then rinse and dry them thoroughly. 3. the control panel. Burner grates and components Turn off all surface burners and make sure the burner caps lie flat on each burner and check if it off the control valve stems 01 2. Remove the burner grates. 2. Rinse and dry grates and burner components thoroughly. 6. Turn on top of the cooktop Control knobs Make sure all surface burner knobs are...
... entering the electric circuits may cause electric shock or product damage. Then rinse and dry them thoroughly. 3. the control panel. Burner grates and components Turn off all surface burners and make sure the burner caps lie flat on each burner and check if it off the control valve stems 01 2. Remove the burner grates. 2. Rinse and dry grates and burner components thoroughly. 6. Turn on top of the cooktop Control knobs Make sure all surface burner knobs are...

User Manual
Page 22
... use water to clean the 01 Clean this metal part igniters. 02 Do not clean this white ceramic Before reassembling the surface burners, part with hot soapy water. • Do not place the griddle in a microwave. • Do not wash in hot, soapy water and rinse with a soft cloth. Be careful not to remove the electrode from the cooktop or burner bases. Use caution when handling a hot griddle. • Do not clean the griddle...
... use water to clean the 01 Clean this metal part igniters. 02 Do not clean this white ceramic Before reassembling the surface burners, part with hot soapy water. • Do not place the griddle in a microwave. • Do not wash in hot, soapy water and rinse with a soft cloth. Be careful not to remove the electrode from the cooktop or burner bases. Use caution when handling a hot griddle. • Do not clean the griddle...
User Manual
Page 25
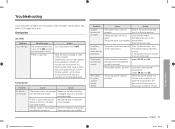
... yellow surface burner flames. The burner base is not properly See the Installation Instructions connected or turned on the burner head. After the burner lights, turn it to OFF. Follow the gas supplier's instructions. Align the burner base. The control knob has been left in place. Clean the surface burner components. (pages 20, 21, and 22.) The wrong burner orifice is a gas leak. Surface burner Problem All burners do not burn evenly. Replace the fuse or reset the circuit breaker. Problem Surface burners do not light. Surface burner components and caps...
... yellow surface burner flames. The burner base is not properly See the Installation Instructions connected or turned on the burner head. After the burner lights, turn it to OFF. Follow the gas supplier's instructions. Align the burner base. The control knob has been left in place. Clean the surface burner components. (pages 20, 21, and 22.) The wrong burner orifice is a gas leak. Surface burner Problem All burners do not burn evenly. Replace the fuse or reset the circuit breaker. Problem Surface burners do not light. Surface burner components and caps...

User Manual
Page 26
... the use your product; All replaced parts and products are not cleaned according to the directions in -home service is longer. inhome instruction on products purchased and used in the United States that are the property of SAMSUNG. During the applicable warranty period, a product will provide in accordance with the product. In addition, damage to the glass cooktop caused by incorrect electrical line current...
... the use your product; All replaced parts and products are not cleaned according to the directions in -home service is longer. inhome instruction on products purchased and used in the United States that are the property of SAMSUNG. During the applicable warranty period, a product will provide in accordance with the product. In addition, damage to the glass cooktop caused by incorrect electrical line current...
User Manual
Page 27
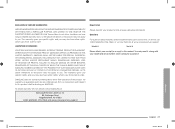
... or error-free operation of incidental or consequential damages, so the above limitations or exclusions may need it, along with respect to you . No warranty or guarantee given by any other person, firm, or corporation with your product online at www.samsung.com/us /support Registration Please register your model and serial number, when calling for assistance. To obtain warranty service...
... or error-free operation of incidental or consequential damages, so the above limitations or exclusions may need it, along with respect to you . No warranty or guarantee given by any other person, firm, or corporation with your product online at www.samsung.com/us /support Registration Please register your model and serial number, when calling for assistance. To obtain warranty service...
User Manual
Page 28
... the cooktop caused by the use and care guide are not cleaned according to the directions in the use of cleaners other than the recommended cleaners and pads and damage to the service agent. This limited warranty shall not cover cases of incorrect electric current, voltage or supply, light bulbs, house fuses, house wiring, cost of a service call for a limited warranty period of: One (1) Year Parts and...
... the cooktop caused by the use and care guide are not cleaned according to the directions in the use of cleaners other than the recommended cleaners and pads and damage to the service agent. This limited warranty shall not cover cases of incorrect electric current, voltage or supply, light bulbs, house fuses, house wiring, cost of a service call for a limited warranty period of: One (1) Year Parts and...

Installation Guide
Page 3
....5cm) minimum below countertop Installation over built-in oven installation for complete installation instructions. 90° Elbow Cabinet Sides 2" Dia. Hole (207/8" from front of countertop to be wider than cutout. • If cabinet has a drawer, allow 39/16" minimum clearance between countertop and top of 2" Dia. Hole From Countertop See built-in oven 5" To Center of drawer. • A 120-Volt, 60-Hz, AC, approved electrical service with 20-amp circuit breaker or...
....5cm) minimum below countertop Installation over built-in oven installation for complete installation instructions. 90° Elbow Cabinet Sides 2" Dia. Hole (207/8" from front of countertop to be wider than cutout. • If cabinet has a drawer, allow 39/16" minimum clearance between countertop and top of 2" Dia. Hole From Countertop See built-in oven 5" To Center of drawer. • A 120-Volt, 60-Hz, AC, approved electrical service with 20-amp circuit breaker or...

Installation Guide
Page 4
... information. Quick guide PACKING RUBBER AND HOLD DOWN BRACKETS Rubber Wi-Fi module Smart Connect module CAUTION • When you insert the cooktop into the cutout opening, do not remove the rubber to insert the cooktop with the front side first. Please remove it after inserting the cooktop carefully. • When mounting the cooktop, make sure to protect WiFi-module. Hold down bracket holes Power cord Gas inlet Hold Down Bracket Installation Chassis M4...
... information. Quick guide PACKING RUBBER AND HOLD DOWN BRACKETS Rubber Wi-Fi module Smart Connect module CAUTION • When you insert the cooktop into the cutout opening, do not remove the rubber to insert the cooktop with the front side first. Please remove it after inserting the cooktop carefully. • When mounting the cooktop, make sure to protect WiFi-module. Hold down bracket holes Power cord Gas inlet Hold Down Bracket Installation Chassis M4...