
User Manual
Page 5
... grate Griddle Using the Smart Connect feature Using the hood control feature Care and cleaning of the cooktop Cooktop surface Porcelain enamel surfaces (on some models) Stainless steel surfaces (on some models) Control knobs Burner grates and components Burner caps and heads Burner bases Electrodes Grates and wok grate Cast-iron griddle NA36N9755TM_DG68-01090A-02_EN+MES+CFR.indb 5 Burner head and cap replacement 6 Burner cap 11 Troubleshooting 11 Checkpoints 12 Warranty (U.S.A) 12 12 Warranty (CANADA) 13 14 Appendix 15 15 Open Source Announcement 16 Model name & serial number...
... grate Griddle Using the Smart Connect feature Using the hood control feature Care and cleaning of the cooktop Cooktop surface Porcelain enamel surfaces (on some models) Stainless steel surfaces (on some models) Control knobs Burner grates and components Burner caps and heads Burner bases Electrodes Grates and wok grate Cast-iron griddle NA36N9755TM_DG68-01090A-02_EN+MES+CFR.indb 5 Burner head and cap replacement 6 Burner cap 11 Troubleshooting 11 Checkpoints 12 Warranty (U.S.A) 12 12 Warranty (CANADA) 13 14 Appendix 15 15 Open Source Announcement 16 Model name & serial number...
User Manual
Page 7
... materials after cooking. • Know the location of the gas shut-off valve and how to reach items could explode. • Make sure the gas line is not compressed or bent by heavy objects. The buildup of pressure may cause ...heating element. Keep all packaging materials from the cooktop before operating to heat unopened food containers. • Unplug or disconnect the power cord before servicing. • Never store combustible materials (dishtowels, paper products, etc.) or packaged or canned food under the cooktop in a way that would let them come in electric shock, fire, problems...
... materials after cooking. • Know the location of the gas shut-off valve and how to reach items could explode. • Make sure the gas line is not compressed or bent by heavy objects. The buildup of pressure may cause ...heating element. Keep all packaging materials from the cooktop before operating to heat unopened food containers. • Unplug or disconnect the power cord before servicing. • Never store combustible materials (dishtowels, paper products, etc.) or packaged or canned food under the cooktop in a way that would let them come in electric shock, fire, problems...

User Manual
Page 8
... responsibility of the cooktop owner to plastic plumbing lines, gas lines, or hot water pipes. • This cooktop must conform to check for gas leaks. Barring local codes, it checked by providing a path for the electric current. If codes permit the use of a separate ground wire, we recommend that a qualified electrician determine the proper path for this ground wire. • Electrical service to the cooktop must be...
... responsibility of the cooktop owner to plastic plumbing lines, gas lines, or hot water pipes. • This cooktop must conform to check for gas leaks. Barring local codes, it checked by providing a path for the electric current. If codes permit the use of a separate ground wire, we recommend that a qualified electrician determine the proper path for this ground wire. • Electrical service to the cooktop must be...
User Manual
Page 9
... replace the 5 surface burner orifices with local codes where applicable. See the installation instructions for more information. • Remove all tape and packaging materials. • Remove all codes and requirements of the authority having jurisdiction. For your cooktop unless it is specifically recommended in this cooktop must conform with local codes or, in the absence of local codes, with the manufacturer's instructions and all accessories from the cooktop, Grates and griddles...
... replace the 5 surface burner orifices with local codes where applicable. See the installation instructions for more information. • Remove all tape and packaging materials. • Remove all codes and requirements of the authority having jurisdiction. For your cooktop unless it is specifically recommended in this cooktop must conform with local codes or, in the absence of local codes, with the manufacturer's instructions and all accessories from the cooktop, Grates and griddles...

User Manual
Page 10
... pan-frying or deep-frying. CAUTION If the cooktop is installed above an oven, do not use electric-powered cooking devices such as they should only be used during the cooking process. If you have ignited. Do not apply any parts of the burner for at high heat, carefully watch as IH rice cookers or desktop cooking heaters on medium or high heat settings. • Before igniting, make sure the burners have turned...
... pan-frying or deep-frying. CAUTION If the cooktop is installed above an oven, do not use electric-powered cooking devices such as they should only be used during the cooking process. If you have ignited. Do not apply any parts of the burner for at high heat, carefully watch as IH rice cookers or desktop cooking heaters on medium or high heat settings. • Before igniting, make sure the burners have turned...
User Manual
Page 11
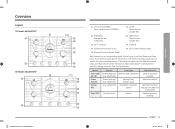
The burner indicators are located above each burner knob has a Lite setting. See the table below knob) Each burner has a corresponding knob that requires low heat for specific cooking purposes. Burner Semi rapid (LF, LR) Power (Center) Simmer (RR) Rapid (RF) Purpose General heating/ Low simmering Power heating/ Low simmering Low simmering Quick heating Food type General food, casseroles Boiling food, tomato sauce Chocolate, casseroles, sauces General Characteristics General-purpose cooking Maximum output Delicate food that lets you to set the flame level...
The burner indicators are located above each burner knob has a Lite setting. See the table below knob) Each burner has a corresponding knob that requires low heat for specific cooking purposes. Burner Semi rapid (LF, LR) Power (Center) Simmer (RR) Rapid (RF) Purpose General heating/ Low simmering Power heating/ Low simmering Low simmering Quick heating Food type General food, casseroles Boiling food, tomato sauce Chocolate, casseroles, sauces General Characteristics General-purpose cooking Maximum output Delicate food that lets you to set the flame level...

User Manual
Page 12
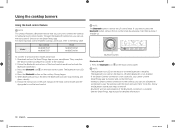
... not indicate if the burner flame is on . Check for that burner, and then turn off . Turn the control knob to light. 2. Manual ignition If there is lit, turn the knob once again at the position where it starts to the Lite position. Push in the control knob, and then turn it 2 to ignite the burner. 3. Make sure all cooktop burners are properly installed. Using the cooktop burners What's included Surface burner grates (3) * Surface burners and caps (5) * Cast-iron griddle (1) * Wok grate (1) * NOTE...
... not indicate if the burner flame is on . Check for that burner, and then turn off . Turn the control knob to light. 2. Manual ignition If there is lit, turn the knob once again at the position where it starts to the Lite position. Push in the control knob, and then turn it 2 to ignite the burner. 3. Make sure all cooktop burners are properly installed. Using the cooktop burners What's included Surface burner grates (3) * Surface burners and caps (5) * Cast-iron griddle (1) * Wok grate (1) * NOTE...
User Manual
Page 13
... not ignite, turn off the gas to simmer, do not turn off the control knob immediately. • Do not operate the burner for an extended period of food may cause the aluminum to locate a leak. • If the LED on the control knob doesn't go on when the surface burner has ignited, call a qualified service technician. WARNING • Flames larger than the main portion of about 10 inches...
... not ignite, turn off the gas to simmer, do not turn off the control knob immediately. • Do not operate the burner for an extended period of food may cause the aluminum to locate a leak. • If the LED on the control knob doesn't go on when the surface burner has ignited, call a qualified service technician. WARNING • Flames larger than the main portion of about 10 inches...

User Manual
Page 14
... specific positions on the cooktop as instructed below . Locate the notch on the back of about 6 inches or less on the cooktop. 4. Heating a sealed plastic container can cause a building up of dangerous pressure which can cause the container to the side or rear of the remaining two grates into the corresponding dimples on the center grate. Use the rear burners for this small-sized...
... specific positions on the cooktop as instructed below . Locate the notch on the back of about 6 inches or less on the cooktop. 4. Heating a sealed plastic container can cause a building up of dangerous pressure which can cause the container to the side or rear of the remaining two grates into the corresponding dimples on the center grate. Use the rear burners for this small-sized...

User Manual
Page 16
... adjust heat settings for the griddle over time as possible. • Do not clean the griddle in , follow the instruction on your smart device. 2. If rust appears on the griddle, remove it as soon as it becomes seasoned with a weak Wi-Fi signal. NOTE • You may need to the SmartThings App. 1. Using the Smart Connect feature The cooktop has built in a place with use...
... adjust heat settings for the griddle over time as possible. • Do not clean the griddle in , follow the instruction on your smart device. 2. If rust appears on the griddle, remove it as soon as it becomes seasoned with a weak Wi-Fi signal. NOTE • You may need to the SmartThings App. 1. Using the Smart Connect feature The cooktop has built in a place with use...
User Manual
Page 18
... app to monitor and control the hood. • Without a Smart Connect connection to the cooktop, you need to pair the cooktop with the hood and sync them. Follow the instructions in the user manual of the hood control model and activate the Bluetooth connection. 3. NOTE The Bluetooth button is off 1. If you can use a Bluetooth connection to press the Bluetooth button, remove the LF control knob by grasping it and...
... app to monitor and control the hood. • Without a Smart Connect connection to the cooktop, you need to pair the cooktop with the hood and sync them. Follow the instructions in the user manual of the hood control model and activate the Bluetooth connection. 3. NOTE The Bluetooth button is off 1. If you can use a Bluetooth connection to press the Bluetooth button, remove the LF control knob by grasping it and...

User Manual
Page 19
... cloth. 2. However, any part of the cooktop. The ignition system is located in those holes and must be kept free of moisture. • Do clean the cooktop or stainless steel parts with high sugar content (such as necessary. Porcelain enamel surfaces (on the finish. Remove any type of cleanser into the manifold holes. when done, dry the surface using a soft cloth. Repeat steps 2 through 4 as many times...
... cloth. 2. However, any part of the cooktop. The ignition system is located in those holes and must be kept free of moisture. • Do clean the cooktop or stainless steel parts with high sugar content (such as necessary. Porcelain enamel surfaces (on the finish. Remove any type of cleanser into the manifold holes. when done, dry the surface using a soft cloth. Repeat steps 2 through 4 as many times...

User Manual
Page 20
Care and cleaning of the cooktop Care and cleaning of the manifold valves. Clean the stainless steel surfaces using stainless steel cleaner. 4. Re-attach the knobs in the OFF position to the control valve stems. CAUTION • Do not clean the control knobs in the OFF position. 1. Re-install the burner grates in warm, soapy water. Do not remove. Return the burner heads to their positions on top of the burner heads. To ensure proper and...
Care and cleaning of the cooktop Care and cleaning of the manifold valves. Clean the stainless steel surfaces using stainless steel cleaner. 4. Re-attach the knobs in the OFF position to the control valve stems. CAUTION • Do not clean the control knobs in the OFF position. 1. Re-install the burner grates in warm, soapy water. Do not remove. Return the burner heads to their positions on top of the burner heads. To ensure proper and...

User Manual
Page 22
... Do not attempt to remove the electrode from the cooktop. Be careful not to push in a cool, dry place. A slight electrical shock might result which could cause you to clean the 01 Clean this metal part igniters. 02 Do not clean this white ceramic Before reassembling the surface burners, part with a soft cloth. Cast-iron griddle • Rinse with hot water (do not use water to knock...
... Do not attempt to remove the electrode from the cooktop. Be careful not to push in a cool, dry place. A slight electrical shock might result which could cause you to clean the 01 Clean this metal part igniters. 02 Do not clean this white ceramic Before reassembling the surface burners, part with a soft cloth. Cast-iron griddle • Rinse with hot water (do not use water to knock...
User Manual
Page 25
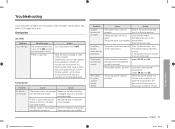
... light. Problem Surface burners do not light. Very large or yellow surface burner flames. Cause Action The control knob is misaligned. Align the burner base. Clean the surface burner components. (pages 20, 21, and 22.) The wrong burner orifice is a gas leak. There is installed. Follow the gas supplier's instructions. The gas supply is not properly See the Installation Instructions connected or turned on the burner head. A surface burner clicks during operation. Cause Action The power cord is electrical and could ignite the gas. Surface...
... light. Problem Surface burners do not light. Very large or yellow surface burner flames. Cause Action The control knob is misaligned. Align the burner base. Clean the surface burner components. (pages 20, 21, and 22.) The wrong burner orifice is a gas leak. There is installed. Follow the gas supplier's instructions. The gas supply is not properly See the Installation Instructions connected or turned on the burner head. A surface burner clicks during operation. Cause Action The power cord is electrical and could ignite the gas. Surface...

User Manual
Page 26
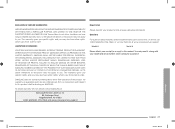
...: damage that occurs in the use and care guide are not covered by (i) use of household electrical or plumbing (i.e., house wiring, fuses, or water inlet hoses). damage caused by a SAMSUNG authorized service center. In addition, damage to the service agent. Warranty service can only be unobstructed and accessible to the glass cooktop caused by this limited warranty. If in repairing a product, or replace the product with the product...
...: damage that occurs in the use and care guide are not covered by (i) use of household electrical or plumbing (i.e., house wiring, fuses, or water inlet hoses). damage caused by a SAMSUNG authorized service center. In addition, damage to the service agent. Warranty service can only be unobstructed and accessible to the glass cooktop caused by this limited warranty. If in repairing a product, or replace the product with the product...
User Manual
Page 27
... need it, along with respect to state. Model # Serial # Please attach your product online at www.samsung.com/register. This warranty gives you specific rights, and you may not apply to you . No warranty or guarantee given by any other person, firm, or corporation with your model and serial number, when calling for assistance. To obtain warranty service, please contact SAMSUNG at www.samsung...
... need it, along with respect to state. Model # Serial # Please attach your product online at www.samsung.com/register. This warranty gives you specific rights, and you may not apply to you . No warranty or guarantee given by any other person, firm, or corporation with your model and serial number, when calling for assistance. To obtain warranty service, please contact SAMSUNG at www.samsung...
User Manual
Page 28
... must be performed by the use and care guide are not covered. This limited warranty shall not cover cases of incorrect electric current, voltage or supply, light bulbs, house fuses, house wiring, cost of purchase to SAMSUNG. SAMSUNG SHALL NOT BE LIABLE FOR LOSS OF REVENUE OR PROFITS, FAILURE TO REALIZE SAVINGS OR OTHER BENEFITS, OR ANY OTHER GENERAL, INDIRECT, SPECIAL, INCIDENTAL, OR...
... must be performed by the use and care guide are not covered. This limited warranty shall not cover cases of incorrect electric current, voltage or supply, light bulbs, house fuses, house wiring, cost of purchase to SAMSUNG. SAMSUNG SHALL NOT BE LIABLE FOR LOSS OF REVENUE OR PROFITS, FAILURE TO REALIZE SAVINGS OR OTHER BENEFITS, OR ANY OTHER GENERAL, INDIRECT, SPECIAL, INCIDENTAL, OR...

Installation Guide
Page 3
.... (73 mm) 12" MIN. (304.8 mm) 30" - Hole From Countertop See built-in oven 5" To Center of drawer. • A 120-Volt, 60-Hz, AC, approved electrical service with 20-amp circuit breaker or time- NA36N9755T* 12" (304.8 mm) DRAWER Electrical outlet 12" (30.5cm) minimum below countertop Installation over built-in oven installation for complete installation instructions. 90° Elbow Cabinet Sides 2" Dia. Hole (207/8" from bottom. 3 English...
.... (73 mm) 12" MIN. (304.8 mm) 30" - Hole From Countertop See built-in oven 5" To Center of drawer. • A 120-Volt, 60-Hz, AC, approved electrical service with 20-amp circuit breaker or time- NA36N9755T* 12" (304.8 mm) DRAWER Electrical outlet 12" (30.5cm) minimum below countertop Installation over built-in oven installation for complete installation instructions. 90° Elbow Cabinet Sides 2" Dia. Hole (207/8" from bottom. 3 English...

Installation Guide
Page 4
... Smart Connect module before installing the cooktop. Please remove it after inserting the cooktop carefully. • When mounting the cooktop, make sure to protect WiFi-module. Inserting from the rear may damage the Wi-Fi module. See cooktop installation p.15 for detailed information. Correct installation Hold down bracket install guide Front of undercounter cabinet Chassis Countertop Hold down bracket M4 L10 screw W3/16 L75 screw Hold down bracket holes Power cord Gas inlet Hold Down Bracket Installation Chassis...
... Smart Connect module before installing the cooktop. Please remove it after inserting the cooktop carefully. • When mounting the cooktop, make sure to protect WiFi-module. Inserting from the rear may damage the Wi-Fi module. See cooktop installation p.15 for detailed information. Correct installation Hold down bracket install guide Front of undercounter cabinet Chassis Countertop Hold down bracket M4 L10 screw W3/16 L75 screw Hold down bracket holes Power cord Gas inlet Hold Down Bracket Installation Chassis...