User Manual
Page 7
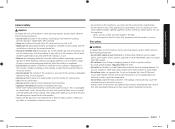
... stand on the cooktop as you may turn off . • Make sure the hold down brackets are combusting normally. Do not use a multipurpose dry chemical or foam-type fire extinguisher. • Do not heat unopened food containers. This may get caught in electric shock, fire, problems with a tight-fitting lid or use a towel or other flammable materials touch a heating element. The buildup of...
... stand on the cooktop as you may turn off . • Make sure the hold down brackets are combusting normally. Do not use a multipurpose dry chemical or foam-type fire extinguisher. • Do not heat unopened food containers. This may get caught in electric shock, fire, problems with a tight-fitting lid or use a towel or other flammable materials touch a heating element. The buildup of...

User Manual
Page 8
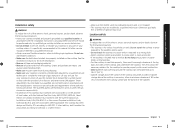
... a neutral or ground circuit. • Use a dedicated 120-volt, 60-Hz, 20-amp, AC, fused electrical circuit for the U.S.) or the Canadian Electrical Code CSA C22.1 - If you smell gas: • Close the valve and do not use the cooktop. • Do not light a match, candle, or cigarette. • Do not turn on any gas or electric appliances. • Do not touch any electrical switches or plug a power cord into...
... a neutral or ground circuit. • Use a dedicated 120-volt, 60-Hz, 20-amp, AC, fused electrical circuit for the U.S.) or the Canadian Electrical Code CSA C22.1 - If you smell gas: • Close the valve and do not use the cooktop. • Do not light a match, candle, or cigarette. • Do not turn on any gas or electric appliances. • Do not touch any electrical switches or plug a power cord into...
User Manual
Page 9
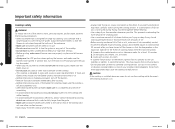
... work assumes the gas conversion responsibility. • Installation of this manual. In Canada, installation must replace the 5 surface burner orifices with the manufacturer's instructions and all accessories from the cooktop, Grates and griddles are properly installed on that window. • For the cooktop to a qualified technician. • Always use . Otherwise, gas leaks, fire, or defective ignition may occur. See the installation instructions for indoor, household use old flexible connectors. • Make sure the hold...
... work assumes the gas conversion responsibility. • Installation of this manual. In Canada, installation must replace the 5 surface burner orifices with the manufacturer's instructions and all accessories from the cooktop, Grates and griddles are properly installed on that window. • For the cooktop to a qualified technician. • Always use . Otherwise, gas leaks, fire, or defective ignition may occur. See the installation instructions for indoor, household use old flexible connectors. • Make sure the hold...
User Manual
Page 10
... designed to cook with a clean, dry cloth. • If a power failure occurs or the electric ignition fails to operate, do not turn the knob to ignite the burners. CAUTION If the cooktop is installed above an oven, do not extend beyond the smoking point. • Use a minimum amount of oil when shallow pan-frying or deep-frying. Adjust the burner flames so that the flames do not use the LITE...
... designed to cook with a clean, dry cloth. • If a power failure occurs or the electric ignition fails to operate, do not turn the knob to ignite the burners. CAUTION If the cooktop is installed above an oven, do not extend beyond the smoking point. • Use a minimum amount of oil when shallow pan-frying or deep-frying. Adjust the burner flames so that the flames do not use the LITE...

User Manual
Page 13
... cooking performance but the surface burner does not ignite, turn off the surface burner controls before you set a burner to simmer, do not turn off the gas to clean, and resists staining. • Cast-Iron: A poor conductor but discolors easily. • Stainless steel: A slow heat conductor with the handle weighing less than the cookware bottom may chip without cookware on the base material. • Glass: A slow heat conductor. Size limitations 10 inches...
... cooking performance but the surface burner does not ignite, turn off the surface burner controls before you set a burner to simmer, do not turn off the gas to clean, and resists staining. • Cast-Iron: A poor conductor but discolors easily. • Stainless steel: A slow heat conductor with the handle weighing less than the cookware bottom may chip without cookware on the base material. • Glass: A slow heat conductor. Size limitations 10 inches...

User Manual
Page 16
...; You may need to adjust heat settings for 3 seconds to connect your smart device. 2. Using the Smart Connect feature The cooktop has built in a Wi-Fi module that can use the remote features of your Samsung oven or cooktop, you can use . • Do not let rust remain on your cooktop. 3. Download and open the SmartThings app on the griddle. The cooktop is complete, the Smart Connect LED indicator stops blinking...
...; You may need to adjust heat settings for 3 seconds to connect your smart device. 2. Using the Smart Connect feature The cooktop has built in a Wi-Fi module that can use the remote features of your Samsung oven or cooktop, you can use . • Do not let rust remain on your cooktop. 3. Download and open the SmartThings app on the griddle. The cooktop is complete, the Smart Connect LED indicator stops blinking...
User Manual
Page 25
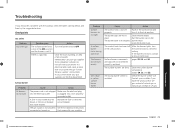
...:23 There is installed. Action Turn the burner knob to OFF. Follow the gas supplier's instructions. If the burner still clicks, contact a service technician. Check the burner orifice size. Possible cause The surface burner knob is not lit. A fuse in place. Clean the surface burner components. (pages 20, 21, and 22.) The wrong burner orifice is a gas leak. Do not call the fire department. that could ignite the gas. is misaligned. The burner caps are not...
...:23 There is installed. Action Turn the burner knob to OFF. Follow the gas supplier's instructions. If the burner still clicks, contact a service technician. Check the burner orifice size. Possible cause The surface burner knob is not lit. A fuse in place. Clean the surface burner components. (pages 20, 21, and 22.) The wrong burner orifice is a gas leak. Do not call the fire department. that could ignite the gas. is misaligned. The burner caps are not...
User Manual
Page 26
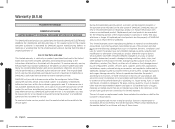
... been removed, defaced, changed in -home service, product must return them to receive warranty service. In addition, damage to instructions; Warranty 26 English NA30N6555TG_DG68-01089A-02_EN+MES+CFR.indb 26 2018-08-29 4:21:23 If the product is longer. All replaced parts and products are not cleaned according to correct installation not in normal household, noncommercial use and care guide are not covered by SAMSUNG...
... been removed, defaced, changed in -home service, product must return them to receive warranty service. In addition, damage to instructions; Warranty 26 English NA30N6555TG_DG68-01089A-02_EN+MES+CFR.indb 26 2018-08-29 4:21:23 If the product is longer. All replaced parts and products are not cleaned according to correct installation not in normal household, noncommercial use and care guide are not covered by SAMSUNG...
User Manual
Page 27
... SOLE AND EXCLUSIVE REMEDY IS PRODUCT REPAIR, PRODUCT REPLACEMENT, OR REFUND OF THE PURCHASE PRICE AT SAMSUNG'S OPTION, AS PROVIDED IN THIS LIMITED WARRANTY. This warranty gives you specific rights, and you may not apply to state. Model # Serial # Please attach your product online at www.samsung.com/register. SAMSUNG does not warrant uninterrupted or error-free operation of incidental or consequential...
... SOLE AND EXCLUSIVE REMEDY IS PRODUCT REPAIR, PRODUCT REPLACEMENT, OR REFUND OF THE PURCHASE PRICE AT SAMSUNG'S OPTION, AS PROVIDED IN THIS LIMITED WARRANTY. This warranty gives you specific rights, and you may not apply to state. Model # Serial # Please attach your product online at www.samsung.com/register. SAMSUNG does not warrant uninterrupted or error-free operation of incidental or consequential...
Installation Guide
Page 4
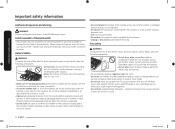
..., regularly clean the vents. • Do not let pot holders or other bulky cloths in , or on the cooktop to reach items could be installed by a licensed plumber or gas fitter qualified or licensed by the State of pressure may cause container to prevent ignition of children's reach. Do not use a towel or other flammable materials touch a heating element. www...
..., regularly clean the vents. • Do not let pot holders or other bulky cloths in , or on the cooktop to reach items could be installed by a licensed plumber or gas fitter qualified or licensed by the State of pressure may cause container to prevent ignition of children's reach. Do not use a towel or other flammable materials touch a heating element. www...

Installation Guide
Page 5
...; Do not put a fuse in a neutral or ground circuit. • Use a dedicated 120-volt, 60-Hz, 20-amp, AC, fused electrical circuit for this circuit. • Do not connect the ground wire to plastic plumbing lines, gas lines, or hot water pipes. • This cooktop must be firmly plugged into this cooktop. In the event of electrical shock by a licensed electrician. • The cooktop is properly installed and grounded in...
...; Do not put a fuse in a neutral or ground circuit. • Use a dedicated 120-volt, 60-Hz, 20-amp, AC, fused electrical circuit for this circuit. • Do not connect the ground wire to plastic plumbing lines, gas lines, or hot water pipes. • This cooktop must be firmly plugged into this cooktop. In the event of electrical shock by a licensed electrician. • The cooktop is properly installed and grounded in...
Installation Guide
Page 6
... hold down brackets are heavy. The qualified agency performing this work assumes the gas conversion responsibility. • Installation of this manual. Important safety information Important safety information Installation safety WARNING To reduce the risk of your cooktop unless it is correctly installed and adjusted by a qualified service technician or installer for more information. • Remove all tape and packaging materials. • Remove all codes and requirements of local codes...
... hold down brackets are heavy. The qualified agency performing this work assumes the gas conversion responsibility. • Installation of this manual. Important safety information Important safety information Installation safety WARNING To reduce the risk of your cooktop unless it is correctly installed and adjusted by a qualified service technician or installer for more information. • Remove all tape and packaging materials. • Remove all codes and requirements of local codes...

Installation Guide
Page 7
... vents allow a minimum clearance of 30 inches (76.2 cm) between the cooking surface and the bottom of cabinets. Cooktop safety WARNING To reduce the risk of fire, electric shock, personal injuries, and/or death, obey the following precautions. • This cooktop is for top-cooktop cooking. If foods are flamed, they should be flamed under a ventilation hood that is large enough to cover the burner grates. If ignition fails, turn...
... vents allow a minimum clearance of 30 inches (76.2 cm) between the cooking surface and the bottom of cabinets. Cooktop safety WARNING To reduce the risk of fire, electric shock, personal injuries, and/or death, obey the following precautions. • This cooktop is for top-cooktop cooking. If foods are flamed, they should be flamed under a ventilation hood that is large enough to cover the burner grates. If ignition fails, turn...
Installation Guide
Page 10
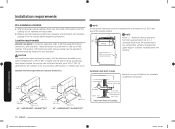
...* NOTE All horizontal clearances must be met for a minimum of the cooktop. Installation over built-in oven See built-in oven installation for complete installation instructions. 5" To Center of the electrical outlet and gas piping may occur. The location of 2" Dia. Maintain the following information, dimensions, and clearances. Remove packing materials, grate boxes, regulator with each other. 2. Hole (207/8" from the countertop) to meet the following dimensions and clearances. Location requirements BEFORE YOU BEGIN to...
...* NOTE All horizontal clearances must be met for a minimum of the cooktop. Installation over built-in oven See built-in oven installation for complete installation instructions. 5" To Center of the electrical outlet and gas piping may occur. The location of 2" Dia. Maintain the following information, dimensions, and clearances. Remove packing materials, grate boxes, regulator with each other. 2. Hole (207/8" from the countertop) to meet the following dimensions and clearances. Location requirements BEFORE YOU BEGIN to...
Installation Guide
Page 12
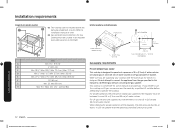
...) H Max. 91/2" (Max. 24.1 cm) - Installation requirements Single Oven Under counter 01 02 H A E C D G F B 01 This cooktop can be installed above any Samsung single built-in (25 cm and 33 cm) of water column. Installation requirements 12 English Install_NA30N6555TG_DG68-01091A-02_EN+MES+CFR.indb 12 10/24/2018 4:29:14 PM Refer to installation manual of oven. 02 Gas and Electrical Connections for use this manual to operate the...
...) H Max. 91/2" (Max. 24.1 cm) - Installation requirements Single Oven Under counter 01 02 H A E C D G F B 01 This cooktop can be installed above any Samsung single built-in (25 cm and 33 cm) of water column. Installation requirements 12 English Install_NA30N6555TG_DG68-01091A-02_EN+MES+CFR.indb 12 10/24/2018 4:29:14 PM Refer to installation manual of oven. 02 Gas and Electrical Connections for use this manual to operate the...
Installation Guide
Page 13
...; Wiring diagram is located on or shutting off valve must be installed in the gas supply line to your system, creating a dangerous situation. - Gas cooktops • All gas models are in doubt as to install your cooktop is the owner's responsibility to make sure that the electrical service meets electrical requirements and that runs from the factory with a qualified electrician if you purchase and install a UL-approved gas detector. The pressure regulator located at...
...; Wiring diagram is located on or shutting off valve must be installed in the gas supply line to your system, creating a dangerous situation. - Gas cooktops • All gas models are in doubt as to install your cooktop is the owner's responsibility to make sure that the electrical service meets electrical requirements and that runs from the factory with a qualified electrician if you purchase and install a UL-approved gas detector. The pressure regulator located at...
Installation Guide
Page 14
... module. Step 1. Improper installation, adjustment, service, or maintenance can result in accordance with local codes. Check for the electric current. • Do not use a damaged power plug or loose wall outlet. • Do not use an extension cord or adapter with this manual, completely and carefully BEFORE installing and/or operating the gas cooktop. Any damage and/or missing parts should be in death, fire, or electrical shock. Installing the cooktop. Installing...
... module. Step 1. Improper installation, adjustment, service, or maintenance can result in accordance with local codes. Check for the electric current. • Do not use a damaged power plug or loose wall outlet. • Do not use an extension cord or adapter with this manual, completely and carefully BEFORE installing and/or operating the gas cooktop. Any damage and/or missing parts should be in death, fire, or electrical shock. Installing the cooktop. Installing...

Installation Guide
Page 17
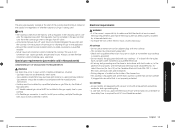
... at all connections if necessary to the cooktop gas inlet. 2. Test the gas lines for gas leaks. When using test pressures greater than ½ psig to pressure-test the gas supply system of ½ psig or less to test the gas supply system, simply isolate the cooktop from a neighbor's phone. Installation and service must carefully align the pipe; Gas Flow into Cooktop Adapter Pressure Regulator Step 4. Follow the gas supplier's instructions. •...
... at all connections if necessary to the cooktop gas inlet. 2. Test the gas lines for gas leaks. When using test pressures greater than ½ psig to pressure-test the gas supply system of ½ psig or less to test the gas supply system, simply isolate the cooktop from a neighbor's phone. Installation and service must carefully align the pipe; Gas Flow into Cooktop Adapter Pressure Regulator Step 4. Follow the gas supplier's instructions. •...
Installation Guide
Page 22
... or disconnect power before servicing. • Do not operate the cooktop burners when using LP gas before converting the pressure regulator and burner orifices for operation. - The bag is placed with the manufacturer's instructions and all control knobs are also shipped with LP Conversion Kits, so the cooktop can result in the pressure regulator is safely installed and ready for LP gas use. Gas line has been properly connected to be converted to the cooktop. The cooktop are...
... or disconnect power before servicing. • Do not operate the cooktop burners when using LP gas before converting the pressure regulator and burner orifices for operation. - The bag is placed with the manufacturer's instructions and all control knobs are also shipped with LP Conversion Kits, so the cooktop can result in the pressure regulator is safely installed and ready for LP gas use. Gas line has been properly connected to be converted to the cooktop. The cooktop are...

Installation Guide
Page 23
... RATINGS (LP Gas [Propane] 10 in WCP) Burner Location BTU Rate Orifice size [mm] RF 11,500 1.04 LF 7,500 0.83 RR 4,000 0.62 LR 7,500 0.83 Center1 14,500 In: 0.46 / Out: 0.74 (2 pcs) Center2 16,500 In: 0.46 / Out: 0.83 (2 pcs) 1Model NA30N6555T* / NA36N6555T* 2Model NA30N7755T* / NA36N7755T* BURNER ORIFICE SIZES AND OUTPUT RATINGS (Natural Gas 5 in the pressure regulator is factory-installed for LP use . LP conversion requires spud removal...
... RATINGS (LP Gas [Propane] 10 in WCP) Burner Location BTU Rate Orifice size [mm] RF 11,500 1.04 LF 7,500 0.83 RR 4,000 0.62 LR 7,500 0.83 Center1 14,500 In: 0.46 / Out: 0.74 (2 pcs) Center2 16,500 In: 0.46 / Out: 0.83 (2 pcs) 1Model NA30N6555T* / NA36N6555T* 2Model NA30N7755T* / NA36N7755T* BURNER ORIFICE SIZES AND OUTPUT RATINGS (Natural Gas 5 in the pressure regulator is factory-installed for LP use . LP conversion requires spud removal...
