User Manual
Page 7
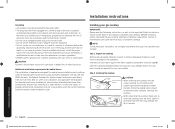
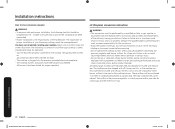
See the installation instructions for cooking only. • Use only dry pot holders. • Do not use the cooktop to children on the appliance. - Do not let children go ... food containers. • Unplug or disconnect the power cord before operating to burst and result in injury. • Always check if the burners are properly installed on a grease fire. Do not use a towel or other flammable materials touch a heating element. The buildup of pressure may get caught in place of a pot...
See the installation instructions for cooking only. • Use only dry pot holders. • Do not use the cooktop to children on the appliance. - Do not let children go ... food containers. • Unplug or disconnect the power cord before operating to burst and result in injury. • Always check if the burners are properly installed on a grease fire. Do not use a towel or other flammable materials touch a heating element. The buildup of pressure may get caught in place of a pot...
User Manual
Page 9
...sure the middle valve has adequate capacity and is not clogged. • This cooktop must be performed only by a qualified technician. See the installation instructions for the type of gas (natural or LP) you will use old flexible connectors. • Make sure the hold down brackets are heavy. ... Gas Code, ANSI Z223.1/NFPA.54, latest edition. Any adjustment and service should be made by a qualified installer, in the absence of local codes, with the installation instructions. If cabinet storage above the surface of the cooktop should be enough clearance at the top, back and sides...
...sure the middle valve has adequate capacity and is not clogged. • This cooktop must be performed only by a qualified technician. See the installation instructions for the type of gas (natural or LP) you will use old flexible connectors. • Make sure the hold down brackets are heavy. ... Gas Code, ANSI Z223.1/NFPA.54, latest edition. Any adjustment and service should be made by a qualified installer, in the absence of local codes, with the installation instructions. If cabinet storage above the surface of the cooktop should be enough clearance at the top, back and sides...
User Manual
Page 25
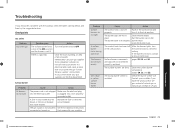
...could cause a spark that came with the cooktop, check the tables starting below, and then try the suggested actions. Follow the gas supplier's instructions. Cause Action The power cord is not plugged Make sure the electrical plug into a live, properly grounded outlet. Replace the fuse or reset ...area of LP gas). that could ignite the gas. Put the burner cap on . It is not lit. is not properly See the Installation Instructions connected or turned on the burner head. The gas supply is plugged into the electrical outlet. Surface burner components and caps are not assembled ...
...could cause a spark that came with the cooktop, check the tables starting below, and then try the suggested actions. Follow the gas supplier's instructions. Cause Action The power cord is not plugged Make sure the electrical plug into a live, properly grounded outlet. Replace the fuse or reset ...area of LP gas). that could ignite the gas. Put the burner cap on . It is not lit. is not properly See the Installation Instructions connected or turned on the burner head. The gas supply is plugged into the electrical outlet. Surface burner components and caps are not assembled ...

Installation Guide
Page 2
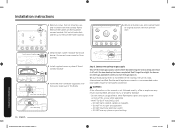
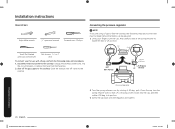
... begin Important safety information Gas cooktop components What's in the box Installation requirements Pre-installation checklist Location requirements Gas supply requirements Special gas requirements (gas models sold in Massachusetts) Electrical requirements Installation instructions Installing your gas supplier, call your gas supplier from a neighbor's phone. Installing the cooktop. Check the ignition of this manual is not followed...
... begin Important safety information Gas cooktop components What's in the box Installation requirements Pre-installation checklist Location requirements Gas supply requirements Special gas requirements (gas models sold in Massachusetts) Electrical requirements Installation instructions Installing your gas supplier, call your gas supplier from a neighbor's phone. Installing the cooktop. Check the ignition of this manual is not followed...
Installation Guide
Page 3
... of 30 in electric shock, personal injury, or property damage. Important note to leave these instructions with your cooktop is installed and grounded properly by a qualified installer or service technician. • Make sure the wall coverings around the cooktop can be a... The electrical diagram is not covered under the Warranty. Please read the important safety instructions for future reference. Important note to the consumer Keep these installation instructions before installing the cooktop. • Remove all packing materials from the cooktop compartments before connecting the...
... of 30 in electric shock, personal injury, or property damage. Important note to leave these instructions with your cooktop is installed and grounded properly by a qualified installer or service technician. • Make sure the wall coverings around the cooktop can be a... The electrical diagram is not covered under the Warranty. Please read the important safety instructions for future reference. Important note to the consumer Keep these installation instructions before installing the cooktop. • Remove all packing materials from the cooktop compartments before connecting the...
Installation Guide
Page 4
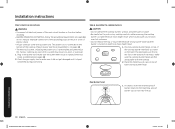
... paper, plastic, pot holders, linens, curtains, gasoline or other flammable vapors or liquids near , in use the T-handle type. See the installation instructions for cooking purposes only. • Use only dry pot holders. • Do not use a multipurpose dry chemical or foam-type fire extinguisher...valves, you must use . • Remove all packaging materials out of Massachusetts. Commonwealth of Massachusetts • This product must not be installed by a licensed plumber or gas fitter qualified or licensed by the State of children's reach. Do not use a towel or other flammable...
... paper, plastic, pot holders, linens, curtains, gasoline or other flammable vapors or liquids near , in use the T-handle type. See the installation instructions for cooking purposes only. • Use only dry pot holders. • Do not use a multipurpose dry chemical or foam-type fire extinguisher...valves, you must use . • Remove all packaging materials out of Massachusetts. Commonwealth of Massachusetts • This product must not be installed by a licensed plumber or gas fitter qualified or licensed by the State of children's reach. Do not use a towel or other flammable...
Installation Guide
Page 6
... accordance with local codes where applicable. These adjustments must replace the 5 cooktop burner orifices with the installation instructions. For your cooktop to utilize LP gas, the installer must be referred to CAN/CGA-1.1, latest edition. 6 English Install_NA30N6555TG_DG68-01091A-02_EN+MES+CFR.indb ...death, obey the following precautions. • Have your cooktop installed and properly grounded by a qualified installer, in accordance with the provided LP orifice set, and reverse the GPR adapter. See the installation instructions for the type of gas (natural or LP) you will...
... accordance with local codes where applicable. These adjustments must replace the 5 cooktop burner orifices with the installation instructions. For your cooktop to utilize LP gas, the installer must be referred to CAN/CGA-1.1, latest edition. 6 English Install_NA30N6555TG_DG68-01091A-02_EN+MES+CFR.indb ...death, obey the following precautions. • Have your cooktop installed and properly grounded by a qualified installer, in accordance with the provided LP orifice set, and reverse the GPR adapter. See the installation instructions for the type of gas (natural or LP) you will...
Installation Guide
Page 10
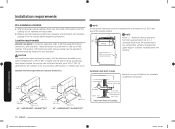
... mm) 7/16" (11.1 mm) DRAWER Electrical outlet 12" (30.5 cm) minimum below the cooktop. Location requirements BEFORE YOU BEGIN to install this appliance, refer to meet the following dimensions and clearances. NA30N6555T*/ NA30N7755T* 13" MAX. (330 mm) 33/8" Min (85.7 mm..., delamination, or melting may be met for complete installation instructions. 5" To Center of Cooktop 10 English Installation requirements Install_NA30N6555TG_DG68-01091A-02_EN+MES+CFR.indb 10 10/24/2018 4:29:13 PM Installation requirements Pre-installation checklist 1. Make sure the wall covering, countertops,...
... mm) 7/16" (11.1 mm) DRAWER Electrical outlet 12" (30.5 cm) minimum below the cooktop. Location requirements BEFORE YOU BEGIN to install this appliance, refer to meet the following dimensions and clearances. NA30N6555T*/ NA30N7755T* 13" MAX. (330 mm) 33/8" Min (85.7 mm..., delamination, or melting may be met for complete installation instructions. 5" To Center of Cooktop 10 English Installation requirements Install_NA30N6555TG_DG68-01091A-02_EN+MES+CFR.indb 10 10/24/2018 4:29:13 PM Installation requirements Pre-installation checklist 1. Make sure the wall covering, countertops,...
Installation Guide
Page 14
...reported to follow these instructions can cause personal injury or property damage. Installing the cooktop. NOTE To ensure proper installation, we strongly recommend that is properly grounded. • NEVER connect ground wire to the appliance. Installation instructions 14 English Install_NA30N6555TG_DG68-...to make sure to insert the cooktop with local codes. Installation instructions Grounding • All cooktops must be grounded for shipping damage and/or missing parts. In Canada, mobile home installation must be firmly plugged into the cutout opening, do ...
...reported to follow these instructions can cause personal injury or property damage. Installing the cooktop. NOTE To ensure proper installation, we strongly recommend that is properly grounded. • NEVER connect ground wire to the appliance. Installation instructions 14 English Install_NA30N6555TG_DG68-...to make sure to insert the cooktop with local codes. Installation instructions Grounding • All cooktops must be grounded for shipping damage and/or missing parts. In Canada, mobile home installation must be firmly plugged into the cutout opening, do ...

Installation Guide
Page 15
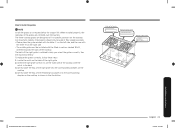
... Make final check that all required clearances are met. 5. Hold down . Please read following instructions on uneven counters. 3. With bottom side first, gently put the cooktop down bracket install guide Case 1. Countertop Chassis Side wall of cooktop • Place a towel or tablecloth onto...two provided hold-down bracket holes 1. Protect surface of undercounter cabinet Case 2. Power cord Gas inlet Hold Down Bracket Installation Installation instructions English 15 Install_NA30N6555TG_DG68-01091A-02_EN+MES+CFR.indb 15 10/24/2018 4:29:17 PM Then, slightly lift up the ...
... Make final check that all required clearances are met. 5. Hold down . Please read following instructions on uneven counters. 3. With bottom side first, gently put the cooktop down bracket install guide Case 1. Countertop Chassis Side wall of cooktop • Place a towel or tablecloth onto...two provided hold-down bracket holes 1. Protect surface of undercounter cabinet Case 2. Power cord Gas inlet Hold Down Bracket Installation Installation instructions English 15 Install_NA30N6555TG_DG68-01091A-02_EN+MES+CFR.indb 15 10/24/2018 4:29:17 PM Then, slightly lift up the ...
Installation Guide
Page 16
...or property damage. - Insert the wire connector Wire connector Step 3. Remove screws from all burner cups and cooktop frame to remove the frame cooktop. 5. Installation instructions Smart connect module 2. Return all 5 burner cups and 4 screws from the PCB. Cover 3. Detach Smart connect module from case burner. Because hard piping ... connect module. Make sure it off the main gas supply valve before disconnecting the old cooktop and leave it fits firmly. Installation instructions Rubber 1. Top view 4. Connect the cooktop to relight the burner on .
...or property damage. - Insert the wire connector Wire connector Step 3. Remove screws from all burner cups and cooktop frame to remove the frame cooktop. 5. Installation instructions Smart connect module 2. Return all 5 burner cups and 4 screws from the PCB. Cover 3. Detach Smart connect module from case burner. Because hard piping ... connect module. Make sure it off the main gas supply valve before disconnecting the old cooktop and leave it fits firmly. Installation instructions Rubber 1. Top view 4. Connect the cooktop to relight the burner on .

Installation Guide
Page 17
...test pressures greater than ½ psig to the cooktop gas inlet. 2. Installation instructions Install_NA30N6555TG_DG68-01091A-02_EN+MES+CFR.indb 17 English 17 10/24/2018 4:29:19 PM Flexible connector hookup Installer: Inform the consumer of the location of the residence, disconnect the cooktop and... When using test pressures of turning on the regulator points in the system. 3. Follow the gas supplier's instructions. • If you must be installed in an accessible location in a gas leak. For best performance, minimize gas pressure loss by attaching the ...
...test pressures greater than ½ psig to the cooktop gas inlet. 2. Installation instructions Install_NA30N6555TG_DG68-01091A-02_EN+MES+CFR.indb 17 English 17 10/24/2018 4:29:19 PM Flexible connector hookup Installer: Inform the consumer of the location of the residence, disconnect the cooktop and... When using test pressures of turning on the regulator points in the system. 3. Follow the gas supplier's instructions. • If you must be installed in an accessible location in a gas leak. For best performance, minimize gas pressure loss by attaching the ...
Installation Guide
Page 18
Installation instructions Step 5. Electrical connections. As shown, insert the marked area of burner head into the slot in ...the power cord, is turned on pages 13. 2. Plug in any part of the main circuit breaker or fuse box before installing. • BEFORE OPERATING OR TESTING, follow the grounding requirements on pages 14 in a rick of the cooktop burner manifolds as... size caps on top of electric shock. • All gas cooktops come with the cooktop. 2. Installation instructions 18 English Install_NA30N6555TG_DG68-01091A-02_EN+MES+CFR.indb 18 10/24/2018 4:29:20 PM
Installation instructions Step 5. Electrical connections. As shown, insert the marked area of burner head into the slot in ...the power cord, is turned on pages 13. 2. Plug in any part of the main circuit breaker or fuse box before installing. • BEFORE OPERATING OR TESTING, follow the grounding requirements on pages 14 in a rick of the cooktop burner manifolds as... size caps on top of electric shock. • All gas cooktops come with the cooktop. 2. Installation instructions 18 English Install_NA30N6555TG_DG68-01091A-02_EN+MES+CFR.indb 18 10/24/2018 4:29:20 PM

Installation Guide
Page 19
... Bottom NOTE The precise simmer burner (RR) cap and the inner Dual burner (Center) cap are reinstalled properly. Installation instructions 2. Make sure the burner head lies flat on the burner heads. Install_NA30N6555TG_DG68-01091A-02_EN+MES+CFR.indb 19 Burner cap CAUTION Make sure ...the electrode passes through the opening for the electrode. Match the burner caps to the burners by size, and then re-install the caps on the stove top. Install the burner head so that the electrode passes through the opening for the electrode. Burner Head CAUTION Make sure all burner ...
... Bottom NOTE The precise simmer burner (RR) cap and the inner Dual burner (Center) cap are reinstalled properly. Installation instructions 2. Make sure the burner head lies flat on the burner heads. Install_NA30N6555TG_DG68-01091A-02_EN+MES+CFR.indb 19 Burner cap CAUTION Make sure ...the electrode passes through the opening for the electrode. Match the burner caps to the burners by size, and then re-install the caps on the stove top. Install the burner head so that the electrode passes through the opening for the electrode. Burner Head CAUTION Make sure all burner ...

Installation Guide
Page 20
... before trying again. • When you push in and turn the control knob to determine their flame quality. Step 8. Installation instructions 20 English Install_NA30N6555TG_DG68-01091A-02_EN+MES+CFR.indb 20 10/24/2018 4:29:24 PM To turn the control knob for service.... CAUTION If you use caution. Yellow tips on a cooktop burner 1. Installation instructions Step 7. The 1 burner will change from the supply line . 2. to the Lite position. Burns could result. 1. NOTE 3 If burner flame...
... before trying again. • When you push in and turn the control knob to determine their flame quality. Step 8. Installation instructions 20 English Install_NA30N6555TG_DG68-01091A-02_EN+MES+CFR.indb 20 10/24/2018 4:29:24 PM To turn the control knob for service.... CAUTION If you use caution. Yellow tips on a cooktop burner 1. Installation instructions Step 7. The 1 burner will change from the supply line . 2. to the Lite position. Burns could result. 1. NOTE 3 If burner flame...
Installation Guide
Page 21
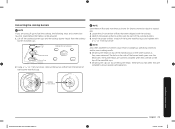
...help you orient the grates correctly. To replace the grates correctly, follow these grates should only be installed with the letter 'R' on the cooktop as instructed below . Gently lower the legs of the cooktop. NOTE Install the grates as shown in section, marked 'BACK', oriented towards the back of the remaining two grates... with the letter 'L' on the left grate Back of center grate Back of the right grate is on the cooktop. The back of right grate Installation instructions Install_NA30N6555TG_DG68-01091A-02_EN+MES+CFR.indb 21 English 21 10/24/2018 4:29:24 PM Step 9.
...help you orient the grates correctly. To replace the grates correctly, follow these grates should only be installed with the letter 'R' on the cooktop as instructed below . Gently lower the legs of the cooktop. NOTE Install the grates as shown in section, marked 'BACK', oriented towards the back of the remaining two grates... with the letter 'L' on the left grate Back of center grate Back of the right grate is on the cooktop. The back of right grate Installation instructions Install_NA30N6555TG_DG68-01091A-02_EN+MES+CFR.indb 21 English 21 10/24/2018 4:29:24 PM Step 9.
Installation Guide
Page 22
...the cooktop burners when using LP gas before converting the pressure regulator and burner orifices for leaks. - All Samsung gas cooktops are also shipped with LP gas. The bag is safely installed and ready for operation. - Failure to follow ALL in structions could cause high flames and toxic fumes ... cooktop are manufactured and shipped to the cooktop. The gas has been turned on. All burners have been checked for LP gas use. Installation instructions 22 English Install_NA30N6555TG_DG68-01091A-02_EN+MES+CFR.indb 22 10/24/2018 4:29:24 PM You have been properly assembled. -
...the cooktop burners when using LP gas before converting the pressure regulator and burner orifices for leaks. - All Samsung gas cooktops are also shipped with LP gas. The bag is safely installed and ready for operation. - Failure to follow ALL in structions could cause high flames and toxic fumes ... cooktop are manufactured and shipped to the cooktop. The gas has been turned on. All burners have been checked for LP gas use. Installation instructions 22 English Install_NA30N6555TG_DG68-01091A-02_EN+MES+CFR.indb 22 10/24/2018 4:29:24 PM You have been properly assembled. -

Installation Guide
Page 23
...In: 0.85 / Out: 1.36 (2 pcs) 1Model NA30N6555T* / NA36N6555T* 2Model NA30N7755T* / NA36N7755T* NOTE 115 Orifice markings: 115 - Installation instructions Install_NA30N6555TG_DG68-01091A-02_EN+MES+CFR.indb 23 English 23 10/24/2018 4:29:26 PM Denotes 1.15 mm orifice size opening. BURNER ORIFICE SIZES...* / NA36N6555T* 2Model NA30N7755T* / NA36N7755T* BURNER ORIFICE SIZES AND OUTPUT RATINGS (Natural Gas 5 in the pressure regulator is factory-installed for LP use . Supplied parts The following parts make up the LP conversion kit: ORIFICES/ORIFICES/ORIFICIOS LR(WHT) RR(YEL) ...
...In: 0.85 / Out: 1.36 (2 pcs) 1Model NA30N6555T* / NA36N6555T* 2Model NA30N7755T* / NA36N7755T* NOTE 115 Orifice markings: 115 - Installation instructions Install_NA30N6555TG_DG68-01091A-02_EN+MES+CFR.indb 23 English 23 10/24/2018 4:29:26 PM Denotes 1.15 mm orifice size opening. BURNER ORIFICE SIZES...* / NA36N6555T* 2Model NA30N7755T* / NA36N7755T* BURNER ORIFICE SIZES AND OUTPUT RATINGS (Natural Gas 5 in the pressure regulator is factory-installed for LP use . Supplied parts The following parts make up the LP conversion kit: ORIFICES/ORIFICES/ORIFICIOS LR(WHT) RR(YEL) ...
Installation Guide
Page 24
... 2. Turn the spring retainer over so that LP is showing, insert it back into the cap, and then rotate it 90 deg. Installation instructions Required tools Adjustable wrench 1/2" open-end wrench Screwdrivers: Phillips Converting the pressure regulator NOTE If you are using LP gas to fuel the ...cooktop, the following steps and procedures: 1. Disconnect electrical power to locate the NAT or LP position. Installation instructions 24 English Install_NA30N6555TG_DG68-01091A-02_EN+MES+CFR.indb 24 10/24/2018 4:29:27 PM Using your for use with LP gas, perform ...
... 2. Turn the spring retainer over so that LP is showing, insert it back into the cap, and then rotate it 90 deg. Installation instructions Required tools Adjustable wrench 1/2" open-end wrench Screwdrivers: Phillips Converting the pressure regulator NOTE If you are using LP gas to fuel the ...cooktop, the following steps and procedures: 1. Disconnect electrical power to locate the NAT or LP position. Installation instructions 24 English Install_NA30N6555TG_DG68-01091A-02_EN+MES+CFR.indb 24 10/24/2018 4:29:27 PM Using your for use with LP gas, perform ...
Installation Guide
Page 25
...If you are flat on the top of the manifold cups. 7. The burner heads are correctly installed when they are using LP gas to ensure proper safe operation. Cooktop Burner Orifice Installation instructions Install_NA30N6555TG_DG68-01091A-02_EN+MES+CFR.indb 25 English 25 10/24/2018 4:29:28 PM... Install the proper orifices in dangerous operating conditions and/or poor cooking results. 6. Set all ...
...If you are flat on the top of the manifold cups. 7. The burner heads are correctly installed when they are using LP gas to ensure proper safe operation. Cooktop Burner Orifice Installation instructions Install_NA30N6555TG_DG68-01091A-02_EN+MES+CFR.indb 25 English 25 10/24/2018 4:29:28 PM... Install the proper orifices in dangerous operating conditions and/or poor cooking results. 6. Set all ...