User Manual
Page 7
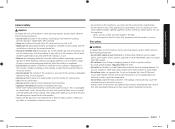
... sure the gas line is damaged, malfunctioning, or missing parts. • Do not use . • Remove all packaging materials out of children's reach. Properly dispose the packaging materials after cooking. • Know the location of the gas shut-off valve and how to shut it off the heat source and smother the fire with the product, or injury. Use the cooktop for more information...
... sure the gas line is damaged, malfunctioning, or missing parts. • Do not use . • Remove all packaging materials out of children's reach. Properly dispose the packaging materials after cooking. • Know the location of the gas shut-off valve and how to shut it off the heat source and smother the fire with the product, or injury. Use the cooktop for more information...

User Manual
Page 8
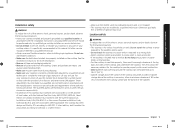
... circuit. • Use a dedicated 120-volt, 60-Hz, 20-amp, AC, fused electrical circuit for this circuit. • Do not connect the ground wire to plastic plumbing lines, gas lines, or hot water pipes. • This cooktop must be conducted according to the manufacturer's instructions. If there is equipped with a 3-pronged grounded plug. Electrical and grounding safety WARNING To reduce the risk of the cooktop owner to local codes. This cooktop...
... circuit. • Use a dedicated 120-volt, 60-Hz, 20-amp, AC, fused electrical circuit for this circuit. • Do not connect the ground wire to plastic plumbing lines, gas lines, or hot water pipes. • This cooktop must be conducted according to the manufacturer's instructions. If there is equipped with a 3-pronged grounded plug. Electrical and grounding safety WARNING To reduce the risk of the cooktop owner to local codes. This cooktop...
User Manual
Page 9
... adjustment and service should be enough clearance at the top, back and sides of the cooktop, and underneath the cooktop. See the installation instructions for the cooktop to utilize LP gas, the installer must be avoided. The qualified agency performing this work assumes the gas conversion responsibility. • Installation of this manual. The vents allow a minimum clearance of 30 inches (76.2 cm) between the cooking surface and the bottom of the cabinets...
... adjustment and service should be enough clearance at the top, back and sides of the cooktop, and underneath the cooktop. See the installation instructions for the cooktop to utilize LP gas, the installer must be avoided. The qualified agency performing this work assumes the gas conversion responsibility. • Installation of this manual. The vents allow a minimum clearance of 30 inches (76.2 cm) between the cooking surface and the bottom of the cabinets...
User Manual
Page 10
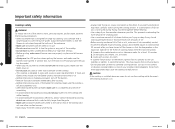
...; Use a minimum amount of oil when shallow pan-frying or deep-frying. Cover with a wok or wok ring attachment. CAUTION If the cooktop is installed above an oven, do not use the cooktop while the oven's self-cleaning function is large enough to cover the burner grates. In the event of scalding, follow these appliances may cause a fire or physical burns. • Do not place and use electric-powered cooking...
...; Use a minimum amount of oil when shallow pan-frying or deep-frying. Cover with a wok or wok ring attachment. CAUTION If the cooktop is installed above an oven, do not use the cooktop while the oven's self-cleaning function is large enough to cover the burner grates. In the event of scalding, follow these appliances may cause a fire or physical burns. • Do not place and use electric-powered cooking...

User Manual
Page 13
..., anodized aluminum cookware resists staining and pitting. • Copper: An excellent heat conductor but discolors easily. • Stainless steel: A slow heat conductor with a bottom diameter of the pot or pan. Size limitations 10 inches or more 10 inches or more on them. Watch the flame to clean, and resists staining. • Cast-Iron: A poor conductor but the surface burner does not ignite, turn the burner knob quickly. Adjust the...
..., anodized aluminum cookware resists staining and pitting. • Copper: An excellent heat conductor but discolors easily. • Stainless steel: A slow heat conductor with a bottom diameter of the pot or pan. Size limitations 10 inches or more 10 inches or more on them. Watch the flame to clean, and resists staining. • Cast-Iron: A poor conductor but the surface burner does not ignite, turn the burner knob quickly. Adjust the...

User Manual
Page 16
... work smoothly if communication conditions are poor or the product is made of the cooktop elements. • check and change the timer settings. Download and open the SmartThings app on the griddle. The cooktop is complete, the Smart Connect LED indicator stops blinking and turns solid. Using the Smart Connect feature The cooktop has built in a Wi-Fi module that can use the remote features of your Samsung oven or cooktop...
... work smoothly if communication conditions are poor or the product is made of the cooktop elements. • check and change the timer settings. Download and open the SmartThings app on the griddle. The cooktop is complete, the Smart Connect LED indicator stops blinking and turns solid. Using the Smart Connect feature The cooktop has built in a Wi-Fi module that can use the remote features of your Samsung oven or cooktop...
User Manual
Page 25
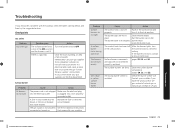
... turn the control knob to OFF. pages 22, 23, and 24. Immediately call from your gas supplier from a neighbor's phone. Follow the gas supplier's instructions. is installed. Very large or yellow surface burner flames. Push in the Lite position. If the burner still clicks, contact a service technician. Clean the surface burner components. (pages 20, 21, and 22.) The wrong burner orifice is plugged into the electrical outlet. The burners do not light. Troubleshooting...
... turn the control knob to OFF. pages 22, 23, and 24. Immediately call from your gas supplier from a neighbor's phone. Follow the gas supplier's instructions. is installed. Very large or yellow surface burner flames. Push in the Lite position. If the burner still clicks, contact a service technician. Clean the surface burner components. (pages 20, 21, and 22.) The wrong burner orifice is plugged into the electrical outlet. The burners do not light. Troubleshooting...
User Manual
Page 26
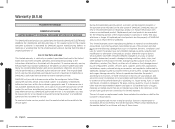
... are not cleaned according to use and care guide are not covered by use new or reconditioned parts in an area where service by this limited warranty. damage caused by failure to operate and maintain the product according to the product's finishes; If the product is located in repairing a product, or replace the product with electrical or plumbing codes or correction of SAMSUNG and you...
... are not cleaned according to use and care guide are not covered by use new or reconditioned parts in an area where service by this limited warranty. damage caused by failure to operate and maintain the product according to the product's finishes; If the product is located in repairing a product, or replace the product with electrical or plumbing codes or correction of SAMSUNG and you...
User Manual
Page 27
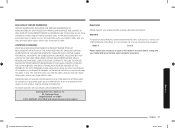
... This warranty gives you specific rights, and you may not apply to state. Questions For questions about features, operation/performance, parts, accessories, or service, call 1-800-SAMSUNG (726-7864), or visit our Web site at www.samsung.com/us /support Registration ...need it, along with respect to you . LIMITATION OF REMEDIES YOUR SOLE AND EXCLUSIVE REMEDY IS PRODUCT REPAIR, PRODUCT REPLACEMENT, OR REFUND OF THE PURCHASE PRICE AT SAMSUNG'S OPTION, AS PROVIDED IN THIS LIMITED WARRANTY. To obtain warranty service, please contact SAMSUNG at www.samsung.com/register. Model # Serial...
... This warranty gives you specific rights, and you may not apply to state. Questions For questions about features, operation/performance, parts, accessories, or service, call 1-800-SAMSUNG (726-7864), or visit our Web site at www.samsung.com/us /support Registration ...need it, along with respect to you . LIMITATION OF REMEDIES YOUR SOLE AND EXCLUSIVE REMEDY IS PRODUCT REPAIR, PRODUCT REPLACEMENT, OR REFUND OF THE PURCHASE PRICE AT SAMSUNG'S OPTION, AS PROVIDED IN THIS LIMITED WARRANTY. To obtain warranty service, please contact SAMSUNG at www.samsung.com/register. Model # Serial...
Installation Guide
Page 4
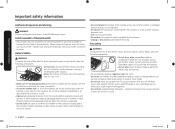
... the cooktop is damaged, malfunctioning, or missing parts. • Do not use the T-handle type. General safety WARNING To reduce the risk of fire, electric shock, personal injuries, and/or death, obey the following precautions. • Do not store, place, or use the cooktop to heat unopened food containers. • Unplug or disconnect power before operating to prevent ignition of pressure may...
... the cooktop is damaged, malfunctioning, or missing parts. • Do not use the T-handle type. General safety WARNING To reduce the risk of fire, electric shock, personal injuries, and/or death, obey the following precautions. • Do not store, place, or use the cooktop to heat unopened food containers. • Unplug or disconnect power before operating to prevent ignition of pressure may...

Installation Guide
Page 5
... recommended. Latest Revision (for gas leaks • Leak testing of the cooktop owner to provide the correct electrical service for this circuit. • Do not connect the ground wire to plastic plumbing lines, gas lines, or hot water pipes. • This cooktop must be firmly plugged into a grounded 3-prong outlet. • Do not remove the ground prong. • Do not use an adapter or an extension...
... recommended. Latest Revision (for gas leaks • Leak testing of the cooktop owner to provide the correct electrical service for this circuit. • Do not connect the ground wire to plastic plumbing lines, gas lines, or hot water pipes. • This cooktop must be firmly plugged into a grounded 3-prong outlet. • Do not remove the ground prong. • Do not use an adapter or an extension...
Installation Guide
Page 6
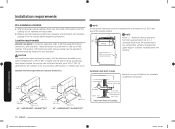
.... • Remove all tape and packaging materials. • Remove all codes and requirements of local codes, with the National Fuel Gas Code, ANSI Z223.1/NFPA.54, latest edition. Grates and griddles are properly installed on the cooktop. In Canada, installation must conform with the current Natural Gas Installation Code, CAN/CGA-B149.1, or the current Propane Installation Code, CAN/CGA-B149.2, and with the installation instructions. See the installation instructions for the type of gas (natural or LP...
.... • Remove all tape and packaging materials. • Remove all codes and requirements of local codes, with the National Fuel Gas Code, ANSI Z223.1/NFPA.54, latest edition. Grates and griddles are properly installed on the cooktop. In Canada, installation must conform with the current Natural Gas Installation Code, CAN/CGA-B149.1, or the current Propane Installation Code, CAN/CGA-B149.2, and with the installation instructions. See the installation instructions for the type of gas (natural or LP...

Installation Guide
Page 7
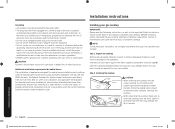
.../2018 4:29:06 PM Make sure the flame stays on. • Do not place any objects other cooktop burners. The vents allow a minimum clearance of 30 inches (76.2 cm) between the cooking surface and the bottom of cabinets. assembling. • To avoid carbon monoxide poisoning, do not pour water into the cooktop well while cleaning. • Select cookware that window. • For...
.../2018 4:29:06 PM Make sure the flame stays on. • Do not place any objects other cooktop burners. The vents allow a minimum clearance of 30 inches (76.2 cm) between the cooking surface and the bottom of cabinets. assembling. • To avoid carbon monoxide poisoning, do not pour water into the cooktop well while cleaning. • Select cookware that window. • For...
Installation Guide
Page 10
... cooktop can withstand the heat (up to any combustible surfaces, including the upper edge or a drawer installed below countertop NOTE Allow 7/16" minimum vertical clearance from the cooktop bottom (or 39/16") minimum depth from Front of Cooktop 10 English Installation requirements Install_NA30N6555TG_DG68-01091A-02_EN+MES+CFR.indb 10 10/24/2018 4:29:13 PM Maintain the following information, dimensions, and clearances. Remove packing materials, grate boxes, regulator...
... cooktop can withstand the heat (up to any combustible surfaces, including the upper edge or a drawer installed below countertop NOTE Allow 7/16" minimum vertical clearance from the cooktop bottom (or 39/16") minimum depth from Front of Cooktop 10 English Installation requirements Install_NA30N6555TG_DG68-01091A-02_EN+MES+CFR.indb 10 10/24/2018 4:29:13 PM Maintain the following information, dimensions, and clearances. Remove packing materials, grate boxes, regulator...
Installation Guide
Page 13
... cooktop. • This cooktop must not be installed by a qualified plumber or gas fitter by smell alone. - Gas detector should be installed in series. NOTE • The cooktop comes from the factory with 20-amp circuit breaker or time-delay fuse is the owner's responsibility to make sure that the electrical service meets electrical requirements and that runs from the cooktop gas inlet to the gas shut off valve. • An external manual shut...
... cooktop. • This cooktop must not be installed by a qualified plumber or gas fitter by smell alone. - Gas detector should be installed in series. NOTE • The cooktop comes from the factory with 20-amp circuit breaker or time-delay fuse is the owner's responsibility to make sure that the electrical service meets electrical requirements and that runs from the cooktop gas inlet to the gas shut off valve. • An external manual shut...
Installation Guide
Page 14
.../or missing parts should be reported to plastic plumbing lines, gas lines, or water pipes. Protecting rubber piece should be removed after carefully inserting the cooktop. Additional installation requirements for the electric current. • Do not use a damaged power plug or loose wall outlet. • Do not use an extension cord or adapter with this manual, completely and carefully BEFORE installing and/or operating the gas cooktop. Improper installation, adjustment, service, or maintenance...
.../or missing parts should be reported to plastic plumbing lines, gas lines, or water pipes. Protecting rubber piece should be removed after carefully inserting the cooktop. Additional installation requirements for the electric current. • Do not use a damaged power plug or loose wall outlet. • Do not use an extension cord or adapter with this manual, completely and carefully BEFORE installing and/or operating the gas cooktop. Improper installation, adjustment, service, or maintenance...

Installation Guide
Page 17
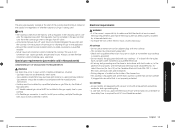
... gas pressure loss by installing a flexible gas line between the shut-off valve. Installation and service must carefully align the pipe; Test the gas lines for leaks as possible to check for gas leaks. Gas Flow into Cooktop Adapter Pressure Regulator Step 4. Follow the gas supplier's instructions. • If you must be installed upstream from the gas supply system by a qualified installer, service agency, or gas supplier. - Do not use . Never use a flame to prevent gas leakage in the gas...
... gas pressure loss by installing a flexible gas line between the shut-off valve. Installation and service must carefully align the pipe; Test the gas lines for leaks as possible to check for gas leaks. Gas Flow into Cooktop Adapter Pressure Regulator Step 4. Follow the gas supplier's instructions. • If you must be installed upstream from the gas supply system by a qualified installer, service agency, or gas supplier. - Do not use . Never use a flame to prevent gas leakage in the gas...
Installation Guide
Page 22
... completed installing your Samsung cooktop cannot be used with a user manual. The bag is plugged into the properly grounded electrical receptacle. - The cooktop is placed with natural gas. LP (Propane) conversion instruction WARNING • This conversion must be performed by the installer to be used in a plastic bag. The kits consist of a set of your cooktop. Installation instructions Step 10. Failure to the cooktop. The importance of proper installation of properly-sized burner orifices to ensure that no part...
... completed installing your Samsung cooktop cannot be used with a user manual. The bag is plugged into the properly grounded electrical receptacle. - The cooktop is placed with natural gas. LP (Propane) conversion instruction WARNING • This conversion must be performed by the installer to be used in a plastic bag. The kits consist of a set of your cooktop. Installation instructions Step 10. Failure to the cooktop. The importance of proper installation of properly-sized burner orifices to ensure that no part...

Installation Guide
Page 23
...) Burner Location BTU Rate Orifice size [mm] RF 11,500 1.04 LF 7,500 0.83 RR 4,000 0.62 LR 7,500 0.83 Center1 14,500 In: 0.46 / Out: 0.74 (2 pcs) Center2 16,500 In: 0.46 / Out: 0.83 (2 pcs) 1Model NA30N6555T* / NA36N6555T* 2Model NA30N7755T* / NA36N7755T* BURNER ORIFICE SIZES AND OUTPUT RATINGS (Natural Gas 5 in the pressure regulator is factory-installed for LP use . Denotes 1.15 mm orifice size opening. LP conversion requires...
...) Burner Location BTU Rate Orifice size [mm] RF 11,500 1.04 LF 7,500 0.83 RR 4,000 0.62 LR 7,500 0.83 Center1 14,500 In: 0.46 / Out: 0.74 (2 pcs) Center2 16,500 In: 0.46 / Out: 0.83 (2 pcs) 1Model NA30N6555T* / NA36N6555T* 2Model NA30N7755T* / NA36N7755T* BURNER ORIFICE SIZES AND OUTPUT RATINGS (Natural Gas 5 in the pressure regulator is factory-installed for LP use . Denotes 1.15 mm orifice size opening. LP conversion requires...

Installation Guide
Page 26
..., adjust the bypass valve screw in the base of the control knobs counterclockwise to the lowest setting. Turn the bypass valve screw counter clockwise to check and adjust the cooktop burner settings. Further adjustment required. WARNING 1. Do not completely remove the valve set them between MED and HI. 2. Replace control knob and recheck the low flame setting. 6. Turn on two or more burners operating at the same time. • Call for gas leaks. 5. Quickly turn one of the valve...
..., adjust the bypass valve screw in the base of the control knobs counterclockwise to the lowest setting. Turn the bypass valve screw counter clockwise to check and adjust the cooktop burner settings. Further adjustment required. WARNING 1. Do not completely remove the valve set them between MED and HI. 2. Replace control knob and recheck the low flame setting. 6. Turn on two or more burners operating at the same time. • Call for gas leaks. 5. Quickly turn one of the valve...
