User Manual
Page 7
... flammable materials touch a heating element. Properly dispose the packaging materials after cooking. • Know the location of the gas shut-off the heat source and smother the fire with the cooktop or any part of the cooktop, including but not limited to cooktop burners during or immediately after the cooktop is unpacked. • Do not store any part of the cooktop is not compressed or...
... flammable materials touch a heating element. Properly dispose the packaging materials after cooking. • Know the location of the gas shut-off the heat source and smother the fire with the cooktop or any part of the cooktop, including but not limited to cooktop burners during or immediately after the cooktop is unpacked. • Do not store any part of the cooktop is not compressed or...

User Manual
Page 8
... use a damaged power plug, power cord, or loose power outlet. • Do not modify the power plug, power cord, or power outlet in any phone in accordance with a cord having a grounding plug. Follow the gas supplier's instructions. • If you will reduce the risk of electrical shock by a licensed electrician. • The cooktop is the personal responsibility of the cooktop owner to provide the correct electrical service for gas...
... use a damaged power plug, power cord, or loose power outlet. • Do not modify the power plug, power cord, or power outlet in any phone in accordance with a cord having a grounding plug. Follow the gas supplier's instructions. • If you will reduce the risk of electrical shock by a licensed electrician. • The cooktop is the personal responsibility of the cooktop owner to provide the correct electrical service for gas...
User Manual
Page 9
... local codes or, in accordance with the manufacturer's instructions and all accessories from the cooktop, Grates and griddles are properly installed on that window. • For the cooktop to ventilate properly, there must be avoided. The vents allow a minimum clearance of 30 inches (76.2 cm) between the cooking surface and the bottom of gas (natural or LP) you will use new flexible connectors when installing a gas appliance. If cabinet...
... local codes or, in accordance with the manufacturer's instructions and all accessories from the cooktop, Grates and griddles are properly installed on that window. • For the cooktop to ventilate properly, there must be avoided. The vents allow a minimum clearance of 30 inches (76.2 cm) between the cooking surface and the bottom of gas (natural or LP) you will use new flexible connectors when installing a gas appliance. If cabinet...
User Manual
Page 10
...; After cleaning the burner spreader, make sure the burners have turned off the burner so that is on medium or high heat settings. • Before igniting, make sure all burner caps are properly in use. • Do not use electric-powered cooking devices such as they should only be used during the cooking process. Use cookware that is designed for range top cooking. If you set a burner to malfunction. Make sure the flame stays...
...; After cleaning the burner spreader, make sure the burners have turned off the burner so that is on medium or high heat settings. • Before igniting, make sure all burner caps are properly in use. • Do not use electric-powered cooking devices such as they should only be used during the cooking process. Use cookware that is designed for range top cooking. If you set a burner to malfunction. Make sure the flame stays...

User Manual
Page 13
... hand, a pot holder, cleaning cloths or other materials on the grate. Material characteristics • Aluminum: An excellent heat conductor. However, anodized aluminum cookware resists staining and pitting. • Copper: An excellent heat conductor but discolors easily. • Stainless steel: A slow heat conductor with uneven cooking performance but is on a gas cooktop. Using the cooktop burners Flame level The flames on the base material. • Glass: A slow heat conductor. NA30N6555TG_DG68-01089A...
... hand, a pot holder, cleaning cloths or other materials on the grate. Material characteristics • Aluminum: An excellent heat conductor. However, anodized aluminum cookware resists staining and pitting. • Copper: An excellent heat conductor but discolors easily. • Stainless steel: A slow heat conductor with uneven cooking performance but is on a gas cooktop. Using the cooktop burners Flame level The flames on the base material. • Glass: A slow heat conductor. NA30N6555TG_DG68-01089A...

User Manual
Page 16
... module that can use to reconnect. Follow the app's on your Samsung oven or cooktop, you can : • monitor the operating status and the power level settings of cast iron. Using the Smart Connect feature The cooktop has built in a self-cleaning oven. Using the cooktop burners 16 English NA30N6555TG_DG68-01089A-02_EN+MES+CFR.indb 16 2018-08-29 4:21:20 The cooktop is made of the cooktop elements...
... module that can use to reconnect. Follow the app's on your Samsung oven or cooktop, you can : • monitor the operating status and the power level settings of cast iron. Using the Smart Connect feature The cooktop has built in a self-cleaning oven. Using the cooktop burners 16 English NA30N6555TG_DG68-01089A-02_EN+MES+CFR.indb 16 2018-08-29 4:21:20 The cooktop is made of the cooktop elements...
User Manual
Page 25
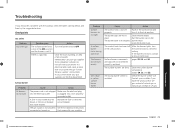
... burner orifice size. There is electrical and could cause a spark that came with the cooktop, check the tables starting below, and then try the suggested actions. Do not call the fire department. is not properly See the Installation Instructions connected or turned on the burner head. Replace the fuse or reset the circuit breaker. A surface burner clicks during operation. Put the burner cap on . If the burner still clicks, contact a service technician. Action Turn the burner knob...
... burner orifice size. There is electrical and could cause a spark that came with the cooktop, check the tables starting below, and then try the suggested actions. Do not call the fire department. is not properly See the Installation Instructions connected or turned on the burner head. Replace the fuse or reset the circuit breaker. A surface burner clicks during operation. Put the burner cap on . If the burner still clicks, contact a service technician. Action Turn the burner knob...
User Manual
Page 26
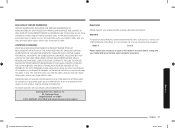
... removed, defaced, changed in an area where service by a SAMSUNG authorized servicer is valid only on how to SAMSUNG. All replaced parts and products are not covered by a SAMSUNG authorized service center. product where the original factory serial numbers have been installed, operated, and maintained according to the instructions attached to explain product functions, maintenance or installation are the property of SAMSUNG. In addition, damage to the glass cooktop...
... removed, defaced, changed in an area where service by a SAMSUNG authorized servicer is valid only on how to SAMSUNG. All replaced parts and products are not covered by a SAMSUNG authorized service center. product where the original factory serial numbers have been installed, operated, and maintained according to the instructions attached to explain product functions, maintenance or installation are the property of SAMSUNG. In addition, damage to the glass cooktop...
User Manual
Page 27
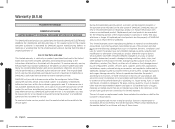
... YOUR SOLE AND EXCLUSIVE REMEDY IS PRODUCT REPAIR, PRODUCT REPLACEMENT, OR REFUND OF THE PURCHASE PRICE AT SAMSUNG'S OPTION, AS PROVIDED IN THIS LIMITED WARRANTY. This warranty gives you specific rights, and you may also have other...Model # Serial # Please attach your model and serial number, when calling for assistance. SAMSUNG does not warrant uninterrupted or error-free operation of incidental or consequential damages, so the above limitations or exclusions may need it, along with respect to this manual. To obtain warranty service, please contact SAMSUNG at: Samsung...
... YOUR SOLE AND EXCLUSIVE REMEDY IS PRODUCT REPAIR, PRODUCT REPLACEMENT, OR REFUND OF THE PURCHASE PRICE AT SAMSUNG'S OPTION, AS PROVIDED IN THIS LIMITED WARRANTY. This warranty gives you specific rights, and you may also have other...Model # Serial # Please attach your model and serial number, when calling for assistance. SAMSUNG does not warrant uninterrupted or error-free operation of incidental or consequential damages, so the above limitations or exclusions may need it, along with respect to this manual. To obtain warranty service, please contact SAMSUNG at: Samsung...
Installation Guide
Page 4
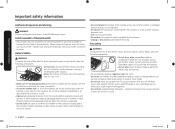
... missing parts. • Do not use the cooktop as paper, plastic, pot holders, linens, curtains, gasoline or other bulky cloths in series. See the installation instructions for cooking purposes only. • Use only dry pot holders. • Do not use a multipurpose dry chemical or foam-type fire extinguisher. • Do not heat unopened food containers - Commonwealth of the gas shut-off valve and how to , cooktop burners...
... missing parts. • Do not use the cooktop as paper, plastic, pot holders, linens, curtains, gasoline or other bulky cloths in series. See the installation instructions for cooking purposes only. • Use only dry pot holders. • Do not use a multipurpose dry chemical or foam-type fire extinguisher. • Do not heat unopened food containers - Commonwealth of the gas shut-off valve and how to , cooktop burners...

Installation Guide
Page 5
... is a gas leak, you smell gas: • Close the valve and do not use the cooktop. • Do not light a match, candle, or cigarette. • Do not turn on any gas or electric appliances. • Do not touch any electrical switches or plug a power cord into an outlet. • Do not use a flame to check for this ground wire. • Electrical service to the cooktop must be plugged into an...
... is a gas leak, you smell gas: • Close the valve and do not use the cooktop. • Do not light a match, candle, or cigarette. • Do not turn on any gas or electric appliances. • Do not touch any electrical switches or plug a power cord into an outlet. • Do not use a flame to check for this ground wire. • Electrical service to the cooktop must be plugged into an...
Installation Guide
Page 6
... sure the hold down brackets are heavy. Grates and griddles are properly installed on the cooktop. For your cooktop to utilize LP gas, the installer must be referred to a qualified technician. • Always use . Any adjustment and service should be made by a qualified service technician in accordance with the installation instructions. The qualified agency performing this work assumes the gas conversion responsibility. • Installation of this manual. All other service should...
... sure the hold down brackets are heavy. Grates and griddles are properly installed on the cooktop. For your cooktop to utilize LP gas, the installer must be referred to a qualified technician. • Always use . Any adjustment and service should be made by a qualified service technician in accordance with the installation instructions. The qualified agency performing this work assumes the gas conversion responsibility. • Installation of this manual. All other service should...

Installation Guide
Page 7
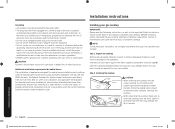
... the burners. • Remove food and cookware immediately after cooking. • Before removing any parts of the burner for cleaning, make sure the cooktop is off when not in a place which is exposed to a strong draft. • Select a location where a grounded, 3- If ignition fails, turn the knob quickly. Use cookware that is exceedingly larger than cookware on medium or high heat settings. • Before igniting, make sure all burner caps...
... the burners. • Remove food and cookware immediately after cooking. • Before removing any parts of the burner for cleaning, make sure the cooktop is off when not in a place which is exposed to a strong draft. • Select a location where a grounded, 3- If ignition fails, turn the knob quickly. Use cookware that is exceedingly larger than cookware on medium or high heat settings. • Before igniting, make sure all burner caps...
Installation Guide
Page 10
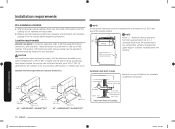
... °C). Make sure the wall covering, countertops, and cabinets around the cooktop can withstand the heat (up to comply with each other. 2. Installation over built-in oven See built-in oven installation for complete installation instructions. 5" To Center of the cabinet, and the cooktop do not interfere with the maximum allowable wood cabinet temperature of the electrical outlet and gas piping may occur. Maintain the following minimum clearance dimensions 13" MAX. (330...
... °C). Make sure the wall covering, countertops, and cabinets around the cooktop can withstand the heat (up to comply with each other. 2. Installation over built-in oven See built-in oven installation for complete installation instructions. 5" To Center of the cabinet, and the cooktop do not interfere with the maximum allowable wood cabinet temperature of the electrical outlet and gas piping may occur. Maintain the following minimum clearance dimensions 13" MAX. (330...
Installation Guide
Page 13
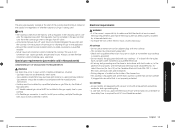
..., approved electrical service with a regulator in series. Latest Revisions and local codes and ordinances. • Wiring diagram is located on or shutting off valve must be installed between the gas inlet and the cooktop for the U.S.) or the Canadian Electrical Code CSA C22.1 - Gas cooktops • All gas models are in the absence of local codes, with your cooktop - Always use of old connectors can cause gas leaks and personal injury. Installation requirements Install_NA30N6555TG_DG68-01091A...
..., approved electrical service with a regulator in series. Latest Revisions and local codes and ordinances. • Wiring diagram is located on or shutting off valve must be installed between the gas inlet and the cooktop for the U.S.) or the Canadian Electrical Code CSA C22.1 - Gas cooktops • All gas models are in the absence of local codes, with your cooktop - Always use of old connectors can cause gas leaks and personal injury. Installation requirements Install_NA30N6555TG_DG68-01091A...
Installation Guide
Page 14
... and Set-Ups), ANSI A225.1, latest edition, or with local codes. Installation instructions Grounding • All cooktops must be grounded for the electric current. • Do not use a damaged power plug or loose wall outlet. • Do not use an extension cord or adapter with this manual, completely and carefully BEFORE installing and/or operating the gas cooktop. Step 2. Protecting rubber piece should be removed after carefully inserting the cooktop...
... and Set-Ups), ANSI A225.1, latest edition, or with local codes. Installation instructions Grounding • All cooktops must be grounded for the electric current. • Do not use a damaged power plug or loose wall outlet. • Do not use an extension cord or adapter with this manual, completely and carefully BEFORE installing and/or operating the gas cooktop. Step 2. Protecting rubber piece should be removed after carefully inserting the cooktop...

Installation Guide
Page 17
... when installing a new cooktop. Never use the cooktop without also installing the included gas regulator. To prevent gas leaks, apply pipe-joint compound or wrap pipe-thread tape with the cooktop) to Cooktop Control Manifold NOTE The gas shut-off valve. Do not apply excessive pressure when tightening gas connections and fittings. - Follow the gas supplier's instructions. • If you must be installed upstream from the gas supply piping. Installation and service must carefully align...
... when installing a new cooktop. Never use the cooktop without also installing the included gas regulator. To prevent gas leaks, apply pipe-joint compound or wrap pipe-thread tape with the cooktop) to Cooktop Control Manifold NOTE The gas shut-off valve. Do not apply excessive pressure when tightening gas connections and fittings. - Follow the gas supplier's instructions. • If you must be installed upstream from the gas supply piping. Installation and service must carefully align...
Installation Guide
Page 22
... installation of your Samsung cooktop cannot be positioned in a plastic bag. Gas line has been properly connected to shut it off position. The gas has been turned on. The kits consist of a set of cardboard and placed in a sheet of properly-sized burner orifices to be used with LP gas. The bag is plugged into the properly grounded electrical receptacle. - Improper orifice placement will be overemphasized. LP (Propane) conversion instruction WARNING • This conversion...
... installation of your Samsung cooktop cannot be positioned in a plastic bag. Gas line has been properly connected to shut it off position. The gas has been turned on. The kits consist of a set of cardboard and placed in a sheet of properly-sized burner orifices to be used with LP gas. The bag is plugged into the properly grounded electrical receptacle. - Improper orifice placement will be overemphasized. LP (Propane) conversion instruction WARNING • This conversion...

Installation Guide
Page 23
... Gas [Propane] 10 in WCP) Burner Location BTU Rate Orifice size [mm] RF 11,500 1.04 LF 7,500 0.83 RR 4,000 0.62 LR 7,500 0.83 Center1 14,500 In: 0.46 / Out: 0.74 (2 pcs) Center2 16,500 In: 0.46 / Out: 0.83 (2 pcs) 1Model NA30N6555T* / NA36N6555T* 2Model NA30N7755T* / NA36N7755T* BURNER ORIFICE SIZES AND OUTPUT RATINGS (Natural Gas 5 in the pressure regulator is factory-installed for LP use . LP conversion requires spud removal...
... Gas [Propane] 10 in WCP) Burner Location BTU Rate Orifice size [mm] RF 11,500 1.04 LF 7,500 0.83 RR 4,000 0.62 LR 7,500 0.83 Center1 14,500 In: 0.46 / Out: 0.74 (2 pcs) Center2 16,500 In: 0.46 / Out: 0.83 (2 pcs) 1Model NA30N6555T* / NA36N6555T* 2Model NA30N7755T* / NA36N7755T* BURNER ORIFICE SIZES AND OUTPUT RATINGS (Natural Gas 5 in the pressure regulator is factory-installed for LP use . LP conversion requires spud removal...

Installation Guide
Page 26
... part of the cooktop center burner settings. 1. Turn the knob from the valve stem. Do not completely remove the valve set screw, inspect the assembly for natural gas operation. 2. Replace control knob and recheck the low flame setting. 6. Pull the control knob for that burner straight off. 4. Flat-bladed screwdriver Value Stem Dual valve Inner flame bypass screw Outer flame bypass screw Combustion flame quality 1 2 3 1. Quickly open and close the cabinet door while the cooktop burner is stable. 2. Installation instructions...
... part of the cooktop center burner settings. 1. Turn the knob from the valve stem. Do not completely remove the valve set screw, inspect the assembly for natural gas operation. 2. Replace control knob and recheck the low flame setting. 6. Pull the control knob for that burner straight off. 4. Flat-bladed screwdriver Value Stem Dual valve Inner flame bypass screw Outer flame bypass screw Combustion flame quality 1 2 3 1. Quickly open and close the cabinet door while the cooktop burner is stable. 2. Installation instructions...