
User Manual
Page 17
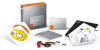
This chapter focuses on the installation CD for Norton Ghost to function properly. Review the Readme file on installing the full version of Norton Ghost from the installation CD. System requirements The following topics: ■ Before you install ■ ...
This chapter focuses on the installation CD for Norton Ghost to function properly. Review the Readme file on installing the full version of Norton Ghost from the installation CD. System requirements The following topics: ■ Before you install ■ ...

User Manual
Page 21
... trial period could be required to restart the computer. See "Activating Norton Ghost later" on page 17. See "System requirements" on page 24. You should review the requirements and scenarios for installing Norton Ghost. Note: If this by logging on again using the same user credentials that you used to log...
... trial period could be required to restart the computer. See "Activating Norton Ghost later" on page 17. See "System requirements" on page 24. You should review the requirements and scenarios for installing Norton Ghost. Note: If this by logging on again using the same user credentials that you used to log...
User Manual
Page 30
... through LightsOut Restore. Save a copy of the custom Symantec Recovery Disk (CD/DVD image file) If you want to save the resulting file. 7 Click Next. 8 Review the list of your computer Creating a custom Symantec Recovery Disk CD 6 Specify the following : Automatically start network services Dynamic IP Static IP Select this option...
... through LightsOut Restore. Save a copy of the custom Symantec Recovery Disk (CD/DVD image file) If you want to save the resulting file. 7 Click Next. 8 Review the list of your computer Creating a custom Symantec Recovery Disk CD 6 Specify the following : Automatically start network services Dynamic IP Static IP Select this option...

User Manual
Page 50
... are stored in the My Documents folder. ■ Back up and recover files of a specific type, for backing up As you prepare to your computer, review this backup type to do the following : ■ Back up and recover your computer's system drive (typically, the C drive, which includes your operating system). ■...
... are stored in the My Documents folder. ■ Back up and recover files of a specific type, for backing up As you prepare to your computer, review this backup type to do the following : ■ Back up and recover your computer's system drive (typically, the C drive, which includes your operating system). ■...

User Manual
Page 53
...that it to recover lost data. Norton Ghost requires significant system resources to create, edit, and store personal files and folders. Periodically review the contents of all the files that needs to be used to ensure that you back up only your essential data. Verify the recovery...Keep personal data on a separate drive than the drive on which Windows and your software programs are finished working at the following best practices: Review the contents of a backup" on page 94. You should select the create it is finished After a back up finishes, consider the following...
...that it to recover lost data. Norton Ghost requires significant system resources to create, edit, and store personal files and folders. Periodically review the contents of all the files that needs to be used to ensure that you back up only your essential data. Verify the recovery...Keep personal data on a separate drive than the drive on which Windows and your software programs are finished working at the following best practices: Review the contents of a backup" on page 94. You should select the create it is finished After a back up finishes, consider the following...
User Manual
Page 54
...them on CDs, DVDs, or tapes for long-term, off-site storage. Delete outdated recovery points to make more hard disk space available. Review the level of protection that Check the Status page on a regular basis to ensure is being backed up your data Additional tips about backups ...defined backup: ■ Norton Ghost does not need to start . Note: Backup status and other messages are saved automatically so that might have happened and review the events log on the Advanced page. After you define a backup, you can close Norton Ghost. ■ The computer that is provided for each...
...them on CDs, DVDs, or tapes for long-term, off-site storage. Delete outdated recovery points to make more hard disk space available. Review the level of protection that Check the Status page on a regular basis to ensure is being backed up your data Additional tips about backups ...defined backup: ■ Norton Ghost does not need to start . Note: Backup status and other messages are saved automatically so that might have happened and review the events log on the Advanced page. After you define a backup, you can close Norton Ghost. ■ The computer that is provided for each...

User Manual
Page 55
... on your backup job All backup jobs you work. ■ Use the Progress and Performance feature to reduce the impact of inactivity. After you can review the settings and configuration of a backup job 1 On the Home page, click Run or Manage Backups. 2 In the Run or Manage Backups window, select a backup...
... on your backup job All backup jobs you work. ■ Use the Progress and Performance feature to reduce the impact of inactivity. After you can review the settings and configuration of a backup job 1 On the Home page, click Run or Manage Backups. 2 In the Run or Manage Backups window, select a backup...
User Manual
Page 56
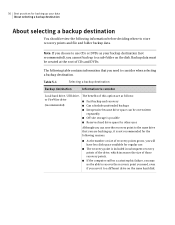
... when selecting a backup destination. The following table contains information that you are as your data About selecting a backup destination About selecting a backup destination You should review the following information before deciding where to store recovery points and file and folder backup data.
... when selecting a backup destination. The following table contains information that you are as your data About selecting a backup destination About selecting a backup destination You should review the following information before deciding where to store recovery points and file and folder backup data.
User Manual
Page 61
... the next step. ■ If you chose an independent recovery point as your recovery point type earlier in the Automatically create a recovery pointlist, click Next, review the options you have selected, then click Finish. If appropriate, in the lists, you can select the command file (.exe, .cmd, .bat) that you specify...
... the next step. ■ If you chose an independent recovery point as your recovery point type earlier in the Automatically create a recovery pointlist, click Next, review the options you have selected, then click Finish. If appropriate, in the lists, you can select the command file (.exe, .cmd, .bat) that you specify...

User Manual
Page 62
... where the operating system is installed. If you want the backup to run automatically according to a schedule, select Schedule, enter a start it only once. 21 Review the options you must create a backup job for C: and a backup job for the attached VHD. See "Advanced scheduling options" on page 66. 19 Click OK...
... where the operating system is installed. If you want the backup to run automatically according to a schedule, select Schedule, enter a start it only once. 21 Review the options you must create a backup job for C: and a backup job for the attached VHD. See "Advanced scheduling options" on page 66. 19 Click OK...

User Manual
Page 89
.... However, they are backed up when you define and run automatically, according to a schedule. Note: Depending on page 67. 13 Click Next and review the backup options you have identified for storing personal files or folders. Backing up files and folders 89 About folders that are excluded by default... 6-4 on the amount of data you want to specific events, click Advanced and configure the desired options. If you have selected. 14 To review the total number and size of files to be included in response to run . 12 For advanced scheduling options, such as setting up event triggers...
.... However, they are backed up when you define and run automatically, according to a schedule. Note: Depending on page 67. 13 Click Next and review the backup options you have identified for storing personal files or folders. Backing up files and folders 89 About folders that are excluded by default... 6-4 on the amount of data you want to specific events, click Advanced and configure the desired options. If you have selected. 14 To review the total number and size of files to be included in response to run . 12 For advanced scheduling options, such as setting up event triggers...

User Manual
Page 95
..." on page 73. See "Verifying the integrity of a recovery point" on page 118. To verify that a backup is successful 1 On the Status page, review the Backups calendar, and verify that the backup appears on the date that you ran it was. Running and managing backup jobs 95 Verifying that... is aligned with each drive on your mouse over a backup icon to review the status of the backup. It also identifies upcoming, scheduled backups. The Edit Settings feature gives you quickly identify when a backup ran, and ...
..." on page 73. See "Verifying the integrity of a recovery point" on page 118. To verify that a backup is successful 1 On the Status page, review the Backups calendar, and verify that the backup appears on the date that you ran it was. Running and managing backup jobs 95 Verifying that... is aligned with each drive on your mouse over a backup icon to review the status of the backup. It also identifies upcoming, scheduled backups. The Edit Settings feature gives you quickly identify when a backup ran, and ...
User Manual
Page 115
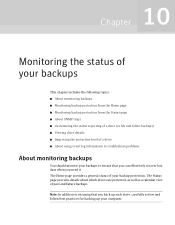
... problems About monitoring backups You should monitor your backups to ensuring that you can effectively recover lost data when you back up each drive, carefully review and follow best practices for backing up your backup protection.
... problems About monitoring backups You should monitor your backups to ensuring that you can effectively recover lost data when you back up each drive, carefully review and follow best practices for backing up your backup protection.

User Manual
Page 121
...from running. The status information appears in the bottom half of the Status page. 3 Move your mouse over a backup icon in the calendar to review the status of the backup. 4 To move around in the calendar, use one is scheduled to view. This problem could occur if an error ...prevents a backup from the Status page 1 On the Status page, review the Backups calendar and verify that the backup appears on which this icon appears. Indicates that at a future time. Indicates that two or more backups...
...from running. The status information appears in the bottom half of the Status page. 3 Move your mouse over a backup icon in the calendar to review the status of the backup. 4 To move around in the calendar, use one is scheduled to view. This problem could occur if an error ...prevents a backup from the Status page 1 On the Status page, review the Backups calendar and verify that the backup appears on which this icon appears. Indicates that at a future time. Indicates that two or more backups...
User Manual
Page 124
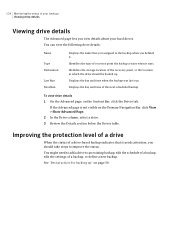
To view drive details 1 On the Advanced page, on the Primary Navigation Bar, click View > Show Advanced Page. 2 In the Drive column, select a drive. 3 Review the Details section below the Drives table. If the Advanced page is not visible on the Content Bar, click the Drives tab. Identifies the storage ...
To view drive details 1 On the Advanced page, on the Primary Navigation Bar, click View > Show Advanced Page. 2 In the Drive column, select a drive. 3 Review the Details section below the Drives table. If the Advanced page is not visible on the Content Bar, click the Drives tab. Identifies the storage ...

User Manual
Page 141
... Finish. The following encryption levels: ■ Low (8+ character password) ■ Medium (16+ character password) ■ High (32+ character password). 11 Click OK. 12 Click Next, review the options that you can delete them from recovery points: ■ VMware Workstation 4, 5, and 6 ■ VMware ESX Server 3.0, 3.5, 3.5i, 4.0, and 4.0i ■ VMware Server 1 ■...
... Finish. The following encryption levels: ■ Low (8+ character password) ■ Medium (16+ character password) ■ High (32+ character password). 11 Click OK. 12 Click Next, review the options that you can delete them from recovery points: ■ VMware Workstation 4, 5, and 6 ■ VMware ESX Server 3.0, 3.5, 3.5i, 4.0, and 4.0i ■ VMware Server 1 ■...
User Manual
Page 147
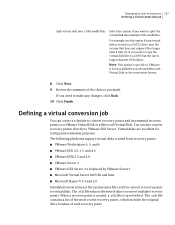
... also convert recovery points directly to a DVD but the size is not available if you selected Microsoft Virtual Disk as the conversion format. 8 Click Next. 9 Review the summary of each recovery point. Managing backup destinations 147 Defining a virtual conversion job Split virtual disk into 2 GB (.vmdk) files Select this option if...
... also convert recovery points directly to a DVD but the size is not available if you selected Microsoft Virtual Disk as the conversion format. 8 Click Next. 9 Review the summary of each recovery point. Managing backup destinations 147 Defining a virtual conversion job Split virtual disk into 2 GB (.vmdk) files Select this option if...
User Manual
Page 153
... a virtual conversion job Running an existing virtual conversion job immediately After you create a conversion job, you can use Properties for a selected virtual conversion job to review a summary of a conversion job whose properties you want to run immediately. 3 On the toolbar, click Run Now.
... a virtual conversion job Running an existing virtual conversion job immediately After you create a conversion job, you can use Properties for a selected virtual conversion job to review a summary of a conversion job whose properties you want to run immediately. 3 On the toolbar, click Run Now.
User Manual
Page 164
... and time. To recover a drive, you must have a recovery point that includes the drive that drive to restore the data. If you are not sure, review the Status page to determine what recovery points are restoring the recovery point is replaced by the data in the recovery point. For example, if...
... and time. To recover a drive, you must have a recovery point that includes the drive that drive to restore the data. If you are not sure, review the Status page to determine what recovery points are restoring the recovery point is replaced by the data in the recovery point. For example, if...
User Manual
Page 165
... to restore a recovery point, press Shift and then select multiple, contiguous destinations that you need to access recovery points on page 165. 9 Click Next and review your user name and password, and then click Next. 6 Select the drive that you want to complete. This option can specify for the recovery to...
... to restore a recovery point, press Shift and then select multiple, contiguous destinations that you need to access recovery points on page 165. 9 Click Next and review your user name and password, and then click Next. 6 Select the drive that you want to complete. This option can specify for the recovery to...