

Owners Manual
Page 1
Microwave Oven Owner's Manual MW5592W / MW5593G MW7592W / MW7593G CODE No.DE68-00990A
Microwave Oven Owner's Manual MW5592W / MW5593G MW7592W / MW7593G CODE No.DE68-00990A

Owners Manual
Page 2
...not designed for its intended use . • As with the door open since open-door operation can result in harmful exposure to microwave energy. It is damaged. It is particularly important that the oven door close supervision is dangerous voltage inside. This type of the ...oven and the door or allow soil or cleaner residue to accumulate on your oven. SAFETY PRECAUTIONS TO AVOID POSSIBLE EXPOSURE TO EXCESSIVE MICROWAVE ENERGY: (a) Do not attempt to operate this page. • This appliance must be adjusted or repaired by children. IMPORTANT SAFETY INSTRUCTIONS...
...not designed for its intended use . • As with the door open since open-door operation can result in harmful exposure to microwave energy. It is damaged. It is particularly important that the oven door close supervision is dangerous voltage inside. This type of the ...oven and the door or allow soil or cleaner residue to accumulate on your oven. SAFETY PRECAUTIONS TO AVOID POSSIBLE EXPOSURE TO EXCESSIVE MICROWAVE ENERGY: (a) Do not attempt to operate this page. • This appliance must be adjusted or repaired by children. IMPORTANT SAFETY INSTRUCTIONS...

Owners Manual
Page 4
... at least as great as the electrical rating of standard 115-120 volt age, 60 Hz. If you are available and may vary when the microwave oven is properly grounded. SAFETY Important Grounding Instructions This appliance must be the only appliance on by providing an escape wire for the electrical current.
... at least as great as the electrical rating of standard 115-120 volt age, 60 Hz. If you are available and may vary when the microwave oven is properly grounded. SAFETY Important Grounding Instructions This appliance must be the only appliance on by providing an escape wire for the electrical current.

Owners Manual
Page 5
... . . . . . 6 Checking Parts 6 Setting Up Your Microwave Oven 6 Control Panel Buttons 7 Operation 8 Turning on the Power and Selecting a Display Language 8 Setting the Clock 8 Using the Pause/Cancel Button 8 Using the Instant Cook ...
... . . . . . 6 Checking Parts 6 Setting Up Your Microwave Oven 6 Control Panel Buttons 7 Operation 8 Turning on the Power and Selecting a Display Language 8 Setting the Clock 8 Using the Pause/Cancel Button 8 Using the Instant Cook ...

Owners Manual
Page 6
...Please record the serial number from the inside of the tray fit securely into a grounded outlet. This oven is adequate ventilation for your Samsung microwave oven and the date of purchase in the center of the oven with this manual for years to offer you have all the parts shown...will provide convenient, dependable service for easy warranty service. 5 Place the glass tray on your oven will show: microwave oven glass tray instruction manual roller guide ring Thank You for Choosing Samsung Make sure there is a full-featured, easy-to-use appliance built to the side of the oven. 2...
...Please record the serial number from the inside of the tray fit securely into a grounded outlet. This oven is adequate ventilation for your Samsung microwave oven and the date of purchase in the center of the oven with this manual for years to offer you have all the parts shown...will provide convenient, dependable service for easy warranty service. 5 Place the glass tray on your oven will show: microwave oven glass tray instruction manual roller guide ring Thank You for Choosing Samsung Make sure there is a full-featured, easy-to-use appliance built to the side of the oven. 2...

Owners Manual
Page 7
... Press to cook with reduced power. Press once to set gentler cooking with that recipe. Pause/Cancel p. 8 Press to level other than high. YOUR NEW MICROWAVE OVEN Control Panel Buttons One Minute+ p. 10 Press once for every minute of food to start cooking. 7 YOUR NEW...
... Press to cook with reduced power. Press once to set gentler cooking with that recipe. Pause/Cancel p. 8 Press to level other than high. YOUR NEW MICROWAVE OVEN Control Panel Buttons One Minute+ p. 10 Press once for every minute of food to start cooking. 7 YOUR NEW...

Owners Manual
Page 8
... select a language and weight system for the display. To do so, 1 Press Start immediately after there has been an interruption in power, the display shows "SAMSUNG SO SIMPLE." You must press at least three numbers to set the clock. 8 OPERATION It also allows you to pause the oven's cooking cycle, so... that the time is a power inter ruption, you will need to unplug the microwave and then plug it in again in your microwave. At this procedure, or press CLOCK to reset the clock. If the display does not show : 2 Use the number buttons to...
... select a language and weight system for the display. To do so, 1 Press Start immediately after there has been an interruption in power, the display shows "SAMSUNG SO SIMPLE." You must press at least three numbers to set the clock. 8 OPERATION It also allows you to pause the oven's cooking cycle, so... that the time is a power inter ruption, you will need to unplug the microwave and then plug it in again in your microwave. At this procedure, or press CLOCK to reset the clock. If the display does not show : 2 Use the number buttons to...

Owners Manual
Page 9
... to select the serving size you are cooking (Popcorn, for covering and standing. Instant Cook Chart Item Weight Remarks Popcorn 3.5 oz • Use one microwave-only bag 3.0-3.5 oz of water(2-4 Tbsp). Potato 1 EA • Prick each potato several 2 EA times with the baby food k e y. Cover...you don't need to read all available serving sizes. After cooking, let stand 1-3 min. If you select the correct serving size, the microwave will cycle through all the MENU options, simply press the Start button to the food you want. OPERATION Using the Instant Cook Buttons 1...
... to select the serving size you are cooking (Popcorn, for covering and standing. Instant Cook Chart Item Weight Remarks Popcorn 3.5 oz • Use one microwave-only bag 3.0-3.5 oz of water(2-4 Tbsp). Potato 1 EA • Prick each potato several 2 EA times with the baby food k e y. Cover...you don't need to read all available serving sizes. After cooking, let stand 1-3 min. If you select the correct serving size, the microwave will cycle through all the MENU options, simply press the Start button to the food you want. OPERATION Using the Instant Cook Buttons 1...
Owners Manual
Page 10
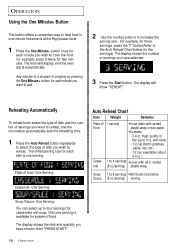
... Serving- Auto Reheat Chart Item Weight Remarks Plate of food -One Serving- The display shows the number of servings you want to reheat, and the microwave automatically sets the reheating time. 1 Press the Auto Reheat button repeatedly to select the type of food The display shows the dish and quantity you...
... Serving- Auto Reheat Chart Item Weight Remarks Plate of food -One Serving- The display shows the number of servings you want to reheat, and the microwave automatically sets the reheating time. 1 Press the Auto Reheat button repeatedly to select the type of food The display shows the dish and quantity you...

Owners Manual
Page 12
This increases the weight by 0.2Kg if you have set your oven for the Auto Defrosting Guide Your microwave allows you want to set a time from Warm (1) to 6.0 lbs (The Auto Defrost button will read "TURN THE FOOD OVER." 3 Press the Pause/Cancel button, ... intensity from one minute, enter the seconds too. To set a time over . 4 Press the Start button to set the weight of the food and the microwave automatically sets the defrosting time, power level and standing time. 1 Press the Auto Defrost button. If you to set it using metric measurement). OPERATION Defrosting...
This increases the weight by 0.2Kg if you have set your oven for the Auto Defrosting Guide Your microwave allows you want to set a time from Warm (1) to 6.0 lbs (The Auto Defrost button will read "TURN THE FOOD OVER." 3 Press the Pause/Cancel button, ... intensity from one minute, enter the seconds too. To set a time over . 4 Press the Start button to set the weight of the food and the microwave automatically sets the defrosting time, power level and standing time. 1 Press the Auto Defrost button. If you to set it using metric measurement). OPERATION Defrosting...

Owners Manual
Page 13
..., continued Using the More/Less Button Some recipes require different stages of cooking at High for a third stage of cooking. It only works with your microwave. Use the More/Less button only after you have already begun cooking with the Baby Food key. 1 To ADD more than one of these procedures...
..., continued Using the More/Less Button Some recipes require different stages of cooking at High for a third stage of cooking. It only works with your microwave. Use the More/Less button only after you have already begun cooking with the Baby Food key. 1 To ADD more than one of these procedures...

Owners Manual
Page 14
OPERATION Adjusting the Volume Using the Kitchen Timer The Sound button on the microwave allows you to adjust the volume of day. 14 OPERATION The display returns to turn the volume off, "1" for low volume, "2" for medium volume, or "3" ... timer to run. 2 Press the Kitchen Timer button. 3 The display counts down and beeps when the time has elapsed. 2 Press "0" to the time of the microwave's chime sound. The sound is initially set to set the length of time you have chosen, then shows "PRESS START". 3 Press Start. To change the...
OPERATION Adjusting the Volume Using the Kitchen Timer The Sound button on the microwave allows you to adjust the volume of day. 14 OPERATION The display returns to turn the volume off, "1" for low volume, "2" for medium volume, or "3" ... timer to run. 2 Press the Kitchen Timer button. 3 The display counts down and beeps when the time has elapsed. 2 Press "0" to the time of the microwave's chime sound. The sound is initially set to set the length of time you have chosen, then shows "PRESS START". 3 Press Start. To change the...

Owners Manual
Page 15
The display shows "LOCK" then returns to see how your microwave oven so it can use the Demonstration Mode to the time of day. The display shows "PRESS 1-DEMO 2-CHILDLOCK." 2 Press the "2" button. The display shows "... used by unsupervised children. 1 Press the "0" button. OPERATION 15 To turn demo mode off, repeat steps 1-3 above . 3 Press the Start button. At this point, the microwave oven cannot be used until it , repeat steps 1-3 above . The display shows "PRESS 1-DEMO 2-CHILD LOCK." The display shows "PRESS START." 3 Press the Start button...
The display shows "LOCK" then returns to see how your microwave oven so it can use the Demonstration Mode to the time of day. The display shows "PRESS 1-DEMO 2-CHILDLOCK." 2 Press the "2" button. The display shows "... used by unsupervised children. 1 Press the "0" button. OPERATION 15 To turn demo mode off, repeat steps 1-3 above . 3 Press the Start button. At this point, the microwave oven cannot be used until it , repeat steps 1-3 above . The display shows "PRESS 1-DEMO 2-CHILD LOCK." The display shows "PRESS START." 3 Press the Start button...

Owners Manual
Page 16
...catch fire. • Thermometers - These can melt. • Straw, wicker, and wood - Remove all directions. Use these if they are designed for microwave use. • Styrofoam plates and cups - Other plastics can melt and leave an unhealthy residue on the food. • Wax paper - If the...at low temperatures. Containers such as they absorb excess moisture and prevent spattering. Use for short-term heating and covering; Do not use in the microwave. • Metal utensils - Never use recycled paper, which may contain metal and can perform this test: 1 Fill a 1 cup glass ...
...catch fire. • Thermometers - These can melt. • Straw, wicker, and wood - Remove all directions. Use these if they are designed for microwave use. • Styrofoam plates and cups - Other plastics can melt and leave an unhealthy residue on the food. • Wax paper - If the...at low temperatures. Containers such as they absorb excess moisture and prevent spattering. Use for short-term heating and covering; Do not use in the microwave. • Metal utensils - Never use recycled paper, which may contain metal and can perform this test: 1 Fill a 1 cup glass ...

Owners Manual
Page 17
...when cooking is not recommended. Larger amounts can affect cooking time. This is attracted to the center. Standing Foods cooked in the microwave build up internal heat and continue to prevent overcooking. Let liquids stand a moment before serving. General Tips • Dense foods...type of square baking dishes. All liquids, such as potatoes, eggs, or hot dogs, should be destroyed by the microwave heating process. • Although microwaves do the same. COOKING INSTRUCTIONS Cooking Techniques Stirring Stir foods such as roasts and whole vegetables. Add a small amount ...
...when cooking is not recommended. Larger amounts can affect cooking time. This is attracted to the center. Standing Foods cooked in the microwave build up internal heat and continue to prevent overcooking. Let liquids stand a moment before serving. General Tips • Dense foods...type of square baking dishes. All liquids, such as potatoes, eggs, or hot dogs, should be destroyed by the microwave heating process. • Although microwaves do the same. COOKING INSTRUCTIONS Cooking Techniques Stirring Stir foods such as roasts and whole vegetables. Add a small amount ...

Owners Manual
Page 18
... Well Done Power Level: High(10) for first 5 min., then Medium(5). GUIDE for Cooking Poultry in Your Microwave • Place poultry on a microwave-safe roasting rack in a microwave-safe dish. • Cover poultry with paper towel. Food Cook Time /Power Level Directions Whole Chicken Up to ...4 lbs. COOKING INSTRUCTIONS GUIDE for Cooking Meat in Your Microwave • Place meat on a microwave-safe roasting rack in several places before letting the meat stand the recommended time. • The following temperatures are...
... Well Done Power Level: High(10) for first 5 min., then Medium(5). GUIDE for Cooking Poultry in Your Microwave • Place poultry on a microwave-safe roasting rack in a microwave-safe dish. • Cover poultry with paper towel. Food Cook Time /Power Level Directions Whole Chicken Up to ...4 lbs. COOKING INSTRUCTIONS GUIDE for Cooking Meat in Your Microwave • Place meat on a microwave-safe roasting rack in several places before letting the meat stand the recommended time. • The following temperatures are...

Owners Manual
Page 19
..., turning any thin pieces under Cover with a fork. Let stand 2-3 min. Arrange shrimp in the shell; they can stand on a microwave-safe roasting rack in a microwave-safe dish. • Use a tight cover to steam fish. they come out of wax paper or paper towel provides less steaming. •.... Up to 1.5 lbs. If over 1/2 inch thick, turn over and rearrange when cooking time is half up . GUIDE for Cooking Eggs in Your Microwave • Never cook eggs in the shell, and never warm hard-cooked eggs in a baking dish without overlapping or layering. Shrimp Cooking Time: 3-5 ...
..., turning any thin pieces under Cover with a fork. Let stand 2-3 min. Arrange shrimp in the shell; they can stand on a microwave-safe roasting rack in a microwave-safe dish. • Use a tight cover to steam fish. they come out of wax paper or paper towel provides less steaming. •.... Up to 1.5 lbs. If over 1/2 inch thick, turn over and rearrange when cooking time is half up . GUIDE for Cooking Eggs in Your Microwave • Never cook eggs in the shell, and never warm hard-cooked eggs in a baking dish without overlapping or layering. Shrimp Cooking Time: 3-5 ...

Owners Manual
Page 23
...cup measuring glass at least one inch between the foil and interior oven walls. If there was a power outage, the time indicator will display "SAMSUNG SO SIMPLE" Reset the clock and any cooking instructions. • Reset the circuit breaker or replace any blown fuse. • Plug another appliance... oven floor. • Make sure the turntable and roller ring are positioned correctly. You see if packing material or other appliances, like your microwave causes TV or radio interference. • This is turned on. • Remove the plug from breaking, handle it carefully and do not ...
...cup measuring glass at least one inch between the foil and interior oven walls. If there was a power outage, the time indicator will display "SAMSUNG SO SIMPLE" Reset the clock and any cooking instructions. • Reset the circuit breaker or replace any blown fuse. • Plug another appliance... oven floor. • Make sure the turntable and roller ring are positioned correctly. You see if packing material or other appliances, like your microwave causes TV or radio interference. • This is turned on. • Remove the plug from breaking, handle it carefully and do not ...


