
User Manual
Page 1
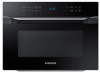
Microwave Oven User manual MC12J8035CT
Microwave Oven User manual MC12J8035CT
User Manual
Page 2
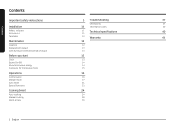
... 12 Replacement (repair) 13 Care during an extended period of disuse 13 Before you start 13 Clock 13 Sound On/Off 14 About microwave energy 14 Cookware for microwave mode 15 Operations 16 Control panel 16 Manual mode 17 Auto mode 21 Special functions 23 Cooking Smart 24 Auto cooking 24 Manual...
... 12 Replacement (repair) 13 Care during an extended period of disuse 13 Before you start 13 Clock 13 Sound On/Off 14 About microwave energy 14 Cookware for microwave mode 15 Operations 16 Control panel 16 Manual mode 17 Auto mode 21 Special functions 23 Cooking Smart 24 Auto cooking 24 Manual...
User Manual
Page 3
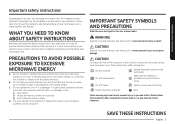
...section, keep it is no damage to use and care of your new Samsung microwave oven. CAUTION Hazards or unsafe practices that there is damaged. CAUTION To reduce the risk of your microwave oven's many benefits and features. Do NOT disassemble. It is particularly important... that the oven door close properly and that may occur. PRECAUTIONS TO AVOID POSSIBLE EXPOSURE TO EXCESSIVE MICROWAVE ENERGY A. B. The oven should not be adjusted or repaired by anyone except properly qualified service personnel. Do NOT attempt. After ...
...section, keep it is no damage to use and care of your new Samsung microwave oven. CAUTION Hazards or unsafe practices that there is damaged. CAUTION To reduce the risk of your microwave oven's many benefits and features. Do NOT disassemble. It is particularly important... that the oven door close properly and that may occur. PRECAUTIONS TO AVOID POSSIBLE EXPOSURE TO EXCESSIVE MICROWAVE ENERGY A. B. The oven should not be adjusted or repaired by anyone except properly qualified service personnel. Do NOT attempt. After ...
User Manual
Page 4
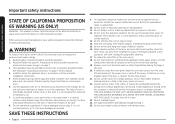
... of burns, electric shock, fire, personal injury or exposure to properly grounded outlets. Do not cover or block any adjustments or repairs to excessive microwave energy" on page 3. 3. Do not overcook food. Do not use . 7. THIS COULD RESULT IN VERY HOT LIQUIDS SUDDENLY BOILING OVER WHEN ... its intended use this manual. 4. Contact the nearest authorized service facility for storage purposes. Do not immerse the cord or plug in a microwave oven. 6. Unplug the plug before and halfway through heating it has been damaged or dropped. Do not tamper with or make any openings...
... of burns, electric shock, fire, personal injury or exposure to properly grounded outlets. Do not cover or block any adjustments or repairs to excessive microwave energy" on page 3. 3. Do not overcook food. Do not use . 7. THIS COULD RESULT IN VERY HOT LIQUIDS SUDDENLY BOILING OVER WHEN ... its intended use this manual. 4. Contact the nearest authorized service facility for storage purposes. Do not immerse the cord or plug in a microwave oven. 6. Unplug the plug before and halfway through heating it has been damaged or dropped. Do not tamper with or make any openings...

User Manual
Page 5
...and a grounding plug. USE OF EXTENSION CORDS A short power-supply cord is provided to reduce the risk of the blower may vary when the microwave oven is on by children or tripped over a longer cord. If you use an extension cord, the interior light may be grounded. CAUTION 1.... The longer cord should not inserted in the microwave oven for safe use . 32. Cooking times may flicker and the speed of your becoming entangled in use to avoid possible exposure to excessive ...
...and a grounding plug. USE OF EXTENSION CORDS A short power-supply cord is provided to reduce the risk of the blower may vary when the microwave oven is on by children or tripped over a longer cord. If you use an extension cord, the interior light may be grounded. CAUTION 1.... The longer cord should not inserted in the microwave oven for safe use . 32. Cooking times may flicker and the speed of your becoming entangled in use to avoid possible exposure to excessive ...

User Manual
Page 7
...this Safety Information Section. Boil overs cause smoking and greasy spillovers that the door or any foreign substance such as water enters the microwave, unplug it immediately and contact your oven unattended at the fuse or circuit breaker panel. Read and follow the specific "Precautions to... that may result in electric shock or fire due to electromagnetic waves. • When the oven requires repair, contact your own. If the microwave generates a strange noise, a burning smell or smoke, unplug it and contact your body while cooking or just after cooking. • Failing to...
...this Safety Information Section. Boil overs cause smoking and greasy spillovers that the door or any foreign substance such as water enters the microwave, unplug it immediately and contact your oven unattended at the fuse or circuit breaker panel. Read and follow the specific "Precautions to... that may result in electric shock or fire due to electromagnetic waves. • When the oven requires repair, contact your own. If the microwave generates a strange noise, a burning smell or smoke, unplug it and contact your body while cooking or just after cooking. • Failing to...

User Manual
Page 8
...test the temperature by tasting before heating. Do not use or place flammable sprays or objects near the oven. • Heat from the microwave can cause flammable sprays to explode or burn. • Failing to do so may result in electric shock, fire, problems with such ...the appliance immediately after cooking. Make sure all cookware used in electric shock, fire or problems with golden or silver rims into the microwave. • These objects can cause burns. Important safety instructions Important safety instructions Do not let children or any adjustments or repairs to...
...test the temperature by tasting before heating. Do not use or place flammable sprays or objects near the oven. • Heat from the microwave can cause flammable sprays to explode or burn. • Failing to do so may result in electric shock, fire, problems with such ...the appliance immediately after cooking. Make sure all cookware used in electric shock, fire or problems with golden or silver rims into the microwave. • These objects can cause burns. Important safety instructions Important safety instructions Do not let children or any adjustments or repairs to...

User Manual
Page 10
... includes a broken hinge, a worn out seal, or distorted/bent casing. • Do not remove the oven from its casing. • This microwave oven is for home use only and is adequate ventilation for a short or extended period of your oven by the manufacturer, its condition, unplug the... oven. • NOT FOR BUILT-IN INSTALLATION 04 1. SAVE THESE INSTRUCTIONS 10 English For your dishwasher. Dust and dampness may adversely affect the microwave parts. • Do not repair, replace or service any extension cable used must be respected and any part of time, choose a dust-free...
... includes a broken hinge, a worn out seal, or distorted/bent casing. • Do not remove the oven from its casing. • This microwave oven is for home use only and is adequate ventilation for a short or extended period of your oven by the manufacturer, its condition, unplug the... oven. • NOT FOR BUILT-IN INSTALLATION 04 1. SAVE THESE INSTRUCTIONS 10 English For your dishwasher. Dust and dampness may adversely affect the microwave parts. • Do not repair, replace or service any extension cable used must be respected and any part of time, choose a dust-free...

User Manual
Page 11
... Control panel 04 Door 03 04 02 Safety Door Lock 03 Door Handle Accessories The oven comes with the oven or accessories, contact a local Samsung customer center or the retailer. A smaller dish on the turntable, and the other on the turntable. Use this page and the next page... * Turntable * Racks * Crusty plate Put in the product package. IMPORTANT DO NOT operate the oven without the turntable on the roller ring with Microwave mode. You can use wire racks with the center fitting the coupler. If you have a problem with different accessories that help you need an accessory...
... Control panel 04 Door 03 04 02 Safety Door Lock 03 Door Handle Accessories The oven comes with the oven or accessories, contact a local Samsung customer center or the retailer. A smaller dish on the turntable, and the other on the turntable. Use this page and the next page... * Turntable * Racks * Crusty plate Put in the product package. IMPORTANT DO NOT operate the oven without the turntable on the roller ring with Microwave mode. You can use wire racks with the center fitting the coupler. If you have a problem with different accessories that help you need an accessory...
User Manual
Page 13
... timer to replace or repair the oven yourself. • If you encounter a problem with the outer housing of the oven. There are a two microwave components that builds up arrow ( ) for 3 seconds, and then follow the above steps. • The clock time cannot be changed during any cooking... mode, you encounter a problem with hinges, seal and/or the door, contact a qualified technician or a local Samsung service center for an extended period of disuse If you start Replacement (repair) WARNING This oven has no user-removable parts inside the oven may...
... timer to replace or repair the oven yourself. • If you encounter a problem with the outer housing of the oven. There are a two microwave components that builds up arrow ( ) for 3 seconds, and then follow the above steps. • The clock time cannot be changed during any cooking... mode, you encounter a problem with hinges, seal and/or the door, contact a qualified technician or a local Samsung service center for an extended period of disuse If you start Replacement (repair) WARNING This oven has no user-removable parts inside the oven may...
User Manual
Page 14
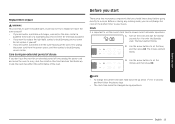
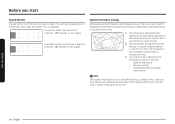
... this manual, which cook or reheat food without deforming or discolouring the food. 1. To mute the sound, hold down for 3 seconds. The microwaves are high-frequency electromagnetic waves. Before you start Sound On/Off You can turn on or off the key tone, beep, or alarm. The... time is affected by the whirling distribution system. Before you start 14 English This setting is available only in magnetron to the core. The microwaves generated by the magnetron are dissipated inside the food as cooking continues. 3. To unmute the sound, hold down again for 3 seconds. The...
... this manual, which cook or reheat food without deforming or discolouring the food. 1. To mute the sound, hold down for 3 seconds. The microwaves are high-frequency electromagnetic waves. Before you start Sound On/Off You can turn on or off the key tone, beep, or alarm. The... time is affected by the whirling distribution system. Before you start 14 English This setting is available only in magnetron to the core. The microwaves generated by the magnetron are dissipated inside the food as cooking continues. 3. To unmute the sound, hold down again for 3 seconds. The...

User Manual
Page 15
..., napkins, and kitchen paper Recycled paper Containers Plastic Cling film Freezer bags Wax or grease-proof paper Microwavesafe Description Microwave-safe unless decorated with metal trims. Delicate glassware may cause arcing Material Oven-to the following guide. Crusty plate Do... or containers Overheating may cause arcing or fire. Causes arcing. Use boilable or ovenproof bags only. Cookware for microwave mode Cookware used for Microwave Mode must allow microwaves to melt. Requirements: • Flat bottom and straight sides • Tight-fitting lid • Well-balanced...
..., napkins, and kitchen paper Recycled paper Containers Plastic Cling film Freezer bags Wax or grease-proof paper Microwavesafe Description Microwave-safe unless decorated with metal trims. Delicate glassware may cause arcing Material Oven-to the following guide. Crusty plate Do... or containers Overheating may cause arcing or fire. Causes arcing. Use boilable or ovenproof bags only. Cookware for microwave mode Cookware used for Microwave Mode must allow microwaves to melt. Requirements: • Flat bottom and straight sides • Tight-fitting lid • Well-balanced...
User Manual
Page 16
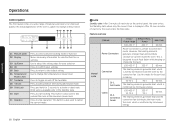
... Press to start cooking. Child Lock is displayed. After 25 more minutes of materials and colors. Press to add operation time during Microwave mode. However, the heating elements generate stronger heat and distribute stronger air current inside the oven by... microwave energy. The heating elements generate heat, which is reinforced by microwave energy. 100-400 °F 10-70 % 350 °F 70 % 60 min. The heating elements generate heat, which is similar to select a...
... Press to start cooking. Child Lock is displayed. After 25 more minutes of materials and colors. Press to add operation time during Microwave mode. However, the heating elements generate stronger heat and distribute stronger air current inside the oven by... microwave energy. The heating elements generate heat, which is reinforced by microwave energy. 100-400 °F 10-70 % 350 °F 70 % 60 min. The heating elements generate heat, which is similar to select a...
User Manual
Page 17
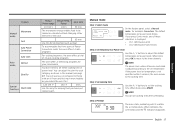
...unless otherwise mentioned, is adjusted according to set temperature. If the power level or temperature is displayed: • Cb-1 (Microwave+Grill) • Cb-2 (Microwave+Convection) Step 2. When complete, the oven beeps and the indicator disappears. To accommodate first-time users of Power Convection mode... of oil. 125-175 °F 150 °F 3 hrs. Step 3. Use this manual (see page 27). Feature Manual mode Microwave Grill Auto Power Convection Auto mode Auto Cook Defrost Slim Fry Special functions Warm Hold Temp./ Default Temp./ Power range Power Max. When...
...unless otherwise mentioned, is adjusted according to set temperature. If the power level or temperature is displayed: • Cb-1 (Microwave+Grill) • Cb-2 (Microwave+Convection) Step 2. When complete, the oven beeps and the indicator disappears. To accommodate first-time users of Power Convection mode... of oil. 125-175 °F 150 °F 3 hrs. Step 3. Use this manual (see page 27). Feature Manual mode Microwave Grill Auto Power Convection Auto mode Auto Cook Defrost Slim Fry Special functions Warm Hold Temp./ Default Temp./ Power range Power Max. When...

User Manual
Page 18
..., "0:00" blinks. Step 1 Power Convection Step 2 Step 3 > > > Temperature Cooking time Step 4 Preheating 1. Operations CAUTION • Always use oven gloves while taking out food. • The microwave fan may continue to operate for baking breads, or cooking confectionery. You can burn the tops of the Low rack and Crusty plate on page...
..., "0:00" blinks. Step 1 Power Convection Step 2 Step 3 > > > Temperature Cooking time Step 4 Preheating 1. Operations CAUTION • Always use oven gloves while taking out food. • The microwave fan may continue to operate for baking breads, or cooking confectionery. You can burn the tops of the Low rack and Crusty plate on page...

User Manual
Page 19
...setting the temperature, Preheating will start. 2. Operations English 19 Convection The heating elements generate heat, which is evenly distributed inside the oven by the microwave energy. Step 1 Convection Step 2 Step 3 > > > Temperature Cooking time Step 4 Preheating 1. Put the High rack or the combination of...oven gloves to take out food. When cooking is complete, "0:00" blinks. When cooking is complete, "0:00" blinks. Use only microwave-safe cookware, such as fruit cakes, choux pastries, and soufflés. You can use the Low rack or a combination of High rack...
...setting the temperature, Preheating will start. 2. Operations English 19 Convection The heating elements generate heat, which is evenly distributed inside the oven by the microwave energy. Step 1 Convection Step 2 Step 3 > > > Temperature Cooking time Step 4 Preheating 1. Put the High rack or the combination of...oven gloves to take out food. When cooking is complete, "0:00" blinks. When cooking is complete, "0:00" blinks. Use only microwave-safe cookware, such as fruit cakes, choux pastries, and soufflés. You can use the Low rack or a combination of High rack...

User Manual
Page 20
..., and then place the container in the center of glass, pottery, or bone china without changing either the form or the color. • Use only microwave-safe cookware. Operations Combi - Step 1 > Combo Step 2 Mode (Cb-2) Step 3 > > Temperature and Power Level Step 4 Cooking Time Step 5 > ... rack and Crusty plate on page 17. 4. Follow steps 1-4 in Manual mode on page 17. 3. Follow steps 1-3 in Manual mode on the turntable. 2. The microwave energy cooks or reheats food without metal trim. Power level 100 % 90 % 80 % 70 % 60 % (High) (Sauté) (Reheat) (Medium high)...
..., and then place the container in the center of glass, pottery, or bone china without changing either the form or the color. • Use only microwave-safe cookware. Operations Combi - Step 1 > Combo Step 2 Mode (Cb-2) Step 3 > > Temperature and Power Level Step 4 Cooking Time Step 5 > ... rack and Crusty plate on page 17. 4. Follow steps 1-4 in Manual mode on page 17. 3. Follow steps 1-3 in Manual mode on the turntable. 2. The microwave energy cooks or reheats food without metal trim. Power level 100 % 90 % 80 % 70 % 60 % (High) (Sauté) (Reheat) (Medium high)...

User Manual
Page 24
...No. As your taste, Brush the Steaks with oil and seasonings. Cooking Smart Auto cooking Auto Power Convection guide Cook No. When the microwave beeps, turn the hamburgers over Bone-In Chicken Pieces and press start to continue. Place the pizza on the high rack. 12 inch ... on the high rack. 1 : 2 servings 2 : 4 servings (4 sticks per serving) on the high rack. 1 serving (6 ea.) 2 servings (12 ea.) (3 ea. When the microwave beeps, turn over the pork chops and press start to continue. Cooking Smart 24 English Place the steak on the high rack. Food P5 Sirloin...
...No. As your taste, Brush the Steaks with oil and seasonings. Cooking Smart Auto cooking Auto Power Convection guide Cook No. When the microwave beeps, turn the hamburgers over Bone-In Chicken Pieces and press start to continue. Place the pizza on the high rack. 12 inch ... on the high rack. 1 : 2 servings 2 : 4 servings (4 sticks per serving) on the high rack. 1 serving (6 ea.) 2 servings (12 ea.) (3 ea. When the microwave beeps, turn over the pork chops and press start to continue. Cooking Smart 24 English Place the steak on the high rack. Food P5 Sirloin...

User Manual
Page 25
...start to 4 servings (8 oz./serving) 1 serving Directions Pour the refrigerated soup into a suitable sized glass Pyrex dish or leave in a microwave safe container. Stir well before serving. Do not overlap the slices or cover. Let stand 1-3 minutes before serving. Remove the paper towel immediately... care that this is suitable for covering. Let stand 1-2 minutes before serving. Layer 2 paper towels on a microwave safe plate and arrange the bacon on a microwave safe plate. Pierce the hot dogs 3 times with vented plastic wrap or wax paper. English 25 Cooking Smart After...
...start to 4 servings (8 oz./serving) 1 serving Directions Pour the refrigerated soup into a suitable sized glass Pyrex dish or leave in a microwave safe container. Stir well before serving. Do not overlap the slices or cover. Let stand 1-3 minutes before serving. Remove the paper towel immediately... care that this is suitable for covering. Let stand 1-2 minutes before serving. Layer 2 paper towels on a microwave safe plate and arrange the bacon on a microwave safe plate. Pierce the hot dogs 3 times with vented plastic wrap or wax paper. English 25 Cooking Smart After...

User Manual
Page 26
... ⅓ cup grated cheese Place the pretzels on the crusty plate, then place the plate on the low rack. Place the butter on a microwave safe dish and cover with cheese. Place 8 cookies on the crusty plate, then place the tray on the high rack. Cook No. Stir well...A22 Melt Cheese A23 Melt Marshmallows Amount Directions 1 stick (¼ lbs.) 2 sticks (½ lbs.) Unwrap the butter and cut the butter stick. When the microwave beeps, stir well and press start to continue. Sprinkle evenly with wax paper. Stir well afterwards. 1 stick (¼ lbs.) 2 sticks (½ lbs.) ...
... ⅓ cup grated cheese Place the pretzels on the crusty plate, then place the plate on the low rack. Place the butter on a microwave safe dish and cover with cheese. Place 8 cookies on the crusty plate, then place the tray on the high rack. Cook No. Stir well...A22 Melt Cheese A23 Melt Marshmallows Amount Directions 1 stick (¼ lbs.) 2 sticks (½ lbs.) Unwrap the butter and cut the butter stick. When the microwave beeps, stir well and press start to continue. Sprinkle evenly with wax paper. Stir well afterwards. 1 stick (¼ lbs.) 2 sticks (½ lbs.) ...


