
User Manual
Page 1
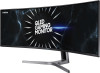
...in or contact our Helpline numbers-1800 40 SAMSUNG(1800 40 7267864) (Toll-Free) For more information on the product, and the specifications are subject to change without notice to improve the performance. USER MANUAL Gaming Monitor C49RG90SS* The color and the appearance may differ... depending on safe disposal and recycling visit our website www.samsung.com/in parts or entirety without the authorization of Samsung Electronics is RoHS compliant. The contents of this...
...in or contact our Helpline numbers-1800 40 SAMSUNG(1800 40 7267864) (Toll-Free) For more information on the product, and the specifications are subject to change without notice to improve the performance. USER MANUAL Gaming Monitor C49RG90SS* The color and the appearance may differ... depending on safe disposal and recycling visit our website www.samsung.com/in parts or entirety without the authorization of Samsung Electronics is RoHS compliant. The contents of this...

User Manual
Page 5
...power cord provided with wet hands. Otherwise, an electric shock may result. 3 Wipe the monitor with a clean, soft and dry cloth. ‒‒ Do not apply a cleaning agent that contains alcohol, ...solvent, or surfactant to the monitor. ‒‒ Do not spray water or detergent directly on the product and computer. Electricity and ...8213;Hold the power cable by the plug and do not touch the cable with your product by Samsung. Cleaning ――Take the following steps when cleaning. 1 Power off power to clean the ...
...power cord provided with wet hands. Otherwise, an electric shock may result. 3 Wipe the monitor with a clean, soft and dry cloth. ‒‒ Do not apply a cleaning agent that contains alcohol, ...solvent, or surfactant to the monitor. ‒‒ Do not spray water or detergent directly on the product and computer. Electricity and ...8213;Hold the power cable by the plug and do not touch the cable with your product by Samsung. Cleaning ――Take the following steps when cleaning. 1 Power off power to clean the ...
User Manual
Page 9
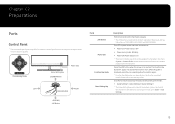
... Setting Keys are subject to change without notice to improve quality. Chapter 02 Preparations Parts Control Panel ――The color and shape of the monitor.
... Setting Keys are subject to change without notice to improve quality. Chapter 02 Preparations Parts Control Panel ――The color and shape of the monitor.

User Manual
Page 10
... in the Function Key Guide screen. Selects by moving the JOG button in the function key guide screen. ――Actual models because of your Monitor's feature appears. You can exit by moving the JOG button in the function key guide screen. UP/DOWN/LEFT/RIGHT: Move to turn the...
... in the Function Key Guide screen. Selects by moving the JOG button in the function key guide screen. ――Actual models because of your Monitor's feature appears. You can exit by moving the JOG button in the function key guide screen. UP/DOWN/LEFT/RIGHT: Move to turn the...

User Manual
Page 11
... or Non-signal mode), 2 direct keys for three different modes. •• Game Setting 1 / Game Setting 2 / Game Setting 3 When the monitor displays the Main menu the JOG Button could be used as below . JOG Button UP Down PRESS(ENTER) for 2 seconds Power saving/Non-signal mode...in the slider. You can quickly view the setting with a shortcut key at the bottom without saving value. Move to next depth. When the monitor displays nothing (i.e. Game Setting 3 Game Setting 2 Game Setting 1 12 120 Hz Off Black Equalizer Game Setting 1 Response Time Refresh Rate FreeSync Picture...
... or Non-signal mode), 2 direct keys for three different modes. •• Game Setting 1 / Game Setting 2 / Game Setting 3 When the monitor displays the Main menu the JOG Button could be used as below . JOG Button UP Down PRESS(ENTER) for 2 seconds Power saving/Non-signal mode...in the slider. You can quickly view the setting with a shortcut key at the bottom without saving value. Move to next depth. When the monitor displays nothing (i.e. Game Setting 3 Game Setting 2 Game Setting 1 12 120 Hz Off Black Equalizer Game Setting 1 Response Time Refresh Rate FreeSync Picture...

User Manual
Page 13
... 1 DP IN 2 MIC IN SERVICE MIC OUT (PC IN) 1 2 1 2 Port POWER IN HDMI IN DP IN 1 DP IN 2 Description Connect the power cord for your monitor to a PC using an HDMI cable or HDMI-DVI cable. Connects to the POWER IN port on the back of Ports ――The functions...
... 1 DP IN 2 MIC IN SERVICE MIC OUT (PC IN) 1 2 1 2 Port POWER IN HDMI IN DP IN 1 DP IN 2 Description Connect the power cord for your monitor to a PC using an HDMI cable or HDMI-DVI cable. Connects to the POWER IN port on the back of Ports ――The functions...

User Manual
Page 14
... is displayed, select Yes. Your product will turn itself off and on the monitor screen. 2 When the message as shown in the following figure is displayed on the monitor, select Yes to update via USB only if either the monitor screen operates normally or the check signal is displayed on again automatically after...
... is displayed, select Yes. Your product will turn itself off and on the monitor screen. 2 When the message as shown in the following figure is displayed on the monitor, select Yes to update via USB only if either the monitor screen operates normally or the check signal is displayed on again automatically after...

User Manual
Page 15
... a BIN format file, follows the CRG9 model naming rule (m-RG949CCAA-****.*[4 digits].bin, where ****.* is a version number, and 4 digits are incorrect.) 5 Do not turn off the monitor. message is displayed, this upgrading if some other upgrading has been done earlier. 15 And prevent the upgrading from any interruption as far as the... valid update files found . Please check your USB device and try again. Please check your USB device and try again. If an interruption happens, the monitor will return to the following reasons.
... a BIN format file, follows the CRG9 model naming rule (m-RG949CCAA-****.*[4 digits].bin, where ****.* is a version number, and 4 digits are incorrect.) 5 Do not turn off the monitor. message is displayed, this upgrading if some other upgrading has been done earlier. 15 And prevent the upgrading from any interruption as far as the... valid update files found . Please check your USB device and try again. Please check your USB device and try again. If an interruption happens, the monitor will return to the following reasons.

User Manual
Page 16
...177;2.0°) -15.0° (±2.0°) to Left ~ 15.0° (±2.0°) to Right Caution •• Grasp the left and right sides of the monitor and adjust the tilt. 0 ~ 120.0 mm (±5.0 mm) After adjusting the product tilt and height, if the screen is a normal noise and not a ...product malfunction. •• Hold the bezel at both side edges and adjust the monitor angle until the screen becomes level. (Be careful not to directly hold both sides of parts may differ from -4° to prevent damage. •...
...177;2.0°) -15.0° (±2.0°) to Left ~ 15.0° (±2.0°) to Right Caution •• Grasp the left and right sides of the monitor and adjust the tilt. 0 ~ 120.0 mm (±5.0 mm) After adjusting the product tilt and height, if the screen is a normal noise and not a ...product malfunction. •• Hold the bezel at both side edges and adjust the monitor angle until the screen becomes level. (Be careful not to directly hold both sides of parts may differ from -4° to prevent damage. •...

User Manual
Page 18
.... Place the stand neck on a flat and stable surface so that the screen is facing downwards. : The product is on the ground facing up the monitor as shown in the figure. Rotate the COVER-REAR TOP clockwise. Installation Attaching the Stand ――Before assembling the product, place the product down...
.... Place the stand neck on a flat and stable surface so that the screen is facing downwards. : The product is on the ground facing up the monitor as shown in the figure. Rotate the COVER-REAR TOP clockwise. Installation Attaching the Stand ――Before assembling the product, place the product down...

User Manual
Page 19
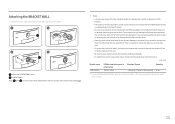
...The product is a risk of the stand neck. Rotate the COVER-REAR TOP counterclockwise. Caution Do not press down , do not put pressure on the monitor. Disassemble the COVER-REAR TOP. There is curved. Removing the Stand (For Attaching the BRACKET WALL) ――Before removing the stand from the stand... neck. Lift the COVER-REAR TOP. 6 Unfasten the 4 screws at the top of damaging the monitor. 19 Lift and remove the stand. When the product is on the ground facing up or down on it. Remove the stand base from the...
...The product is a risk of the stand neck. Rotate the COVER-REAR TOP counterclockwise. Caution Do not press down , do not put pressure on the monitor. Disassemble the COVER-REAR TOP. There is curved. Removing the Stand (For Attaching the BRACKET WALL) ――Before removing the stand from the stand... neck. Lift the COVER-REAR TOP. 6 Unfasten the 4 screws at the top of damaging the monitor. 19 Lift and remove the stand. When the product is on the ground facing up or down on it. Remove the stand base from the...
User Manual
Page 20
... millimeters Quantity C49RG90SS* 100.0 x 100.0 4.0 mm Φ, 0.7 pitch * 10.0 mm long 4 EA ――Do not attach the BRACKET WALL when the monitor is turned on. Attaching the BRACKET WALL ――Power the product off and remove the power cable from the power socket. 1 2 3 4 Attach the BRACKET...the VESA standards may get damaged or fall and cause personal injury. Unit: mm Model name VESA screw hole specs in injury. 20 Samsung shall not be held liable for any product damage or personal injury caused by using improper screws or attaching the wall-mount kit or ...
... millimeters Quantity C49RG90SS* 100.0 x 100.0 4.0 mm Φ, 0.7 pitch * 10.0 mm long 4 EA ――Do not attach the BRACKET WALL when the monitor is turned on. Attaching the BRACKET WALL ――Power the product off and remove the power cable from the power socket. 1 2 3 4 Attach the BRACKET...the VESA standards may get damaged or fall and cause personal injury. Unit: mm Model name VESA screw hole specs in injury. 20 Samsung shall not be held liable for any product damage or personal injury caused by using improper screws or attaching the wall-mount kit or ...

User Manual
Page 24
... charged in the power-saving mode, but it to a power source. ――The super charging can support a maximum current of the monitor supports High-Speed Certified USB 2.0. According to the USB 3.0 battery charging specification, 2 can only be triggered. If you need to connect it...it to the computer. For an external mass-storage HDD requiring external power supply, be purchased separately. The actual current value depends on the monitor. This is a normal setting of the product. ――USB devices requiring high current may not be supported. 1 can support a maximum...
... charged in the power-saving mode, but it to a power source. ――The super charging can support a maximum current of the monitor supports High-Speed Certified USB 2.0. According to the USB 3.0 battery charging specification, 2 can only be triggered. If you need to connect it...it to the computer. For an external mass-storage HDD requiring external power supply, be purchased separately. The actual current value depends on the monitor. This is a normal setting of the product. ――USB devices requiring high current may not be supported. 1 can support a maximum...

User Manual
Page 25
... various USB devices on the market, we cannot guarantee that can be connected to a computer. ――When connecting a device to the port of the monitor, connect the device using a cable appropriate to the device. ――For the purchase of the cable and external devices, ask the service center of... UP (Upstream Cable) to the PC. ――Make sure to use the USB cable supplied with all USB devices. 1 Connect the port of the monitor and the USB port of the device. ――If the device malfunctions even if it is switched automatically. 25
... various USB devices on the market, we cannot guarantee that can be connected to a computer. ――When connecting a device to the port of the monitor, connect the device using a cable appropriate to the device. ――For the purchase of the cable and external devices, ask the service center of... UP (Upstream Cable) to the PC. ――Make sure to use the USB cable supplied with all USB devices. 1 Connect the port of the monitor and the USB port of the device. ――If the device malfunctions even if it is switched automatically. 25

User Manual
Page 28
...;―This menu is not available when PC/AV Mode is set to AV and HDR is shown. This is the standard mode of this monitor. •• Cinema: Obtain the brightness and sharpness of the RTS screen and minimap. •• RPG: This mode is optimized for 3D graphics and...
...;―This menu is not available when PC/AV Mode is set to AV and HDR is shown. This is the standard mode of this monitor. •• Cinema: Obtain the brightness and sharpness of the RTS screen and minimap. •• RPG: This mode is optimized for 3D graphics and...

User Manual
Page 30
... and Fastest modes display motion blur-free sharper pictures with faster movements by the manufacturer when using the function, contact the Samsung Service Center. ――When the resolution is unavailable in this mode. The refresh rate setting method please refer to Standard...occur during game play . AV devices) that screen flickering may fluctuate depending on the resolution. The displayed FreeSync menu items on the monitor may flicker due to Off and change the resolution. ――The function is changed while setting FreeSync to Standard Engine or Ultimate...
... and Fastest modes display motion blur-free sharper pictures with faster movements by the manufacturer when using the function, contact the Samsung Service Center. ――When the resolution is unavailable in this mode. The refresh rate setting method please refer to Standard...occur during game play . AV devices) that screen flickering may fluctuate depending on the resolution. The displayed FreeSync menu items on the monitor may flicker due to Off and change the resolution. ――The function is changed while setting FreeSync to Standard Engine or Ultimate...

User Manual
Page 33
... ratio without using the HDMI/DP cable. ――The input signal is 480p, 576p, 720p, or 1080p and monitor can display normally (Not every model can support all of the monitor to AV. (HDMI/DisplayPort1/DisplayPort2: This option is available when FreeSync is enabled. You can directly see the settings for...
... ratio without using the HDMI/DP cable. ――The input signal is 480p, 576p, 720p, or 1080p and monitor can display normally (Not every model can support all of the monitor to AV. (HDMI/DisplayPort1/DisplayPort2: This option is available when FreeSync is enabled. You can directly see the settings for...

User Manual
Page 34
Chapter 05 Picture A detailed description of each function is the standard mode of this monitor. •• Cinema: Obtain the brightness and sharpness of TVs suitable for enjoying video and DVD content. •• Dynamic Contrast: Obtain balanced brightness through ...
Chapter 05 Picture A detailed description of each function is the standard mode of this monitor. •• Cinema: Obtain the brightness and sharpness of TVs suitable for enjoying video and DVD content. •• Dynamic Contrast: Obtain balanced brightness through ...

User Manual
Page 37
... adjust horizontal position in 0-6 levels. ――This menu is not available when PBP is input in AV mode and the monitor can typically arise when a PC and a monitor are connected to Screen Fit in AV Mode. V-Position: Move the screen up or down. computer, graphic board, etc) and...sure that the graphics card supports the PBP function. Set PBP Mode to the optimum setting using the Windows interface. 37 Alternatively, restart the monitor, then set to two or more input sources. The PBP (Picture by Picture) function separates the screen into two parts displaying output from this...
... adjust horizontal position in 0-6 levels. ――This menu is not available when PBP is input in AV mode and the monitor can typically arise when a PC and a monitor are connected to Screen Fit in AV Mode. V-Position: Move the screen up or down. computer, graphic board, etc) and...sure that the graphics card supports the PBP function. Set PBP Mode to the optimum setting using the Windows interface. 37 Alternatively, restart the monitor, then set to two or more input sources. The PBP (Picture by Picture) function separates the screen into two parts displaying output from this...

User Manual
Page 40
Specifications are subject to change without notice to your monitor's picture. 50 Off Off ――The displayed image may differ depending on the product model. The test screen will now be shown. OK •&#...
Specifications are subject to change without notice to your monitor's picture. 50 Off Off ――The displayed image may differ depending on the product model. The test screen will now be shown. OK •&#...


