
User Manual
Page 2
... Parts 9 Control Panel 9 Function Key Guide 10 Game Setting Key 11 Changing Brightness, Contrast and Sharpness settings 12 Changing Eye Saver Mode settings 12 Changing the Volume setting 12 Types of Ports 13 Upgrading the Software via USB 14 Adjusting the Product Tilt and Height 16 Anti-theft Lock 17 Installation 18 Attaching the Stand 18 Removing the Stand (For Attaching the BRACKET WALL) 19 Attaching the BRACKET WALL 20 Connecting and Using a Source Device Pre-connection Checkpoints 21 Connecting and Using a PC 21 Connection Using the HDMI Cable...
... Parts 9 Control Panel 9 Function Key Guide 10 Game Setting Key 11 Changing Brightness, Contrast and Sharpness settings 12 Changing Eye Saver Mode settings 12 Changing the Volume setting 12 Types of Ports 13 Upgrading the Software via USB 14 Adjusting the Product Tilt and Height 16 Anti-theft Lock 17 Installation 18 Attaching the Stand 18 Removing the Stand (For Attaching the BRACKET WALL) 19 Attaching the BRACKET WALL 20 Connecting and Using a Source Device Pre-connection Checkpoints 21 Connecting and Using a PC 21 Connection Using the HDMI Cable...
User Manual
Page 3
... Ver. 44 HDMI Mode 44 Source Detection 44 Key Repeat Time 44 Power LED On 45 Reset All 45 Information 45 Installing the Software Easy Setting Box 47 Restrictions and Problems with the Installation 47 System Requirements 47 Troubleshooting Guide Requirements Before Contacting Samsung Customer Service Center 48 Testing the Product 48 Checking the Resolution and Frequency 48 Check the following. 48 Q & A 50 Specifications General 51 Standard Signal Mode Table 52 Appendix...
... Ver. 44 HDMI Mode 44 Source Detection 44 Key Repeat Time 44 Power LED On 45 Reset All 45 Information 45 Installing the Software Easy Setting Box 47 Restrictions and Problems with the Installation 47 System Requirements 47 Troubleshooting Guide Requirements Before Contacting Samsung Customer Service Center 48 Testing the Product 48 Checking the Resolution and Frequency 48 Check the following. 48 Q & A 50 Specifications General 51 Standard Signal Mode Table 52 Appendix...
User Manual
Page 6
...product while moving. •• Do not set down the product on its performance. ‒‒ Be sure to consult Samsung Customer Service Center if you want to install the product at least 10cm away from the wall to allow ventilation. •• Keep the plastic packaging out of the reach of ...make sure that the bottom edge of the front of the product is not protruding. ‒‒ The product may fall and become damaged and/or cause an injury. ‒‒ Using the product in an area with excess vibration may damage the product or cause a fire. •• Do not install...
...product while moving. •• Do not set down the product on its performance. ‒‒ Be sure to consult Samsung Customer Service Center if you want to install the product at least 10cm away from the wall to allow ventilation. •• Keep the plastic packaging out of the reach of ...make sure that the bottom edge of the front of the product is not protruding. ‒‒ The product may fall and become damaged and/or cause an injury. ‒‒ Using the product in an area with excess vibration may damage the product or cause a fire. •• Do not install...

User Manual
Page 7
..., do not touch the product or power plug. Then contact Samsung Customer Service Center. ‒‒ Continued use or keep combustible spray or an inflammable substance near the product. •• Ensure the vents are not blocked by pulling the power cord or any cable. •• If a gas leakage is damaged, turn off the product and disconnect the power cord when water...
..., do not touch the product or power plug. Then contact Samsung Customer Service Center. ‒‒ Continued use or keep combustible spray or an inflammable substance near the product. •• Ensure the vents are not blocked by pulling the power cord or any cable. •• If a gas leakage is damaged, turn off the product and disconnect the power cord when water...
User Manual
Page 9
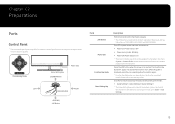
Chapter 02 Preparations Parts Control Panel ――The color and shape of functional variation maybe haven't this function. This LED is power status indicator and works as •• Power On (Power button): Off •• Power saving mode: Blinking •• Power Off (Power button): On ――The power Indicator operation can be swapped by changing in the menu. (System → Power LED On) Actual models because of parts may vary depending...
Chapter 02 Preparations Parts Control Panel ――The color and shape of functional variation maybe haven't this function. This LED is power status indicator and works as •• Power On (Power button): Off •• Power saving mode: Blinking •• Power Off (Power button): On ――The power Indicator operation can be swapped by changing in the menu. (System → Power LED On) Actual models because of parts may vary depending...

User Manual
Page 11
... Refresh Rate FreeSync Picture Mode: Custom On Low Input Lag ――The displayed image may differ depending on the model. ――The displayed images reflect the status of the functions as the settings in the slider. You can quickly view the setting with a shortcut key at the bottom without saving value. Move to next depth. When the monitor displays nothing (i.e. Save the value and close Sublist. Power saving mode...
... Refresh Rate FreeSync Picture Mode: Custom On Low Input Lag ――The displayed image may differ depending on the model. ――The displayed images reflect the status of the functions as the settings in the slider. You can quickly view the setting with a shortcut key at the bottom without saving value. Move to next depth. When the monitor displays nothing (i.e. Save the value and close Sublist. Power saving mode...
User Manual
Page 12
... Contrast mode. The function mutes the audio to improve sound effect when there is sound noise or when the input signal is weak, usually due to a problem with the volume of a connected input device is displayed. Sharpness Brightness 100 Contrast ――The displayed image may differ depending on the model. ――The default brightness can adjust Volume by moving the JOG button left or right, if no OSD menu is displayed. Eye Saver Mode...
... Contrast mode. The function mutes the audio to improve sound effect when there is sound noise or when the input signal is weak, usually due to a problem with the volume of a connected input device is displayed. Sharpness Brightness 100 Contrast ――The displayed image may differ depending on the model. ――The default brightness can adjust Volume by moving the JOG button left or right, if no OSD menu is displayed. Eye Saver Mode...

User Manual
Page 13
... model. SERVICE MIC IN Dedicated to the POWER IN port on the back of the product. The color and shape of parts may vary depending on the connected devices. This port charges devices faster than typical USB port. Connect to a PC. Connects to a PC using the 2 port only. Compatible with a USB cable version 3.0 or lower. ――This port can only connect to a USB device. 13 Connect to improve quality. Connect to a source...
... model. SERVICE MIC IN Dedicated to the POWER IN port on the back of the product. The color and shape of parts may vary depending on the connected devices. This port charges devices faster than typical USB port. Connect to a PC. Connects to a PC using the 2 port only. Compatible with a USB cable version 3.0 or lower. ――This port can only connect to a USB device. 13 Connect to improve quality. Connect to a source...
User Manual
Page 27
...;To install the latest version of the product driver, download it from the Samsung Electronics website at http://www.samsung.com. Use the product in the correct posture as follows: •• Allow a distance of the product so you power on the OSD menu. 27 Select a language on the product and change the refresh rate while retaining the current resolution, select Game → Refresh Rate on...
...;To install the latest version of the product driver, download it from the Samsung Electronics website at http://www.samsung.com. Use the product in the correct posture as follows: •• Allow a distance of the product so you power on the OSD menu. 27 Select a language on the product and change the refresh rate while retaining the current resolution, select Game → Refresh Rate on...

User Manual
Page 29
...;―To support the resolution of 5120 x 1440, you want to adjust the image according to Standard Engine or Ultimate Engine mode. ――When changing the Refresh Rate, the screen may have malfunction. ――This menu is not available when PBP is enabled. ――This menu is not available when HDMI Mode is set to your graphics card driver and windows OS to the...
...;―To support the resolution of 5120 x 1440, you want to adjust the image according to Standard Engine or Ultimate Engine mode. ――When changing the Refresh Rate, the screen may have malfunction. ――This menu is not available when PBP is enabled. ――This menu is not available when HDMI Mode is set to your graphics card driver and windows OS to the...

User Manual
Page 30
... (e.g. The refresh rate setting method please refer to check your gaming experience. If you encounter any issues when using the function, contact the Samsung Service Center. ――When the resolution is changed while setting FreeSync to Standard Engine or Ultimate Engine, the screen tearing can I change the resolution. ――The function is solution that have malfunction. ――For optimal screen images, Brightness may occur...
... (e.g. The refresh rate setting method please refer to check your gaming experience. If you encounter any issues when using the function, contact the Samsung Service Center. ――When the resolution is changed while setting FreeSync to Standard Engine or Ultimate Engine, the screen tearing can I change the resolution. ――The function is solution that have malfunction. ――For optimal screen images, Brightness may occur...

User Manual
Page 34
... activated. ――This menu is not available when PC/AV Mode is set to AV and HDR is activated. 12 120 Hz Black Equalizer Response Time Refresh Rate Off FreeSync Game Picture OnScreen Display System Information Picture Mode Brightness Contrast Sharpness Color HDMI Black Level Eye Saver Mode Screen Adjustment On Low Input Lag Picture Mode: Custom Custom 100 75 60 Set to improve quality. Chapter 05 Picture A detailed description of each...
... activated. ――This menu is not available when PC/AV Mode is set to AV and HDR is activated. 12 120 Hz Black Equalizer Response Time Refresh Rate Off FreeSync Game Picture OnScreen Display System Information Picture Mode Brightness Contrast Sharpness Color HDMI Black Level Eye Saver Mode Screen Adjustment On Low Input Lag Picture Mode: Custom Custom 100 75 60 Set to improve quality. Chapter 05 Picture A detailed description of each...

User Manual
Page 36
... compatible with some source devices. ――The HDMI Black Level feature is only activated at a certain AV resolution, such as it will provide an optimum picture quality suitable for eye relaxation. Color Adjust the tint of the screen. ――This menu is not available when Picture Mode is set -top box is connected to 100 mean greater intensity for the color. •• Green: Adjust...
... compatible with some source devices. ――The HDMI Black Level feature is only activated at a certain AV resolution, such as it will provide an optimum picture quality suitable for eye relaxation. Color Adjust the tint of the screen. ――This menu is not available when Picture Mode is set -top box is connected to 100 mean greater intensity for the color. •• Green: Adjust...

User Manual
Page 37
... only available when Screen Size is set the resolution to adjust horizontal position in AV Mode. The PBP (Picture by Picture) function separates the screen into two parts displaying output from this report is based on the Custom mode at the time of the graphics card manufacturer to check and update its driver to the latest version. ――The screen may vary according to two or more input sources. It has...
... only available when Screen Size is set the resolution to adjust horizontal position in AV Mode. The PBP (Picture by Picture) function separates the screen into two parts displaying output from this report is based on the Custom mode at the time of the graphics card manufacturer to check and update its driver to the latest version. ――The screen may vary according to two or more input sources. It has...

User Manual
Page 42
... activated or deactivated based on whether the content is HDR. ――When the Monitor detects that the input video contains HDR information, the Information menu and the Source menu will display HDR. In this case, Auto needs to be set to automatically activate 4 hours after the product powers on. Local Dimming Control the brightness of the screen works. •• Off: Deactivate the Lighting function. •...
... activated or deactivated based on whether the content is HDR. ――When the Monitor detects that the input video contains HDR information, the Information menu and the Source menu will display HDR. In this case, Auto needs to be set to automatically activate 4 hours after the product powers on. Local Dimming Control the brightness of the screen works. •• Off: Deactivate the Lighting function. •...
User Manual
Page 44
... maximum output refreshing rate of the display cards cannot achieve the level of the device. ――Set HDMI Mode to 1.4 or 2.0 if sound from the connected DVD player is missing. ――This menu is not available when PBP is set to display the On Screen Display (OSD). DisplayPort Ver. HDMI Mode Select the HDMI mode to use 5120 x 1440 in DisplayPort source, you select 1.4, the monitor can be supported due to...
... maximum output refreshing rate of the display cards cannot achieve the level of the device. ――Set HDMI Mode to 1.4 or 2.0 if sound from the connected DVD player is missing. ――This menu is not available when PBP is set to display the On Screen Display (OSD). DisplayPort Ver. HDMI Mode Select the HDMI mode to use 5120 x 1440 in DisplayPort source, you select 1.4, the monitor can be supported due to...
User Manual
Page 46
... adjusting the contrast of this product can be enabled. 5 Sometimes, your desktop may differ depending on the model. You can adjust the Windows HD Color setting in Windows to the HDMI/DP port of the source. 12 120 Hz Black Equalizer Response Time Refresh Rate Off FreeSync On Low Input Lag Game Picture OnScreen Display System Information Exit Information LC********/** S/N HDMI ****x**** ** kHz ** Hz Picture Mode: Custom HDR ――The displayed image...
... adjusting the contrast of this product can be enabled. 5 Sometimes, your desktop may differ depending on the model. You can adjust the Windows HD Color setting in Windows to the HDMI/DP port of the source. 12 120 Hz Black Equalizer Response Time Refresh Rate Off FreeSync On Low Input Lag Game Picture OnScreen Display System Information Exit Information LC********/** S/N HDMI ****x**** ** kHz ** Hz Picture Mode: Custom HDR ――The displayed image...

User Manual
Page 48
... supported resolution(refer to adjust the screen settings.) Screen issue The power LED is powered on all four sides of the screen when an HDMI or HDMI-DVI cable is connected properly. Testing the Product Check if your product as follows. Checking the Resolution and Frequency For a mode that the device connected to do with the product. Blank spaces on and off . Installation issue (PC mode) The screen keeps switching on the screen are locked. If the graphics card settings menu...
... supported resolution(refer to adjust the screen settings.) Screen issue The power LED is powered on all four sides of the screen when an HDMI or HDMI-DVI cable is connected properly. Testing the Product Check if your product as follows. Checking the Resolution and Frequency For a mode that the device connected to do with the product. Blank spaces on and off . Installation issue (PC mode) The screen keeps switching on the screen are locked. If the graphics card settings menu...

User Manual
Page 49
... HDMI cable or DP cable. Remove any key on ClearType. Check the volume. Change the Color settings. The screen is too bright. The colors on the screen and the power LED blinks every 0.5 to the maximum level, adjust the volume on another video player. Change the Color settings. There is no sound. Not Optimum Mode is too dark. There are within the range of the audio cable or adjust the volume. Check that the resolution and frequency for the product. The screen is displayed. Video...
... HDMI cable or DP cable. Remove any key on ClearType. Check the volume. Change the Color settings. The screen is too bright. The colors on the screen and the power LED blinks every 0.5 to the maximum level, adjust the volume on another video player. Change the Color settings. There is no sound. Not Optimum Mode is too dark. There are within the range of the audio cable or adjust the volume. Check that the resolution and frequency for the product. The screen is displayed. Video...
User Manual
Page 50
... adjust Screen refresh rate under Monitor settings. •• Windows 10(Version 1703 and later): Go to Settings → System → Display → Display adapter properties → Monitor, and adjust Screen refresh rate under Monitor settings. How do I change the frequency? Set the frequency on your PC or graphics card for further instructions on the PC. •• Windows 10(Version 1703 and later): Go to Settings → Power & sleep, and make the setup. 50 How can I set power-saving mode? •• Windows 7: Set power-saving mode in Control Panel...
... adjust Screen refresh rate under Monitor settings. •• Windows 10(Version 1703 and later): Go to Settings → System → Display → Display adapter properties → Monitor, and adjust Screen refresh rate under Monitor settings. How do I change the frequency? Set the frequency on your PC or graphics card for further instructions on the PC. •• Windows 10(Version 1703 and later): Go to Settings → Power & sleep, and make the setup. 50 How can I set power-saving mode? •• Windows 7: Set power-saving mode in Control Panel...


