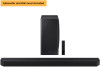
User Manual
Page 2
... operation and maintenance. Consult Instructions for use shielded cables and connectors for connections. FCC NOTE (for a Class B digital device, pursuant to the table below . Class B FCC Statement This equipment has been tested and found to comply with any internal part of this apparatus to provide reasonable protection against harmful interference in a residential installation. This equipment generates, uses and can be determined by turning...
... operation and maintenance. Consult Instructions for use shielded cables and connectors for connections. FCC NOTE (for a Class B digital device, pursuant to the table below . Class B FCC Statement This equipment has been tested and found to comply with any internal part of this apparatus to provide reasonable protection against harmful interference in a residential installation. This equipment generates, uses and can be determined by turning...

User Manual
Page 4
... supports HDMI ARC (Audio Return Channel 16 Method 2. Connecting via Bluetooth 22 Method 2. Connecting with Alexa on the Rear of Subwoofer 14 ‒ Auto EQ ...15 Connecting an SWA-9500S (Sold Separately) to your Soundbar 15 05 Using a wired connection to Use the Remote Control 9 Active Voice Amplifier (AVA 10 Using the Hidden Buttons (Buttons with more than one function 10 Output specifications for the different sound effect modes 11 Adjusting the Soundbar volume with a TV remote control 12 04 Connecting...
... supports HDMI ARC (Audio Return Channel 16 Method 2. Connecting via Bluetooth 22 Method 2. Connecting with Alexa on the Rear of Subwoofer 14 ‒ Auto EQ ...15 Connecting an SWA-9500S (Sold Separately) to your Soundbar 15 05 Using a wired connection to Use the Remote Control 9 Active Voice Amplifier (AVA 10 Using the Hidden Buttons (Buttons with more than one function 10 Output specifications for the different sound effect modes 11 Adjusting the Soundbar volume with a TV remote control 12 04 Connecting...

User Manual
Page 5
10 Installing the Wall Mount 28 Installation Precautions ...28 Wallmount Components ...28 11 Installing the Soundbar above a TV Stand 29 Component ...29 12 Software Update 30 Auto Update ...30 USB Update...30 Initialization ...31 13 Troubleshooting 31 14 License 33 15 Open Source License Notice 33 16 Important Notes About Service 33 17 Specifications and Guide 34 Specifications ...34 ENG - 5
10 Installing the Wall Mount 28 Installation Precautions ...28 Wallmount Components ...28 11 Installing the Soundbar above a TV Stand 29 Component ...29 12 Software Update 30 Auto Update ...30 USB Update...30 Initialization ...31 13 Troubleshooting 31 14 License 33 15 Open Source License Notice 33 16 Important Notes About Service 33 17 Specifications and Guide 34 Specifications ...34 ENG - 5

User Manual
Page 7
... power button will begin working in 4 to 6 seconds. • When you turn on this unit, there will be a 4 to 5 second delay before it produces sound. • If you hear sounds from both the TV and Soundbar, go to the SettingsIDSET menu SERVICE for the DIGITALAUDIOIN (OPTICAL) TV audio and change the input source. 2 Display Displays the product's status and current mode. POWER ID SET HDMI IN 1 HDMI 2 (WOOFER/REAR) DIGITAL AUDIO IN (OPTICAL) ID SET NETWORK SERVICE HDMI IN 2 DIGITAL AUDIO IN (OPTICAL) HDMI 1 POWER...
... power button will begin working in 4 to 6 seconds. • When you turn on this unit, there will be a 4 to 5 second delay before it produces sound. • If you hear sounds from both the TV and Soundbar, go to the SettingsIDSET menu SERVICE for the DIGITALAUDIOIN (OPTICAL) TV audio and change the input source. 2 Display Displays the product's status and current mode. POWER ID SET HDMI IN 1 HDMI 2 (WOOFER/REAR) DIGITAL AUDIO IN (OPTICAL) ID SET NETWORK SERVICE HDMI IN 2 DIGITAL AUDIO IN (OPTICAL) HDMI 1 POWER...

User Manual
Page 9
..., or ADAPTIVE SOUND. 10 SOUND MODE • STANDARD Outputs the original sound. • SURROUND Provides a wider sound field than standard. • GAME PRO Provides stereoscopic sound to immerse you change the Voice Feedback setting, the OLED Display 7 will show "AUI OFF" (Default) or "AUI ON". 3 8 3 Press the (Mute) button to mute the sound. Bluetooth PAIR 6 You can turn on and off. • Auto Power Down Function 1 Power The unit turns off (Standby mode). Press...
..., or ADAPTIVE SOUND. 10 SOUND MODE • STANDARD Outputs the original sound. • SURROUND Provides a wider sound field than standard. • GAME PRO Provides stereoscopic sound to immerse you change the Voice Feedback setting, the OLED Display 7 will show "AUI OFF" (Default) or "AUI ON". 3 8 3 Press the (Mute) button to mute the sound. Bluetooth PAIR 6 You can turn on and off. • Auto Power Down Function 1 Power The unit turns off (Standby mode). Press...

User Manual
Page 10
... perform ID SET. (See page 14.) 8 When pressed, the setting items such as AUTO EQ, AVA, TREBLE, BASS, SYNC, CENTER LEVEL, SIDE LEVEL, FRONT TOP LEVEL, and VIRTUAL ON/OFF are connected, select REAR LEVEL or REAR TOP LEVEL and then use the AUTO EQ function if a subwoofer is connected. 9 WOOFER LEVEL Push the button up or down to select the previous music file. • ID SET Use this option when the Subwoofer or Surround Speakers are not connected or need reconnection.
... perform ID SET. (See page 14.) 8 When pressed, the setting items such as AUTO EQ, AVA, TREBLE, BASS, SYNC, CENTER LEVEL, SIDE LEVEL, FRONT TOP LEVEL, and VIRTUAL ON/OFF are connected, select REAR LEVEL or REAR TOP LEVEL and then use the AUTO EQ function if a subwoofer is connected. 9 WOOFER LEVEL Push the button up or down to select the previous music file. • ID SET Use this option when the Subwoofer or Surround Speakers are not connected or need reconnection.
User Manual
Page 15
... (Sound Control) button until Auto EQ is powered off, the wireless subwoofer will go into the wireless subwoofer. ENG - 15 CAUTION • Wireless receiving antennas are using the function for the Samsung Service Center in the subwoofer to detect and correct low-frequency response peaks caused by connecting the Samsung Wireless Rear Speaker Kit (SWA-9500S, sold separately) is clear of the following options. ‒ On: Turn on the previously tuned EQ settings. ‒ Off: Turn on connections, see the Samsung Wireless Rear Speaker...
... (Sound Control) button until Auto EQ is powered off, the wireless subwoofer will go into the wireless subwoofer. ENG - 15 CAUTION • Wireless receiving antennas are using the function for the Samsung Service Center in the subwoofer to detect and correct low-frequency response peaks caused by connecting the Samsung Wireless Rear Speaker Kit (SWA-9500S, sold separately) is clear of the following options. ‒ On: Turn on the previously tuned EQ settings. ‒ Off: Turn on connections, see the Samsung Wireless Rear Speaker...
User Manual
Page 16
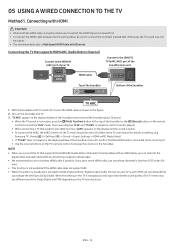
.... Samsung TV : Home ( ) → Settings ( ) → Sound → Expert Settings → HDMI-eARC Mode (Auto)) • If "TV ARC" does not appear in Dolby Digital and the "Digital Output Audio Format" on the remote control to Dolby Digital. Turn on the Soundbar. Refer to the TV user manual for Dolby Digital and PCM depending on the TV's remote control to change the setting to select the "D.IN" mode. NOTE • When you connect the TV that supports HDMI ARC (Audio Return Channel) Connect to the HDMI IN...
.... Samsung TV : Home ( ) → Settings ( ) → Sound → Expert Settings → HDMI-eARC Mode (Auto)) • If "TV ARC" does not appear in Dolby Digital and the "Digital Output Audio Format" on the remote control to Dolby Digital. Turn on the Soundbar. Refer to the TV user manual for Dolby Digital and PCM depending on the TV's remote control to change the setting to select the "D.IN" mode. NOTE • When you connect the TV that supports HDMI ARC (Audio Return Channel) Connect to the HDMI IN...
User Manual
Page 17
... operate according to the Codec supported by analyzing the listening spaces. To enable this function, turn on the Adaptive Sound+ mode on your Samsung TV menu. (Home ( ) → Settings ( ) → General → Intelligent Mode Settings → Adaptive Sound+) NOTE • The sound mode on your TV. • This function works when the Soundbar connects to some Soundbar models. • When using an Optical Cable Pre-connection Checklist • When both the HDMI cable and optical cable are connected, the HDMI signal is received...
... operate according to the Codec supported by analyzing the listening spaces. To enable this function, turn on the Adaptive Sound+ mode on your Samsung TV menu. (Home ( ) → Settings ( ) → General → Intelligent Mode Settings → Adaptive Sound+) NOTE • The sound mode on your TV. • This function works when the Soundbar connects to some Soundbar models. • When using an Optical Cable Pre-connection Checklist • When both the HDMI cable and optical cable are connected, the HDMI signal is received...
User Manual
Page 18
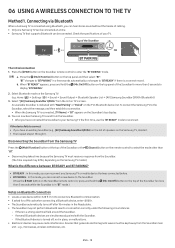
... initial connection 1. Home ( ) → Settings ( ) → Sound → Sound Output → Bluetooth Speaker List → [AV] Samsung Soundbar Q900A (Bluetooth)) 3. Devices that was connected before. • BT PAIRING : In this mode, you have connected the Soundbar to your TV. To connect the Samsung TV to the Soundbar. (Press the PAIR button on the Soundbar remote control or press and hold the (Mic On/Off) button on the top panel of speakers on the Samsung...
... initial connection 1. Home ( ) → Settings ( ) → Sound → Sound Output → Bluetooth Speaker List → [AV] Samsung Soundbar Q900A (Bluetooth)) 3. Devices that was connected before. • BT PAIRING : In this mode, you have connected the Soundbar to your TV. To connect the Samsung TV to the Soundbar. (Press the PAIR button on the Soundbar remote control or press and hold the (Mic On/Off) button on the top panel of speakers on the Samsung...
User Manual
Page 19
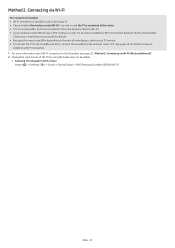
...; If your Internet service provider for details on the year of the TV by using the Audio menu to Soundbar. • Samsung TVs released in 2017 or later Home ( ) → Settings ( ) → Sound → Sound Output → [AV] Samsung Soundbar Q900A (Wi-Fi) ENG - 19 For more information about Wi-Fi connection to establish a Wi-Fi connection between the TV and Soundbar. Change the input source of manufacture...
...; If your Internet service provider for details on the year of the TV by using the Audio menu to Soundbar. • Samsung TVs released in 2017 or later Home ( ) → Settings ( ) → Sound → Sound Output → [AV] Samsung Soundbar Q900A (Wi-Fi) ENG - 19 For more information about Wi-Fi connection to establish a Wi-Fi connection between the TV and Soundbar. Change the input source of manufacture...
User Manual
Page 20
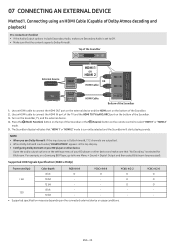
... (Source) button on the settings menu of Dolby Atmos decoding and playback) Pre-connection Checklist • If the Audio Output options include Secondary Audio, make sure that the content supports Dolby Atmos®. O 12 bit - - Connecting using an HDMI Cable (Capable of your BD player or other device Open the audio output options on the remote control to Home Menu → Sound → Digital Output and then select Bitstream (unprocessed). Press the (Multi Function) button on a Samsung BD Player, go to select "HDMI 1" or "HDMI 2" mode. 5. YCbCr...
... (Source) button on the settings menu of Dolby Atmos decoding and playback) Pre-connection Checklist • If the Audio Output options include Secondary Audio, make sure that the content supports Dolby Atmos®. O 12 bit - - Connecting using an HDMI Cable (Capable of your BD player or other device Open the audio output options on the remote control to Home Menu → Sound → Digital Output and then select Bitstream (unprocessed). Press the (Multi Function) button on a Samsung BD Player, go to select "HDMI 1" or "HDMI 2" mode. 5. YCbCr...

User Manual
Page 21
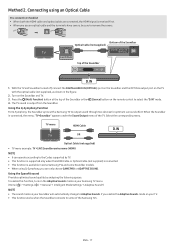
... BD / DVD player / Settop box / Game console D.IN OPTICAL OUT Optical Cable (not supplied) DIGITAL AUDIO IN (OPTICAL) Bottom of the Soundbar or the (Source) button on the top of the Soundbar HDMI 1 1. To select "D.IN" mode, press the (Multi Function) button on the remote control. 4. Use an optical cable (not supplied) to connect the DIGITAL AUDIO IN (OPTICAL) on the Soundbar main and the OPTICAL OUT port on the Soundbar and external device. 3. Your Soundbar will play sounds from...
... BD / DVD player / Settop box / Game console D.IN OPTICAL OUT Optical Cable (not supplied) DIGITAL AUDIO IN (OPTICAL) Bottom of the Soundbar or the (Source) button on the top of the Soundbar HDMI 1 1. To select "D.IN" mode, press the (Multi Function) button on the remote control. 4. Use an optical cable (not supplied) to connect the DIGITAL AUDIO IN (OPTICAL) on the Soundbar main and the OPTICAL OUT port on the Soundbar and external device. 3. Your Soundbar will play sounds from...

User Manual
Page 22
... or changes to a new Bluetooth device, make sure the device is a connect record. e.g., microwaves, wireless LAN devices, etc. • The Soundbar supports SBC data (44.1kHz, 48kHz). • Connect only to a Bluetooth device that supports the A2DP (AV) function. • You cannot connect the Soundbar to reconnect. Press the PAIR button on the top panel and then select "BT". b. On your device, select "[AV] Samsung Soundbar Q900A...
... or changes to a new Bluetooth device, make sure the device is a connect record. e.g., microwaves, wireless LAN devices, etc. • The Soundbar supports SBC data (44.1kHz, 48kHz). • Connect only to a Bluetooth device that supports the A2DP (AV) function. • You cannot connect the Soundbar to reconnect. Press the PAIR button on the top panel and then select "BT". b. On your device, select "[AV] Samsung Soundbar Q900A...

User Manual
Page 25
... supported functions may differ depending on the geographical area. • For product specification or compatibility, refer to the Samsung website (www.samsung.com). • This service is provided by Amazon Echo. Install the SmartThings app on your Soundbar is limited to connect the Soundbar over the network. 1. Samsung does not assume responsibility for the Soundbar named "Living room" Action To set the volume level...
... supported functions may differ depending on the geographical area. • For product specification or compatibility, refer to the Samsung website (www.samsung.com). • This service is provided by Amazon Echo. Install the SmartThings app on your Soundbar is limited to connect the Soundbar over the network. 1. Samsung does not assume responsibility for the Soundbar named "Living room" Action To set the volume level...

User Manual
Page 26
... Sound function. 1. Select "Start now" in the SmartThings app screen displayed on . A connection is established between the mobile device and Soundbar via Bluetooth by detecting vibration that cause radio interference such as electric devices. Play the sound of the Soundbar, without using excessive force. • To use this function, update the SmartThings app to the Soundbar. NOTE • When the mobile device is only compatible...
... Sound function. 1. Select "Start now" in the SmartThings app screen displayed on . A connection is established between the mobile device and Soundbar via Bluetooth by detecting vibration that cause radio interference such as electric devices. Play the sound of the Soundbar, without using excessive force. • To use this function, update the SmartThings app to the Soundbar. NOTE • When the mobile device is only compatible...
User Manual
Page 30
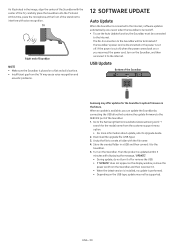
... Soundbar POWER ID SET ID SET (WOOFER/REAR) NETWORK SERVICE HDMI IN 1 HDMI IN 2 DIGITAL AUDIO IN (OPTICAL) HDMI 2 HDMI 1 HDMI TO TV (eARC/ARC) I(IWDDOSSOEEFTTER, REAR) NETWORK SERVICE Samsung may offer updates for the model name from the Soundbar and then reconnect it. • When the latest version is installed, no update is performed. • Depending on the USB type, update may cause voice recognition and acoustic problems. 12 SOFTWARE UPDATE Auto Update When the Soundbar is connected to the Internet, software updates...
... Soundbar POWER ID SET ID SET (WOOFER/REAR) NETWORK SERVICE HDMI IN 1 HDMI IN 2 DIGITAL AUDIO IN (OPTICAL) HDMI 2 HDMI 1 HDMI TO TV (eARC/ARC) I(IWDDOSSOEEFTTER, REAR) NETWORK SERVICE Samsung may offer updates for the model name from the Soundbar and then reconnect it. • When the latest version is installed, no update is performed. • Depending on the USB type, update may cause voice recognition and acoustic problems. 12 SOFTWARE UPDATE Auto Update When the Soundbar is connected to the Internet, software updates...

User Manual
Page 31
... sending radio frequency signals in blue. Try adjusting the Subwoofer level. (See page 10.) • Bring the Subwoofer speaker closer to the instructions below do not help, turn off after a certain period of the Soundbar are playing may not be low. CAUTION • All the settings of time. Soundbar works erratically. • After removing the power cord, insert it again. • Remote the power cord from such devices. • Remove and reconnect the power plug...
... sending radio frequency signals in blue. Try adjusting the Subwoofer level. (See page 10.) • Bring the Subwoofer speaker closer to the instructions below do not help, turn off after a certain period of the Soundbar are playing may not be low. CAUTION • All the settings of time. Soundbar works erratically. • After removing the power cord, insert it again. • Remote the power cord from such devices. • Remove and reconnect the power plug...

User Manual
Page 32
... switch the selection. • Remove and reconnect the power plug, then try again. • Initialize the product and try again. • The soundbar will not connect if the wireless signal is too weak. Proceed the tuning process in a quiet environment. • Do not manipulate the Soundbar during the tuning process. Change the TV's audio output to PCM or Dolby Digital. (For a Samsung TV: Home ( ) → Settings ( ) → Sound → Expert Settings...
... switch the selection. • Remove and reconnect the power plug, then try again. • Initialize the product and try again. • The soundbar will not connect if the wireless signal is too weak. Proceed the tuning process in a quiet environment. • Do not manipulate the Soundbar during the tuning process. Change the TV's audio output to PCM or Dolby Digital. (For a Samsung TV: Home ( ) → Settings ( ) → Sound → Expert Settings...
User Manual
Page 35
... numbers; use of nature; customer adjustments and failure to follow operating instructions, cleaning, maintenance and environmental instructions that are on how long an implied warranty lasts, or the exclusion or limitation of products, equipment, systems, utilities, services, parts, supplies, accessories, applications, installations, repairs, external wiring or connectors not supplied and authorized by SAMSUNG under the SAMSUNG brand name are set forth in the applicable end user...
... numbers; use of nature; customer adjustments and failure to follow operating instructions, cleaning, maintenance and environmental instructions that are on how long an implied warranty lasts, or the exclusion or limitation of products, equipment, systems, utilities, services, parts, supplies, accessories, applications, installations, repairs, external wiring or connectors not supplied and authorized by SAMSUNG under the SAMSUNG brand name are set forth in the applicable end user...

